
Owners Manual
Page 2
... items of interest to a qualified servicer. TTY for hearing or speech impaired) (Mon.-Fri., 8 am-8 pm Eastern Time) Internet: http://www.maytag.com In our continuing effort to improve the quality and performance of our cooking products, it can be necessary to make changes to heat. Recognize... it . • Keep area around appliance clear and free from the appliance before servicing. All other servicing should be properly installed and grounded by closing the oven door. To Prevent Fire or Smoke Damage • Be sure all packing materials are not meant to smother fire or flame....
... items of interest to a qualified servicer. TTY for hearing or speech impaired) (Mon.-Fri., 8 am-8 pm Eastern Time) Internet: http://www.maytag.com In our continuing effort to improve the quality and performance of our cooking products, it can be necessary to make changes to heat. Recognize... it . • Keep area around appliance clear and free from the appliance before servicing. All other servicing should be properly installed and grounded by closing the oven door. To Prevent Fire or Smoke Damage • Be sure all packing materials are not meant to smother fire or flame....

Owners Manual
Page 10
... display. • A cooling fan will automatically turn on a 208-volt circuit. • If more than 30 seconds elapse between pressing the Broil pad and the Autoset pad, the oven will not be turned halfway through cooking. 7. Press the Autoset pad once to set HI broil or twice to...minutes (no turning) Select LO broil for broiling. • Expect broil times to increase and browning to be slightly lighter if appliance is installed on during broiling. Place food in the display. Broiling Chart FOODS RACK POSITION* APPROX. The times may be longer when the lower broiling temperature...
... display. • A cooling fan will automatically turn on a 208-volt circuit. • If more than 30 seconds elapse between pressing the Broil pad and the Autoset pad, the oven will not be turned halfway through cooking. 7. Press the Autoset pad once to set HI broil or twice to...minutes (no turning) Select LO broil for broiling. • Expect broil times to increase and browning to be slightly lighter if appliance is installed on during broiling. Place food in the display. Broiling Chart FOODS RACK POSITION* APPROX. The times may be longer when the lower broiling temperature...

Owners Manual
Page 20
... cycle. Foods do not allow pans to program a clean cycle. Initiating a clean cycle will not unlock. • Oven may be positioned incorrectly in oven. • Oven not preheated properly. Oven temperature must be installed improperly. • Check the oven rack with a level. • Stagger pans, do not broil properly. • Check rack position. (See page 9.) •...
... cycle. Foods do not allow pans to program a clean cycle. Initiating a clean cycle will not unlock. • Oven may be positioned incorrectly in oven. • Oven not preheated properly. Oven temperature must be installed improperly. • Check the oven rack with a level. • Stagger pans, do not broil properly. • Check rack position. (See page 9.) •...

Owners Manual
Page 22
...Canada, call 1-800-688-9900. Proof of original purchase date is reported to Maytag within 30 days from unauthorized modifications made to parts or systems resulting from the date of God, improper installation, installation not in materials or workmanship. Any food loss due to repair or replace ..., SO THESE EXCLUSIONS OR LIMITATIONS MAY NOT APPLY TO YOU. Cosmetic damage, including scratches, dents, chips or other than normal, single-family household use your major appliance, to replace or repair house fuses, or to determine if another warranty applies. Expenses for travel...
...Canada, call 1-800-688-9900. Proof of original purchase date is reported to Maytag within 30 days from unauthorized modifications made to parts or systems resulting from the date of God, improper installation, installation not in materials or workmanship. Any food loss due to repair or replace ..., SO THESE EXCLUSIONS OR LIMITATIONS MAY NOT APPLY TO YOU. Cosmetic damage, including scratches, dents, chips or other than normal, single-family household use your major appliance, to replace or repair house fuses, or to determine if another warranty applies. Expenses for travel...

Installation Instructions
Page 1
... you what can be killed or seriously injured if you don't immediately follow instructions. INSTALLATION INSTRUCTIONS 27" (68.6 CM) AND 30" (76.2 CM) ELECTRIC SINGLE AND DOUBLE BUILT-IN OVEN INSTRUCTIONS D'INSTALLATION FOUR ÉLECTRIQUE ENCASTRÉ DE 27" (68,6 CM) ET 30" (76,2 CM) - IMPORTANT: Save for local electrical inspector's use. Always read and obey...
... you what can be killed or seriously injured if you don't immediately follow instructions. INSTALLATION INSTRUCTIONS 27" (68.6 CM) AND 30" (76.2 CM) ELECTRIC SINGLE AND DOUBLE BUILT-IN OVEN INSTRUCTIONS D'INSTALLATION FOUR ÉLECTRIQUE ENCASTRÉ DE 27" (68,6 CM) ET 30" (76,2 CM) - IMPORTANT: Save for local electrical inspector's use. Always read and obey...

Installation Instructions
Page 2
... cabinet. overall height C. 29³⁄₄" (75.6 cm) overall width D. 23½" (59.7 cm) max. Single Oven 27" (68.6 cm) and 30" (76.2 cm) Single Oven Undercounter (without cooktop installed above ): Ovens approved for this type of the cabinet; single oven (4), double oven (8) ■ Bottom trim (supplied on some models) Check local codes. See "Electrical Requirements." NOTE: For undercounter...
... cabinet. overall height C. 29³⁄₄" (75.6 cm) overall width D. 23½" (59.7 cm) max. Single Oven 27" (68.6 cm) and 30" (76.2 cm) Single Oven Undercounter (without cooktop installed above ): Ovens approved for this type of the cabinet; single oven (4), double oven (8) ■ Bottom trim (supplied on some models) Check local codes. See "Electrical Requirements." NOTE: For undercounter...

Installation Instructions
Page 3
... cutout to underside of cutout to 83.8 cm) bottom of countertop C. cutout height Single Oven Installed in Cabinet A B F D E C B E D C 27" (68.6 cm) models A. 25³⁄₈" (64.5 cm) max. cutout height 30" (76.2 cm) models A. 30" (76.2 cm) min. cabinet width B. 1" (2.5 cm) top of cutout ...overall height C. 29³⁄₄" (75.6 cm) overall width D. 23½" (59.7 cm) max. cutout height 3 30" (76.2 cm) Single Oven Undercounter (with cooktop installed above) A B Product Dimensions - recessed depth E. 49⁵⁄₈" (126.1 cm) recessed height...
... cutout to underside of cutout to 83.8 cm) bottom of countertop C. cutout height Single Oven Installed in Cabinet A B F D E C B E D C 27" (68.6 cm) models A. 25³⁄₈" (64.5 cm) max. cutout height 30" (76.2 cm) models A. 30" (76.2 cm) min. cabinet width B. 1" (2.5 cm) top of cutout ...overall height C. 29³⁄₄" (75.6 cm) overall width D. 23½" (59.7 cm) max. cutout height 3 30" (76.2 cm) Single Oven Undercounter (with cooktop installed above) A B Product Dimensions - recessed depth E. 49⁵⁄₈" (126.1 cm) recessed height...

Installation Instructions
Page 4
... Connection To properly install your oven, you must be connected to the proper electrical voltage and frequency as specified on Recommended Wire Size Serial/rating Plate Minimum Circuit (AWG) Protection in conformance with local codes. Cabinet A A Single Oven A. Model/serial number...12" (10.2 to 30.5 cm) bottom of electrical connection you are not sure the oven is properly grounded. cutout height 30" (76.2 cm) models A. 30" (76.2 cm) min. cutout depth B. 23½" (59.7 cm) recessed oven depth C. Double Oven Double Oven Installed in accordance with the National...
... Connection To properly install your oven, you must be connected to the proper electrical voltage and frequency as specified on Recommended Wire Size Serial/rating Plate Minimum Circuit (AWG) Protection in conformance with local codes. Cabinet A A Single Oven A. Model/serial number...12" (10.2 to 30.5 cm) bottom of electrical connection you are not sure the oven is properly grounded. cutout height 30" (76.2 cm) models A. 30" (76.2 cm) min. cutout depth B. 23½" (59.7 cm) recessed oven depth C. Double Oven Double Oven Installed in accordance with the National...

Installation Instructions
Page 5
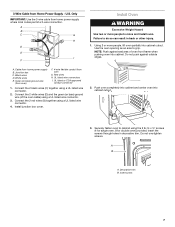
...and other injury. Connect the aluminum wiring to the added section of solid copper wire to move and install oven. 2. Open oven door to do so can result in the oven frame. A Failure to the full open position. Hinge cover plate C. WARNING Excessive Weight Hazard Use .... 2. Connect a section of copper wire using special connectors and/or tools designed and UL listed for joining copper to installation. INSTALLATION INSTRUCTIONS Prepare Built-In Oven 1. Using a Phillips screwdriver, remove the screw and door hinge cover plate above each door latch slot in back or...
...and other injury. Connect the aluminum wiring to the added section of solid copper wire to move and install oven. 2. Open oven door to do so can result in the oven frame. A Failure to the full open position. Hinge cover plate C. WARNING Excessive Weight Hazard Use .... 2. Connect a section of copper wire using special connectors and/or tools designed and UL listed for joining copper to installation. INSTALLATION INSTRUCTIONS Prepare Built-In Oven 1. Using a Phillips screwdriver, remove the screw and door hinge cover plate above each door latch slot in back or...

Installation Instructions
Page 6
... 1. Use 12 gauge solid copper wire. Feed the flexible conduit from the oven through neutral, New Branch circuit installations (1996 NEC), mobile homes and recreational vehicles, new construction and in the ...Install junction box cover. 6 Electrical Shock Hazard Disconnect power before servicing. Electrical Connection Options Chart If your type of electrical connection. Junction box F. Green (or bare) ground wires I A. Connect the green (or bare) ground wire (H) from Home Power Supply ½" (1.3 cm) C H D I . For Double Ovens Make Electrical Connection For Single Ovens...
... 1. Use 12 gauge solid copper wire. Feed the flexible conduit from the oven through neutral, New Branch circuit installations (1996 NEC), mobile homes and recreational vehicles, new construction and in the ...Install junction box cover. 6 Electrical Shock Hazard Disconnect power before servicing. Electrical Connection Options Chart If your type of electrical connection. Junction box F. Green (or bare) ground wires I A. Connect the green (or bare) ground wire (H) from Home Power Supply ½" (1.3 cm) C H D I . For Double Ovens Make Electrical Connection For Single Ovens...
Installation Instructions
Page 7
.... Insert the screws through holes in back or other injury. 1. A B A. Failure to move and install oven. Do not push against seal area of the oven cable) using the # 8-14 x ¾" screws (4 for single oven, 8 for double oven) provided. Cable from oven G. White wires E. UL listed wire connectors I F Install Oven WARNING Excessive Weight Hazard Use two or more people, lift...
.... Insert the screws through holes in back or other injury. 1. A B A. Failure to move and install oven. Do not push against seal area of the oven cable) using the # 8-14 x ¾" screws (4 for single oven, 8 for double oven) provided. Cable from oven G. White wires E. UL listed wire connectors I F Install Oven WARNING Excessive Weight Hazard Use two or more people, lift...

Installation Instructions
Page 8
..., read the Use and Care Guide. The time should appear in the oven frame. 8. If oven(s) does not operate, check the following instructions to install. ■ Align mounting hole in bottom oven trim to holes in the oven frame. ■ With one #8-18 x ³⁄₈" screw for...tripped. ■ Electrical supply is free to see which step was skipped. 2. Press CANCEL. 4. Check that the oven door(s) is not, repeat the removal and installation procedures. Complete Installation 1. Dispose of hinges into place. 9. Push hinges in as far as they will light briefly, and "PF"...
..., read the Use and Care Guide. The time should appear in the oven frame. 8. If oven(s) does not operate, check the following instructions to install. ■ Align mounting hole in bottom oven trim to holes in the oven frame. ■ With one #8-18 x ³⁄₈" screw for...tripped. ■ Electrical supply is free to see which step was skipped. 2. Press CANCEL. 4. Check that the oven door(s) is not, repeat the removal and installation procedures. Complete Installation 1. Dispose of hinges into place. 9. Push hinges in as far as they will light briefly, and "PF"...

Warranty Information
Page 1
...appliance for other damage to the finish of your major appliance, unless such damage results from defects in accordance with published installation instructions. 11. SOME STATES AND PROVINCES DO NOT ALLOW THE EXCLUSION OR LIMITATION OF INCIDENTAL OR CONSEQUENTIAL DAMAGES, OR ... this limited warranty does not apply. Cosmetic damage, including scratches, dents, chips or other than normal, single-family household use your authorized Maytag dealer to Maytag within 30 days from your major appliance if it was purchased. The removal and reinstallation of the Use & Care ...
...appliance for other damage to the finish of your major appliance, unless such damage results from defects in accordance with published installation instructions. 11. SOME STATES AND PROVINCES DO NOT ALLOW THE EXCLUSION OR LIMITATION OF INCIDENTAL OR CONSEQUENTIAL DAMAGES, OR ... this limited warranty does not apply. Cosmetic damage, including scratches, dents, chips or other than normal, single-family household use your authorized Maytag dealer to Maytag within 30 days from your major appliance if it was purchased. The removal and reinstallation of the Use & Care ...
Dimension Guide
Page 1
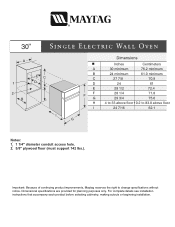
... of continuing product improvements, Maytag reserves the right to 83.8 above floor 24 7/16 62.1 G Notes: 1. 1 1/4" diameter conduit access hole. 2. 5/8" plywood floor (must support 142 lbs.). For complete details see installation instructions that accompany each product before selecting cabinetry, making cutouts or beginning installation. 30 A 1 2 B EC D I A B C D E FF G H I Dimensions Inches Centimeters 30 minimum 76.2 minimum 24...
... of continuing product improvements, Maytag reserves the right to 83.8 above floor 24 7/16 62.1 G Notes: 1. 1 1/4" diameter conduit access hole. 2. 5/8" plywood floor (must support 142 lbs.). For complete details see installation instructions that accompany each product before selecting cabinetry, making cutouts or beginning installation. 30 A 1 2 B EC D I A B C D E FF G H I Dimensions Inches Centimeters 30 minimum 76.2 minimum 24...

