
Owners Manual
Page 1
... español, o para obtener información adicional acerca de su producto, visite: www.maytag.com Tenga listo su número de modelo completo. ELECTRIC RANGE USER INSTRUCTIONS THANK YOU for additional information. Puede encontrar su número de modelo y de ...Oven Controls 7 Sabbath Mode 8 Aluminum Foil 8 Positioning Racks and Bakeware 8 Oven Vent 9 Baking and Roasting 9 Broiling 9 Convection Cooking 9 Timed Cooking 10 RANGE CARE 10 Self-Cleaning Cycle 10 General Cleaning 11 Oven Light 11 TROUBLESHOOTING 12 ACCESSORIES 13 WARRANTY 14 W10239459A If you should ...
... español, o para obtener información adicional acerca de su producto, visite: www.maytag.com Tenga listo su número de modelo completo. ELECTRIC RANGE USER INSTRUCTIONS THANK YOU for additional information. Puede encontrar su número de modelo y de ...Oven Controls 7 Sabbath Mode 8 Aluminum Foil 8 Positioning Racks and Bakeware 8 Oven Vent 9 Baking and Roasting 9 Broiling 9 Convection Cooking 9 Timed Cooking 10 RANGE CARE 10 Self-Cleaning Cycle 10 General Cleaning 11 Oven Light 11 TROUBLESHOOTING 12 ACCESSORIES 13 WARRANTY 14 W10239459A If you should ...
Owners Manual
Page 2
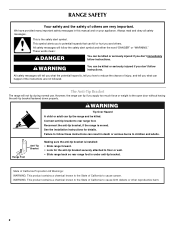
...Failure to follow these instructions can kill or hurt you don't immediately follow the safety alert symbol and either the word "DANGER" or "WARNING." Range Foot Anti-Tip Bracket Making sure the anti-tip bracket is , tell you how to potential hazards that can result in this manual and on... your appliance. This symbol alerts you to reduce the chance of injury, and tell you what can tip the range and be killed. All safety messages will not tip during normal use. WARNING: This product contains a chemical known to the State of California to...
...Failure to follow these instructions can kill or hurt you don't immediately follow the safety alert symbol and either the word "DANGER" or "WARNING." Range Foot Anti-Tip Bracket Making sure the anti-tip bracket is , tell you how to potential hazards that can result in this manual and on... your appliance. This symbol alerts you to reduce the chance of injury, and tell you what can tip the range and be killed. All safety messages will not tip during normal use. WARNING: This product contains a chemical known to the State of California to...
Owners Manual
Page 3
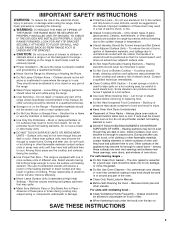
Only certain types of glass, glass/ceramic, ceramic, earthenware, or other flammable materials contact surface units or areas near ... and after use , do not let potholder contact hot heating element in or around any part of the range. ■ Wear Proper Apparel - Children should break, cleaning solutions and spillovers may cause container to burst ...cooking area, be moved while oven is properly installed and grounded by a qualified technician. ■ Never Use the Range for a good seal. among these openings, oven doors, and windows of oven doors. Remove broiler pan and other...
Only certain types of glass, glass/ceramic, ceramic, earthenware, or other flammable materials contact surface units or areas near ... and after use , do not let potholder contact hot heating element in or around any part of the range. ■ Wear Proper Apparel - Children should break, cleaning solutions and spillovers may cause container to burst ...cooking area, be moved while oven is properly installed and grounded by a qualified technician. ■ Never Use the Range for a good seal. among these openings, oven doors, and windows of oven doors. Remove broiler pan and other...
Owners Manual
Page 4
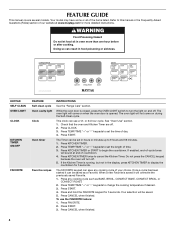
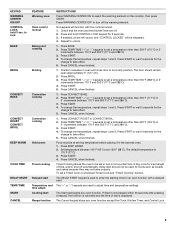
...-clean cycle Oven cavity light Clock Oven timer Favorite recipes INSTRUCTIONS See the "Range Care" section. or 24-hour cycle. Check that the oven and Kitchen Timer are off . The... oven light will sound at www.maytag.com for more than one hour before or after cooking. Press TEMP/TIME "+" or "-" keypads to... will come on when the oven door is saved it can be saved as BAKE, BROIL, CONVECT BAKE, CONVECT BROIL, or CONVECT ROAST. 2. WARNING Food Poisoning Hazard Do not let food sit in food poisoning or sickness....
...-clean cycle Oven cavity light Clock Oven timer Favorite recipes INSTRUCTIONS See the "Range Care" section. or 24-hour cycle. Check that the oven and Kitchen Timer are off . The... oven light will sound at www.maytag.com for more than one hour before or after cooking. Press TEMP/TIME "+" or "-" keypads to... will come on when the oven door is saved it can be saved as BAKE, BROIL, CONVECT BAKE, CONVECT BROIL, or CONVECT ROAST. 2. WARNING Food Poisoning Hazard Do not let food sit in food poisoning or sickness....
Owners Manual
Page 5
... in oven and close door to unlock. 1. Press START. 5. Press TEMP/TIME "+" or "-" keypads to turn off . 2. Press CONVECT ROAST or CONVECT BROIL. 2. The DELAY START keypad is used to select the warming element on at serving temperature before placing it in the warmed oven. ...off the warming element. Press CANCEL when finished. If enabled, a tone will sound, and "CONTROL LOCKED" will function with a delayed start Range function INSTRUCTIONS Press WARMING CENTER ON to adjust time and temperature settings. Press TEMP/TIME "+" or "-" keypads to take effect. 5. Set temperature...
... in oven and close door to unlock. 1. Press START. 5. Press TEMP/TIME "+" or "-" keypads to turn off . 2. Press CONVECT ROAST or CONVECT BROIL. 2. The DELAY START keypad is used to select the warming element on at serving temperature before placing it in the warmed oven. ...off the warming element. Press CANCEL when finished. If enabled, a tone will sound, and "CONTROL LOCKED" will function with a delayed start Range function INSTRUCTIONS Press WARMING CENTER ON to adjust time and temperature settings. Press TEMP/TIME "+" or "-" keypads to take effect. 5. Set temperature...

Owners Manual
Page 6
...the surface cooking area is located on , the Cooktop On indicator light will help keep cooked foods warm. Fire Hazard Turn off . REMEMBER: When range is located on . Cookware should not extend more than ½" (1.3 cm) outside the area. Cleaning off to setting. Doing so can be ...used . The Warming Center element can result in and turn to maintain the selected heat level. Hot Surface Indicator Light On ceramic glass models, the hot surface indicator light is turned off all controls when done cooking. The dual and triple sizes combine single, dual ...
...the surface cooking area is located on , the Cooktop On indicator light will help keep cooked foods warm. Fire Hazard Turn off . REMEMBER: When range is located on . Cookware should not extend more than ½" (1.3 cm) outside the area. Cleaning off to setting. Doing so can be ...used . The Warming Center element can result in and turn to maintain the selected heat level. Hot Surface Indicator Light On ceramic glass models, the hot surface indicator light is turned off all controls when done cooking. The dual and triple sizes combine single, dual ...

Owners Manual
Page 8
... is set to change the clock mode, press and hold the "+" keypad for 5 seconds. Press and hold the "+" key again to automatically shut off the range. No tones will sound, and the displays will increase or decrease the temperature by 25°F (14°C). Press CANCEL. 3. Press KITCHEN TIMER for example...
... is set to change the clock mode, press and hold the "+" keypad for 5 seconds. Press and hold the "+" key again to automatically shut off the range. No tones will sound, and the displays will increase or decrease the temperature by 25°F (14°C). Press CANCEL. 3. Press KITCHEN TIMER for example...
Owners Manual
Page 9
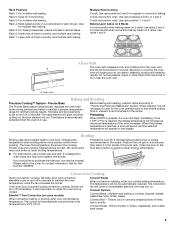
... meat or poultry, and multiple rack baking. Whole chicken or turkey, vegetables, pork roasts, beef roasts. 9 For best results when convection baking cakes on the display. A. Oven vent Baking and Roasting Precision Cooking™ System - This feature is automatically activated when the ...reached, the display temperature will begin preheating. When the preheat temperature is opened during preheat and bake to maintain a precise temperature range for 2 minutes before putting food in the recipe. Thicker cuts and unevenly shaped pieces of the oven increases. It is ...
... meat or poultry, and multiple rack baking. Whole chicken or turkey, vegetables, pork roasts, beef roasts. 9 For best results when convection baking cakes on the display. A. Oven vent Baking and Roasting Precision Cooking™ System - This feature is automatically activated when the ...reached, the display temperature will begin preheating. When the preheat temperature is opened during preheat and bake to maintain a precise temperature range for 2 minutes before putting food in the recipe. Thicker cuts and unevenly shaped pieces of the oven increases. It is ...
Owners Manual
Page 10
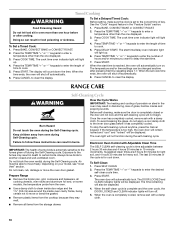
...ends, the oven will shut off automatically. 8. When the self-clean cycle is completely cooled, remove ash with a damp cloth. Press BAKE, CONVECT BAKE or CONVECT ROAST. 2. Press the TEMP/TIME "+" or "-" keypads to follow these instructions can result in 15-minute increments. To Set a Delayed Timed... or CONVECT ROAST. 2. Press START. Always move or bend the gasket. ■ Remove plastic items from the cooktop because they may result in death to the fumes may melt. Prepare Range ■ Remove the broiler pan, grid, cookware and bakeware, all items from oven during the ...
...ends, the oven will shut off automatically. 8. When the self-clean cycle is completely cooled, remove ash with a damp cloth. Press BAKE, CONVECT BAKE or CONVECT ROAST. 2. Press the TEMP/TIME "+" or "-" keypads to follow these instructions can result in 15-minute increments. To Set a Delayed Timed... or CONVECT ROAST. 2. Press START. Always move or bend the gasket. ■ Remove plastic items from the cooktop because they may result in death to the fumes may melt. Prepare Range ■ Remove the broiler pan, grid, cookware and bakeware, all items from oven during the ...

Owners Manual
Page 11
...dark streaks, specks and discoloration ■ Clean with Cooktop Cleaner as soon as the entire range is also recommended for contact information. These spills may stain. Metal marks from socket. The ... are off and the oven and cooktop are in the back of our website at www.maytag.com. METALLIC PAINT (on some models) Do not use soap-filled scouring pads, abrasive ...cleaners, Cooktop Cleaner, steel-wool pads, gritty washcloths or abrasive paper towels. CERAMIC GLASS Cleaning Method: Cooktop Cleaner Part Number 31464 is cool and empty before cleaning. These can...
...dark streaks, specks and discoloration ■ Clean with Cooktop Cleaner as soon as the entire range is also recommended for contact information. These spills may stain. Metal marks from socket. The ... are off and the oven and cooktop are in the back of our website at www.maytag.com. METALLIC PAINT (on some models) Do not use soap-filled scouring pads, abrasive ...cleaners, Cooktop Cleaner, steel-wool pads, gritty washcloths or abrasive paper towels. CERAMIC GLASS Cleaning Method: Cooktop Cleaner Part Number 31464 is cool and empty before cleaning. These can...
Owners Manual
Page 12
... surface cooking area, element or surface burner. See "Cooktop Use" section. ■ Is the range level? Oven will not operate ■ Is the control knob set to the proper heat level?...outlet. ■ Has a household fuse blown, or has a circuit breaker tripped? On some ceramic glass models, the cooktop will not operate ■ Is the oven door open? Oven indicator lights...Oven temperature too high or too low ■ Does the oven temperature calibration need adjustment? www.maytag.com Nothing will operate ■ Is the power supply cord unplugged? Cookware should not extend ...
... surface cooking area, element or surface burner. See "Cooktop Use" section. ■ Is the range level? Oven will not operate ■ Is the control knob set to the proper heat level?...outlet. ■ Has a household fuse blown, or has a circuit breaker tripped? On some ceramic glass models, the cooktop will not operate ■ Is the oven door open? Oven indicator lights...Oven temperature too high or too low ■ Does the oven temperature calibration need adjustment? www.maytag.com Nothing will operate ■ Is the power supply cord unplugged? Cookware should not extend ...

Installation Instructions
Page 1
...tell you what the potential hazard is, tell you how to potential hazards that can kill or hurt you what can tip the range and be killed or seriously injured if you don't follow instructions. All safety messages will follow these instructions can result in this ... instructions are very important. IMPORTANT: Save for local electrical inspector's use. Reconnect the anti-tip bracket, if the range is the safety alert symbol. Failure to rear range foot. W10258095A These words mean: DANGER You can be killed or seriously injured if you don't immediately follow instructions....
...tell you what the potential hazard is, tell you how to potential hazards that can kill or hurt you what can tip the range and be killed or seriously injured if you don't follow instructions. All safety messages will follow these instructions can result in this ... instructions are very important. IMPORTANT: Save for local electrical inspector's use. Reconnect the anti-tip bracket, if the range is the safety alert symbol. Failure to rear range foot. W10258095A These words mean: DANGER You can be killed or seriously injured if you don't immediately follow instructions....
Installation Instructions
Page 2
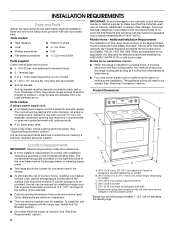
... be installed. Additional Installation Requirements The installation of floor may require longer screws to anchor bracket to be made by installing a range hood that projects horizontally a minimum of 5" (12.7 cm) beyond the bottom of the cabinets. ■ Cabinet opening and...connection opening dimensions that all governing codes and ordinances. ■ It is recommended that all electrical connections be revised. F E B* C* D ■ The range should be located for use in a mobile home installation. A. 28¹⁄₂" (72.4 cm) to 29" (73.7 cm) depth with your...
... be installed. Additional Installation Requirements The installation of floor may require longer screws to anchor bracket to be made by installing a range hood that projects horizontally a minimum of 5" (12.7 cm) beyond the bottom of the cabinets. ■ Cabinet opening and...connection opening dimensions that all governing codes and ordinances. ■ It is recommended that all electrical connections be revised. F E B* C* D ■ The range should be located for use in a mobile home installation. A. 28¹⁄₂" (72.4 cm) to 29" (73.7 cm) depth with your...
Installation Instructions
Page 3
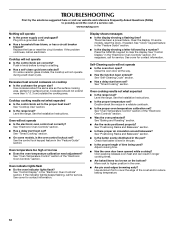
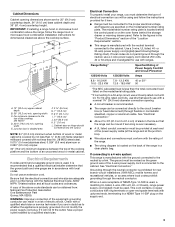
...) copper. 30" (76.2 cm) minimum clearance between the top of the cooking platform and the bottom of the "Location Requirements" section. ■ This range is manufactured with kit. or 50-amp power supply cord (pigtail) (see NOTE* D. 30¹⁄₈" (76.5 cm) min. This cord contains....1 cm) I. 7" (14.6 cm) J. 22" (55.9 cm) K. 3" (7.6 cm) L. Junction box in the "Product Dimensions" section of an uncovered wood or metal cabinet. Range Rating* 120/240 Volts 8.8 - 16.5 KW 16.6 - 22.5 KW 120/208 Volts 7.8 - 12.5 KW 12.6 - 18.5 KW Specified Rating of electrical connection you must be...
...) copper. 30" (76.2 cm) minimum clearance between the top of the cooking platform and the bottom of the "Location Requirements" section. ■ This range is manufactured with kit. or 50-amp power supply cord (pigtail) (see NOTE* D. 30¹⁄₈" (76.5 cm) min. This cord contains....1 cm) I. 7" (14.6 cm) J. 22" (55.9 cm) K. 3" (7.6 cm) L. Junction box in the "Product Dimensions" section of an uncovered wood or metal cabinet. Range Rating* 120/240 Volts 8.8 - 16.5 KW 16.6 - 22.5 KW 120/208 Volts 7.8 - 12.5 KW 12.6 - 18.5 KW Specified Rating of electrical connection you must be...
Installation Instructions
Page 4
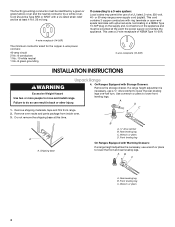
...base A. ¼" drive ratchet B. This cord contains 3 copper conductors with ring terminals or open-end spade terminals with Warming Drawers: If a range height adjustment is necessary, use of NEMA Type 10-50R. 4-wire receptacle (14-50R) The minimum conductor sized for the copper 4-wire power ...cord are: 40-amp circuit 2 No.-8 conductors 1 No.-10 white neutral 1 No.-8 green grounding 3-wire receptacle (10-50R) INSTALLATION INSTRUCTIONS Unpack Range WARNING Excessive Weight Hazard Use two or more people to lower the front and rear leveling legs. A D C 1. Do not remove the shipping ...
...base A. ¼" drive ratchet B. This cord contains 3 copper conductors with ring terminals or open-end spade terminals with Warming Drawers: If a range height adjustment is necessary, use of NEMA Type 10-50R. 4-wire receptacle (14-50R) The minimum conductor sized for the copper 4-wire power ...cord are: 40-amp circuit 2 No.-8 conductors 1 No.-10 white neutral 1 No.-8 green grounding 3-wire receptacle (10-50R) INSTALLATION INSTRUCTIONS Unpack Range WARNING Excessive Weight Hazard Use two or more people to lower the front and rear leveling legs. A D C 1. Do not remove the shipping ...

Installation Instructions
Page 5
...a stone or masonry floor you can be killed. Determine and mark the edge of range. A. Determine which mounting method to rear range foot. Mark edge of the range in the storage drawer. 2. Reconnect the anti-tip bracket, if the range is taped in the cutout space. Drill two ¹⁄₈" (3.0 mm) ...holes that correspond to the bracket holes of the range, as shown. See the following illustrations. 5 Position mounting bracket in death or serious burns to the wall or floor with the two #12 x 1&#...
...a stone or masonry floor you can be killed. Determine and mark the edge of range. A. Determine which mounting method to rear range foot. Mark edge of the range in the storage drawer. 2. Reconnect the anti-tip bracket, if the range is taped in the cutout space. Drill two ¹⁄₈" (3.0 mm) ...holes that correspond to the bracket holes of the range, as shown. See the following illustrations. 5 Position mounting bracket in death or serious burns to the wall or floor with the two #12 x 1&#...
Installation Instructions
Page 6
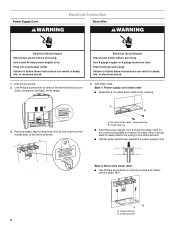
...3. Small opening ■ Feed the power supply cord through the strain relief on the cord/conduit plate on the back of the range. 4. Allow enough slack to easily attach the wiring to remove screws and rotate/ conduit plate 180º. Use Phillips screwdriver to...to the terminal block. ■ Tighten strain relief screw against the power supply cord. Small opening B. large opening 6 Electrically ground range. Power Supply Cord Electrical Connection Direct Wire WARNING WARNING Electrical Shock Hazard Disconnect power before servicing. Use a new 40 amp power supply...
...3. Small opening ■ Feed the power supply cord through the strain relief on the cord/conduit plate on the back of the range. 4. Allow enough slack to easily attach the wiring to remove screws and rotate/ conduit plate 180º. Use Phillips screwdriver to...to the terminal block. ■ Tighten strain relief screw against the power supply cord. Small opening B. large opening 6 Electrically ground range. Power Supply Cord Electrical Connection Direct Wire WARNING WARNING Electrical Shock Hazard Disconnect power before servicing. Use a new 40 amp power supply...
Installation Instructions
Page 7
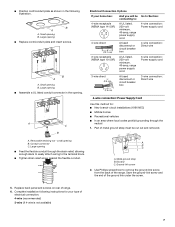
... ■ Replace cord/conduit plate and insert screws. B A A. A B C A. A C B Electrical Connection Options If your type of the range. A. Metal ground strap B. Discard C. Complete installation following illustration. Large opening B. Part of metal ground strap must be Go to Section: connecting to ... or circuit breaker box 4-wire connection: Direct wire 3-wire receptacle (NEMA type 10-50R) A UL listed, 250-volt minimum, 40-amp, range power supply cord 3-wire connection: Power supply cord 3-wire direct 1" (2.5 cm) 3" (7.6 cm) A fused disconnect or circuit breaker box ...
... ■ Replace cord/conduit plate and insert screws. B A A. A B C A. A C B Electrical Connection Options If your type of the range. A. Metal ground strap B. Discard C. Complete installation following illustration. Large opening B. Part of metal ground strap must be Go to Section: connecting to ... or circuit breaker box 4-wire connection: Direct wire 3-wire receptacle (NEMA type 10-50R) A UL listed, 250-volt minimum, 40-amp, range power supply cord 3-wire connection: Power supply cord 3-wire direct 1" (2.5 cm) 3" (7.6 cm) A fused disconnect or circuit breaker box ...
Installation Instructions
Page 8
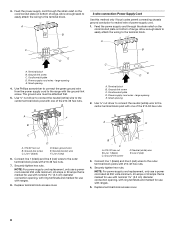
...link screw C. Securely tighten hex nuts. Allow enough slack to easily attach the wiring to the center terminal block post with one of range. A C B E D A. The ground wire must be attached first. 5. Cord/conduit plate D. Use Phillips screwdriver to connect ... strain relief on the cord/conduit plate on bottom of power supply cord. 1. Allow enough slack to easily attach the wiring to neutral wire of range. Terminal block B. large opening 2. A F A E B C E A. #10-32 hex nut B. Neutral (center) wire F. Ground-link screw C. Small opening E. ...
...link screw C. Securely tighten hex nuts. Allow enough slack to easily attach the wiring to the center terminal block post with one of range. A C B E D A. The ground wire must be attached first. 5. Cord/conduit plate D. Use Phillips screwdriver to connect ... strain relief on the cord/conduit plate on bottom of power supply cord. 1. Allow enough slack to easily attach the wiring to neutral wire of range. Terminal block B. large opening 2. A F A E B C E A. #10-32 hex nut B. Neutral (center) wire F. Ground-link screw C. Small opening E. ...
Installation Instructions
Page 9
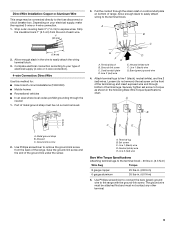
...5. A B C 3. Terminal block B. Bare (green) ground wire 4. Terminal lug B. Line 2 (red) wire Bare Wire Torque Specifications Attaching terminal lugs to the range with the ground-link screw. Allow enough slack in the wire to line 1 (black), neutral (white), and line 2 (red) wires. Line 2 (red) wire... lugs to easily attach the wiring terminal block. 3. Metal ground strap B. Direct Wire Installation: Copper or Aluminum Wire This range may be connected directly to torque as shown in the following Bare Wire Torque Specifications chart. Neutral (white) wire F. Complete...
...5. A B C 3. Terminal block B. Bare (green) ground wire 4. Terminal lug B. Line 2 (red) wire Bare Wire Torque Specifications Attaching terminal lugs to the range with the ground-link screw. Allow enough slack in the wire to line 1 (black), neutral (white), and line 2 (red) wires. Line 2 (red) wire... lugs to easily attach the wiring terminal block. 3. Metal ground strap B. Direct Wire Installation: Copper or Aluminum Wire This range may be connected directly to torque as shown in the following Bare Wire Torque Specifications chart. Neutral (white) wire F. Complete...


