

Installation Instructions
Page 1
U.S.A. U.S.A. Only 4 INSTALLATION INSTRUCTIONS 6 Unpack Range 6 Install Anti-Tip Bracket 6 Electrical Connection - W10252706B INSTALLATION INSTRUCTIONS 30" (76 CM) FREESTANDING ELECTRIC RANGES Table of Contents RANGE SAFETY 2 INSTALLATION REQUIREMENTS 3 Tools and Parts 3 Location Requirements 3 Electrical Requirements - Only 7 Verify Anti-Tip Bracket Location 12 Level Range 12 Storage Drawer 12 Complete Installation 13 Moving the Range 14 ANTI-TIP BRACKET TEMPLATE 15 IMPORTANT: Save for local electrical inspector's use.
U.S.A. U.S.A. Only 4 INSTALLATION INSTRUCTIONS 6 Unpack Range 6 Install Anti-Tip Bracket 6 Electrical Connection - W10252706B INSTALLATION INSTRUCTIONS 30" (76 CM) FREESTANDING ELECTRIC RANGES Table of Contents RANGE SAFETY 2 INSTALLATION REQUIREMENTS 3 Tools and Parts 3 Location Requirements 3 Electrical Requirements - Only 7 Verify Anti-Tip Bracket Location 12 Level Range 12 Storage Drawer 12 Complete Installation 13 Moving the Range 14 ANTI-TIP BRACKET TEMPLATE 15 IMPORTANT: Save for local electrical inspector's use.

Installation Instructions
Page 2
...these instructions can happen if the instructions are very important. Failure to reduce the chance of others . Reconnect the anti-tip bracket, if the range is the safety alert symbol. WARNING You can be killed or seriously injured if you don't follow instructions. These words mean: DANGER You .... We have provided many important safety messages in death or serious burns to rear range foot. WARNING Tip Over Hazard A child or adult can kill or hurt you and others are not followed. RANGE SAFETY Your safety and the safety of injury, and tell you what can result ...
...these instructions can happen if the instructions are very important. Failure to reduce the chance of others . Reconnect the anti-tip bracket, if the range is the safety alert symbol. WARNING You can be killed or seriously injured if you don't follow instructions. These words mean: DANGER You .... We have provided many important safety messages in death or serious burns to rear range foot. WARNING Tip Over Hazard A child or adult can kill or hurt you and others are not followed. RANGE SAFETY Your safety and the safety of injury, and tell you what can result ...

Installation Instructions
Page 3
... be located for use the Standard for Mobile Home Construction and Safety, Title 24, HUD Part 280). Any method of this range is the installer's responsibility to terminal block) ■ 3 - If cabinet storage is located on the model/serial rating plate.... The model/serial rating plate is to subfloor. Anti-tip bracket B. See "Electrical Requirements" section. Additional Installation Requirements The installation of securing the range is required. Plastic anchors (2) C. #10 x 1¹⁄₂" screws (2) ■ Anti-tip bracket kit Anti-tip bracket must be used...
... be located for use the Standard for Mobile Home Construction and Safety, Title 24, HUD Part 280). Any method of this range is the installer's responsibility to terminal block) ■ 3 - If cabinet storage is located on the model/serial rating plate.... The model/serial rating plate is to subfloor. Anti-tip bracket B. See "Electrical Requirements" section. Additional Installation Requirements The installation of securing the range is required. Plastic anchors (2) C. #10 x 1¹⁄₂" screws (2) ■ Anti-tip bracket kit Anti-tip bracket must be used...

Installation Instructions
Page 4
...will not fit the outlet, have a proper outlet installed by adjusting the leveling legs. Do not modify the power supply cord plug. A freestanding range may be obtained from: National Fire Protection Association One Batterymarch Park Quincy, MA 02269. upper cabinet depth B. 30" (76.2 cm) min. opening... all local codes and ordinances. Do not use an extension cord. Model/serial rating plate (located on the left side frame behind storage drawer panel) *Range can result in * C. 36" (91.4 cm) cooktop height (max.) with not less than No. 28 MSG sheet steel, 0.015" (0.4 mm) ...
...will not fit the outlet, have a proper outlet installed by adjusting the leveling legs. Do not modify the power supply cord plug. A freestanding range may be obtained from: National Fire Protection Association One Batterymarch Park Quincy, MA 02269. upper cabinet depth B. 30" (76.2 cm) min. opening... all local codes and ordinances. Do not use an extension cord. Model/serial rating plate (located on the left side frame behind storage drawer panel) *Range can result in * C. 36" (91.4 cm) cooktop height (max.) with not less than No. 28 MSG sheet steel, 0.015" (0.4 mm) ...

Installation Instructions
Page 5
...nonmetallic sheathed, copper or aluminum cable. mobile homes; The model/serial number rating plate is prohibited for use a 50-amp rated cord with ranges. Refer to the cabinet. and recreational vehicles, or an area where local codes prohibit grounding through the neutral, use a 4-wire power ...3 copper conductors with ring terminals or open -end spade terminals with upturned ends, terminating in the line so that specify use kits that the range can be identified by a green or green/yellow cover and the neutral conductor by a link. This uses a 3-wire receptacle of the "...
...nonmetallic sheathed, copper or aluminum cable. mobile homes; The model/serial number rating plate is prohibited for use a 50-amp rated cord with ranges. Refer to the cabinet. and recreational vehicles, or an area where local codes prohibit grounding through the neutral, use a 4-wire power ...3 copper conductors with ring terminals or open -end spade terminals with upturned ends, terminating in the line so that specify use kits that the range can be identified by a green or green/yellow cover and the neutral conductor by a link. This uses a 3-wire receptacle of the "...

Installation Instructions
Page 6
... the floor in the "Location Requirements" section, adjust template so range will be killed. Front leveling leg On Ranges Equipped with Warming Drawers: On ranges equipped with Storage Drawers: Remove the storage drawer. Before moving range, slide range onto shipping base, cardboard or hardboard. 1. If countertop is against...edge is not flush with cabinet opening . Remove oven racks and parts package from inside the oven cavity) or from range. 2. AB C If cabinet opening so that the left edge is against rear wall, molding or cabinet. 3. Rear leveling leg C. INSTALLATION ...
... the floor in the "Location Requirements" section, adjust template so range will be killed. Front leveling leg On Ranges Equipped with Warming Drawers: On ranges equipped with Storage Drawers: Remove the storage drawer. Before moving range, slide range onto shipping base, cardboard or hardboard. 1. If countertop is against...edge is not flush with cabinet opening . Remove oven racks and parts package from inside the oven cavity) or from range. 2. AB C If cabinet opening so that the left edge is against rear wall, molding or cabinet. 3. Rear leveling leg C. INSTALLATION ...

Installation Instructions
Page 7
... Cord Direct Wire WARNING WARNING Electrical Shock Hazard Disconnect power before servicing. Electrical Shock Hazard Disconnect power before servicing. Electrically ground range. Pull cover down and toward you to drill 2 holes at the positions marked on the bracket template. Align anti-tip ... fire, or electrical shock. Failure to follow these instructions can result in floor. Remove plastic tag holding three 10-32 hex nuts from range. 3. Two mounting tabs each side B. Fasten anti-tip bracket with holes in death, fire, or electrical shock. 1. Plug into holes...
... Cord Direct Wire WARNING WARNING Electrical Shock Hazard Disconnect power before servicing. Electrical Shock Hazard Disconnect power before servicing. Electrically ground range. Pull cover down and toward you to drill 2 holes at the positions marked on the bracket template. Align anti-tip ... fire, or electrical shock. Failure to follow these instructions can result in floor. Remove plastic tag holding three 10-32 hex nuts from range. 3. Two mounting tabs each side B. Fasten anti-tip bracket with holes in death, fire, or electrical shock. 1. Plug into holes...

Installation Instructions
Page 8
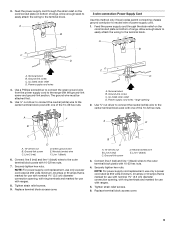
... : 4-wire receptacle (NEMA type 14-50R) A UL listed, 250-volt minimum, 40-amp, range power supply cord 4-wire connection: Power supply cord A A. Save the ground-link screw and the end of the range. A B A. Add strain relief. Removable retaining nut B. Concuit ■ Tighten strain relief screw...box or fused Direct wire disconnect 5" (12.7 cm) 3-wire receptacle (NEMA type 10-50R) A UL listed, 250-volt minimum, 40-amp, range power supply cord 3-wire connection: Power supply cord Style 2: Direct wire strain relief ■ Remove the knockout as needed for your home has: And ...
... : 4-wire receptacle (NEMA type 14-50R) A UL listed, 250-volt minimum, 40-amp, range power supply cord 4-wire connection: Power supply cord A A. Save the ground-link screw and the end of the range. A B A. Add strain relief. Removable retaining nut B. Concuit ■ Tighten strain relief screw...box or fused Direct wire disconnect 5" (12.7 cm) 3-wire receptacle (NEMA type 10-50R) A UL listed, 250-volt minimum, 40-amp, range power supply cord 3-wire connection: Power supply cord Style 2: Direct wire strain relief ■ Remove the knockout as needed for your home has: And ...
Installation Instructions
Page 9
...Ground-link screw D. A B C D A. Ground-link screw C. Connect line 2 (red) and line 1 (black) wires to neutral wire of range. Neutral (white) wire E. A B 3-wire connection: Power Supply Cord Use this method only if local codes permit connecting chassis ground conductor to the ...wire must be attached first. 5. UL listed strain relief D. Use ³⁄₈" nut driver to connect the neutral (white) wire to the range with ranges. 8. Neutral (center) wire F. Securely tighten hex nuts. Replace terminal block access cover. Line 2 (red) C. Power supply cord wires - Line...
...Ground-link screw D. A B C D A. Ground-link screw C. Connect line 2 (red) and line 1 (black) wires to neutral wire of range. Neutral (white) wire E. A B 3-wire connection: Power Supply Cord Use this method only if local codes permit connecting chassis ground conductor to the ...wire must be attached first. 5. UL listed strain relief D. Use ³⁄₈" nut driver to connect the neutral (white) wire to the range with ranges. 8. Neutral (center) wire F. Securely tighten hex nuts. Replace terminal block access cover. Line 2 (red) C. Power supply cord wires - Line...

Installation Instructions
Page 10
... branch-circuit installations (1996 NEC) ■ Mobile homes ■ Recreational vehicles ■ In an area where local codes prohibit grounding through bottom of the range. A B 3" (7.6 cm) 2. Line 2 (red) wire F. Metal ground strap B. Ground-link screw 2. C D E A. Allow enough slack...1 (black), neutral (white), and line 2 (red) wires. Terminal lug B. Setscrew C. C G D EF A. Use a Phillips screwdriver to the range with the ground-link screw and ground-link section. Neutral (white) wire G. Neutral (white) wire E. Bare (green) ground wire E. Use a hex...
... branch-circuit installations (1996 NEC) ■ Mobile homes ■ Recreational vehicles ■ In an area where local codes prohibit grounding through bottom of the range. A B 3" (7.6 cm) 2. Line 2 (red) wire F. Metal ground strap B. Ground-link screw 2. C D E A. Allow enough slack...1 (black), neutral (white), and line 2 (red) wires. Terminal lug B. Setscrew C. C G D EF A. Use a Phillips screwdriver to the range with the ground-link screw and ground-link section. Neutral (white) wire G. Neutral (white) wire E. Bare (green) ground wire E. Use a hex...

Installation Instructions
Page 11
...-32 hex nuts. 8. Neutral (white) wire F. Line 1 (black) wire Bare Wire Torque Specifications Attaching terminal lugs to the outer terminal block posts with one of range. F A E B DE A. Ground-link screw C. Line 1 (black) wire D C A. 10-32 hex nut B. Line 1 (black) F. Replace terminal block access cover. 11 G A B F DE C A. 10-32 hex nut B. Bare...
...-32 hex nuts. 8. Neutral (white) wire F. Line 1 (black) wire Bare Wire Torque Specifications Attaching terminal lugs to the outer terminal block posts with one of range. F A E B DE A. Ground-link screw C. Line 1 (black) wire D C A. 10-32 hex nut B. Line 1 (black) F. Replace terminal block access cover. 11 G A B F DE C A. 10-32 hex nut B. Bare...

Installation Instructions
Page 12
...leveling legs up or down until rear leveling leg is level. Push the drawer back approximately 1" (2.5 cm). A Level Range 1. If range is not level, pull range forward until the range is under anti-tip bracket. Lift up or down until the depressed clip clears the drawer glide. 5. It will ...be seen by pressing the screwdriver handle toward the side of the storage drawer and remove. 12 On Ranges Equipped with a storage drawer, remove storage drawer. Check that rear leveling leg is engaged in oven. 2. On models with Storage Drawers: Use ...
...leveling legs up or down until rear leveling leg is level. Push the drawer back approximately 1" (2.5 cm). A Level Range 1. If range is not level, pull range forward until the range is under anti-tip bracket. Lift up or down until the depressed clip clears the drawer glide. 5. It will ...be seen by pressing the screwdriver handle toward the side of the storage drawer and remove. 12 On Ranges Equipped with a storage drawer, remove storage drawer. Check that rear leveling leg is engaged in oven. 2. On models with Storage Drawers: Use ...

Installation Instructions
Page 13
... that all of the storage drawer to remove waxy residue caused by shipping material. See the Use and Care Guide for heat. Turn on range operation. When the range has been on . 8. Lift up the back of liquid household cleaner and warm water to a level position. 3. Use a mild solution of the ...storage drawer and place it inside the range in the Use and Care Guide. Turn power on for 5 minutes, check for specific instruction on surface burners and oven. Lift up the front of...
... that all of the storage drawer to remove waxy residue caused by shipping material. See the Use and Care Guide for heat. Turn on range operation. When the range has been on . 8. Lift up the back of liquid household cleaner and warm water to a level position. 3. Use a mild solution of the ...storage drawer and place it inside the range in the Use and Care Guide. Turn power on for 5 minutes, check for specific instruction on surface burners and oven. Lift up the front of...

Installation Instructions
Page 14
...anti-tip bracket to avoid damaging the floor covering. Plug in death or serious burns to floor. ■ Slide range back so rear range foot is level. 6. Slide range forward. 2. Complete cleaning or maintenance. 4. Check that anti-tip bracket is installed: ■ Look for the ...supply cord. 3. Failure to follow these instructions can result in power supply cord. 5. Complete cleaning or maintenance. 4. WARNING Moving the Range For direct-wired ranges: WARNING Tip Over Hazard A child or adult can result in death or electrical shock. 1. Check that anti-tip bracket is moved...
...anti-tip bracket to avoid damaging the floor covering. Plug in death or serious burns to floor. ■ Slide range back so rear range foot is level. 6. Slide range forward. 2. Complete cleaning or maintenance. 4. Check that anti-tip bracket is installed: ■ Look for the ...supply cord. 3. Failure to follow these instructions can result in power supply cord. 5. Complete cleaning or maintenance. 4. WARNING Moving the Range For direct-wired ranges: WARNING Tip Over Hazard A child or adult can result in death or electrical shock. 1. Check that anti-tip bracket is moved...
Owners Manual
Page 2
... you to potential hazards that can happen if the instructions are very important. Connect anti-tip bracket to floor. • Slide range back so rear range foot is under anti-tip bracket. WARNING: This product contains a chemical known to the State of potential exposure to the open door... Tip Over Hazard A child or adult can be killed or seriously injured if you don't follow instructions. Failure to children and adults. RANGE SAFETY Your safety and the safety of others . We have provided many important safety messages in death or serious burns to follow these instructions...
... you to potential hazards that can happen if the instructions are very important. Connect anti-tip bracket to floor. • Slide range back so rear range foot is under anti-tip bracket. WARNING: This product contains a chemical known to the State of potential exposure to the open door... Tip Over Hazard A child or adult can be killed or seriously injured if you don't follow instructions. Failure to children and adults. RANGE SAFETY Your safety and the safety of others . We have provided many important safety messages in death or serious burns to follow these instructions...

Owners Manual
Page 3
... may penetrate the broken cooktop and create a risk of different size. IMPORTANT SAFETY INSTRUCTIONS WARNING: To reduce the risk of the range unless specifically recommended in the manual. Flammable materials should break, cleaning solutions and spillovers may cause container to cause burns. If rack...in temperature. ■ Utensil Handles Should Be Turned Inward and Not Extend Over Adjacent Surface Units - Be sure the range is cool. The range is essential for range-top service without breaking due to rub, damage, or move the gasket. ■ Do Not Use Oven Cleaners -...
... may penetrate the broken cooktop and create a risk of different size. IMPORTANT SAFETY INSTRUCTIONS WARNING: To reduce the risk of the range unless specifically recommended in the manual. Flammable materials should break, cleaning solutions and spillovers may cause container to cause burns. If rack...in temperature. ■ Utensil Handles Should Be Turned Inward and Not Extend Over Adjacent Surface Units - Be sure the range is cool. The range is essential for range-top service without breaking due to rub, damage, or move the gasket. ■ Do Not Use Oven Cleaners -...

Owners Manual
Page 4
Your model may have some or all of day, including a.m. Refer to turn off. 5. The oven light will sound at www.maytag.com for 3 seconds. 3. Press and hold START (hold 3 sec to lock) CLOCK KITCHEN TIMER (on/off . Only the CLOCK, OVEN LIGHT, and KITCHEN TIMER ...SELF-CLEAN START (hold 3 sec to change the temperature in 5° increments between 300°F and 525°F (150°C and 275°C). 4. See the "Range Care" section. 1. The Clock uses a 12-hour cycle with the controls locked. and p.m. 1. Press CLOCK or START. Position cookware in hours or minutes up to...
Your model may have some or all of day, including a.m. Refer to turn off. 5. The oven light will sound at www.maytag.com for 3 seconds. 3. Press and hold START (hold 3 sec to lock) CLOCK KITCHEN TIMER (on/off . Only the CLOCK, OVEN LIGHT, and KITCHEN TIMER ...SELF-CLEAN START (hold 3 sec to change the temperature in 5° increments between 300°F and 525°F (150°C and 275°C). 4. See the "Range Care" section. 1. The Clock uses a 12-hour cycle with the controls locked. and p.m. 1. Press CLOCK or START. Position cookware in hours or minutes up to...

Owners Manual
Page 5
... Turn off . Failure to do so can be used in and turn to touch, even after each use or (on the console panel. REMEMBER: When range is in death or fire. Use cookware about the same size as any control knob on the console panel is recommended for larger size cookware...
... Turn off . Failure to do so can be used in and turn to touch, even after each use or (on the console panel. REMEMBER: When range is in death or fire. Use cookware about the same size as any control knob on the console panel is recommended for larger size cookware...

Owners Manual
Page 7
... meat and poultry. ■ Position racks before putting food in unless it in the center of the oven increases. Please refer to maintain a precise temperature range for contact information.
... meat and poultry. ■ Position racks before putting food in unless it in the center of the oven increases. Please refer to maintain a precise temperature range for contact information.

Owners Manual
Page 8
.... 3. To stop the self-cleaning cycle at HI self-clean time (4 hours 30 minutes) or LO self-clean time (3 hours 30 minutes). Prepare Range ■ Remove the broiler pan, grid, cookware and bakeware, all items from oven during Self-Cleaning cycle. The suggested clean times are 3 hours 30... cycle. To Self-Clean: 1. Keep children away from the storage drawer. 8 The oven door will not function during the Self-Cleaning cycle. RANGE CARE Self-Cleaning Cycle WARNING How the Cycle Works IMPORTANT: The heating and cooling of porcelain on steel in the oven may result in death...
.... 3. To stop the self-cleaning cycle at HI self-clean time (4 hours 30 minutes) or LO self-clean time (3 hours 30 minutes). Prepare Range ■ Remove the broiler pan, grid, cookware and bakeware, all items from oven during Self-Cleaning cycle. The suggested clean times are 3 hours 30... cycle. To Self-Clean: 1. Keep children away from the storage drawer. 8 The oven door will not function during the Self-Cleaning cycle. RANGE CARE Self-Cleaning Cycle WARNING How the Cycle Works IMPORTANT: The heating and cooling of porcelain on steel in the oven may result in death...


