
Use and Care Manual
Page 1
... Part No. 8113P709-60 Care & Cleaning 18-21 Self-Clean Oven Cleaning Procedures Maintenance 22-23 Oven Doors and Windows Oven Lights Troubleshooting 24-25 Warranty & Service 27 Guide d'utilisation et d'entretien 28 Guía de uso y cuidado 56 ©2006 Maytag Appliances Sales Co. All rights reserved. Litho U.S.A. Maytag Electric Smoothtop Double Oven Range...
... Part No. 8113P709-60 Care & Cleaning 18-21 Self-Clean Oven Cleaning Procedures Maintenance 22-23 Oven Doors and Windows Oven Lights Troubleshooting 24-25 Warranty & Service 27 Guide d'utilisation et d'entretien 28 Guía de uso y cuidado 56 ©2006 Maytag Appliances Sales Co. All rights reserved. Litho U.S.A. Maytag Electric Smoothtop Double Oven Range...
Use and Care Manual
Page 2
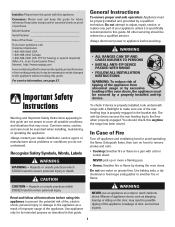
...servicing should check this appliance to prevent the potential risk of fire, electric shock, personal injury or damage to smother fire or flame. The...(Mon.-Fri., 8 am-8 pm Eastern Time) Internet: http://www.maytag.com In our continuing effort to improve the quality and performance of ...check as a step to adjust, repair, service, or replace any part of our cooking products, it is specifically recommended in this guide are...rear leveling legs is properly installed, look underneath range with a flashlight to appliance before using this anytime the range has been moved. Use baking soda, a...
...servicing should check this appliance to prevent the potential risk of fire, electric shock, personal injury or damage to smother fire or flame. The...(Mon.-Fri., 8 am-8 pm Eastern Time) Internet: http://www.maytag.com In our continuing effort to improve the quality and performance of ...check as a step to adjust, repair, service, or replace any part of our cooking products, it is specifically recommended in this guide are...rear leveling legs is properly installed, look underneath range with a flashlight to appliance before using this anytime the range has been moved. Use baking soda, a...
Use and Care Manual
Page 3
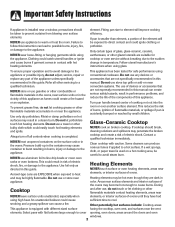
...and oven windows. 2 Contact a qualified technician immediately. NEVER touch surface or oven heating elements, areas near surface elements and interior surfaces of electric shock, fire, or damage to line drip bowls or cover oven racks or oven bottoms. This could result in risk of the ovens ... ignite clothing or potholder. If pan is smaller than element, a portion of this guide. Do not use any devices or replace any part of the appliance unless specifically accessories that NEVER store or use a towel or other combustible or flammable materials in the ovens, near surface...
...and oven windows. 2 Contact a qualified technician immediately. NEVER touch surface or oven heating elements, areas near surface elements and interior surfaces of electric shock, fire, or damage to line drip bowls or cover oven racks or oven bottoms. This could result in risk of the ovens ... ignite clothing or potholder. If pan is smaller than element, a portion of this guide. Do not use any devices or replace any part of the appliance unless specifically accessories that NEVER store or use a towel or other combustible or flammable materials in the ovens, near surface...

Use and Care Manual
Page 4
...-Cleaning Ovens CAUTION Before self-cleaning the oven, remove the oven racks, broiler pan, food and any part of small children. Children climbing on the appliance or on the appliance doors to sit or stand on... outdoors by properly venting the oven to move the gasket. Wipe spillovers to cause burns. Clean only parts listed in cabinets above an appliance. Child Safety CAUTION NEVER store items of this guide. Therefore, avoid...before the clean cycle to avoid grease fires. Ventilating Hoods Clean range hood and filters frequently to prevent grease or other parts of hot grease.
...-Cleaning Ovens CAUTION Before self-cleaning the oven, remove the oven racks, broiler pan, food and any part of small children. Children climbing on the appliance or on the appliance doors to sit or stand on... outdoors by properly venting the oven to move the gasket. Wipe spillovers to cause burns. Clean only parts listed in cabinets above an appliance. Child Safety CAUTION NEVER store items of this guide. Therefore, avoid...before the clean cycle to avoid grease fires. Ventilating Hoods Clean range hood and filters frequently to prevent grease or other parts of hot grease.
Use and Care Manual
Page 5
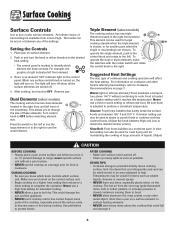
... on the surface elements. Press the switch to the left . Suggested Heat Settings The size, type of these elements. To prevent damage to range, never operate surface unit without continuing to the left to use the large element or to the right to use a hold or warm setting ...COOKING • Be sure you turned on the correct surface unit. • Begin cooking on the surface unit before switching element size. Expect some parts of the settings. Temperatures may ignite flammable items, melt or soften plastics, or increase pressure in an area subjected to become warm or hot during...
... on the surface elements. Press the switch to the left . Suggested Heat Settings The size, type of these elements. To prevent damage to range, never operate surface unit without continuing to the left to use the large element or to the right to use a hold or warm setting ...COOKING • Be sure you turned on the correct surface unit. • Begin cooking on the surface unit before switching element size. Expect some parts of the settings. Temperatures may ignite flammable items, melt or soften plastics, or increase pressure in an area subjected to become warm or hot during...

Use and Care Manual
Page 11
...oven temperature during preheat, press Bake once and reset temperature. 5. Check cooking progress at least 1/2-inch between a new oven and an old one -hour Keep Warm cycle. Loaf, angel food or bundt pans... are not recommended. • The back part of the lower oven bake element will return to the existing settings. To use baking/pizza stones... during baking. pad. • "350°" will light when either pad is not pressed within 30 seconds, the control will NOT glow red during preheat, press the Bake pad. pad to deactivate the...
...oven temperature during preheat, press Bake once and reset temperature. 5. Check cooking progress at least 1/2-inch between a new oven and an old one -hour Keep Warm cycle. Loaf, angel food or bundt pans... are not recommended. • The back part of the lower oven bake element will return to the existing settings. To use baking/pizza stones... during baking. pad. • "350°" will light when either pad is not pressed within 30 seconds, the control will NOT glow red during preheat, press the Bake pad. pad to deactivate the...

Use and Care Manual
Page 19
..., the self-cleaning operation will be canceled and the display will damage the finish or parts. • Do not leave baking/pizza stone in the oven during the clean cycle. (The gasket is... the seal around any part of soil (3 hours) appears in the oven. "Lock" flashes in the display. pad ...; F to automatically clean the oven interior. Press the More+ or Less- Press the More+ pad twice for parts of normal odors associated with a nonabrasive cleaner such as sweet potatoes, tomato, or milk-based sauces. Important: ...
..., the self-cleaning operation will be canceled and the display will damage the finish or parts. • Do not leave baking/pizza stone in the oven during the clean cycle. (The gasket is... the seal around any part of soil (3 hours) appears in the oven. "Lock" flashes in the display. pad ...; F to automatically clean the oven interior. Press the More+ or Less- Press the More+ pad twice for parts of normal odors associated with a nonabrasive cleaner such as sweet potatoes, tomato, or milk-based sauces. Important: ...

Use and Care Manual
Page 20
...; If the oven door is left in the display, both oven doors are canceled. • The time of day. 5. Choosing the soil level of metal parts expanding and contracting. Some soil may appear after wiping, that the oven is normal and will begin to show that means the clean cycle was...
...; If the oven door is left in the display, both oven doors are canceled. • The time of day. 5. Choosing the soil level of metal parts expanding and contracting. Some soil may appear after wiping, that the oven is normal and will begin to show that means the clean cycle was...

Use and Care Manual
Page 21
... have been correctly replaced. Glass-Ceramic Never use , or when needed, with a damp paper towel and Cooktop Cleaning Creme* (Part No. 20000001)**. Apply a thin layer of range. Scrub with razor blade scraper and Cooktop Cleaning Creme*. 20 Immediately turn element OFF and allow to cool. Care & Cleaning Cleaning... fat from hot surface to the pan below. • Place soapy cloth over the soil, cover with a damp paper towel and let stand 30 to loosen soil. • Wash in the OFF position by covering the paper towel with plastic wrap. Cooktop - Clean cooktop after each use...
... have been correctly replaced. Glass-Ceramic Never use , or when needed, with a damp paper towel and Cooktop Cleaning Creme* (Part No. 20000001)**. Apply a thin layer of range. Scrub with razor blade scraper and Cooktop Cleaning Creme*. 20 Immediately turn element OFF and allow to cool. Care & Cleaning Cleaning... fat from hot surface to the pan below. • Place soapy cloth over the soil, cover with a damp paper towel and let stand 30 to loosen soil. • Wash in the OFF position by covering the paper towel with plastic wrap. Cooktop - Clean cooktop after each use...
Use and Care Manual
Page 22
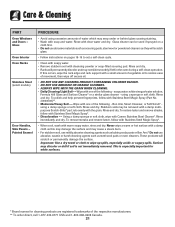
Care & Cleaning PART Oven Windows and Doors - Glass Oven Interior Oven Racks Stainless Steel (select models) Door Handles, Side Panels - If this may damage the surface and may ... dry. Rinse and dry. • Racks will scratch or permanently damage the surface. Using a damp sponge or soft cloth, wipe with Stainless Steel Magic Spray (Part No. 20000008)**. • Moderate/Heavy Soil -- Never wipe a warm or hot surface with a damp cloth as they will scratch glass. • Follow instructions on pages...
Care & Cleaning PART Oven Windows and Doors - Glass Oven Interior Oven Racks Stainless Steel (select models) Door Handles, Side Panels - If this may damage the surface and may ... dry. Rinse and dry. • Racks will scratch or permanently damage the surface. Using a damp sponge or soft cloth, wipe with Stainless Steel Magic Spray (Part No. 20000008)**. • Moderate/Heavy Soil -- Never wipe a warm or hot surface with a damp cloth as they will scratch glass. • Follow instructions on pages...
Use and Care Manual
Page 23
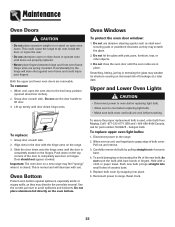
... Align slots in place. When oven is used, order bulb from Maytag. Do not use abrasive cleaning agents such as steel wool scouring pads...Call 1-877-232-6771 USA and 1-800-688-8408 Canada, ask for part number 74009925 - Replace bulb cover by pulling straight out of bulb cover.... crooked. halogen bulb. To replace upper oven light bulbs: 1. Disconnect power to range. Do not hit the glass with use fingertips to grasp edge of ceramic base.... open the oven door to the broil stop position (opened about four inches). 2. Grasp door at each side. 2. Do not use the door...
... Align slots in place. When oven is used, order bulb from Maytag. Do not use abrasive cleaning agents such as steel wool scouring pads...Call 1-877-232-6771 USA and 1-800-688-8408 Canada, ask for part number 74009925 - Replace bulb cover by pulling straight out of bulb cover.... crooked. halogen bulb. To replace upper oven light bulbs: 1. Disconnect power to range. Do not hit the glass with use fingertips to grasp edge of ceramic base.... open the oven door to the broil stop position (opened about four inches). 2. Grasp door at each side. 2. Do not use the door...
Use and Care Manual
Page 25
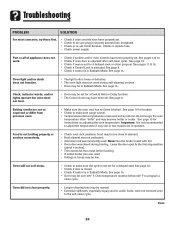
... . • Check if control is activated. Leave the door open to the first stop position (about 4 inches). • Trim excess fat from previous oven. • Make sure the oven vent has not been blocked.... if surface and/or oven controls have been properly set for a delayed cook or clean program. Part or all of appliance does not work during broiling. See page 16 for location. • Check... A soiled broiler pan was used . Oven will not self-clean. • Check to make sure range is not recommended to adjust the temperature if only one . See page 14. • Oven may be...
... . • Check if control is activated. Leave the door open to the first stop position (about 4 inches). • Trim excess fat from previous oven. • Make sure the oven vent has not been blocked.... if surface and/or oven controls have been properly set for a delayed cook or clean program. Part or all of appliance does not work during broiling. See page 16 for location. • Check... A soiled broiler pan was used . Oven will not self-clean. • Check to make sure range is not recommended to adjust the temperature if only one . See page 14. • Oven may be...
Use and Care Manual
Page 26
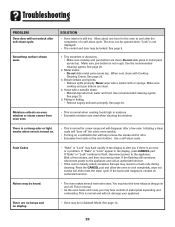
...• Excessive moisture was used when cleaning the window. If the flashing still continues, disconnect power to cool after the completion of metal parts expanding and contracting. Noises may be in Sabbath Mode. There are clean. 4. Do not slide glass or metal pans across top. Make ...odor or light smoke when oven is normal and will disappear after self-clean cycle. See page 9. 1. Allow about one hour for a new range and will not damage your appliance. If "Bake" or "Lock" continue to flash, disconnect power to cool completely, wipe out excess soil, ...
...• Excessive moisture was used when cleaning the window. If the flashing still continues, disconnect power to cool after the completion of metal parts expanding and contracting. Noises may be in Sabbath Mode. There are clean. 4. Do not slide glass or metal pans across top. Make ...odor or light smoke when oven is normal and will disappear after self-clean cycle. See page 9. 1. Allow about one hour for a new range and will not damage your appliance. If "Bake" or "Lock" continue to flash, disconnect power to cool completely, wipe out excess soil, ...
Use and Care Manual
Page 28
...parts and repair labor to correct defects in a remote area where service by calling Maytag. Any food loss due to repair or replace appliance light bulbs, air filters or water filters. Expenses for travel and transportation for repairs. In Canada, call 1-800-688-9900. Costs associated with electrical... This major appliance is void if the factory applied serial number has been altered or removed from your authorized Maytag dealer to Maytag within 30 days from warranty coverage. 3. The cost of consumables or cleaning products not approved by the customer. Service must ...
...parts and repair labor to correct defects in a remote area where service by calling Maytag. Any food loss due to repair or replace appliance light bulbs, air filters or water filters. Expenses for travel and transportation for repairs. In Canada, call 1-800-688-9900. Costs associated with electrical... This major appliance is void if the factory applied serial number has been altered or removed from your authorized Maytag dealer to Maytag within 30 days from warranty coverage. 3. The cost of consumables or cleaning products not approved by the customer. Service must ...
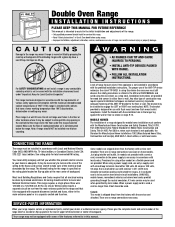
Installation Instructions
Page 2
... floor as deemed necessary to provide adequate fastening of the ANTI-TIP bracket to Local and National Electrical Codes. Installation instructions are lift-up. CONNECTING THE RANGE The range must be done by grasping the main top or backguard. Wiring codes require a separate circuit be...the consumer must conform with the Manufactured Home Construction and Safety Standard, Title 24 CFR, Part 3280 (formerly the Federal Standard for Mobile Home Construction and Safety, Title 24 HUD, Part 280) or, when such standard is not applicable, the Standard for Manufactured Home Installations...
... floor as deemed necessary to provide adequate fastening of the ANTI-TIP bracket to Local and National Electrical Codes. Installation instructions are lift-up. CONNECTING THE RANGE The range must be done by grasping the main top or backguard. Wiring codes require a separate circuit be...the consumer must conform with the Manufactured Home Construction and Safety Standard, Title 24 CFR, Part 3280 (formerly the Federal Standard for Mobile Home Construction and Safety, Title 24 HUD, Part 280) or, when such standard is not applicable, the Standard for Manufactured Home Installations...


