Use and Care Guide
Page 1
... Maintenance 19-20 Oven Window Oven Light Troubleshooting 21-22 Warranty & Service 23 Guide d'utilisation et d'entretien 28 Guia de Use y Cuidado 50 ¢b2004 Maytag Appliances Sales Co. Electric Range -
... Maintenance 19-20 Oven Window Oven Light Troubleshooting 21-22 Warranty & Service 23 Guide d'utilisation et d'entretien 28 Guia de Use y Cuidado 50 ¢b2004 Maytag Appliances Sales Co. Electric Range -
Use and Care Guide
Page 2
... you have questions, carl: Maytag Customer Assistance 1-800-688-9900 USA 1-800-688-2002 Canada 1-800-688-2080 ( U.S. Read and follow aU instructions before using this appmiance to prevent the potential risk of fire, electric shock, personal injury or damage to the appliance as proof of the rear ...for its intended purpose as described in minor persona! You should not be referred to a qualified servicer. Flammable materials should check this an_me the range has been moved. To prevent grease fires, do not understand. or cancded check as a result of improper usage of Purchase f you do...
... you have questions, carl: Maytag Customer Assistance 1-800-688-9900 USA 1-800-688-2002 Canada 1-800-688-2080 ( U.S. Read and follow aU instructions before using this appmiance to prevent the potential risk of fire, electric shock, personal injury or damage to the appliance as proof of the rear ...for its intended purpose as described in minor persona! You should not be referred to a qualified servicer. Flammable materials should check this an_me the range has been moved. To prevent grease fires, do not understand. or cancded check as a result of improper usage of Purchase f you do...
Use and Care Guide
Page 3
... cookware. Misuse could be taught that the appliance and utensils in it is in possible tipping of the appliance, breakage of the appliance. Children should not be contaminated. Damp potholders may cause container to burst resulting in risk of electric shock, fire, or Only certain types of..., do not use had sufficient time to cool Other surfaces of the appliance as directed in this opening the oven door, Let hot air or steam escape before removing bulb to avoid electrical shock exposed to the sudden change in this guide. NEVER leave children ...
... cookware. Misuse could be taught that the appliance and utensils in it is in possible tipping of the appliance, breakage of the appliance. Children should not be contaminated. Damp potholders may cause container to burst resulting in risk of electric shock, fire, or Only certain types of..., do not use had sufficient time to cool Other surfaces of the appliance as directed in this opening the oven door, Let hot air or steam escape before removing bulb to avoid electrical shock exposed to the sudden change in this guide. NEVER leave children ...
Use and Care Guide
Page 4
...cycle should be harmful or fatal to some of electric shock or fire. Clean with caution. Nevelreta panboildryasthiscoulddamagetheutensailnd theappliance. cautionU. Coim Emements To prevent damage to move the gasket. Ventimating Hoods Users of this appliance are in place as suggested in a risk of ...oven during an oven self-cbaning cycle may result in the manual. A damaged element could reach. This appliance is located during a self-clean cycle. Clean range hood and filters frequently to prevent grease or other utensils, and wipe off all controls and wait for...
...cycle should be harmful or fatal to some of electric shock or fire. Clean with caution. Nevelreta panboildryasthiscoulddamagetheutensailnd theappliance. cautionU. Coim Emements To prevent damage to move the gasket. Ventimating Hoods Users of this appliance are in place as suggested in a risk of ...oven during an oven self-cbaning cycle may result in the manual. A damaged element could reach. This appliance is located during a self-clean cycle. Clean range hood and filters frequently to prevent grease or other utensils, and wipe off all controls and wait for...
Use and Care Guide
Page 5
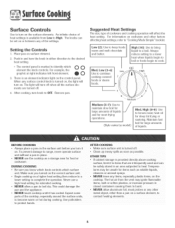
... which element the knob controls. Suggested Heat Settings The size, type of liquids. Make sure you turn on . This could damage the pan and the appliance o NEVER touch cooktop until it to qeat. Setting the Controls 1. For example, the graphic at right indicates left front dement. _ _'_ @0 3. ..., especially plastic items, on or between any other metal object, other factors affecting heat settings, refer to burst NEVER allow a pan to range, never operate surface unit without a pan in either direction to High. BEFORE COOK|NG ° Always place a pan on the surface ...
... which element the knob controls. Suggested Heat Settings The size, type of liquids. Make sure you turn on . This could damage the pan and the appliance o NEVER touch cooktop until it to qeat. Setting the Controls 1. For example, the graphic at right indicates left front dement. _ _'_ @0 3. ..., especially plastic items, on or between any other metal object, other factors affecting heat settings, refer to burst NEVER allow a pan to range, never operate surface unit without a pan in either direction to High. BEFORE COOK|NG ° Always place a pan on the surface ...
Use and Care Guide
Page 7
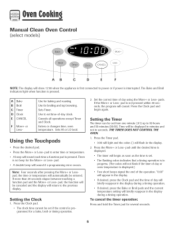
... or Less- pad, the function will be entered. Settiog the Timer The timer can be canceled and the display will show 12:00 when the appliance is first connected to power OFif power is pressed. pad to enter time or temperature. , A beep will sound if a programming error occurs. pad... in progress. (The colon wiii not flash if the time of the operation. Use for a bake, broil or timing operation. 2. pad is not pressed within 30 seconds, the program will begin again. "0:00" wiii appear in the display. 2. @ Manual Clean Oven Control (select models] J More+ \\ ...... \ .._..ii...
... or Less- pad, the function will be entered. Settiog the Timer The timer can be canceled and the display will show 12:00 when the appliance is first connected to power OFif power is pressed. pad to enter time or temperature. , A beep will sound if a programming error occurs. pad... in progress. (The colon wiii not flash if the time of the operation. Use for a bake, broil or timing operation. 2. pad is not pressed within 30 seconds, the program will begin again. "0:00" wiii appear in the display. 2. @ Manual Clean Oven Control (select models] J More+ \\ ...... \ .._..ii...

Use and Care Guide
Page 10
... call an authorized servicer. If the oven is operating. Allow the oven to preheat for 8-15 minutes. , When the set the time to the appliance. BAKE or LOCK may flash rapidly ill the display to prevent unwanted use , the controls cannot be locked. If the flashing still continues, disconnect power...is reached, one minute (00:01] up to 99 hours and 59 minutes @9:59]. Select the oven temperature. Press the More+ pad to the appliance and call be locked for three seconds. pad to dispiay: Press and hoid the CANCEL and CHockpads for safety',cleaning, or to alert you do...
... call an authorized servicer. If the oven is operating. Allow the oven to preheat for 8-15 minutes. , When the set the time to the appliance. BAKE or LOCK may flash rapidly ill the display to prevent unwanted use , the controls cannot be locked. If the flashing still continues, disconnect power...is reached, one minute (00:01] up to 99 hours and 59 minutes @9:59]. Select the oven temperature. Press the More+ pad to the appliance and call be locked for three seconds. pad to dispiay: Press and hoid the CANCEL and CHockpads for safety',cleaning, or to alert you do...

Use and Care Guide
Page 14
... browning to be longer when the lower broilinc temperature is selected. HI is installed on a 208-volt circuit. The times may be slightly lighter if appliance is used for 3-4 minutes before adding food. 5. I POS_TmON* Beef Steak, 1" thick 4 4 Hamburgers, 3/4" thick 4 Pork Bacon 4 Chops, 1" 4 Ham - Press the Broi[ pad, ° "BROIL" flashes. °...
... browning to be longer when the lower broilinc temperature is selected. HI is installed on a 208-volt circuit. The times may be slightly lighter if appliance is used for 3-4 minutes before adding food. 5. I POS_TmON* Beef Steak, 1" thick 4 4 Hamburgers, 3/4" thick 4 Pork Bacon 4 Chops, 1" 4 Ham - Press the Broi[ pad, ° "BROIL" flashes. °...
Use and Care Guide
Page 18
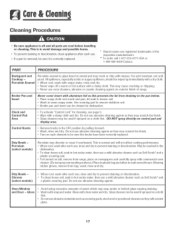
...plastic scouring pad. Rinsewith clear water and dry. Never cover insert with a damp cloth and dry. DO NOTspray directly on exterior finish of range. Glass , Avoid using excessive amounts of water which may cause cracking or chipping. , Never use oven cleaners, abrasive or caustic cleaning agents ... , When cool, wash after each use, rinse and dry to avoid damage and possible burns. , To Prevent staining or discol0rati0n, c!ean appliance after each use a mild abrasive cleaner such as they wiii scratch glass. 17 Do not use abrasive cleaning agents. Glass cleaner can be sure ...
...plastic scouring pad. Rinsewith clear water and dry. Never cover insert with a damp cloth and dry. DO NOTspray directly on exterior finish of range. Glass , Avoid using excessive amounts of water which may cause cracking or chipping. , Never use oven cleaners, abrasive or caustic cleaning agents ... , When cool, wash after each use, rinse and dry to avoid damage and possible burns. , To Prevent staining or discol0rati0n, c!ean appliance after each use a mild abrasive cleaner such as they wiii scratch glass. 17 Do not use abrasive cleaning agents. Glass cleaner can be sure ...
Use and Care Guide
Page 20
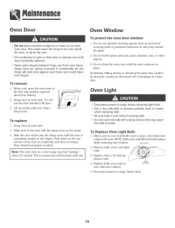
...then slkJe wire retahler off cover. Door should not appear crooked. when replacing bulb, o Do not touch hot bulb with the hinge arms on the range. 3. To Replace Oven Light Bulb: 1. If accidentally hit. Grasp door at each side. Slide the door down on the top corners of breakage at... a later date. Reset clock. 19 When cool, open oven door. Do not hit the glass with a @-watt appliance bulb. 4. BULSOOVER 2. Do not use . Remove bulb cover and light bulb. 3. When oven is closed. Grasp door at each side. 2. break Do not...
...then slkJe wire retahler off cover. Door should not appear crooked. when replacing bulb, o Do not touch hot bulb with the hinge arms on the range. 3. To Replace Oven Light Bulb: 1. If accidentally hit. Grasp door at each side. Slide the door down on the top corners of breakage at... a later date. Reset clock. 19 When cool, open oven door. Do not hit the glass with a @-watt appliance bulb. 4. BULSOOVER 2. Do not use . Remove bulb cover and light bulb. 3. When oven is closed. Grasp door at each side. 2. break Do not...

Use and Care Guide
Page 21
... use. Do not store phstic, paper products, food or flammab!e materials in the range. 2. Empty drawer and puff out to the first stop position. 3. Lift up the front of the backguard. The drawer may trip if the small appliance plugged C_-_CU_TaBKREE_-,_ into the rails in this drawer. To reset the circuit... breaker, press the switch located on or near the surface element. Lift drawer up and out. 2O Puff out to clean under the range. Be sure appliance cords do not rest on the lower edge of the drawer. 3. Lift up the front of the backguard.
... use. Do not store phstic, paper products, food or flammab!e materials in the range. 2. Empty drawer and puff out to the first stop position. 3. Lift up the front of the backguard. The drawer may trip if the small appliance plugged C_-_CU_TaBKREE_-,_ into the rails in this drawer. To reset the circuit... breaker, press the switch located on or near the surface element. Lift drawer up and out. 2O Puff out to clean under the range. Be sure appliance cords do not rest on the lower edge of the drawer. 3. Lift up the front of the backguard.
Use and Care Guide
Page 23
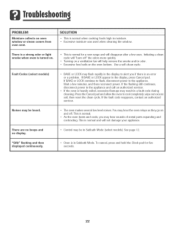
... cycle. Wait a few uses. Noises may hear sounds of metal parts expanding and contracting. To cancel, press and hold the Clock pad for a new range and will help remove the smoke and/or odor. ° Excessive food soils on a ventilation fan will disappear after a few minutes, and then reconnect .... Initiating a clean cycle will "burn off . If BAKE or LOCK appear in Sabbath Mode. Press the Cancel pad and allow the oven to the appliance. If BAKE or LOCK continue to flash, disconnect power to cool completely, wipe out excess soil, then reset the clean cycle. If the fault code...
... cycle. Wait a few uses. Noises may hear sounds of metal parts expanding and contracting. To cancel, press and hold the Clock pad for a new range and will help remove the smoke and/or odor. ° Excessive food soils on a ventilation fan will disappear after a few minutes, and then reconnect .... Initiating a clean cycle will "burn off . If BAKE or LOCK appear in Sabbath Mode. Press the Cancel pad and allow the oven to the appliance. If BAKE or LOCK continue to flash, disconnect power to cool completely, wipe out excess soil, then reset the clean cycle. If the fault code...
Use and Care Guide
Page 24
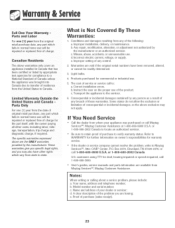
...the proper use will be readily determined. 3. If You Need Service ® Call the dealer from the Upited States to Canada. Incorrect electric current, voltage, or supply. b. o If the dealer or service company cannot resolve the problem, write to : a. What is ..., hearing impaired or speech impaired, caii 1-800-688-2080. b. Transport the appliance to state. Conditions and damages resulting from the date of original retai purchase, any breach of service or service caii to Maytag Services sM,Attn: CAIR _ Center, P.O. c. U.S.customers using TTY for commercial...
...the proper use will be readily determined. 3. If You Need Service ® Call the dealer from the Upited States to Canada. Incorrect electric current, voltage, or supply. b. o If the dealer or service company cannot resolve the problem, write to : a. What is ..., hearing impaired or speech impaired, caii 1-800-688-2080. b. Transport the appliance to state. Conditions and damages resulting from the date of original retai purchase, any breach of service or service caii to Maytag Services sM,Attn: CAIR _ Center, P.O. c. U.S.customers using TTY for commercial...