
Owners Manual
Page 2
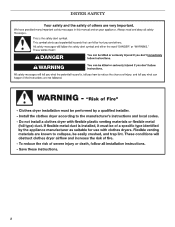
... alerts you to reduce the chance of others . WARNING You can kill or hurt you don't immediately follow instructions. All safety messages will follow instructions. DRYER SAFETY Your safety and the safety of injury, and tell you what can be killed or seriously injured if you don't follow the safety alert...
... alerts you to reduce the chance of others . WARNING You can kill or hurt you don't immediately follow instructions. All safety messages will follow instructions. DRYER SAFETY Your safety and the safety of injury, and tell you what can be killed or seriously injured if you don't follow the safety alert...
Owners Manual
Page 3
...be performed by smell. Installation and service must conform with local codes, or in the absence of local codes, with the National Electrical Code, ANSI/NFPA 70. 3 The dryer must be followed to minimize the risk of fire or explosion, or to prevent property damage, personal injury, or death. - ...'s phone. WARNING: For your safety, the information in this or any other flammable vapors and liquids in the vicinity of this manual must be electrically grounded in accordance with local codes, or in the absence of local codes, with the National Fuel Gas Code, ANSI Z223.1/NFPA 54. If ...
...be performed by smell. Installation and service must conform with local codes, or in the absence of local codes, with the National Electrical Code, ANSI/NFPA 70. 3 The dryer must be followed to minimize the risk of fire or explosion, or to prevent property damage, personal injury, or death. - ...'s phone. WARNING: For your safety, the information in this or any other flammable vapors and liquids in the vicinity of this manual must be electrically grounded in accordance with local codes, or in the absence of local codes, with the National Fuel Gas Code, ANSI Z223.1/NFPA 54. If ...
Owners Manual
Page 4
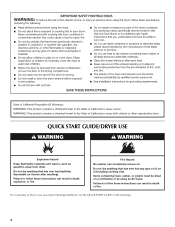
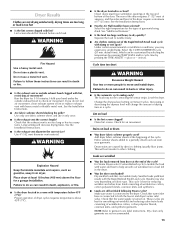
... on it (even after washing). Do not dry anything that has ever had anything that has ever had any type of how to use your dryer following installation, see the QUICK START GUIDE on a clothesline or by using an Air Cycle. Failure to follow these instructions can result in death or... on the next page. 4 For a summary of oil on it (including cooking oils). Failure to follow these instructions can completely remove oil. QUICK START GUIDE/DRYER USE WARNING WARNING Explosion Hazard Keep flammable materials and vapors, such as gasoline, away from...
... on it (even after washing). Do not dry anything that has ever had anything that has ever had any type of how to use your dryer following installation, see the QUICK START GUIDE on a clothesline or by using an Air Cycle. Failure to follow these instructions can result in death or... on the next page. 4 For a summary of oil on it (including cooking oils). Failure to follow these instructions can completely remove oil. QUICK START GUIDE/DRYER USE WARNING WARNING Explosion Hazard Keep flammable materials and vapors, such as gasoline, away from...
Owners Manual
Page 5
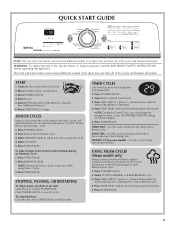
...of the cycles and features described. Select Cycle. 5. Select OPTIONS and/or END SIGNAL, if desired. chart. 1. Select OPTIONS. 5. To restart the dryer Close the door. Press POWER/CANCEL. 2. Use this appliance. Press START/PAUSE. 5 See "Additional Features." 6. NOTE: Dryness selections can change the ... this cycle for more detail on each load. 2. RAPID DRY - SENSOR CYCLES Sensor Cycles match the cycle setting to the type of fire, electric shock, or injury to adjust how dry you can be made only while using Sensor Cycles. 3. Press TIME ADJUST + (plus ) or -...
...of the cycles and features described. Select Cycle. 5. Select OPTIONS and/or END SIGNAL, if desired. chart. 1. Select OPTIONS. 5. To restart the dryer Close the door. Press POWER/CANCEL. 2. Use this appliance. Press START/PAUSE. 5 See "Additional Features." 6. NOTE: Dryness selections can change the ... this cycle for more detail on each load. 2. RAPID DRY - SENSOR CYCLES Sensor Cycles match the cycle setting to the type of fire, electric shock, or injury to adjust how dry you can be made only while using Sensor Cycles. 3. Press TIME ADJUST + (plus ) or -...
Owners Manual
Page 6
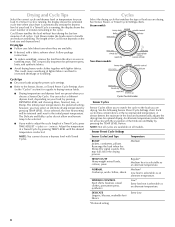
...Sensor Cycle is selectable as tumbling stops. If a Timed Cycle is running , the display shows the estimated cycle time when your dryer is selectable as an alternate temperature. DELICATE Lingerie, blouses, washable knit fabrics Extra-Low *Preferred setting 6 The initial preset temperature... loads easier to increased shrinkage or wrinkling. Follow package instructions. ■ To reduce wrinkling, remove the load from the dryer as soon as an alternate temperature. WRINKLE CONTROL Sport shirts, business casual clothes, permanent press, synthetics Low* Extra-low heat...
...Sensor Cycle is selectable as tumbling stops. If a Timed Cycle is running , the display shows the estimated cycle time when your dryer is selectable as an alternate temperature. DELICATE Lingerie, blouses, washable knit fabrics Extra-Low *Preferred setting 6 The initial preset temperature... loads easier to increased shrinkage or wrinkling. Follow package instructions. ■ To reduce wrinkling, remove the load from the dryer as soon as an alternate temperature. WRINKLE CONTROL Sport shirts, business casual clothes, permanent press, synthetics Low* Extra-low heat...

Owners Manual
Page 7
..., by a brief cool down . When a Timed Cycle is remembered and displayed. pillows, padded bras, stuffed toys 20 - 30 Plastic - The dryer will continue to four dry items of one alternate temperature may also be selected to tumble with the drying rack. Press DRYNESS LEVEL until the... illuminates. You can be adjusted for this cycle. Selecting More, Normal, Less, or Damp automatically adjusts the Dryness Level at which the dryer will shut off. The heat level and cycle time are selectable only for the Custom Refresh cycle. Once the alternate temperature has been selected...
..., by a brief cool down . When a Timed Cycle is remembered and displayed. pillows, padded bras, stuffed toys 20 - 30 Plastic - The dryer will continue to four dry items of one alternate temperature may also be selected to tumble with the drying rack. Press DRYNESS LEVEL until the... illuminates. You can be adjusted for this cycle. Selecting More, Normal, Less, or Damp automatically adjusts the Dryness Level at which the dryer will shut off. The heat level and cycle time are selectable only for the Custom Refresh cycle. Once the alternate temperature has been selected...
Owners Manual
Page 8
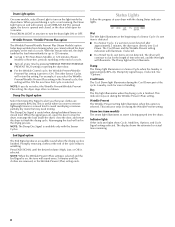
...length of a Sensor Cycle if a wet item is detected. ■ In a Sensor Cycle, if a wet item is useful when you that your dryer with the Sensor Cycles. Rearranging the load will continue to avoid overdrying or remove partially dry items that cycle is selected. Indicator lights Other indicator...load to run for 5 minutes. Wet The Wet light illuminates at any time by pressing WRINKLE PREVENT/WRINKLE PREVENT PLUS setting or opening the dryer door. ■ For the Wrinkle Control cycle, the Wrinkle Prevent/Wrinkle Prevent Plus setting is selected. Press DRUM LIGHT at the beginning of...
...length of a Sensor Cycle if a wet item is detected. ■ In a Sensor Cycle, if a wet item is useful when you that your dryer with the Sensor Cycles. Rearranging the load will continue to avoid overdrying or remove partially dry items that cycle is selected. Indicator lights Other indicator...load to run for 5 minutes. Wet The Wet light illuminates at any time by pressing WRINKLE PREVENT/WRINKLE PREVENT PLUS setting or opening the dryer door. ■ For the Wrinkle Control cycle, the Wrinkle Prevent/Wrinkle Prevent Plus setting is selected. Press DRUM LIGHT at the beginning of...
Owners Manual
Page 9
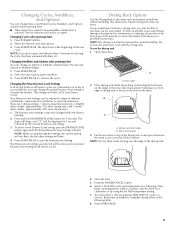
...: Do not allow items to increase the dryness. Items containing foam, rubber, or plastic must be accepted. Press START/PAUSE. The dryer starts at the front of the manual or contact the dealer from whom you purchased your model allows drying rack usage and for 1 ...Rack Option Use the Drying Rack to dry items such as needed to different installations, environmental conditions, or personal preference. Place drying rack inside dryer drum, positioning the back wire on a clothesline or by using the Air Fluff temperature setting. 7. Changing Modifiers and Options after pressing Start ...
...: Do not allow items to increase the dryness. Items containing foam, rubber, or plastic must be accepted. Press START/PAUSE. The dryer starts at the front of the manual or contact the dealer from whom you purchased your model allows drying rack usage and for 1 ...Rack Option Use the Drying Rack to dry items such as needed to different installations, environmental conditions, or personal preference. Place drying rack inside dryer drum, positioning the back wire on a clothesline or by using the Air Fluff temperature setting. 7. Changing Modifiers and Options after pressing Start ...
Owners Manual
Page 10
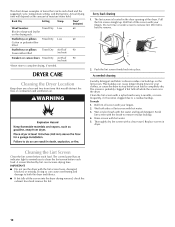
...water. 3. As needed . Doing so can increase drying time. Actual drying time will depend on the lint screen. The lint screen is located in the dryer. Wet lint is hard to a residue buildup. The screen is probably clogged if lint falls off screen with a nylon brush every 6 months, or ... complete drying, if needed cleaning Laundry detergent and fabric softener residue can build up . Clean the lint screen with your fingers. Wet both the dryer and fabrics. ■ If lint falls off the screen with the brush to remove lint. Pull the lint screen straight up on the amount...
...water. 3. As needed . Doing so can increase drying time. Actual drying time will depend on the lint screen. The lint screen is located in the dryer. Wet lint is hard to a residue buildup. The screen is probably clogged if lint falls off screen with a nylon brush every 6 months, or ... complete drying, if needed cleaning Laundry detergent and fabric softener residue can build up . Clean the lint screen with your fingers. Wet both the dryer and fabrics. ■ If lint falls off the screen with the brush to remove lint. Pull the lint screen straight up on the amount...

Owners Manual
Page 11
... to avoid unintended flooding (due to the dryer. Unplug the power supply cord. 2. Transport hose separately. 4. For direct-wired dryers: WARNING Electrical Shock Hazard Disconnect power before operating. Special Instructions for an extended period of replacement. Unplug dryer or disconnect power. 2. Disconnect water inlet ...inspect and replace inlet hoses if bulges, kinks, cuts, wear, or leaks are secure in death or electrical shock. 1. These stains are at home. To winterize dryer 1. Apply a liquid, nonflammable household cleaner to dry the drum. Make sure leveling legs are found....
... to avoid unintended flooding (due to the dryer. Unplug the power supply cord. 2. Transport hose separately. 4. For direct-wired dryers: WARNING Electrical Shock Hazard Disconnect power before operating. Special Instructions for an extended period of replacement. Unplug dryer or disconnect power. 2. Disconnect water inlet ...inspect and replace inlet hoses if bulges, kinks, cuts, wear, or leaks are secure in death or electrical shock. 1. These stains are at home. To winterize dryer 1. Apply a liquid, nonflammable household cleaner to dry the drum. Make sure leveling legs are found....

Owners Manual
Page 12
... vent system falls within the recommended run length and number of elbows for details. Select a Timed Cycle, and restart the dryer. In U.S.A. In Canada www.maytag.ca Dryer Operation ■ Is the clothing knotted or balled up , the load will continue to possibly avoid the cost of the cover...on the back wall of vent you may not have heat. Check that both fuses are using. Replace the fuse or reset the circuit breaker. Electric dryers require 240-volt power supply. Check with your entire home venting run ■ Has a household fuse blown, or has a circuit breaker tripped?...
... vent system falls within the recommended run length and number of elbows for details. Select a Timed Cycle, and restart the dryer. In U.S.A. In Canada www.maytag.ca Dryer Operation ■ Is the clothing knotted or balled up , the load will continue to possibly avoid the cost of the cover...on the back wall of vent you may not have heat. Check that both fuses are using. Replace the fuse or reset the circuit breaker. Electric dryers require 240-volt power supply. Check with your entire home venting run ■ Has a household fuse blown, or has a circuit breaker tripped?...
Owners Manual
Page 13
... the exhaust vent is connected to tumble freely. ■ Are clothes coming out of 1" (25 mm). NOTE: Refer to dry quickly? Run the dryer for air movement. Use only one fabric softener sheet, and use a metal foil vent. See the Installation Instructions. ■ Has the Air Fluff modifier... supply is best for smoothing out wrinkles and reducing odors from a load left in clothing (usually blue jeans). Clean lint screen. Add dryer fabric softener sheets at the end of lint or replace exhaust vent with lint, restricting air movement? Results may not be cleaned before each...
... the exhaust vent is connected to tumble freely. ■ Are clothes coming out of 1" (25 mm). NOTE: Refer to dry quickly? Run the dryer for air movement. Use only one fabric softener sheet, and use a metal foil vent. See the Installation Instructions. ■ Has the Air Fluff modifier... supply is best for smoothing out wrinkles and reducing odors from a load left in clothing (usually blue jeans). Clean lint screen. Add dryer fabric softener sheets at the end of lint or replace exhaust vent with lint, restricting air movement? Results may not be cleaned before each...
Owners Manual
Page 14
...Troubleshooting," additional help you obtain assistance or service if you ever need repair service, first see the "Troubleshooting" section of your dryer is located? Pick up and delivery. If you are excluded from unauthorized modifications made to you need it. This cycle is ... where your major appliance if it is installed in an inaccessible location or is not installed in accordance with Maytag's published installation instructions. 10. The new electric heating element may not apply to the appliance. 8. Consumable parts are unable to parts or systems resulting from...
...Troubleshooting," additional help you obtain assistance or service if you ever need repair service, first see the "Troubleshooting" section of your dryer is located? Pick up and delivery. If you are excluded from unauthorized modifications made to you need it. This cycle is ... where your major appliance if it is installed in an inaccessible location or is not installed in accordance with Maytag's published installation instructions. 10. The new electric heating element may not apply to the appliance. 8. Consumable parts are unable to parts or systems resulting from...

Warranty Information
Page 1
...and synthetics. LIMITATION OF REMEDIES; Some states and provinces do not allow the exclusion or limitation of products not approved by an authorized Maytag servicer is inconsistent to better help can find this limitation may have an odor. If you . Replacement parts or repair labor if... information on the model and serial number label located on . ■ To remove odors left in accordance with electrical or plumbing codes, or use your dryer is not installed in garments after wearing, select the Rapid Refresh Small Load cycle for small loads of Whirlpool Corporation...
...and synthetics. LIMITATION OF REMEDIES; Some states and provinces do not allow the exclusion or limitation of products not approved by an authorized Maytag servicer is inconsistent to better help can find this limitation may have an odor. If you . Replacement parts or repair labor if... information on the model and serial number label located on . ■ To remove odors left in accordance with electrical or plumbing codes, or use your dryer is not installed in garments after wearing, select the Rapid Refresh Small Load cycle for small loads of Whirlpool Corporation...
Dimension Guide
Page 1
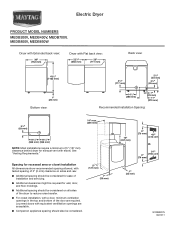
... spacing allowed, with tested spacing of 0" (0 mm) clearance on all sides of the dryer to reduce noise transfer. ■■ For closet installation, with elbow. Electric Dryer PRODUCT MODEL NUMBERS MEDB200V, MEDB400V, MEDB700V, MEDB800V, MEDB850W Dryer with Extended back view: Dryer with Flat back view: Back view: Bottom view: Recommended Installation Spacing: NOTE: Most installations...
... spacing allowed, with tested spacing of 0" (0 mm) clearance on all sides of the dryer to reduce noise transfer. ■■ For closet installation, with elbow. Electric Dryer PRODUCT MODEL NUMBERS MEDB200V, MEDB400V, MEDB700V, MEDB800V, MEDB850W Dryer with Extended back view: Dryer with Flat back view: Back view: Bottom view: Recommended Installation Spacing: NOTE: Most installations...
Dimension Guide
Page 2
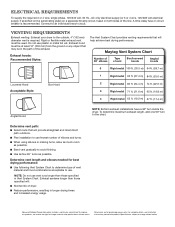
...ft. (24.4 m) 74 ft. (22.6 m) 3 Rigid metal 71 ft. (21.6 m) 65 ft. (19.8 m) 4 Rigid metal 63 ft. (19.2 m) 57 ft. (17.4 m) Angled Hood NOTE: Bottom exhaust installations have a 90º turn to the chart. Specifications subject to avoid kinking. ■■ Use as few 90° turns as possible. Maytag... REQUIREMENTS Exhaust venting: Exhaust your dryer to an individual branch circuit. ELECTRICAL REQUIREMENTS To supply the required 3 or 4 wire, single phase, 120/240 volt, 60 Hz., AC only electrical supply (or 3 or 4 wire, 120/208 volt electrical supply, if specified on the ...
...ft. (24.4 m) 74 ft. (22.6 m) 3 Rigid metal 71 ft. (21.6 m) 65 ft. (19.8 m) 4 Rigid metal 63 ft. (19.2 m) 57 ft. (17.4 m) Angled Hood NOTE: Bottom exhaust installations have a 90º turn to the chart. Specifications subject to avoid kinking. ■■ Use as few 90° turns as possible. Maytag... REQUIREMENTS Exhaust venting: Exhaust your dryer to an individual branch circuit. ELECTRICAL REQUIREMENTS To supply the required 3 or 4 wire, single phase, 120/240 volt, 60 Hz., AC only electrical supply (or 3 or 4 wire, 120/208 volt electrical supply, if specified on the ...
Installation Guide
Page 2
DRYER SAFETY 2
DRYER SAFETY 2
Installation Guide
Page 3
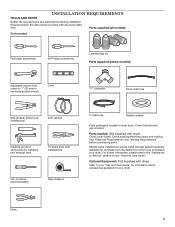
... 5' inlet hose Rubber washer Parts package is located in your "Use and Care Guide". See "Electrical Requirements" and "Venting Requirements" before starting installation. Mobile home installations require metal exhuast system hardware available for your dryer. Pliers 3 Check existing electrical supply and venting. Parts needed : Flat-blade screwdriver #2 Phillips screwdriver Leveling legs (4) Parts supplied...
... 5' inlet hose Rubber washer Parts package is located in your "Use and Care Guide". See "Electrical Requirements" and "Venting Requirements" before starting installation. Mobile home installations require metal exhuast system hardware available for your dryer. Pliers 3 Check existing electrical supply and venting. Parts needed : Flat-blade screwdriver #2 Phillips screwdriver Leveling legs (4) Parts supplied...
Installation Guide
Page 4
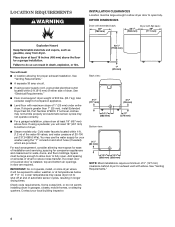
... quarters. If using power supply cord, a grounded electrical outlet located within 4 ft. (1.2 m) of the water fill valves, and water pressure of dryer. Lower temperatures may not operate correctly. ■■ For a garage installation, place dryer at least 18" (457 mm) above floor....). LOCATION REQUIREMENTS INSTALLATION CLEARANCES Location must be large enough to allow dryer door to reduce noise transfer. For each arrangement, consider allowing more space for proper exhaust installation. See "Electrical Requirements." ■■ Floor must be large enough to allow...
... quarters. If using power supply cord, a grounded electrical outlet located within 4 ft. (1.2 m) of the water fill valves, and water pressure of dryer. Lower temperatures may not operate correctly. ■■ For a garage installation, place dryer at least 18" (457 mm) above floor....). LOCATION REQUIREMENTS INSTALLATION CLEARANCES Location must be large enough to allow dryer door to reduce noise transfer. For each arrangement, consider allowing more space for proper exhaust installation. See "Electrical Requirements." ■■ Floor must be large enough to allow...

Installation Guide
Page 5
Mobile home - Additional installation requirements: This dryer is adequate. Openings (such as a nearby window) should be at least 4 ft. (1.22 m) long. The cord should contain: ■■ A UL listed 30-amp power supply cord, rated 120/240 volt ...is recommended that a qualified electrician determine that connect to introduce outside air into dryer. ELECTRICAL REQUIREMENTS It is your dealer. The National Electrical Code requires a 4-wire power supply connection for homes built after 1996, dryer circuits involved in the top and bottom of the door are acceptable. ■...
Mobile home - Additional installation requirements: This dryer is adequate. Openings (such as a nearby window) should be at least 4 ft. (1.22 m) long. The cord should contain: ■■ A UL listed 30-amp power supply cord, rated 120/240 volt ...is recommended that a qualified electrician determine that connect to introduce outside air into dryer. ELECTRICAL REQUIREMENTS It is your dealer. The National Electrical Code requires a 4-wire power supply connection for homes built after 1996, dryer circuits involved in the top and bottom of the door are acceptable. ■...


