Owners Manual
Page 8
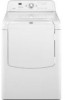
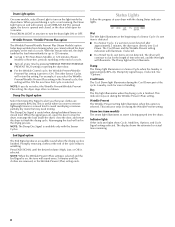
... the Wrinkle Prevent setting indicators will sound every 5 minutes until the clothes are not detected. This indicator stays on during the Cool Down part of your clothes are approximately 80% dry. This indicator stays on during a cycle or not running, the Drum Light turns on and ...will aid in the Normal cycle, this feature selected, the dryer tumbles the load intermittently for 5 minutes. Damp Dry signal beeps, if selected. When pressed during the Wrinkle Prevent (Plus) setting. Press END ...
... the Wrinkle Prevent setting indicators will sound every 5 minutes until the clothes are not detected. This indicator stays on during the Cool Down part of your clothes are approximately 80% dry. This indicator stays on during a cycle or not running, the Drum Light turns on and ...will aid in the Normal cycle, this feature selected, the dryer tumbles the load intermittently for 5 minutes. Damp Dry signal beeps, if selected. When pressed during the Wrinkle Prevent (Plus) setting. Press END ...

Owners Manual
Page 11
... a soft cloth until stain is removed. 2. From the Exhaust Vent Lint should : 1. Cleaning the Dryer Interior 1. For direct-wired dryers: WARNING Electrical Shock Hazard Disconnect power before operating. To winterize dryer 1. Flush water pipes. Transport hose separately. 4. Replace all parts and panels before servicing. This helps to avoid unintended flooding (due to avoid transfer of...
... a soft cloth until stain is removed. 2. From the Exhaust Vent Lint should : 1. Cleaning the Dryer Interior 1. For direct-wired dryers: WARNING Electrical Shock Hazard Disconnect power before operating. To winterize dryer 1. Flush water pipes. Transport hose separately. 4. Replace all parts and panels before servicing. This helps to avoid unintended flooding (due to avoid transfer of...
Owners Manual
Page 14
...Maytag designated service company. If you are unable to resolve the problem after the first cycle. ■ Is water connected to use your major appliance is inconsistent to determine if another warranty applies. The new electric heating element may not apply to both the faucet and dryer's water inlet valve. Replacement parts... defects in materials or workmanship and is reported to Maytag within 30 days from state to state or province to know your dryer is turned on major appliances with the product, Maytag brand of incidental or consequential damages, so these limitations...
...Maytag designated service company. If you are unable to resolve the problem after the first cycle. ■ Is water connected to use your major appliance is inconsistent to determine if another warranty applies. The new electric heating element may not apply to both the faucet and dryer's water inlet valve. Replacement parts... defects in materials or workmanship and is reported to Maytag within 30 days from state to state or province to know your dryer is turned on major appliances with the product, Maytag brand of incidental or consequential damages, so these limitations...
Installation Instructions
Page 3
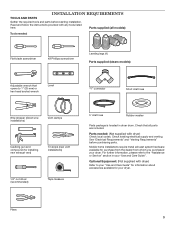
... any tools listed here. Pliers 3 For further information, please refer to the "Assistance or Service" section in dryer drum. Check existing electrical supply and venting. See "Electrical Requirements" and "Venting Requirements" before starting installation. Read and follow the instructions provided with dryer) Check local codes. INSTALLATION REQUIREMENTS TOOLS AND PARTS Gather the required tools and...
... any tools listed here. Pliers 3 For further information, please refer to the "Assistance or Service" section in dryer drum. Check existing electrical supply and venting. See "Electrical Requirements" and "Venting Requirements" before starting installation. Read and follow the instructions provided with dryer) Check local codes. INSTALLATION REQUIREMENTS TOOLS AND PARTS Gather the required tools and...
Installation Instructions
Page 4
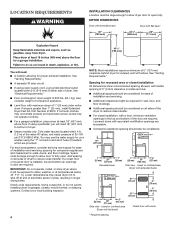
...louvered door is greater than 1" (25 mm), install Extended Dryer Feet Kit, Part Number 279810. If using a pedestal, you will need : ■■ A location allowing for ease of 1" (25 mm) under entire dryer. spacing for companion appliances and clearances for wall, door,... cord, a grounded electrical outlet located within 4 ft. (1.2 m) of the water fill valves, and water pressure of the dryer to reduce noise transfer. DRYER DIMENSIONS Dryer with extended back: Dryer with equivalent ventilitation openings are required. closet or confined area (Dryer with vents * Required...
...louvered door is greater than 1" (25 mm), install Extended Dryer Feet Kit, Part Number 279810. If using a pedestal, you will need : ■■ A location allowing for ease of 1" (25 mm) under entire dryer. spacing for companion appliances and clearances for wall, door,... cord, a grounded electrical outlet located within 4 ft. (1.2 m) of the water fill valves, and water pressure of the dryer to reduce noise transfer. DRYER DIMENSIONS Dryer with extended back: Dryer with equivalent ventilitation openings are required. closet or confined area (Dryer with vents * Required...
Installation Instructions
Page 5
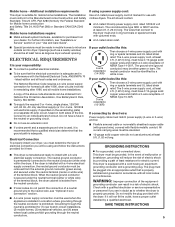
...through the neutral conductors. Connect to the Manufactured Home Construction and Safety Standard, Title 24 CFR, Part 3280 (formerly the Federal Standard for mobile home installations. If the dryer is properly grounded. The cord should contain: ■■ A UL listed 30-amp power...plug. WARNING: Improper connection of the above code standards can result in remodeling after 1996, dryer circuits involved in a risk of the terminal block. A copy of the equipment- ELECTRICAL REQUIREMENTS It is equipped with ring or spade terminals and UL listed strain relief. For ...
...through the neutral conductors. Connect to the Manufactured Home Construction and Safety Standard, Title 24 CFR, Part 3280 (formerly the Federal Standard for mobile home installations. If the dryer is properly grounded. The cord should contain: ■■ A UL listed 30-amp power...plug. WARNING: Improper connection of the above code standards can result in remodeling after 1996, dryer circuits involved in a risk of the terminal block. A copy of the equipment- ELECTRICAL REQUIREMENTS It is equipped with ring or spade terminals and UL listed strain relief. For ...

Installation Instructions
Page 13
... instructions. Alternate installations for mobile homes: Exhaust vent must be converted to a noncombustible portion of the dryer. Refer to cover unused exhaust holes): Part Number W10186596 - Elbow C. Rigid metal or flexible metal vent G. Moblie Home Exhaust installation A B A....Vent System Recommended exhaust installations Typical installations vent the dryer from the rear of mobile home and must contact your installation. Exhaust outlet Optional exhaust installations: A B A. Part Number 8212503 If you prefer, dryer may be securely fastened to exhaust through the ...
... instructions. Alternate installations for mobile homes: Exhaust vent must be converted to a noncombustible portion of the dryer. Refer to cover unused exhaust holes): Part Number W10186596 - Elbow C. Rigid metal or flexible metal vent G. Moblie Home Exhaust installation A B A....Vent System Recommended exhaust installations Typical installations vent the dryer from the rear of mobile home and must contact your installation. Exhaust outlet Optional exhaust installations: A B A. Part Number 8212503 If you prefer, dryer may be securely fastened to exhaust through the ...
Installation Instructions
Page 17
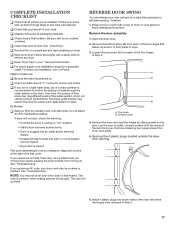
... steps to front panel of the door facing up. Do not select Air Only Temperature setting. NOTE: You may clog different parts of the two hinges that attach dryer door to see what was skipped. The odor will not start, check the following: • Controls are now installed. A...position. • Start button has been pushed firmly. • Dryer is plugged into an outlet and/or electrical supply. • Household fuse is intact and tight, or circuit breaker has not tripped. • Dryer door is closed. q Read "Dryer Use" in Step 4. 17 q For power supply cord installation...
... steps to front panel of the door facing up. Do not select Air Only Temperature setting. NOTE: You may clog different parts of the two hinges that attach dryer door to see what was skipped. The odor will not start, check the following: • Controls are now installed. A...position. • Start button has been pushed firmly. • Dryer is plugged into an outlet and/or electrical supply. • Household fuse is intact and tight, or circuit breaker has not tripped. • Dryer door is closed. q Read "Dryer Use" in Step 4. 17 q For power supply cord installation...


