Owners Manual
Page 4
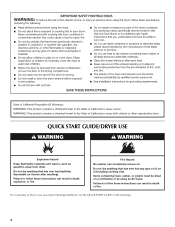
... WARNING WARNING Explosion Hazard Keep flammable materials and vapors, such as gasoline, away from dryer. Failure to follow these instructions can completely remove oil. Fire Hazard No washer can result in death or fire. Items containing foam, rubber, or plastic must be dried on it (...including cooking oils). Failure to use your dryer following installation, see the QUICK START GUIDE on it (even...
... WARNING WARNING Explosion Hazard Keep flammable materials and vapors, such as gasoline, away from dryer. Failure to follow these instructions can completely remove oil. Fire Hazard No washer can result in death or fire. Items containing foam, rubber, or plastic must be dried on it (...including cooking oils). Failure to use your dryer following installation, see the QUICK START GUIDE on it (even...
Installation Instructions
Page 3
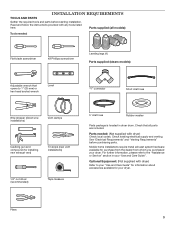
... (recommended) Tape measure 5' inlet hose Rubber washer Parts package is located in your dryer. Check existing electrical supply and venting. Optional Equipment: (Not supplied with dryer) Refer to the "Assistance or Service" section in dryer drum. INSTALLATION REQUIREMENTS TOOLS AND PARTS Gather the...for purchase from the dealer from whom you purchased your "Use and Care Guide". For further information, please refer to your dryer. Pliers 3 Parts needed : Flat-blade screwdriver #2 Phillips screwdriver Leveling legs (4) Parts supplied (steam models): Adjustable wrench ...
... (recommended) Tape measure 5' inlet hose Rubber washer Parts package is located in your dryer. Check existing electrical supply and venting. Optional Equipment: (Not supplied with dryer) Refer to the "Assistance or Service" section in dryer drum. INSTALLATION REQUIREMENTS TOOLS AND PARTS Gather the...for purchase from the dealer from whom you purchased your "Use and Care Guide". For further information, please refer to your dryer. Pliers 3 Parts needed : Flat-blade screwdriver #2 Phillips screwdriver Leveling legs (4) Parts supplied (steam models): Adjustable wrench ...
Installation Instructions
Page 4
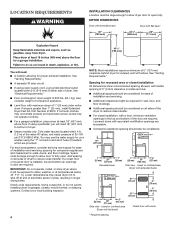
...: Do not operate, install, or store dryer where it will need : ■■ A location allowing for exhaust vent with equivalent ventilitation openings are provided. Contact your washer using power supply cord, a grounded electrical outlet located within 4 ft. (1.2 m) of... the water fill valves, and water pressure of the dryer to reduce noise transfer. ■■ For closet installation...
...: Do not operate, install, or store dryer where it will need : ■■ A location allowing for exhaust vent with equivalent ventilitation openings are provided. Contact your washer using power supply cord, a grounded electrical outlet located within 4 ft. (1.2 m) of... the water fill valves, and water pressure of the dryer to reduce noise transfer. ■■ For closet installation...

Installation Instructions
Page 14
... m) NOTE: Bottom exhaust installations have a 90° turn to the chart. The dryer must fit over the exhaust hood. Turn cold water off, remove and replace rubber washer Turn cold water faucet off and remove washer inlet hose. Install exhaust hood 12" min. (305 mm) 2. Use clamps to exhaust...old hoses. 1. Exhaust systems longer than those specified will: ■■ Shorten life of vent material and hood combinations acceptable to dryer location using the new inlet hoses. Run vent to use duct tape, screws, or other fastening devices that will help achieve best ...
... m) NOTE: Bottom exhaust installations have a 90° turn to the chart. The dryer must fit over the exhaust hood. Turn cold water off, remove and replace rubber washer Turn cold water faucet off and remove washer inlet hose. Install exhaust hood 12" min. (305 mm) 2. Use clamps to exhaust...old hoses. 1. Exhaust systems longer than those specified will: ■■ Shorten life of vent material and hood combinations acceptable to dryer location using the new inlet hoses. Run vent to use duct tape, screws, or other fastening devices that will help achieve best ...

Installation Instructions
Page 15
...to the "Y" connector. NOTE: Do not overtighten. Attach this end to cold water faucet. Attach washer cold inlet hose to other end of long hose to fill valve at bottom of dryer back panel. NOTE: Do not overtighten. Screw on coupling by hand until it is seated on... on connector. 3. Attach long hose to the cold water faucet, the short hose must be used. If "Y" connector cannot be attached directly to dryer fill valve and tighten coupling Fig. Tighten couplings Attach other side of the short hose. Then attach "Y" connector to the coupling can result. 4. ...
...to the "Y" connector. NOTE: Do not overtighten. Attach this end to cold water faucet. Attach washer cold inlet hose to other end of long hose to fill valve at bottom of dryer back panel. NOTE: Do not overtighten. Screw on coupling by hand until it is seated on... on connector. 3. Attach long hose to the cold water faucet, the short hose must be used. If "Y" connector cannot be attached directly to dryer fill valve and tighten coupling Fig. Tighten couplings Attach other side of the short hose. Then attach "Y" connector to the coupling can result. 4. ...


