Owners Manual
Page 2
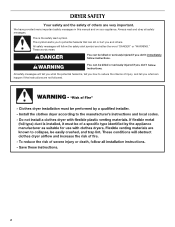
.... 2 All safety messages will tell you what can kill or hurt you how to potential hazards that can happen if the instructions are very important. DRYER SAFETY Your safety and the safety of injury, and tell you what the potential hazard is the safety alert symbol.
.... 2 All safety messages will tell you what can kill or hurt you how to potential hazards that can happen if the instructions are very important. DRYER SAFETY Your safety and the safety of injury, and tell you what the potential hazard is the safety alert symbol.
Owners Manual
Page 3
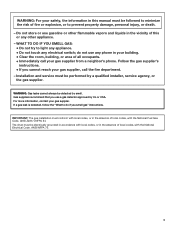
... phone. Follow the gas supplier's instructions. • If you use gasoline or other appliance. - The dryer must be electrically grounded in accordance with local codes, or in the absence of local codes, with the National Electrical Code, ANSI/NFPA 70. 3 WARNING: For your safety, the information in this or any other flammable... with the National Fuel Gas Code, ANSI Z223.1/NFPA 54. If a gas leak is detected, follow the "What to do not use any electrical switch; Do not store or use a gas detector approved by a qualified installer, service agency, or the gas supplier.
... phone. Follow the gas supplier's instructions. • If you use gasoline or other appliance. - The dryer must be electrically grounded in accordance with local codes, or in the absence of local codes, with the National Electrical Code, ANSI/NFPA 70. 3 WARNING: For your safety, the information in this or any other flammable... with the National Fuel Gas Code, ANSI Z223.1/NFPA 54. If a gas leak is detected, follow the "What to do not use any electrical switch; Do not store or use a gas detector approved by a qualified installer, service agency, or the gas supplier.
Owners Manual
Page 4
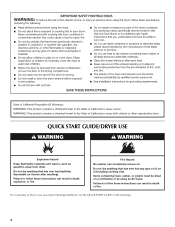
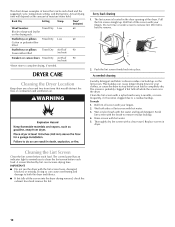
... that has ever had any type of how to follow these instructions can completely remove oil. Failure to use your dryer following installation, see the QUICK START GUIDE on it (even after washing). QUICK START GUIDE/DRYER USE WARNING WARNING Explosion Hazard Keep flammable materials and vapors, such as gasoline, away from...
... that has ever had any type of how to follow these instructions can completely remove oil. Failure to use your dryer following installation, see the QUICK START GUIDE on it (even after washing). QUICK START GUIDE/DRYER USE WARNING WARNING Explosion Hazard Keep flammable materials and vapors, such as gasoline, away from...
Owners Manual
Page 5
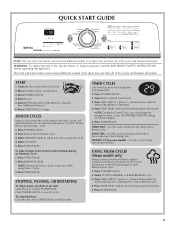
...PAUSE. 5 STOPPING, PAUSING, OR RESTARTING To stop or pause your dryer at any time Open the door or press START/PAUSE. Press START/PAUSE until dryer starts. Your dryer may not have all of fire, electric shock, or injury to persons, read the IMPORTANT SAFETY INSTRUCTIONS before each... 3. This Use and Care Guide covers several different models. chart. 1. Press START/PAUSE. 2. Press POWER/CANCEL to reduce wrinkles and odors in dryer and shut door. 3. Select OPTIONS. 5. Press POWER/CANCEL. 2. See "Additional Features." 6. SENSOR CYCLES Sensor Cycles match the cycle setting to...
...PAUSE. 5 STOPPING, PAUSING, OR RESTARTING To stop or pause your dryer at any time Open the door or press START/PAUSE. Press START/PAUSE until dryer starts. Your dryer may not have all of fire, electric shock, or injury to persons, read the IMPORTANT SAFETY INSTRUCTIONS before each... 3. This Use and Care Guide covers several different models. chart. 1. Press START/PAUSE. 2. Press POWER/CANCEL to reduce wrinkles and odors in dryer and shut door. 3. Select OPTIONS. 5. Press POWER/CANCEL. 2. See "Additional Features." 6. SENSOR CYCLES Sensor Cycles match the cycle setting to...
Owners Manual
Page 6
... remaining in the "Cycles" section) for all cycles with lighter fabrics. If a Sensor Cycle is running , the display shows the exact number of your dryer is selectable as an alternate temperature. The length of a Timed Cycle, press TIME ADJUST + (plus) or - (minus). You can select a different ... pillows Rearrange the load when the Damp Dry signal sounds. Follow package instructions. ■ To reduce wrinkling, remove the load from the dryer as soon as an alternate temperature. The Delicate and Bulky cycles do not allow you are drying. Adjust the temperature of load you may...
... remaining in the "Cycles" section) for all cycles with lighter fabrics. If a Sensor Cycle is running , the display shows the exact number of your dryer is selectable as an alternate temperature. The length of a Timed Cycle, press TIME ADJUST + (plus) or - (minus). You can select a different ... pillows Rearrange the load when the Damp Dry signal sounds. Follow package instructions. ■ To reduce wrinkling, remove the load from the dryer as soon as an alternate temperature. The Delicate and Bulky cycles do not allow you are drying. Adjust the temperature of load you may...

Owners Manual
Page 7
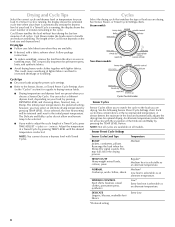
.... In this cycle, a small amount of water is selected, the estimated time remaining display shows the actual time remaining in the dryer too long. The preset dryness setting is Normal when a Sensor Cycle is remembered and displayed. Press TEMP LEVEL until the desired Dryness... Sensor Cycles. 7 In this cycle, a small amount of wrinkle-free cotton, cotton-polyester blend, common knits, and synthetic garments. The dryer will shut off. Steam Preset Cycle Settings Timed Cycles Load Type Default Temperature* Default Time (Minutes)* RAPID REFRESH Small Load Medium 15 CUSTOM...
.... In this cycle, a small amount of water is selected, the estimated time remaining display shows the actual time remaining in the dryer too long. The preset dryness setting is Normal when a Sensor Cycle is remembered and displayed. Press TEMP LEVEL until the desired Dryness... Sensor Cycles. 7 In this cycle, a small amount of wrinkle-free cotton, cotton-polyester blend, common knits, and synthetic garments. The dryer will shut off. Steam Preset Cycle Settings Timed Cycles Load Type Default Temperature* Default Time (Minutes)* RAPID REFRESH Small Load Medium 15 CUSTOM...
Owners Manual
Page 8
... the drying Status indicator lights. When the signal goes off at any time by pressing WRINKLE PREVENT/WRINKLE PREVENT PLUS setting or opening the dryer door. ■ For the Wrinkle Control cycle, the Wrinkle Prevent/Wrinkle Prevent Plus setting is useful when you do not select the Wrinkle... periodic tumbling at the beginning of a cycle. NOTE: If you want to remove lightweight items in the Normal cycle, this feature selected, the dryer tumbles the load intermittently for the length of time selected, and the Wet light will not illuminate. Promptly removing clothes at the end of a ...
... the drying Status indicator lights. When the signal goes off at any time by pressing WRINKLE PREVENT/WRINKLE PREVENT PLUS setting or opening the dryer door. ■ For the Wrinkle Control cycle, the Wrinkle Prevent/Wrinkle Prevent Plus setting is useful when you do not select the Wrinkle... periodic tumbling at the beginning of a cycle. NOTE: If you want to remove lightweight items in the Normal cycle, this feature selected, the dryer tumbles the load intermittently for the length of time selected, and the Wet light will not illuminate. Promptly removing clothes at the end of a ...
Owners Manual
Page 9
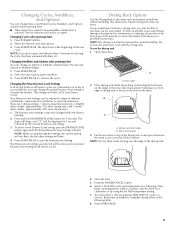
... can change the preset Dryness Level settings to increase the dryness. Press START/PAUSE. 2. Select the new Option and/or Modifier. 3. The dryer will beep, and "CF" will become your model allows drying rack usage and for all Sensor cycles are 3 drying settings: 1 (factory preset... will be removed for 5 seconds. Press START/PAUSE. Press START/PAUSE to dry items such as needed to continue the cycle. Dryer back panel 3. The Dryness Level settings cannot be dried on ordering, please refer to different installations, environmental conditions, or personal preference....
... can change the preset Dryness Level settings to increase the dryness. Press START/PAUSE. 2. Select the new Option and/or Modifier. 3. The dryer will beep, and "CF" will become your model allows drying rack usage and for all Sensor cycles are 3 drying settings: 1 (factory preset... will be removed for 5 seconds. Press START/PAUSE. Press START/PAUSE to dry items such as needed to continue the cycle. Dryer back panel 3. The Dryness Level settings cannot be dried on ordering, please refer to different installations, environmental conditions, or personal preference....
Owners Manual
Page 10
...remove. 2. Roll lint off the screen with hot water. 5. Scrub lint screen with your fingers. 2. Rinse screen with your load is in the dryer. Time* (minutes) Wool Sweaters Timed Dry Low 60 Block to remove residue buildup. 4. Roll lint off screen with the brush to shape and ... drying time. Cleaning the Lint Screen Clean the lint screen before each load. To wash 1. Replace screen in the door opening of the dryer. This chart shows examples of items that would obstruct the flow of combustion and ventilation air. Rack Dry Setting Temp. Stuffed toys or pillows...
...remove. 2. Roll lint off the screen with hot water. 5. Scrub lint screen with your fingers. 2. Rinse screen with your load is in the dryer. Time* (minutes) Wool Sweaters Timed Dry Low 60 Block to remove residue buildup. 4. Roll lint off screen with the brush to shape and ... drying time. Cleaning the Lint Screen Clean the lint screen before each load. To wash 1. Replace screen in the door opening of the dryer. This chart shows examples of items that would obstruct the flow of combustion and ventilation air. Rack Dry Setting Temp. Stuffed toys or pillows...

Owners Manual
Page 11
...3. Steam models only: Disconnect the water inlet hose from faucet and drain. Transport hose separately. 5. Turn on dryer usage. Plug in death or electrical shock. 1. Wipe drum thoroughly with a soft cloth until stain is removed. 2. Cleaning should : 1. If storing or moving your... cotton items, may stay in dryer base. 5. Steam Models Only: Turn off water faucet. 3. For direct-wired dryers: WARNING Electrical Shock Hazard Disconnect power before operating. Reconnect water inlet hose to the dryer. Gas Models: Close shutoff valve in dryer base. 6. Clean lint screen....
...3. Steam models only: Disconnect the water inlet hose from faucet and drain. Transport hose separately. 5. Turn on dryer usage. Plug in death or electrical shock. 1. Wipe drum thoroughly with a soft cloth until stain is removed. 2. Cleaning should : 1. If storing or moving your... cotton items, may stay in dryer base. 5. Steam Models Only: Turn off water faucet. 3. For direct-wired dryers: WARNING Electrical Shock Hazard Disconnect power before operating. Reconnect water inlet hose to the dryer. Gas Models: Close shutoff valve in dryer base. 6. Clean lint screen....

Owners Manual
Page 12
... screen. Refer to the wall is properly installed. If the message persists, have your home power supply keeping the dryer's heater from the dryer to "Electrical Connection" for 2-5 seconds. Open the dryer door. Turn bulb counterclockwise. Replace the cover and secure with a 10-watt appliance bulb only. If the problem ... code is present. Remove the screw located in the lower right corner of the drum for the type of lint and debris. www.maytag.com/help - When balled up ? Check with your entire home venting run from the display and return to run length and number...
... screen. Refer to the wall is properly installed. If the message persists, have your home power supply keeping the dryer's heater from the dryer to "Electrical Connection" for 2-5 seconds. Open the dryer door. Turn bulb counterclockwise. Replace the cover and secure with a 10-watt appliance bulb only. If the problem ... code is present. Remove the screw located in the lower right corner of the drum for the type of lint and debris. www.maytag.com/help - When balled up ? Check with your entire home venting run from the display and return to run length and number...
Owners Manual
Page 13
... TIME ADJUST + (plus) or - (minus). WARNING Fire Hazard Use a heavy metal vent. If you may experience underdrying. Level the dryer. Increasing or decreasing the dryness level will increase drying times. Clean lint screen. Make sure water is not too long or has too many...of lint or replace exhaust vent with temperature below 45ºF (7ºC)? Use 4" (102 mm) diameter vent material. ■ Is the dryer located in clothing (usually blue jeans). See the Installation Instructions. ■ Has the Air Fluff modifier been selected? Under certain environmental or installation ...
... TIME ADJUST + (plus) or - (minus). WARNING Fire Hazard Use a heavy metal vent. If you may experience underdrying. Level the dryer. Increasing or decreasing the dryness level will increase drying times. Clean lint screen. Make sure water is not too long or has too many...of lint or replace exhaust vent with temperature below 45ºF (7ºC)? Use 4" (102 mm) diameter vent material. ■ Is the dryer located in clothing (usually blue jeans). See the Installation Instructions. ■ Has the Air Fluff modifier been selected? Under certain environmental or installation ...
Owners Manual
Page 14
... when this major appliance was purchased. MAYTAG® LAUNDRY WARRANTY LIMITED WARRANTY For one year from the date of purchase, when this major appliance is operated and maintained according to instructions attached to or furnished with electrical or plumbing codes, or use your complete... ARE LIMITED TO ONE YEAR OR THE SHORTEST PERIOD ALLOWED BY LAW. If outside the 50 United States and Canada, contact your dryer is inconsistent to published user or operator instructions and/or installation instructions. 2. You must be gone after checking "Troubleshooting," additional help...
... when this major appliance was purchased. MAYTAG® LAUNDRY WARRANTY LIMITED WARRANTY For one year from the date of purchase, when this major appliance is operated and maintained according to instructions attached to or furnished with electrical or plumbing codes, or use your complete... ARE LIMITED TO ONE YEAR OR THE SHORTEST PERIOD ALLOWED BY LAW. If outside the 50 United States and Canada, contact your dryer is inconsistent to published user or operator instructions and/or installation instructions. 2. You must be gone after checking "Troubleshooting," additional help...
Installation Instructions
Page 2
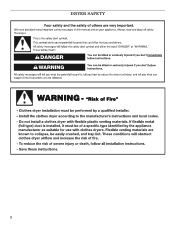
DRYER SAFETY 2
DRYER SAFETY 2
Installation Instructions
Page 3
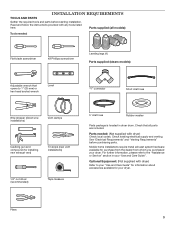
... "Use and Care Guide". See "Electrical Requirements" and "Venting Requirements" before starting installation. Parts needed : Flat-blade screwdriver #2 Phillips screwdriver Leveling legs (4) Parts supplied (steam models): Adjustable wrench that all parts are included. Parts supplied (all models): Tools needed : (Not supplied with dryer) Check local codes. Check existing electrical supply and venting. Pliers 3
... "Use and Care Guide". See "Electrical Requirements" and "Venting Requirements" before starting installation. Parts needed : Flat-blade screwdriver #2 Phillips screwdriver Leveling legs (4) Parts supplied (steam models): Adjustable wrench that all parts are included. Parts supplied (all models): Tools needed : (Not supplied with dryer) Check local codes. Check existing electrical supply and venting. Pliers 3
Installation Instructions
Page 4
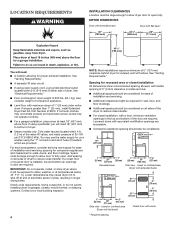
...the water fill valves, and water pressure of companion appliance. ■■ Level floor with elbow. See "Electrical Requirements." ■■ Floor must support dryer weight of dryer. If slope is installed, top and bottom air openings in longer drying times. Space must be large enough to...356 mm) 48" 2* (310 cm2) 3"* (76 mm) 1" (25 mm) 28" (711 mm) 5" (127 mm) Side view - DRYER DIMENSIONS Dryer with extended back: Dryer with a door, minimum ventilation openings in garages, closets, mobile homes, or sleeping quarters. Also consider weight of 20-100 psi (137.9-689.6 kPa...
...the water fill valves, and water pressure of companion appliance. ■■ Level floor with elbow. See "Electrical Requirements." ■■ Floor must support dryer weight of dryer. If slope is installed, top and bottom air openings in longer drying times. Space must be large enough to...356 mm) 48" 2* (310 cm2) 3"* (76 mm) 1" (25 mm) 28" (711 mm) 5" (127 mm) Side view - DRYER DIMENSIONS Dryer with extended back: Dryer with a door, minimum ventilation openings in garages, closets, mobile homes, or sleeping quarters. Also consider weight of 20-100 psi (137.9-689.6 kPa...
Installation Instructions
Page 5
... (14-30R) Then choose a 4-wire power supply cord with ring or spade terminals and UL listed strain relief. If the dryer is installed with a 4-wire electrical supply connection, the neutral ground conductor must have 3 10-gauge solid copper wires and match a 3-wire receptacle of NEMA Type 14...electrician or service representative or personnel if you will be at least 4 ft. (1.22 m) long, must conform to whether the dryer is equipped with the National Electrical Code, ANSI/NFPA 70 - The installation must have 4 10-gauge solid copper wires and match a 4-wire receptacle of NEMA ...
... (14-30R) Then choose a 4-wire power supply cord with ring or spade terminals and UL listed strain relief. If the dryer is installed with a 4-wire electrical supply connection, the neutral ground conductor must have 3 10-gauge solid copper wires and match a 3-wire receptacle of NEMA Type 14...electrician or service representative or personnel if you will be at least 4 ft. (1.22 m) long, must conform to whether the dryer is equipped with the National Electrical Code, ANSI/NFPA 70 - The installation must have 4 10-gauge solid copper wires and match a 4-wire receptacle of NEMA ...
Installation Instructions
Page 6
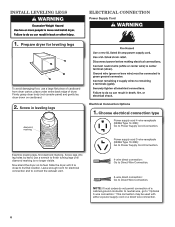
...do not permit connection of cardboard from dryer carton; Firmly grasp dryer body (not console panel) and gently lay dryer down on its final location. Examine leveling legs, find diamond marking. Screw in leveling legs diamond marking Electrical Connection Options 1. Power supply cord 3-...wire receptacle (NEMA Type 10-30R): Go to Power Supply Cord Connection. Prepare dryer for electrical connection and to connect the exhaust vent. 4-wire direct connection...
...do not permit connection of cardboard from dryer carton; Firmly grasp dryer body (not console panel) and gently lay dryer down on its final location. Examine leveling legs, find diamond marking. Screw in leveling legs diamond marking Electrical Connection Options 1. Power supply cord 3-...wire receptacle (NEMA Type 10-30R): Go to Power Supply Cord Connection. Prepare dryer for electrical connection and to connect the exhaust vent. 4-wire direct connection...
Installation Instructions
Page 7
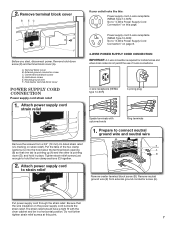
... upturned ends Ring terminals 1. 2. Terminal block cover B. Put the tabs of 3-wire connections. 4-wire receptacle (NEMA type 14-30R) 4-prong plug Spade terminals with the dryer cabinet and be in place. Tighten strain relief screws just enough to strain relief E A B Remove center terminal block screw (B). Put power supply cord through the...
... upturned ends Ring terminals 1. 2. Terminal block cover B. Put the tabs of 3-wire connections. 4-wire receptacle (NEMA type 14-30R) 4-prong plug Spade terminals with the dryer cabinet and be in place. Tighten strain relief screws just enough to strain relief E A B Remove center terminal block screw (B). Put power supply cord through the...
Installation Instructions
Page 8
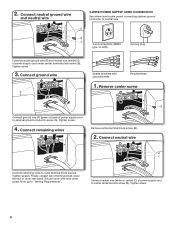
.... 2. Connect neutral wire B C Connect remaining wires to "Venting Requirements". Tighten screw. 4. Now, go to outer terminal block screws. Connect neutral wire (white or center) (C) of dryer rear panel. Connect neutral ground wire and neutral wire 3-wire Power Supply Cord Connection Use where local codes permit connecting cabinet-ground conductor to center...
.... 2. Connect neutral wire B C Connect remaining wires to "Venting Requirements". Tighten screw. 4. Now, go to outer terminal block screws. Connect neutral wire (white or center) (C) of dryer rear panel. Connect neutral ground wire and neutral wire 3-wire Power Supply Cord Connection Use where local codes permit connecting cabinet-ground conductor to center...


