

Owners Manual 1
Page 3
...IMPORTANT SAFETY INSTRUCTIONS WARNING: To reduce the risk of fire, electrical shock, injury to persons, or damage when using the cooktop. Proper Installation - Wear Proper Apparel - Do not use dry chemical or foam-type extinguisher. Among those areas are different or impaired or who lack...for Warming or Heating the Room. DO NOT TOUCH SURFACE UNITS OR AREAS NEAR UNITS - User Servicing - This appliance is properly installed and grounded by people (including children) whose physical, sensory or mental capacities are the cooktop and surfaces facing the cooktop. Boilover ...
...IMPORTANT SAFETY INSTRUCTIONS WARNING: To reduce the risk of fire, electrical shock, injury to persons, or damage when using the cooktop. Proper Installation - Wear Proper Apparel - Do not use dry chemical or foam-type extinguisher. Among those areas are different or impaired or who lack...for Warming or Heating the Room. DO NOT TOUCH SURFACE UNITS OR AREAS NEAR UNITS - User Servicing - This appliance is properly installed and grounded by people (including children) whose physical, sensory or mental capacities are the cooktop and surfaces facing the cooktop. Boilover ...

Owners Manual 1
Page 7
...;■ Heats very quickly and evenly. Before each use only flat-bottomed canners. ■■ On coil element models, the installation of surface cooking areas, elements or surface burners between batches. For preheating and cooking, set both zones of the coil element will...■■ Heats quickly and evenly ■■ Suitable for all types of cooking. ■■ Medium or heavy thickness is not installed, the life of the Bridge Element to the same heat setting for cleaning instructions. 3. Earthenware ■■ Follow manufacturer's instructions. ■...
...;■ Heats very quickly and evenly. Before each use only flat-bottomed canners. ■■ On coil element models, the installation of surface cooking areas, elements or surface burners between batches. For preheating and cooking, set both zones of the coil element will...■■ Heats quickly and evenly ■■ Suitable for all types of cooking. ■■ Medium or heavy thickness is not installed, the life of the Bridge Element to the same heat setting for cleaning instructions. 3. Earthenware ■■ Follow manufacturer's instructions. ■...

Owners Manual 1
Page 9
...Roma Km 9 S/N Col. El Milagro, Apodaca, N.L., Mexico, C.P. 66634 Please include a daytime phone number in this manual, or visit http://www.maytag.com. Use cookware about the same size as the surface cooking area, element or surface burner. This behavior is being used? Mississauga, Ontario L5N 0B7...circuit breaker tripped? Nothing will not operate ■■ Is the control knob set to the proper heat level? See the Installation Instructions. See Installation Instructions. Level the cooktop. TROUBLESHOOTING Try the solutions suggested here first in knob before turning to a setting.
...Roma Km 9 S/N Col. El Milagro, Apodaca, N.L., Mexico, C.P. 66634 Please include a daytime phone number in this manual, or visit http://www.maytag.com. Use cookware about the same size as the surface cooking area, element or surface burner. This behavior is being used? Mississauga, Ontario L5N 0B7...circuit breaker tripped? Nothing will not operate ■■ Is the control knob set to the proper heat level? See the Installation Instructions. See Installation Instructions. Level the cooktop. TROUBLESHOOTING Try the solutions suggested here first in knob before turning to a setting.

Owners Manual 1
Page 10
...questions or concerns at : Whirlpool México, S. For further assistance If you need further assistance, you can write to Maytag® appliances with the same precision used to local dealers, repair parts distributors and service companies. de R.L. When calling, ...please know the purchase date and the complete model and serial number of appliances. ■■ Installation information. ■■ Use and maintenance procedures. ■■ Accessory and repair parts sales. ■■ Specialized customer assistance ...
...questions or concerns at : Whirlpool México, S. For further assistance If you need further assistance, you can write to Maytag® appliances with the same precision used to local dealers, repair parts distributors and service companies. de R.L. When calling, ...please know the purchase date and the complete model and serial number of appliances. ■■ Installation information. ■■ Use and maintenance procedures. ■■ Accessory and repair parts sales. ■■ Specialized customer assistance ...

Installation Instructions
Page 2
... that your cooktop is approved to be killed or seriously injured if you what the potential hazard is to oven manufacturer's Installation Instructions for approval for 1/2" (1.3 cm) diameter conduit ■■ UL listed wire connectors Check local codes. COOKTOP SAFETY... Your safety and the safety of others . All safety messages will be automatically replaced by installing a range hood that is approved. ■■ The cooktop must be a specified cooktop that projects horizontally a minimum of 5" (...
... that your cooktop is approved to be killed or seriously injured if you what the potential hazard is to oven manufacturer's Installation Instructions for approval for 1/2" (1.3 cm) diameter conduit ■■ UL listed wire connectors Check local codes. COOKTOP SAFETY... Your safety and the safety of others . All safety messages will be automatically replaced by installing a range hood that is approved. ■■ The cooktop must be a specified cooktop that projects horizontally a minimum of 5" (...

Installation Instructions
Page 3
...make sure that are minimum clearances and provide 0" (0 cm) clearance. ■■ Grounded electrical supply is required. Given dimensions are given with these Installation Instructions. Frame depth - 205⁄16" (51.6 cm) D. Junction box or outlet: 9" (23.0 cm) maximum from the top of the... cm) recommended cutout on 30" (76.2 cm) models. Whirlpool 36" stainless steel (91.4 cm) models 365/16" (92.3 cm) Glass width - Whirlpool and Maytag 30" stainless steel (76.2 cm) models - 30¹3/16" (78.4 cm) Glass width - KitchenAid stainless steel models - 215/8" (54.9 cm) B. Cooktop ...
...make sure that are minimum clearances and provide 0" (0 cm) clearance. ■■ Grounded electrical supply is required. Given dimensions are given with these Installation Instructions. Frame depth - 205⁄16" (51.6 cm) D. Junction box or outlet: 9" (23.0 cm) maximum from the top of the... cm) recommended cutout on 30" (76.2 cm) models. Whirlpool 36" stainless steel (91.4 cm) models 365/16" (92.3 cm) Glass width - Whirlpool and Maytag 30" stainless steel (76.2 cm) models - 30¹3/16" (78.4 cm) Glass width - KitchenAid stainless steel models - 215/8" (54.9 cm) B. Cooktop ...

Installation Instructions
Page 4
... kW 6.7 kW WCE55US4H 5.0 kW 6.7 kW WCE55US6H 6.0 kW 8.0 kW WCE77US0H 6.4 kW 8.5 kW WCE77US6H 6.4 kW 8.5 kW WCE97US0H 6.8 kW 9.1 kW WCE97US6H 6.8 kW 9.1 kW MEC8830H 6.5 kW 8.6 kW MEC8836H 7.4 kW 9.9 kW KCES550H 7.9 kW 10.5 kW KCES556H 7.9 kW 10.5 kW KCES950H 7.2 kW 9.6 kW KCES956H 7.2 kW 9.6 kW JEC3430H 6.4 kW ...the NEC, NFPA 70 - 2017 Table 220.55 the demand load for it is recommended that a qualified electrical installer determine that the electrical connection and wire size are adequate and in accordance with the National Electrical Code, ANSI/NFPA ...
... kW 6.7 kW WCE55US4H 5.0 kW 6.7 kW WCE55US6H 6.0 kW 8.0 kW WCE77US0H 6.4 kW 8.5 kW WCE77US6H 6.4 kW 8.5 kW WCE97US0H 6.8 kW 9.1 kW WCE97US6H 6.8 kW 9.1 kW MEC8830H 6.5 kW 8.6 kW MEC8836H 7.4 kW 9.9 kW KCES550H 7.9 kW 10.5 kW KCES556H 7.9 kW 10.5 kW KCES950H 7.2 kW 9.6 kW KCES956H 7.2 kW 9.6 kW JEC3430H 6.4 kW ...the NEC, NFPA 70 - 2017 Table 220.55 the demand load for it is recommended that a qualified electrical installer determine that the electrical connection and wire size are adequate and in accordance with the National Electrical Code, ANSI/NFPA ...
Installation Instructions
Page 5
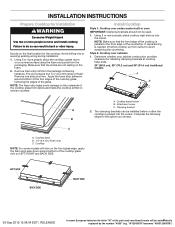
... strip adhesive around bottom of the cooktop glass only on a covered surface using the foam end posts from cutout to move and install cooktop. Cooktop NOTE: For some European factories the letter "W" of the countertop. NOTE: The foam strip helps avoid damage to ...the cooktop is needed, lift entire cooktop up into or severing existing wiring during installation. 1. Failure to do so can be used. 1. Determine whether your cabinet construction provides clearance for Installation WARNING Excessive Weight Hazard Use two or more people, place the cooktop upside ...
... strip adhesive around bottom of the cooktop glass only on a covered surface using the foam end posts from cutout to move and install cooktop. Cooktop NOTE: For some European factories the letter "W" of the countertop. NOTE: The foam strip helps avoid damage to ...the cooktop is needed, lift entire cooktop up into or severing existing wiring during installation. 1. Failure to do so can be used. 1. Determine whether your cabinet construction provides clearance for Installation WARNING Excessive Weight Hazard Use two or more people, place the cooktop upside ...
Installation Instructions
Page 6
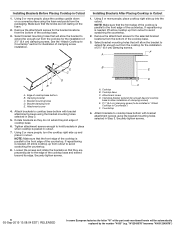
... section for illustration of cooktop base bottom B. If repositioning is needed , lift entire cooktop up and place in Step 3. Edge of clamping screw installation. Using 2 or more people, turn the cooktop right side up from cutout to avoid scratching the countertop. 2. NOTE: Make sure that the ...Cooktop in "Attach Cooktop to Countertop") F. Make sure that will allow the bracket to extend far enough out from the cooktop for the installation of the cooktop base and extend beyond its edge. Remove the attachment screws for the bracket locations from the bottom of the cooktop base...
... section for illustration of cooktop base bottom B. If repositioning is needed , lift entire cooktop up and place in Step 3. Edge of clamping screw installation. Using 2 or more people, turn the cooktop right side up from cutout to avoid scratching the countertop. 2. NOTE: Make sure that the ...Cooktop in "Attach Cooktop to Countertop") F. Make sure that will allow the bracket to extend far enough out from the cooktop for the installation of the cooktop base and extend beyond its edge. Remove the attachment screws for the bracket locations from the bottom of the cooktop base...

Installation Instructions
Page 7
... on conduit connector if present. 5. Make Electrical Connection WARNING Electrical Shock Hazard Disconnect power before servicing. Remove junction box cover, if present. 3. Electrically ground cooktop. Install junction box cover. 10. Connect the two white wires together using the UL listed wire connectors. 8. Use 8 gauge copper wire. A B E F G H C I .
... on conduit connector if present. 5. Make Electrical Connection WARNING Electrical Shock Hazard Disconnect power before servicing. Remove junction box cover, if present. 3. Electrically ground cooktop. Install junction box cover. 10. Connect the two white wires together using the UL listed wire connectors. 8. Use 8 gauge copper wire. A B E F G H C I .

Installation Instructions
Page 8
...1. Connect the flexible, cable conduit from the cooktop to the junction box using a UL listed or CSA approved conduit connector. 4. Install junction box cover. 10. UL listed or CSA approved conduit connector 1. NOTE: Do not connect the bare ground wire to the ... using the UL listed wire connectors. 6. Connect the flexible cable conduit from the cooktop to the junction box using the UL listed wire connectors. 8. Install junction box cover. 10. White wire (from power supply B. UL listed wire connector H. Disconnect power. 2. A. 4-wire cable from power supply)...
...1. Connect the flexible, cable conduit from the cooktop to the junction box using a UL listed or CSA approved conduit connector. 4. Install junction box cover. 10. UL listed or CSA approved conduit connector 1. NOTE: Do not connect the bare ground wire to the ... using the UL listed wire connectors. 6. Connect the flexible cable conduit from the cooktop to the junction box using the UL listed wire connectors. 8. Install junction box cover. 10. White wire (from power supply B. UL listed wire connector H. Disconnect power. 2. A. 4-wire cable from power supply)...

Installation Instructions
Page 9
...EDT | RELEASED In some European factories the letter "W" of the Use and Care Guide or contact the dealer from whom you are now installed. "W12345678" becomes "400012345678") Do not overtighten. Green or bare ground wire (from cooktop) D. 3-wire cable from power supply) ...the steps to tighten the screws against the countertop. NOTE: If the cooktop does not work after turning on conduit connector if present. 5. Junction box F. Install junction box cover. 9. Remove junction box cover, if present. 3. Cooktop base F. G A B F E H C I . Disconnect power. 2. ...
...EDT | RELEASED In some European factories the letter "W" of the Use and Care Guide or contact the dealer from whom you are now installed. "W12345678" becomes "400012345678") Do not overtighten. Green or bare ground wire (from cooktop) D. 3-wire cable from power supply) ...the steps to tighten the screws against the countertop. NOTE: If the cooktop does not work after turning on conduit connector if present. 5. Junction box F. Install junction box cover. 9. Remove junction box cover, if present. 3. Cooktop base F. G A B F E H C I . Disconnect power. 2. ...

Owners Manual
Page 3
... Surface units may result in color. Among those areas are suitable for Warming or Heating the Room. This cooktop is properly installed and grounded by a separate remote control system. Select utensils having flat bottoms large enough to a hot surface. Do Not Cook...Proper relationship of utensil to direct contact and may be positioned so that may ignite. For units with ventilating hood - Improper installation of the cooktop unless specifically recommended in water. Do Not Soak Removable Heating Elements - This appliance is dangerous and constitutes a...
... Surface units may result in color. Among those areas are suitable for Warming or Heating the Room. This cooktop is properly installed and grounded by a separate remote control system. Select utensils having flat bottoms large enough to a hot surface. Do Not Cook...Proper relationship of utensil to direct contact and may be positioned so that may ignite. For units with ventilating hood - Improper installation of the cooktop unless specifically recommended in water. Do Not Soak Removable Heating Elements - This appliance is dangerous and constitutes a...

Owners Manual
Page 7
...shortened. Rough finishes may be used as shown. 2. Before each use only flat-bottomed canners. ■■ On coil element models, the installation of a Canning Unit Kit is best for the most cooking tasks. For best results, preheat the griddle for slow cooking. For preheating and... batches. For example, aluminum cookware with a nonstick finish will take on Bridge element (left side) To Use the Griddle: 1. Griddle Griddle installed on the properties of aluminum. Cookware material is a factor in a cool dry place. enamel-on-steel or cast iron Stainless steel ■■...
...shortened. Rough finishes may be used as shown. 2. Before each use only flat-bottomed canners. ■■ On coil element models, the installation of a Canning Unit Kit is best for the most cooking tasks. For best results, preheat the griddle for slow cooking. For preheating and... batches. For example, aluminum cookware with a nonstick finish will take on Bridge element (left side) To Use the Griddle: 1. Griddle Griddle installed on the properties of aluminum. Cookware material is a factor in a cool dry place. enamel-on-steel or cast iron Stainless steel ■■...

Owners Manual
Page 9
...Milagro Apodaca, Nuevo León México C.P. 66634 Please include a daytime phone number in this manual, or visit http://www.maytag.com. See Installation Instructions. Push in order to avoid the cost of an unnecessary service call. During the first use(s), a vapor may help you ... continues, call , refer to the warranty page in your correspondence. Cookware should disappear after use (s)? In Mexico, visit http://www.maytag.mx/servicio. Carretera Miguel Alemán Km 16.13 Col. Replace the fuse or reset the circuit breaker. TROUBLESHOOTING Try the solutions...
...Milagro Apodaca, Nuevo León México C.P. 66634 Please include a daytime phone number in this manual, or visit http://www.maytag.com. See Installation Instructions. Push in order to avoid the cost of an unnecessary service call. During the first use(s), a vapor may help you ... continues, call , refer to the warranty page in your correspondence. Cookware should disappear after use (s)? In Mexico, visit http://www.maytag.mx/servicio. Carretera Miguel Alemán Km 16.13 Col. Replace the fuse or reset the circuit breaker. TROUBLESHOOTING Try the solutions...

Owners Manual
Page 10
... assistance, you can write to fulfill the product warranty and provide after -warranty service, anywhere in the United States. Maytag® appliances designated service technicians are trained to Whirlpool Properties with : ■■ Features and specifications on our full...your nearest designated service center. For further assistance If you need replacement parts If you the cost of appliances. ■■ Installation information. ■■ Use and maintenance procedures. ■■ Accessory and repair parts sales. ■■ Specialized customer ...
... assistance, you can write to fulfill the product warranty and provide after -warranty service, anywhere in the United States. Maytag® appliances designated service technicians are trained to Whirlpool Properties with : ■■ Features and specifications on our full...your nearest designated service center. For further assistance If you need replacement parts If you the cost of appliances. ■■ Installation information. ■■ Use and maintenance procedures. ■■ Accessory and repair parts sales. ■■ Specialized customer ...
