

Use and Care Guide
Page 4
... efficiency. Absence of glass, glass/ceramic, ceramic, earthenware, or other servicing should not be referred to persons, or damage when using the cooktop. [] User Servicing - Children climbing on any part of electric shock. Only certain types of these liners may result in ignition of a utensil should be positioned so that may penetrate the...
... efficiency. Absence of glass, glass/ceramic, ceramic, earthenware, or other servicing should not be referred to persons, or damage when using the cooktop. [] User Servicing - Children climbing on any part of electric shock. Only certain types of these liners may result in ignition of a utensil should be positioned so that may penetrate the...

Use and Care Guide
Page 5
...) C. Left front control knob E. COOKTOP USE This manual covers different models. Left front control knob E. low high 0 low high o oo mo E high O cooktop on indicator light Cooktop on indicator light high 0 low O F MAYrAG A. The cooktop you have some or all of your model. 30" (76.2 cm) Cooktop 30" (76.2 cm) Dual/Triple Element Cooktop A high high hot surface 0 high...
...) C. Left front control knob E. COOKTOP USE This manual covers different models. Left front control knob E. low high 0 low high o oo mo E high O cooktop on indicator light Cooktop on indicator light high 0 low O F MAYrAG A. The cooktop you have some or all of your model. 30" (76.2 cm) Cooktop 30" (76.2 cm) Dual/Triple Element Cooktop A high high hot surface 0 high...

Use and Care Guide
Page 6
...Right rear control knob D. Medium Maintain a slow boil. The control knobs can result in and turn to a boil. SETTING RECOMMENDED USE HIGH Start food cooking. low oo =Oo high iow hotsour.fa.c.e........E G £ooktop o .on indicator light G. High simmer or...without lids. Right rear control knob D. Left front control knob (with speed heat) B. 36" (91.4 cm) Cooktop A B I oo high high omo o.oOo C oo•oo 36" (91.4 cm) Dual/Triple Element Cooktop A B C high =o o°o a°a=° ' high a._ high _ow oo m°o _ow h,g_ ...
...Right rear control knob D. Medium Maintain a slow boil. The control knobs can result in and turn to a boil. SETTING RECOMMENDED USE HIGH Start food cooking. low oo =Oo high iow hotsour.fa.c.e........E G £ooktop o .on indicator light G. High simmer or...without lids. Right rear control knob D. Left front control knob (with speed heat) B. 36" (91.4 cm) Cooktop A B I oo high high omo o.oOo C oo•oo 36" (91.4 cm) Dual/Triple Element Cooktop A B C high =o o°o a°a=° ' high a._ high _ow oo m°o _ow h,g_ ...
Use and Care Guide
Page 7
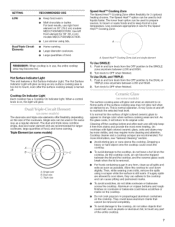
....4 cm) models MECC7536/MECC7636. • Lowsimmer using a scraper while the surface is on 30" (76.2 cm) models MECC7430/MECC7630. Speed Heat TM Cooking Zone dual and single element I Hot Surface Indicator Light This unit features a Hot Surface Indicator Light. Triple Element (on and off . Cooktop cleaner and a cooktop scraper are allowed to cool down...
....4 cm) models MECC7536/MECC7636. • Lowsimmer using a scraper while the surface is on 30" (76.2 cm) models MECC7430/MECC7630. Speed Heat TM Cooking Zone dual and single element I Hot Surface Indicator Light This unit features a Hot Surface Indicator Light. Triple Element (on and off . Cooktop cleaner and a cooktop scraper are allowed to cool down...

Use and Care Guide
Page 8
... ruler, no space or light should be of aluminum. This allows time for most recently used as a guide for best heat conduction and energy efficiency. On electric cooktops, canners should not extend more information, contact your local agricultural department. Companies that manufacture home... or Service" for slow cooking. Rough finishes may be used as its base material. A nonstick finish has the same characteristics as a base they can be used areas to the cooktop, do not cook foods directly on the cooktop or grates. Ceramic or Ceramic glass • Follow manufacturer...
... ruler, no space or light should be of aluminum. This allows time for most recently used as a guide for best heat conduction and energy efficiency. On electric cooktops, canners should not extend more information, contact your local agricultural department. Companies that manufacture home... or Service" for slow cooking. Rough finishes may be used as its base material. A nonstick finish has the same characteristics as a base they can be used areas to the cooktop, do not cook foods directly on the cooktop or grates. Ceramic or Ceramic glass • Follow manufacturer...

Use and Care Guide
Page 9
... soil with a damp paper towel or soft cloth. Cleaning Method: Always wipe with soft, lint-free cloth. Cooktop Cleaner Part Number 31464 is recommended for regular use steel wool, abrasive cleansers or oven cleaner. See "Assistance or Service" section to moderate soil • Paper ...Repeat for stubborn soils, and can be ordered as an accessory. Soap, water and a soft cloth or sponge are cool. The Cooktop Scraper uses razor blades. COOKTOP CARE IMPORTANT: Before cleaning, make sure knobs are in direction of children. See "Assistance or Service" section to order. •...
... soil with a damp paper towel or soft cloth. Cleaning Method: Always wipe with soft, lint-free cloth. Cooktop Cleaner Part Number 31464 is recommended for regular use steel wool, abrasive cleansers or oven cleaner. See "Assistance or Service" section to moderate soil • Paper ...Repeat for stubborn soils, and can be ordered as an accessory. Soap, water and a soft cloth or sponge are cool. The Cooktop Scraper uses razor blades. COOKTOP CARE IMPORTANT: Before cleaning, make sure knobs are in direction of children. See "Assistance or Service" section to order. •...

Use and Care Guide
Page 10
... control knob set to flash, disconnect power or unplug the cooktop. 3. See the Installation Instructions. 10 Push in the cooktop. 4. If the problem continues, call . Is the cooktop level? Is the control knob set correctly? Use cookware about the same size as the surface cooking area, ...element or surface burner. Excessive heat around cookware on and off ? 1. See "Cooktop Controls" section. Cooktop cooking results not what expected Is the proper cookware being used? Level the cooktop. TROUBLESHOOTING Try the solutions suggested here first in order to avoid the cost of an ...
... control knob set to flash, disconnect power or unplug the cooktop. 3. See the Installation Instructions. 10 Push in the cooktop. 4. If the problem continues, call . Is the cooktop level? Is the control knob set correctly? Use cookware about the same size as the surface cooking area, ...element or surface burner. Excessive heat around cookware on and off ? 1. See "Cooktop Controls" section. Cooktop cooking results not what expected Is the proper cookware being used? Level the cooktop. TROUBLESHOOTING Try the solutions suggested here first in order to avoid the cost of an ...

Use and Care Guide
Page 11
... models) Order Part Number 31463 Cooktop Scraper (ceramic glass models) Order Part Number WA906B Call Maytag Customer eXperience Center toll free: 1-800-688-9900, or visit our website at www.maytag.com Our consultants provide assistance with : • Features and specifications on our full line of appliances. • Use and maintenance procedures. • Accessory...
... models) Order Part Number 31463 Cooktop Scraper (ceramic glass models) Order Part Number WA906B Call Maytag Customer eXperience Center toll free: 1-800-688-9900, or visit our website at www.maytag.com Our consultants provide assistance with : • Features and specifications on our full line of appliances. • Use and maintenance procedures. • Accessory...

Use and Care Guide
Page 12
...manner that have been removed, altered or cannot be easily determined. Major appliances with original model/serial numbers that is reported to Maytag within 30 days from the date of purchase. 6. THIS WARRANTY GIVES YOU SPECIFIC LEGAL RIGHTS, AND YOU MAY ALSO HAVE OTHER RIGHTS WHICH...find additional help you obtain assistance or service if you may find this limited warranty does not apply. Costs associated with electrical or plumbing codes, or use or when it is located in which it . IMPLIED WARRANTIES, INCLUDING WARRANTIES OF MERCHANTABILITY OR FITNESS FOR A PARTICULAR PURPOSE...
...manner that have been removed, altered or cannot be easily determined. Major appliances with original model/serial numbers that is reported to Maytag within 30 days from the date of purchase. 6. THIS WARRANTY GIVES YOU SPECIFIC LEGAL RIGHTS, AND YOU MAY ALSO HAVE OTHER RIGHTS WHICH...find additional help you obtain assistance or service if you may find this limited warranty does not apply. Costs associated with electrical or plumbing codes, or use or when it is located in which it . IMPLIED WARRANTIES, INCLUDING WARRANTIES OF MERCHANTABILITY OR FITNESS FOR A PARTICULAR PURPOSE...

Use and Care Guide
Page 24
Imprime aux E.-U. Tous droits reserves. ®Registered trademarkf TM Trademark of Maytag Corporation or its related companies. ®Marque deposeef TM Marque de commerce de Maytag Corporation ou de ses compagnies affiliees. W10274254C ©2011 All rights reserved. Emploi sous licence par Maytag Limited au Canada. 3/11 Printed in Canada. Used under license by Maytag Limited in U.S.A.
Imprime aux E.-U. Tous droits reserves. ®Registered trademarkf TM Trademark of Maytag Corporation or its related companies. ®Marque deposeef TM Marque de commerce de Maytag Corporation ou de ses compagnies affiliees. W10274254C ©2011 All rights reserved. Emploi sous licence par Maytag Limited au Canada. 3/11 Printed in Canada. Used under license by Maytag Limited in U.S.A.

Installation Instructions
Page 1
... what the potential hazard is the safety alert symbol. ELECTRICCOOKTOP INSTALLATIONINSTRUCTIONS INSTRUCTIONSD'INSTALLATIONDE LATABLEDE CUISSON Table of Contents COOKTOP SAFETY 1 INSTALLATION REQUIREMENTS 2 Tools and Parts 2 Location Requirements 2 Electrical Requirements 3 INSTALLATION INSTRUCTIONS 4 Prepare Cooktop for local electrical inspector's use. We have provided many important safety messages in this manual and on your appliance. This is , tell...
... what the potential hazard is the safety alert symbol. ELECTRICCOOKTOP INSTALLATIONINSTRUCTIONS INSTRUCTIONSD'INSTALLATIONDE LATABLEDE CUISSON Table of Contents COOKTOP SAFETY 1 INSTALLATION REQUIREMENTS 2 Tools and Parts 2 Location Requirements 2 Electrical Requirements 3 INSTALLATION INSTRUCTIONS 4 Prepare Cooktop for local electrical inspector's use. We have provided many important safety messages in this manual and on your appliance. This is , tell...

Installation Instructions
Page 2
..." +/- 1A6" (87.8 +/- 0.16 cm) on the top of burns or fire by a licensed, qualified electrical installer. When installing cooktop, use and proper cutout dimensions. See "Electrical Requirements" section. A. 30" (76.2 cm) on 30" models; 36" (91.4 cm) on 36" models B. Check existing electrical supply. If you do not find this label, contact your oven is approved to...
..." +/- 1A6" (87.8 +/- 0.16 cm) on the top of burns or fire by a licensed, qualified electrical installer. When installing cooktop, use and proper cutout dimensions. See "Electrical Requirements" section. A. 30" (76.2 cm) on 30" models; 36" (91.4 cm) on 36" models B. Check existing electrical supply. If you do not find this label, contact your oven is approved to...

Installation Instructions
Page 3
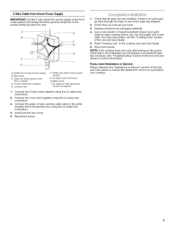
...end of solid copper wire to the added section of the line. Follow the electrical connector manufacturer's recommended procedure. Use 8 gauge copper wire. Electrically ground cooktop. Connect a section of the power supply cable (at the cooktop and at the junction box). If codes permit and a separate ground wire ...is used, it here. • A 3-wire or 4-wire, single phase, 240 volt, 60-Hz., AC only electrical supply is required on a separate, 40-amp circuit for 30" (76.2 cm) models...
...end of solid copper wire to the added section of the line. Follow the electrical connector manufacturer's recommended procedure. Use 8 gauge copper wire. Electrically ground cooktop. Connect a section of the power supply cable (at the cooktop and at the junction box). If codes permit and a separate ground wire ...is used, it here. • A 3-wire or 4-wire, single phase, 240 volt, 60-Hz., AC only electrical supply is required on a separate, 40-amp circuit for 30" (76.2 cm) models...

Installation Instructions
Page 4
... strip keeps debris from cutout to complete installation for the cooktop. 2. See "Electrical Connection Options" chart to avoid scratching the countertop. Using 2 or more people, turn cooktop right side up from the underside of the cooktop is manufactured with edge. Place cooktop in death, fire, or electrical shock. NOTE: Make sure that the front edge of the...
... strip keeps debris from cutout to complete installation for the cooktop. 2. See "Electrical Connection Options" chart to avoid scratching the countertop. Using 2 or more people, turn cooktop right side up from the underside of the cooktop is manufactured with edge. Place cooktop in death, fire, or electrical shock. NOTE: Make sure that the front edge of the...
Installation Instructions
Page 5
... there is an extra part, go back through the steps to the white (neutral) wire in the cooktop Use and Care Guide. 6. Install junction box cover. 5. Connect the green or bare cooktop cable wires to see the "Cooktop Care" section of /recycle all parts are now installed. For more information, see which step was...
... there is an extra part, go back through the steps to the white (neutral) wire in the cooktop Use and Care Guide. 6. Install junction box cover. 5. Connect the green or bare cooktop cable wires to see the "Cooktop Care" section of /recycle all parts are now installed. For more information, see which step was...