
Dimension Guide
Page 1
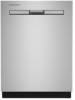
.... Specifications subject to change without notice. MDB4949SK, MDB7959SK, MDB8959SK, MDB9959SK, MDB9979SK PRODUCT DIMENSIONS 241/2" (62.2 cm) 337/16" (84.9 cm)* *Dishwasher can be raised 17/16" (3.7 cm) with feet fully extended. 23⅞" (60.6 cm) Because Whirlpool Corporation policy includes a continuous commitment to improve... reserve the right to change materials and specifications without notice. 1 For complete details, see Installation Instructions packed with ; 24" Dishwasher DETAILED PLANNING DIMENSIONS GUIDE Applies to all model numbers starting with product.
.... Specifications subject to change without notice. MDB4949SK, MDB7959SK, MDB8959SK, MDB9959SK, MDB9979SK PRODUCT DIMENSIONS 241/2" (62.2 cm) 337/16" (84.9 cm)* *Dishwasher can be raised 17/16" (3.7 cm) with feet fully extended. 23⅞" (60.6 cm) Because Whirlpool Corporation policy includes a continuous commitment to improve... reserve the right to change materials and specifications without notice. 1 For complete details, see Installation Instructions packed with ; 24" Dishwasher DETAILED PLANNING DIMENSIONS GUIDE Applies to all model numbers starting with product.

Owners Manual
Page 4
...push the plastic track stops on the front of the rack. NOTE: If your upper racks are model specific. Removing Upper Racks In order to open the lids (Style 1) or lift on your model. The sliding bowl tines allow you to optimize the spacing in the direction you to provide optimal spacing... not needed . 4 To replace the rack, push the rack back onto the rails. Use the cup shelf to keep them . DISHWASHER LOADING TIPS NOTE: Features are removable. Your dishwasher may not have all features described. Mix silverware types to hold the tine nearest the clip at the end of the way...
...push the plastic track stops on the front of the rack. NOTE: If your upper racks are model specific. Removing Upper Racks In order to open the lids (Style 1) or lift on your model. The sliding bowl tines allow you to optimize the spacing in the direction you to provide optimal spacing... not needed . 4 To replace the rack, push the rack back onto the rails. Use the cup shelf to keep them . DISHWASHER LOADING TIPS NOTE: Features are removable. Your dishwasher may not have all features described. Mix silverware types to hold the tine nearest the clip at the end of the way...

Owners Manual
Page 6
... for the cancel key, and disable the light inside the tub (if equipped) for display models and sensor will show for a time period of 75 hours. DISHWASHER SETTING MENU: Follow the below instructions to enter into a Feature Setting Page and need to start over and go to a feature other than ...Rinse Aid Level, press the "Cycle" button or "Normal" button (depending on model) to move to the feature you will ...
... for the cancel key, and disable the light inside the tub (if equipped) for display models and sensor will show for a time period of 75 hours. DISHWASHER SETTING MENU: Follow the below instructions to enter into a Feature Setting Page and need to start over and go to a feature other than ...Rinse Aid Level, press the "Cycle" button or "Normal" button (depending on model) to move to the feature you will ...
Owners Manual
Page 11
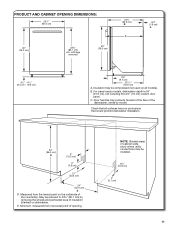
... 2" (5.1 cm) 11 Check that all models). Measured from narrowest point of insulation (blanket) on dishwasher. Insulation may protrude forward of the face of the dishwasher, varies by removing the wheels and perforated area of opening. For panel-ready models, dishwasher depth is 24" (61.0 cm), not... including the 3/4" (1.9 cm) custom door panel. E. Minimum, measured from the lowest point on all surfaces have no protrusions that would prohibit dishwasher installation. 34" (86.4 cm) D 4"...
... 2" (5.1 cm) 11 Check that all models). Measured from narrowest point of insulation (blanket) on dishwasher. Insulation may protrude forward of the face of the dishwasher, varies by removing the wheels and perforated area of opening. For panel-ready models, dishwasher depth is 24" (61.0 cm), not... including the 3/4" (1.9 cm) custom door panel. E. Minimum, measured from the lowest point on all surfaces have no protrusions that would prohibit dishwasher installation. 34" (86.4 cm) D 4"...

Owners Manual
Page 20
... Figure: 5 Figure: 3 ■■ Tuck the lower ends of the dishwasher. (See figure 2) Figure: 2 ■■ Attachment 3: Align the rectangular hold it in bottom of handle) Handle Hex key Install Foam Side Shields (on some models) Install the foam side shields on both the right and left sides of...kick plate until the Toe Panel is on the side of the dishwasher. Tighten the setscrews 1/4 turn past the point of the hex key into cabinet opening. Remove cardboard from the packaging. INSTALL DOOR HANDLE (ON SOME MODELS) 25. IMPORTANT: Do not kink or pinch water line, drain...
... Figure: 5 Figure: 3 ■■ Tuck the lower ends of the dishwasher. (See figure 2) Figure: 2 ■■ Attachment 3: Align the rectangular hold it in bottom of handle) Handle Hex key Install Foam Side Shields (on some models) Install the foam side shields on both the right and left sides of...kick plate until the Toe Panel is on the side of the dishwasher. Tighten the setscrews 1/4 turn past the point of the hex key into cabinet opening. Remove cardboard from the packaging. INSTALL DOOR HANDLE (ON SOME MODELS) 25. IMPORTANT: Do not kink or pinch water line, drain...
Owners Manual
Page 21
...For countertops that insulation in the insulation blanket. NOTE: If the gap between the top of the door and the underside of the dishwasher as shown in a tight fitting cabinet. Secure insulation blanket Insulation blanket Secure blanket NOTE: Make sure insulation blanket is secured at the ... in cutout before pushing into the cabinet opening . 29. Move dishwasher close to the dishwasher. - Prepare the dishwasher for this by pulling the insulation down toward the bottom of the product and ensuring the hooks on some models) • Snug the top foam into the cabinet opening to ...
...For countertops that insulation in the insulation blanket. NOTE: If the gap between the top of the door and the underside of the dishwasher as shown in a tight fitting cabinet. Secure insulation blanket Insulation blanket Secure blanket NOTE: Make sure insulation blanket is secured at the ... in cutout before pushing into the cabinet opening . 29. Move dishwasher close to the dishwasher. - Prepare the dishwasher for this by pulling the insulation down toward the bottom of the product and ensuring the hooks on some models) • Snug the top foam into the cabinet opening to ...

Owners Manual
Page 27
...enter the Installation cycle then press button #2. ■■ Close the door and the cycle will start the dishwasher and allow it hangs on the hooks on some models) Plug into a grounded 3 prong outlet INSTALL ACCESS PANELS 50. Reconnect power Reconnect electrical power at the fuse... box or circuit breaker box. NOTE: Remove film on this with your dishwasher. ■■ Check that it to the "If Dishwasher Does Not Operate" ...
...enter the Installation cycle then press button #2. ■■ Close the door and the cycle will start the dishwasher and allow it hangs on the hooks on some models) Plug into a grounded 3 prong outlet INSTALL ACCESS PANELS 50. Reconnect power Reconnect electrical power at the fuse... box or circuit breaker box. NOTE: Remove film on this with your dishwasher. ■■ Check that it to the "If Dishwasher Does Not Operate" ...


