Owners Manual
Page 24
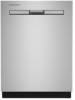
...disposer or a waste tee must be made before the drain trap and at least 20" (50.8 cm) above the floor where the dishwasher will be installed. Complete Steps 18 to waste tee or waste disposer using a flexible braided hose, replace inlet hose after attaching water supply ...Tighten bracket screws. 43. Once complete, return here to Step 44 to the dishwasher should have a manual shut-off valve located under the sink. 41. Attach water supply line IMPORTANT: Check that space between dishwasher cabinet opening and tub is not equal, loosen bracket screws and shift tub. The...
...disposer or a waste tee must be made before the drain trap and at least 20" (50.8 cm) above the floor where the dishwasher will be installed. Complete Steps 18 to waste tee or waste disposer using a flexible braided hose, replace inlet hose after attaching water supply ...Tighten bracket screws. 43. Once complete, return here to Step 44 to the dishwasher should have a manual shut-off valve located under the sink. 41. Attach water supply line IMPORTANT: Check that space between dishwasher cabinet opening and tub is not equal, loosen bracket screws and shift tub. The...

Owners Manual
Page 27
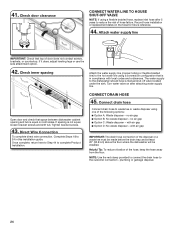
... screw. If running in this model, make sure insulation does not interfere with the float assembly. NOTE: It is present in this manual under the unit. If insulation is removed from the appliance. Check access panel edge Numeric Display Approximate interval Time Machine Action All LEDs ..., start . ■■ All LEDs turn on immediately upon the first run this with the access panel removed in the sequence 1-2-3-1-2-3-1-2-3 with your dishwasher. ■■ Check that all parts have used all tools. ■■ Run the Installation Cycles as follows (Note that it to exit...
... screw. If running in this model, make sure insulation does not interfere with the float assembly. NOTE: It is present in this manual under the unit. If insulation is removed from the appliance. Check access panel edge Numeric Display Approximate interval Time Machine Action All LEDs ..., start . ■■ All LEDs turn on immediately upon the first run this with the access panel removed in the sequence 1-2-3-1-2-3-1-2-3 with your dishwasher. ■■ Check that all parts have used all tools. ■■ Run the Installation Cycles as follows (Note that it to exit...


