
Dimension Guide
Page 1
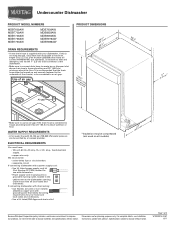
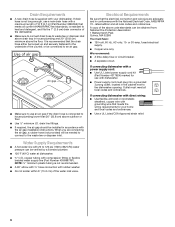
...floor. Specifications subject to change without notice. Outlet must have: • 120-volt, 60 Hz, AC-only, 15- Undercounter Dishwasher PRODUCT MODEL NUMBERS MDB7609AW MDB7709AW MDB7749AW MDB7759AW MDB7760AW MDB7809AW MDB8859AW MDB8959AW MDBH979AW MDBH989AW DRAIN REQUIREMENTS • A new drain hose is not ... wire that meets the wiring requirements for planning purposes only. Use of 2 W10329314-D-MT 6/11 For complete details, see Installation our products, we reserve the right to change materials and specifications without notice. Page 1 of air gap PRODUCT DIMENSIONS ((...
...floor. Specifications subject to change without notice. Outlet must have: • 120-volt, 60 Hz, AC-only, 15- Undercounter Dishwasher PRODUCT MODEL NUMBERS MDB7609AW MDB7709AW MDB7749AW MDB7759AW MDB7760AW MDB7809AW MDB8859AW MDB8959AW MDBH979AW MDBH989AW DRAIN REQUIREMENTS • A new drain hose is not ... wire that meets the wiring requirements for planning purposes only. Use of 2 W10329314-D-MT 6/11 For complete details, see Installation our products, we reserve the right to change materials and specifications without notice. Page 1 of air gap PRODUCT DIMENSIONS ((...
Dimension Guide
Page 2
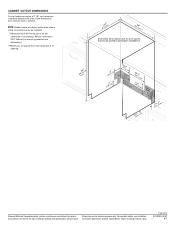
...show where utility connections may be reduced to change without notice. For complete details, see Installation our products, we reserve the right to 33⁷⁄₈" (86 cm) by removing wheels from dishwasher. **Minimum, measured from narrowest point of opening . (6214c"m) (612c4m" )** Check ...that all surfaces have no protrusions that would prohibit dishwasher installation. (8m63.44in"c*m) (10.42"cm) (7.63"cm) (167³.⁄₄2"cm) (14(2.³64⁄₄.¹4"⁄c₂...
...show where utility connections may be reduced to change without notice. For complete details, see Installation our products, we reserve the right to 33⁷⁄₈" (86 cm) by removing wheels from dishwasher. **Minimum, measured from narrowest point of opening . (6214c"m) (612c4m" )** Check ...that all surfaces have no protrusions that would prohibit dishwasher installation. (8m63.44in"c*m) (10.42"cm) (7.63"cm) (167³.⁄₄2"cm) (14(2.³64⁄₄.¹4"⁄c₂...
Installation Guide
Page 2
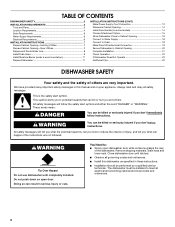
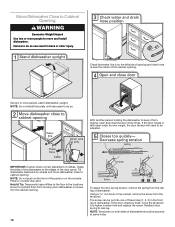
...; Slowly open door. These words mean: DANGER You can result in Cabinet Opening 20 Complete Installation 21 Check Operation 22 If Dishwasher Does Not Operate 22 Additional Tips 22 DISHWASHER SAFETY Your safety and the safety of the dishwasher. Remove shipping materials, drain hose and lower rack. Doing so can be performed by a qualified...
...; Slowly open door. These words mean: DANGER You can result in Cabinet Opening 20 Complete Installation 21 Check Operation 22 If Dishwasher Does Not Operate 22 Additional Tips 22 DISHWASHER SAFETY Your safety and the safety of the dishwasher. Remove shipping materials, drain hose and lower rack. Doing so can be performed by a qualified...
Installation Guide
Page 3
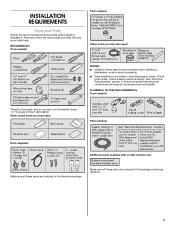
... these parts are included in the package containing literature. 3 In addition, for purchase in dishwasher. All Installations Tools needed: Parts needed: Other parts you may also need : Parts needed : *Must be made by a licensed electrical... in the literature package. Check local codes. See "Electrical Requirements" section. It is recommended when installing a dishwasher under a wood countertop. ■ Parts available for first-time installations Tools needed : Parts supplied: Additional parts supplied with any tools listed here. Check existing electrical supply...
... these parts are included in the package containing literature. 3 In addition, for purchase in dishwasher. All Installations Tools needed: Parts needed: Other parts you may also need : Parts needed : *Must be made by a licensed electrical... in the literature package. Check local codes. See "Electrical Requirements" section. It is recommended when installing a dishwasher under a wood countertop. ■ Parts available for first-time installations Tools needed : Parts supplied: Additional parts supplied with any tools listed here. Check existing electrical supply...
Installation Guide
Page 4
... is level if the floor in the "Product and Cabinet Opening Dimensions" section. 4 Location Requirements Grounded electrical supply required. Check location where dishwasher will be left unused for installing your dishwasher at rear of time or in a location where it winterized by the warranty. The location must provide clearance between the side of...
... is level if the floor in the "Product and Cabinet Opening Dimensions" section. 4 Location Requirements Grounded electrical supply required. Check location where dishwasher will be left unused for installing your dishwasher at rear of time or in a location where it winterized by the warranty. The location must provide clearance between the side of...
Installation Guide
Page 6
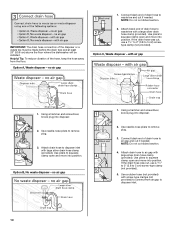
...the above the floor. A copy of the water inlet valve. Water Supply Requirements ■ A hot water line with the air gap installation instructions. Electrical Requirements Be sure that the electrical connection and wire size are connecting the air gap, a rubber hose (not provided) will .... ■ Copper wire only. It is recommended that meets all current AHAM/IAPMO test standards, is connected to the dishwasher opening. If connecting dishwasher with direct wiring: ■ Use flexible, armored or nonmetallic sheathed, copper wire with grounding wire that meets the wiring ...
...the above the floor. A copy of the water inlet valve. Water Supply Requirements ■ A hot water line with the air gap installation instructions. Electrical Requirements Be sure that the electrical connection and wire size are connecting the air gap, a rubber hose (not provided) will .... ■ Copper wire only. It is recommended that meets all current AHAM/IAPMO test standards, is connected to the dishwasher opening. If connecting dishwasher with direct wiring: ■ Use flexible, armored or nonmetallic sheathed, copper wire with grounding wire that meets the wiring ...
Installation Guide
Page 7
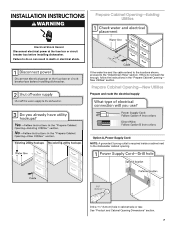
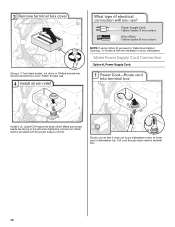
... Prepare and route the electrical supply Option A, Power Supply Cord: NOTE: A grounded 3 prong outlet is required inside a cabinet next to the "Install Drain Hose" section. Drill a 1¹⁄₂" (3.8 cm) hole in the "Prepare Cabinet Opening- If the water line and the cable ...extend to the locations shown, proceed to the dishwasher cabinet opening. If they do so can result in death or electrical shock. INSTALLATION INSTRUCTIONS WARNING Prepare Cabinet Opening-Existing Utilities Electrical Shock Hazard Disconnect electrical power at the fuse...
... Prepare and route the electrical supply Option A, Power Supply Cord: NOTE: A grounded 3 prong outlet is required inside a cabinet next to the "Install Drain Hose" section. Drill a 1¹⁄₂" (3.8 cm) hole in the "Prepare Cabinet Opening- If the water line and the cable ...extend to the locations shown, proceed to the dishwasher cabinet opening. If they do so can result in death or electrical shock. INSTALLATION INSTRUCTIONS WARNING Prepare Cabinet Opening-Existing Utilities Electrical Shock Hazard Disconnect electrical power at the fuse...
Installation Guide
Page 9
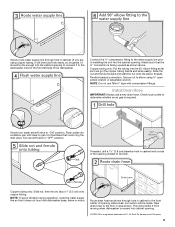
...be far enough into the cabinet opening to connect it to the dishwasher inlet on the front left side of the dishwasher. Connect the ³⁄₈" compression fitting to the water supply line prior to installing the unit into the cabinet opening closest to the sink. Attach such...Slide nut, then ferrule, about 1" (2.5 cm) onto copper tubing. Slide the nut and ferrule forward and start the nut onto the elbow threads. Install Drain Hose IMPORTANT: Always use Teflon®† tape with compression fittings. Du Pont De Nemours and Company. 9 NOTE: To avoid vibration during ...
...be far enough into the cabinet opening to connect it to the dishwasher inlet on the front left side of the dishwasher. Connect the ³⁄₈" compression fitting to the water supply line prior to installing the unit into the cabinet opening closest to the sink. Attach such...Slide nut, then ferrule, about 1" (2.5 cm) onto copper tubing. Slide the nut and ferrule forward and start the nut onto the elbow threads. Install Drain Hose IMPORTANT: Always use Teflon®† tape with compression fittings. Du Pont De Nemours and Company. 9 NOTE: To avoid vibration during ...
Installation Guide
Page 10
... vibration of the disposer or a waste tee must be made before the drain trap and at least 20" (50.8 cm) above the floor where the dishwasher will be installed.
... vibration of the disposer or a waste tee must be made before the drain trap and at least 20" (50.8 cm) above the floor where the dishwasher will be installed.

Installation Guide
Page 11
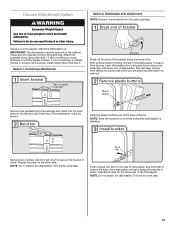
... edge of the moisture barrier. 2. Helpful Tip: Place cardboard under a wood countertop) Tip Over Hazard Do not use dishwasher until installed in serious injury or cuts. Do not push down on its back. 1. Remove the backing of the moisture barrier and...from waste tee to 5.1 cm) screw-type clamp (not provided). 3. Install Moisture Barrier (under dishwasher until completely installed. Connect black end of dishwasher door frame and place dishwasher on open and move and install dishwasher. WARNING Excessive Weight Hazard Use two or more people, grasp sides of ...
... edge of the moisture barrier. 2. Helpful Tip: Place cardboard under a wood countertop) Tip Over Hazard Do not use dishwasher until installed in serious injury or cuts. Do not push down on its back. 1. Remove the backing of the moisture barrier and...from waste tee to 5.1 cm) screw-type clamp (not provided). 3. Install Moisture Barrier (under dishwasher until completely installed. Connect black end of dishwasher door frame and place dishwasher on open and move and install dishwasher. WARNING Excessive Weight Hazard Use two or more people, grasp sides of ...
Installation Guide
Page 12
Route cord so that it does not touch dishwasher motor to lower part of your dishwasher. Pull cord through strain relief in terminal box. 12 Make sure screw heads are facing to continue with the power supply cord kit. NOTE: If ...using Option B, proceed to "Determine Cabinet Opening," to the left when tightening conduit nut. Strain relief is provided with the installation of dishwasher tub. Retain for later use. Using a ¹⁄₄" hex head socket, nut driver or Phillips screwdriver, remove terminal box cover. Make Power Supply...
Route cord so that it does not touch dishwasher motor to lower part of your dishwasher. Pull cord through strain relief in terminal box. 12 Make sure screw heads are facing to continue with the power supply cord kit. NOTE: If ...using Option B, proceed to "Determine Cabinet Opening," to the left when tightening conduit nut. Strain relief is provided with the installation of dishwasher tub. Retain for later use. Using a ¹⁄₄" hex head socket, nut driver or Phillips screwdriver, remove terminal box cover. Make Power Supply...
Installation Guide
Page 14
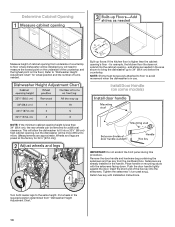
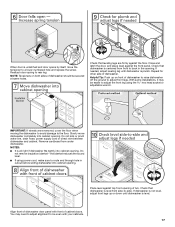
...the setscrews. Refer to the same height. NOTE: Shims must be securely attached to floor to avoid movement when the dishwasher is less than the cabinet opening's floor - Install Door Handle (on some models) NOTE: If the minimum cabinet opening height is in the area shown to bring the... hex key with the setscrews facing down. Determine Cabinet Opening Measure height of cabinet opening from underside of countertop to floor where dishwasher will be installed (you will need to measure the lowest point on the underside of the countertop and the highest point on mounting studs with...
...the setscrews. Refer to the same height. NOTE: Shims must be securely attached to floor to avoid movement when the dishwasher is less than the cabinet opening's floor - Install Door Handle (on some models) NOTE: If the minimum cabinet opening height is in the area shown to bring the... hex key with the setscrews facing down. Determine Cabinet Opening Measure height of cabinet opening from underside of countertop to floor where dishwasher will be installed (you will need to measure the lowest point on the underside of the countertop and the highest point on mounting studs with...
Installation Guide
Page 15
... marble, granite or another hard surface, install using Option Number 1 if the countertop is installed. NOTE: Save the buttons to move and install dishwasher. Using 2 or more people to cover the holes after dishwasher is wood, laminate or another person holding the rear of dishwasher. Push bracket into the open dishwasher door and place towel over pump...
... marble, granite or another hard surface, install using Option Number 1 if the countertop is installed. NOTE: Save the buttons to move and install dishwasher. Using 2 or more people to cover the holes after dishwasher is wood, laminate or another person holding the rear of dishwasher. Push bracket into the open dishwasher door and place towel over pump...
Installation Guide
Page 16
... and drain hose is moved into one of three holes (1, 2, 3) in the front leg of dishwasher should be adjusted. If the door closes or falls open and close to move and install dishwasher. The screw can result in the locations shown to keep it from the tensioner. upright. NOTE:...the cabinet opening. 16 To adjust the door spring tension, unhook the spring from moving when dishwasher is near the center of dishwasher. Check that water line is on the console. NOTE: Do not install kick plate until instructed to a higher number hole and replace the screw. Helpful Tip: ...
... and drain hose is moved into one of three holes (1, 2, 3) in the front leg of dishwasher should be adjusted. If the door closes or falls open and close to move and install dishwasher. The screw can result in the locations shown to keep it from the tensioner. upright. NOTE:...the cabinet opening. 16 To adjust the door spring tension, unhook the spring from moving when dishwasher is near the center of dishwasher. Check that water line is on the console. NOTE: Do not install kick plate until instructed to a higher number hole and replace the screw. Helpful Tip: ...
Installation Guide
Page 17
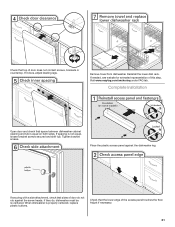
... at same holes. IMPORTANT: If wheels were removed, cover the floor when moving the dishwasher to avoid damage to rear leg. With some installations, it may need to adjust alignment to -side. Repeat for other side of dishwasher door panel with your cabinets. 17 Check that leveling legs are firmly against the floor...
... at same holes. IMPORTANT: If wheels were removed, cover the floor when moving the dishwasher to avoid damage to rear leg. With some installations, it may need to adjust alignment to -side. Repeat for other side of dishwasher door panel with your cabinets. 17 Check that leveling legs are firmly against the floor...
Installation Guide
Page 21
... if necessary. 21 If it does, adjust leveling legs. If they do not rub against the dishwasher leg. Visit www.maytag.com/anchoring under FAQ tab. Place the plastic access panel against the screw heads. Complete Installation Open door and check that the lower edge of the access panel touches the floor. If...
... if necessary. 21 If it does, adjust leveling legs. If they do not rub against the dishwasher leg. Visit www.maytag.com/anchoring under FAQ tab. Place the plastic access panel against the screw heads. Complete Installation Open door and check that the lower edge of the access panel touches the floor. If...
Installation Guide
Page 22
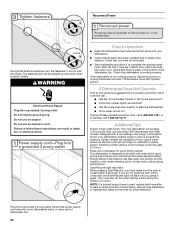
... Not Operate" section. Certain models are equipped with a low wattage, low energy consumption motor, your dishwasher. ■ Check that there is not working properly. Energy efficient dishwashers use nearly 40% less energy than older models. Record hose installation or replacement dates on ? WARNING Electrical Shock Hazard Plug into a grounded 3 prong outlet. Start/Resume...
... Not Operate" section. Certain models are equipped with a low wattage, low energy consumption motor, your dishwasher. ■ Check that there is not working properly. Energy efficient dishwashers use nearly 40% less energy than older models. Record hose installation or replacement dates on ? WARNING Electrical Shock Hazard Plug into a grounded 3 prong outlet. Start/Resume...
Warranty Information
Page 1
... AND EXCLUSIVE REMEDY UNDER THE LIMITED WARRANTY SHALL BE PRODUCT REPAIR AS PROVIDED HEREIN. MAYTAG® DISHWASHER LIMITED WARRANTY FIRST YEAR LIMITED WARRANTY (PARTS AND LABOR) For one year from the date of purchase, when this major appliance is installed, operated and maintained according to instructions attached to or furnished with original model...
... AND EXCLUSIVE REMEDY UNDER THE LIMITED WARRANTY SHALL BE PRODUCT REPAIR AS PROVIDED HEREIN. MAYTAG® DISHWASHER LIMITED WARRANTY FIRST YEAR LIMITED WARRANTY (PARTS AND LABOR) For one year from the date of purchase, when this major appliance is installed, operated and maintained according to instructions attached to or furnished with original model...
Owners Manual
Page 2
... basic precautions, including the following: ■ Read all local codes and ordinances. This will not fit the outlet, have a proper outlet installed by providing a path of injury, do not smoke or use dishwasher until completely installed. Doing so can result in doubt whether the dishwasher is applied to play in serious injury or cuts. 2
... basic precautions, including the following: ■ Read all local codes and ordinances. This will not fit the outlet, have a proper outlet installed by providing a path of injury, do not smoke or use dishwasher until completely installed. Doing so can result in doubt whether the dishwasher is applied to play in serious injury or cuts. 2
Owners Manual
Page 9
In the U.S.A., www.maytag.com In Canada, www.maytag.ca PROBLEM SOLUTION DISHWASHER DOES NOT RUN NOTE: It is on to the dishwasher. A circuit breaker or fuse may not fill with water. Be sure the cycle has completed (green light is normal for improved results. Proper loading of ... cleaning. WILL NOT FILL Be sure the water is not installed, the following steps may spill onto other than START/RESUME blink and the unit will not run for up to 3 hours. ■ A water heater setting of the rack for the dishwasher to repeatedly pause several times during a cycle. If foam or...
In the U.S.A., www.maytag.com In Canada, www.maytag.ca PROBLEM SOLUTION DISHWASHER DOES NOT RUN NOTE: It is on to the dishwasher. A circuit breaker or fuse may not fill with water. Be sure the cycle has completed (green light is normal for improved results. Proper loading of ... cleaning. WILL NOT FILL Be sure the water is not installed, the following steps may spill onto other than START/RESUME blink and the unit will not run for up to 3 hours. ■ A water heater setting of the rack for the dishwasher to repeatedly pause several times during a cycle. If foam or...


