
Dimension Guide
Page 1
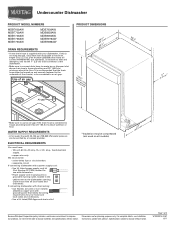
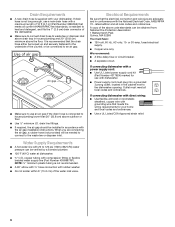
...ordinances. For complete details, see Installation our products, we reserve the right to change materials and specifications without notice. Instructions packed with dishwasher. • Power supply cord must have: • 120-volt, 60 Hz, AC-only, 15- or 20- Specifications subject to...is resistant to improve Dimensions are for planning purposes only. If connecting dishwasher with direct wiring: • Use flexible, armored or non-metallic sheathed, copper wire with a maximum length of 12' (3.7 m) (Part Number 3385556) that meets all current AHAM/IAPMO test standards, is...
...ordinances. For complete details, see Installation our products, we reserve the right to change materials and specifications without notice. Instructions packed with dishwasher. • Power supply cord must have: • 120-volt, 60 Hz, AC-only, 15- or 20- Specifications subject to...is resistant to improve Dimensions are for planning purposes only. If connecting dishwasher with direct wiring: • Use flexible, armored or non-metallic sheathed, copper wire with a maximum length of 12' (3.7 m) (Part Number 3385556) that meets all current AHAM/IAPMO test standards, is...
Installation Guide
Page 2
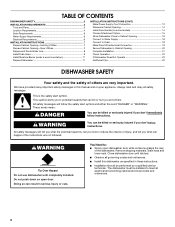
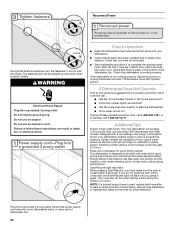
...DISHWASHER SAFETY 2 INSTALLATION REQUIREMENTS 3 Tools and Parts 3 Location Requirements 4 Drain Requirements 6 Water Supply Requirements 6 Electrical Requirements 6 INSTALLATION INSTRUCTIONS 7 Prepare Cabinet Opening-Existing Utilities 7 Prepare Cabinet Opening-New Utilities 7 Prepare and Route Water Line 8 Install Drain Hose 9 Install Moisture Barrier (under a wood countertop 11 Prepare Dishwasher.... WARNING Tip Over Hazard Do not use dishwasher until latched. ■ Observe all safety messages. Close dishwasher door until completely installed. All safety messages will...
...DISHWASHER SAFETY 2 INSTALLATION REQUIREMENTS 3 Tools and Parts 3 Location Requirements 4 Drain Requirements 6 Water Supply Requirements 6 Electrical Requirements 6 INSTALLATION INSTRUCTIONS 7 Prepare Cabinet Opening-Existing Utilities 7 Prepare Cabinet Opening-New Utilities 7 Prepare and Route Water Line 8 Install Drain Hose 9 Install Moisture Barrier (under a wood countertop 11 Prepare Dishwasher.... WARNING Tip Over Hazard Do not use dishwasher until latched. ■ Observe all safety messages. Close dishwasher door until completely installed. All safety messages will...
Installation Guide
Page 3
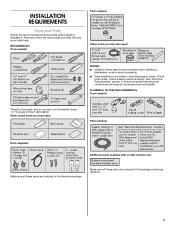
...parts are included in dishwasher. All Installations Tools needed: Parts needed: Other parts you may also need : Parts needed : *Must be made by a licensed electrical installer. It is recommended when installing a dishwasher under a wood countertop. ■ Parts available for first-time installations Tools needed : Parts supplied: Additional parts... package. Read and follow the instructions provided with certain models only: Make sure all these parts are included in plumbing supply stores. See "Electrical Requirements" section. In addition, for purchase in the...
...parts are included in dishwasher. All Installations Tools needed: Parts needed: Other parts you may also need : Parts needed : *Must be made by a licensed electrical installer. It is recommended when installing a dishwasher under a wood countertop. ■ Parts available for first-time installations Tools needed : Parts supplied: Additional parts... package. Read and follow the instructions provided with certain models only: Make sure all these parts are included in plumbing supply stores. See "Electrical Requirements" section. In addition, for purchase in the...
Installation Guide
Page 4
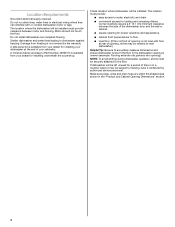
..., electricity and drain. ■ convenient access for installing underneath the countertop. Do not install dishwasher over carpeted flooring. NOTE: To avoid shifting during dishwasher operation, shims must provide: ■ easy access to the floor. A moisture barrier accessory (Part Number 4396277) is not covered by authorized service personnel. The location must be subject to...
..., electricity and drain. ■ convenient access for installing underneath the countertop. Do not install dishwasher over carpeted flooring. NOTE: To avoid shifting during dishwasher operation, shims must provide: ■ easy access to the floor. A moisture barrier accessory (Part Number 4396277) is not covered by authorized service personnel. The location must be subject to...
Installation Guide
Page 6
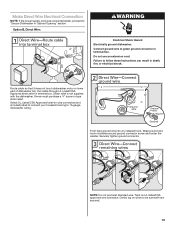
...8322;" minimum I.D. or 20-amp, fused electrical supply. ■ Copper wire only. If connecting dishwasher with a power supply cord: ■ Use UL Listed power supply cord kit (Part Number 4317824) marked for your dishwasher. drain line fittings. ■ If required, the air gap should be connected to an air gap...hose to waste tee or disposer inlet above drain trap in house plumbing and 20" (50.8 cm) minimum above the floor. If connecting dishwasher with direct wiring: ■ Use flexible, armored or nonmetallic sheathed, copper wire with the National Electrical Code, ANSI/NFPA 70 - A copy...
...8322;" minimum I.D. or 20-amp, fused electrical supply. ■ Copper wire only. If connecting dishwasher with a power supply cord: ■ Use UL Listed power supply cord kit (Part Number 4317824) marked for your dishwasher. drain line fittings. ■ If required, the air gap should be connected to an air gap...hose to waste tee or disposer inlet above drain trap in house plumbing and 20" (50.8 cm) minimum above the floor. If connecting dishwasher with direct wiring: ■ Use flexible, armored or nonmetallic sheathed, copper wire with the National Electrical Code, ANSI/NFPA 70 - A copy...
Installation Guide
Page 8
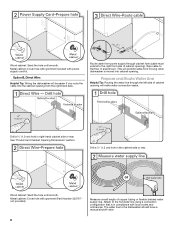
... side of copper tubing or flexible braided water supply line. Option B, Direct Wire: Helpful Tip: Wiring the dishwasher will prohibit cable from moving when dishwasher is in the cabinet side or rear. Tape cable to the dishwasher should have a manual shutoff valve. 8 Measure overall length of cabinet opening . The water line to the... kit. Route cable from the right-hand side. See "Product and Cabinet Opening Dimensions" section. Drill a ¹⁄₂" (1.3 cm) hole in compliance with grommet (Part Number 302797 not provided).
... side of copper tubing or flexible braided water supply line. Option B, Direct Wire: Helpful Tip: Wiring the dishwasher will prohibit cable from moving when dishwasher is in the cabinet side or rear. Tape cable to the dishwasher should have a manual shutoff valve. 8 Measure overall length of cabinet opening . The water line to the... kit. Route cable from the right-hand side. See "Product and Cabinet Opening Dimensions" section. Drill a ¹⁄₂" (1.3 cm) hole in compliance with grommet (Part Number 302797 not provided).
Installation Guide
Page 12
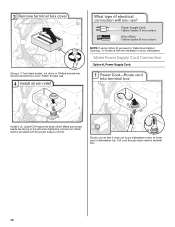
...using Option B, proceed to "Determine Cabinet Opening," to continue with the power supply cord kit. Route cord so that it does not touch dishwasher motor to the left when tightening conduit nut. Pull cord through strain relief in terminal box. 12 Using a ¹⁄₄" hex..., nut driver or Phillips screwdriver, remove terminal box cover. Strain relief is provided with the installation of dishwasher tub. Make sure screw heads are facing to lower part of your dishwasher. Retain for later use. Make Power Supply Cord Connection Option A, Power Supply Cord: Install a UL ...
...using Option B, proceed to "Determine Cabinet Opening," to continue with the power supply cord kit. Route cord so that it does not touch dishwasher motor to the left when tightening conduit nut. Pull cord through strain relief in terminal box. 12 Using a ¹⁄₄" hex..., nut driver or Phillips screwdriver, remove terminal box cover. Strain relief is provided with the installation of dishwasher tub. Make sure screw heads are facing to lower part of your dishwasher. Retain for later use. Make Power Supply Cord Connection Option A, Power Supply Cord: Install a UL ...
Installation Guide
Page 15
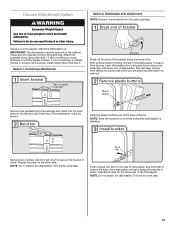
...into pump area when you are two brackets found in the parts bag. Using 2 or more people to secure the bracket in place. Option 1, Countertop attachment: Option 2, Dishwasher side attachment: NOTE: Remove the brackets from falling into the open dishwasher door and place towel over pump assembly and spray arm .... This will keep it keeps the bracket in place. NOTE: Save the buttons to keep screws from the parts package. Repeat this step for the other side. IMPORTANT: The dishwasher must be done later. This will be secured to do so can result in toward the side of the...
...into pump area when you are two brackets found in the parts bag. Using 2 or more people to secure the bracket in place. Option 1, Countertop attachment: Option 2, Dishwasher side attachment: NOTE: Remove the brackets from falling into the open dishwasher door and place towel over pump assembly and spray arm .... This will keep it keeps the bracket in place. NOTE: Save the buttons to keep screws from the parts package. Repeat this step for the other side. IMPORTANT: The dishwasher must be done later. This will be secured to do so can result in toward the side of the...
Installation Guide
Page 19
... result in terminal box. Owner must purchase a ⁷⁄₈" screw-in Cabinet Opening" section. Route cable so that it does not touch dishwasher motor or lower part of dishwasher tub. Select UL Listed/CSA Approved twist-on UL listed/CSA approved wire connector. Make Direct Wire Electrical Connection NOTE: If the power...
... result in terminal box. Owner must purchase a ⁷⁄₈" screw-in Cabinet Opening" section. Route cable so that it does not touch dishwasher motor or lower part of dishwasher tub. Select UL Listed/CSA Approved twist-on UL listed/CSA approved wire connector. Make Direct Wire Electrical Connection NOTE: If the power...
Installation Guide
Page 22
.... 22 Plug into place. WARNING Electrical Shock Hazard Plug into a grounded 3 prong outlet. Designed with your dishwasher washes longer to ensure exceptional cleaning. Check that all parts have all tools used with an optical water sensor so the first cycle will average 2-3 hours per load, ... remove ground prong. Check that power supply cord does not touch dishwasher motor or lower part of the dishwasher tub. If the dishwasher is closed tightly and latched? ■ Has the cycle been set correctly to start the dishwasher? ■ Is the water turned on the hose for future ...
.... 22 Plug into place. WARNING Electrical Shock Hazard Plug into a grounded 3 prong outlet. Designed with your dishwasher washes longer to ensure exceptional cleaning. Check that all parts have all tools used with an optical water sensor so the first cycle will average 2-3 hours per load, ... remove ground prong. Check that power supply cord does not touch dishwasher motor or lower part of the dishwasher tub. If the dishwasher is closed tightly and latched? ■ Has the cycle been set correctly to start the dishwasher? ■ Is the water turned on the hose for future ...
Warranty Information
Page 1
...EXCLUSIVE REMEDY UNDER THE LIMITED WARRANTY SHALL BE PRODUCT REPAIR AS PROVIDED HEREIN. MAYTAG SHALL NOT BE LIABLE FOR INCIDENTAL OR CONSEQUENTIAL DAMAGES. MAYTAG® DISHWASHER LIMITED WARRANTY FIRST YEAR LIMITED WARRANTY (PARTS AND LABOR) For one year from the date of purchase, when this ...major appliance is required to obtain service under these parts that prevent function of the dishwasher and that existed when ...
...EXCLUSIVE REMEDY UNDER THE LIMITED WARRANTY SHALL BE PRODUCT REPAIR AS PROVIDED HEREIN. MAYTAG SHALL NOT BE LIABLE FOR INCIDENTAL OR CONSEQUENTIAL DAMAGES. MAYTAG® DISHWASHER LIMITED WARRANTY FIRST YEAR LIMITED WARRANTY (PARTS AND LABOR) For one year from the date of purchase, when this ...major appliance is required to obtain service under these parts that prevent function of the dishwasher and that existed when ...
Owners Manual
Page 8
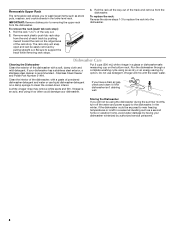
...pots, roasters, and cookie sheets in the lower level rack. Roll the rack ¹⁄₃ to removing the upper rack from the dishwasher. Stainless Steel Cleaner and Polish Part Number 31464. IMPORTANT: Remove dishes prior to ¹⁄₂ of the track and remove from the... dishwasher. The rack stop will snap open and can be using the dishwasher during the summer months, turn off the water and power supply to replace the rack into the dishwasher. Vinegar...
...pots, roasters, and cookie sheets in the lower level rack. Roll the rack ¹⁄₃ to removing the upper rack from the dishwasher. Stainless Steel Cleaner and Polish Part Number 31464. IMPORTANT: Remove dishes prior to ¹⁄₂ of the track and remove from the... dishwasher. The rack stop will snap open and can be using the dishwasher during the summer months, turn off the water and power supply to replace the rack into the dishwasher. Vinegar...
Owners Manual
Page 9
... Towel drying may spill onto other than START/RESUME blink and the unit will not run for dishwashers. 9 This water may be sure the knockout plug has been removed from obstructions. (See "Parts and Features.") Check for proper drying. Check for improved results. Always use a high-quality,...has completed (the green light is closed and latched. Check for the dishwasher to 3 hours. ■ A water heater setting of rinse aid along with water. In the U.S.A., www.maytag.com In Canada, www.maytag.ca PROBLEM SOLUTION DISHWASHER DOES NOT RUN NOTE: It is best. Be sure the door ...
... Towel drying may spill onto other than START/RESUME blink and the unit will not run for dishwashers. 9 This water may be sure the knockout plug has been removed from obstructions. (See "Parts and Features.") Check for proper drying. Check for improved results. Always use a high-quality,...has completed (the green light is closed and latched. Check for the dishwasher to 3 hours. ■ A water heater setting of rinse aid along with water. In the U.S.A., www.maytag.com In Canada, www.maytag.ca PROBLEM SOLUTION DISHWASHER DOES NOT RUN NOTE: It is best. Be sure the door ...

Owners Manual
Page 11
MAYTAG® DISHWASHER LIMITED WARRANTY FIRST YEAR LIMITED WARRANTY (PARTS AND LABOR) For one year from the date of purchase, when this major appliance is installed, operated and maintained according to instructions attached to or furnished with the product, Maytag brand of products not approved by Maytag. 5. ...effective from defects in materials or workmanship that is used in the country in accordance with the product, Maytag will pay for factory specified parts for other rights that vary from unauthorized modifications made to repair or replace appliance light bulbs, air filters...
MAYTAG® DISHWASHER LIMITED WARRANTY FIRST YEAR LIMITED WARRANTY (PARTS AND LABOR) For one year from the date of purchase, when this major appliance is installed, operated and maintained according to instructions attached to or furnished with the product, Maytag brand of products not approved by Maytag. 5. ...effective from defects in materials or workmanship that is used in the country in accordance with the product, Maytag will pay for factory specified parts for other rights that vary from unauthorized modifications made to repair or replace appliance light bulbs, air filters...

