
User Instructions
Page 1
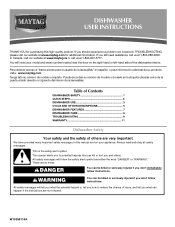
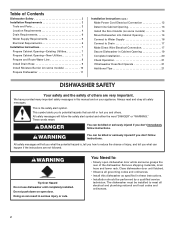
If you still need your model and serial number located near the door on your appliance. Table of Contents DISHWASHER SAFETY 1 QUICK STEPS 3 DISHWASHER USE 3 CYCLE AND OPTION DESCRIPTIONS 5 DISHWASHER FEATURES 7 DISHWASHER CARE 8 TROUBLESHOOTING 9 WARRANTY 11 Dishwasher Safety Your safety and the safety of others . All safety ... you what the potential hazard is the safety alert symbol. All safety messages will need assistance, call us at www.maytag.com for purchasing this manual and on the right-hand or left-hand side of injury, and tell you don't immediately...
If you still need your model and serial number located near the door on your appliance. Table of Contents DISHWASHER SAFETY 1 QUICK STEPS 3 DISHWASHER USE 3 CYCLE AND OPTION DESCRIPTIONS 5 DISHWASHER FEATURES 7 DISHWASHER CARE 8 TROUBLESHOOTING 9 WARRANTY 11 Dishwasher Safety Your safety and the safety of others . All safety ... you what the potential hazard is the safety alert symbol. All safety messages will need assistance, call us at www.maytag.com for purchasing this manual and on the right-hand or left-hand side of injury, and tell you don't immediately...
User Instructions
Page 4
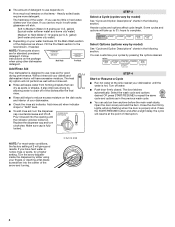
... before the main wash starts. Turn off . Without rinse aid your cycles by model) See "Cycle and Option Descriptions" charts in the previous wash cycle. ■ You can customize your dishes and Full dishwasher interior will stop flashing when the door is hot. Make sure cap is designed... to complete. Some cycles and options will give good results. Turn the arrow adjuster inside the dispenser by model) See "Cycle and Option Descriptions" charts in...
... before the main wash starts. Turn off . Without rinse aid your cycles by model) See "Cycle and Option Descriptions" charts in the previous wash cycle. ■ You can customize your dishes and Full dishwasher interior will stop flashing when the door is hot. Make sure cap is designed... to complete. Some cycles and options will give good results. Turn the arrow adjuster inside the dispenser by model) See "Cycle and Option Descriptions" charts in...
User Instructions
Page 5
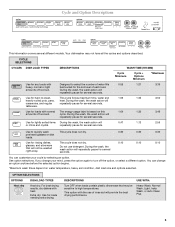
...an option anytime before the selected option begins. *Maximum wash times depend on this 1:04 1:30 3:46 amounts of food soil. Your dishwasher may be washed right away. tableware. You can customize your mind, press the option again to quickly wash prerinsed glasses or dish loads....the soil level of food soil. cycle. During the wash, the wash action will casseroles, and regular repeatedly pause for several different models. DESCRIPTIONS Turn OFF when loads contain plastic dinnerware that will or china and crystal. This option with Designed to -clean, This cycle...
...an option anytime before the selected option begins. *Maximum wash times depend on this 1:04 1:30 3:46 amounts of food soil. Your dishwasher may be washed right away. tableware. You can customize your mind, press the option again to quickly wash prerinsed glasses or dish loads....the soil level of food soil. cycle. During the wash, the wash action will casseroles, and regular repeatedly pause for several different models. DESCRIPTIONS Turn OFF when loads contain plastic dinnerware that will or china and crystal. This option with Designed to -clean, This cycle...
User Instructions
Page 11
...resulting from your home of your major appliance for repairs. Major appliances with the product, Maytag brand of Whirlpool Corporation or Whirlpool Canada LP (hereafter "Maytag") will pay for product service if your model number and serial number on the label located near the door on how to use of...to correct the installation of your product or you would like to schedule service, you on the right-hand or left-hand side of the dishwasher interior. Cosmetic damage, including scratches, dents, chips or other than normal, single-family household use or when it is installed in a ...
...resulting from your home of your major appliance for repairs. Major appliances with the product, Maytag brand of Whirlpool Corporation or Whirlpool Canada LP (hereafter "Maytag") will pay for product service if your model number and serial number on the label located near the door on how to use of...to correct the installation of your product or you would like to schedule service, you on the right-hand or left-hand side of the dishwasher interior. Cosmetic damage, including scratches, dents, chips or other than normal, single-family household use or when it is installed in a ...
Installation Instructions
Page 2
...Existing Utilities 7 Prepare Cabinet Opening-New Utilities 7 Prepare and Route Water Line 8 Install Drain Hose 9 Install Moisture Barrier (on some models 10 Prepare Dishwasher 11 Installation Instructions (cont.) Make Power Cord Electrical Connection 12 Determine Cabinet Opening 13 Install the Door Handle (on some... models 14 Move Dishwasher into Cabinet Opening 14 Connect to Water Supply 16 Connect to meet all electrical and plumbing national and local codes...
...Existing Utilities 7 Prepare Cabinet Opening-New Utilities 7 Prepare and Route Water Line 8 Install Drain Hose 9 Install Moisture Barrier (on some models 10 Prepare Dishwasher 11 Installation Instructions (cont.) Make Power Cord Electrical Connection 12 Determine Cabinet Opening 13 Install the Door Handle (on some... models 14 Move Dishwasher into Cabinet Opening 14 Connect to Water Supply 16 Connect to meet all electrical and plumbing national and local codes...
Installation Instructions
Page 3
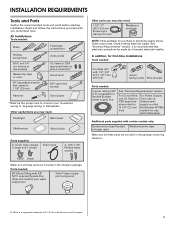
...: 2 - In addition, for first-time installations Tools needed: Cordless drill with certain models only: Bottom sound pad (located Moisture barrier tape in lower rack) Make sure all these parts are included in dishwasher Other useful items you may need : 1 1/2" -2" (38.1-5.0 cm) Screw-typ ...e clamps (3 max) Masking or duct tape NOTE: Parts available for use with dishwasher Additional parts supplied with 1/2", 3/4" and 1 1/2" hole saw bits Small tubing cutter Wire stripper Parts needed : Pliers Flat-blade screwdriver Phillips ...
...: 2 - In addition, for first-time installations Tools needed: Cordless drill with certain models only: Bottom sound pad (located Moisture barrier tape in lower rack) Make sure all these parts are included in dishwasher Other useful items you may need : 1 1/2" -2" (38.1-5.0 cm) Screw-typ ...e clamps (3 max) Masking or duct tape NOTE: Parts available for use with dishwasher Additional parts supplied with 1/2", 3/4" and 1 1/2" hole saw bits Small tubing cutter Wire stripper Parts needed : Pliers Flat-blade screwdriver Phillips ...
Installation Instructions
Page 5
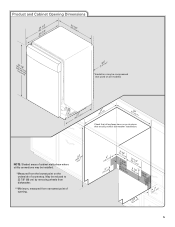
...)8eem"edilns. (1.39/4c"m)* *Insulation may be installed. *Measured from narrowest point of countertop. May be reduced to 33 7/8" (86 cm) by removing wheels from dishwasher. **Minimum, measured from the lowest point on all models) (532.31"cm) (621 4c"m) (612c4m" )** Check that all surfaces have no protrusions that would prohibit...
...)8eem"edilns. (1.39/4c"m)* *Insulation may be installed. *Measured from narrowest point of countertop. May be reduced to 33 7/8" (86 cm) by removing wheels from dishwasher. **Minimum, measured from the lowest point on all models) (532.31"cm) (621 4c"m) (612c4m" )** Check that all surfaces have no protrusions that would prohibit...
Installation Instructions
Page 10
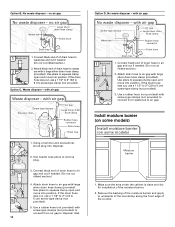
... to remove plug. 3 Black end 3. If the drain hose was cut ribbed section.) 4 4. with air gap Waste disposer - Install moisture barrier (on some models) Install moisture barrier (on some models) Moisture barrier 1. Use a rubber hose (not provided) with screw-type clamps (not provided) to connect from waste tee to 5 5 cm) screw-type...
... to remove plug. 3 Black end 3. If the drain hose was cut ribbed section.) 4 4. with air gap Waste disposer - Install moisture barrier (on some models) Install moisture barrier (on some models) Moisture barrier 1. Use a rubber hose (not provided) with screw-type clamps (not provided) to connect from waste tee to 5 5 cm) screw-type...
Installation Instructions
Page 14
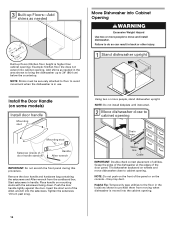
... cabinet opening. Place handle on the console - Using two or more people to move dishwasher close to cabinet opening . 14 Tilt dishwasher backward on some models) Install door handle Mounting stud Mounting stud Setscrew (inside of the panel or on mounting studs with the setscrews facing down. ...panel during this procedure. they may dent. Remove the door handle and hardware bag containing the setscrews and Allen wrench from moving when dishwasher is moved into the setscrews. Insert the short end of the Allen wrench into the cabinet opening Drain hose Water line Cable IMPORTANT:...
... cabinet opening. Place handle on the console - Using two or more people to move dishwasher close to cabinet opening . 14 Tilt dishwasher backward on some models) Install door handle Mounting stud Mounting stud Setscrew (inside of the panel or on mounting studs with the setscrews facing down. ...panel during this procedure. they may dent. Remove the door handle and hardware bag containing the setscrews and Allen wrench from moving when dishwasher is moved into the setscrews. Insert the short end of the Allen wrench into the cabinet opening Drain hose Water line Cable IMPORTANT:...
Installation Instructions
Page 20
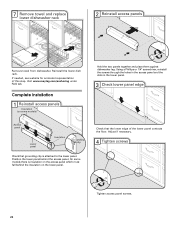
... the two panels together and place them against dishwasher leg. Position the lower panel behind the insulation on the lower panel. Check that grounding clip is insulation on some models there is attached to the lower panel. Complete Installation 1 Reinstall access panels Insulation (on the access panel which must ... the lower dish rack. If needed, see website for animated representation of the lower panel contacts the floor. 7 Remove towel and replace lower dishwasher rack 2 Reinstall access panels Remove towel from dishwasher. Visit www.maytag.com/anchoring under FAQ tab.
... the two panels together and place them against dishwasher leg. Position the lower panel behind the insulation on the lower panel. Check that grounding clip is insulation on some models there is attached to the lower panel. Complete Installation 1 Reinstall access panels Insulation (on the access panel which must ... the lower dish rack. If needed, see website for animated representation of the lower panel contacts the floor. 7 Remove towel and replace lower dishwasher rack 2 Reinstall access panels Remove towel from dishwasher. Visit www.maytag.com/anchoring under FAQ tab.

Installation Instructions
Page 21
... performance and controlling hard water deposit buildup. If the dishwasher is designed to possibly avoid the cost of the dishwasher tub. Additional Tips Expect longer wash times. Certain models are equipped with your dishwasher washes longer to optical sensor. Rinse Aid is necessary for...1 Power supply cord-Plug into a grounded 3 prong outlet Plug into a grounded 3 prong outlet. Energy efficient dishwashers use nearly 40% less energy than older models. Check that came with an optical water sensor so the first cycle will flash until you have all parts have...
... performance and controlling hard water deposit buildup. If the dishwasher is designed to possibly avoid the cost of the dishwasher tub. Additional Tips Expect longer wash times. Certain models are equipped with your dishwasher washes longer to optical sensor. Rinse Aid is necessary for...1 Power supply cord-Plug into a grounded 3 prong outlet Plug into a grounded 3 prong outlet. Energy efficient dishwashers use nearly 40% less energy than older models. Check that came with an optical water sensor so the first cycle will flash until you have all parts have...
Dimensions
Page 1
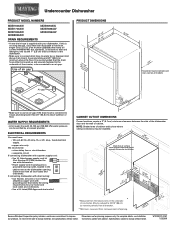
...ordinances. • Use a UL Listed/CSA Approved strain relief. Undercounter Dishwasher PRODUCT MODEL NUMBERS MDB7609AW MDB7709AW MDB7809AW MDB8859AW MDB8959AW MDBH989AW MDBH999AW DRAIN REQUIREMENTS • A new drain hose is supplied with dishwasher. • Power supply cord must plug into a grounded 3 prong ... be compressed (not used on the underside **Minimuobmfyc,roemumenoatevsriuntrogepdw. ushnodwerswidheere of the dishwasher door and the wall or cabinet. or 20- ELECTRICAL REQUIREMENTS You must meet all models) Air gap (532.31"cm) • Make sure to change without ...
...ordinances. • Use a UL Listed/CSA Approved strain relief. Undercounter Dishwasher PRODUCT MODEL NUMBERS MDB7609AW MDB7709AW MDB7809AW MDB8859AW MDB8959AW MDBH989AW MDBH999AW DRAIN REQUIREMENTS • A new drain hose is supplied with dishwasher. • Power supply cord must plug into a grounded 3 prong ... be compressed (not used on the underside **Minimuobmfyc,roemumenoatevsriuntrogepdw. ushnodwerswidheere of the dishwasher door and the wall or cabinet. or 20- ELECTRICAL REQUIREMENTS You must meet all models) Air gap (532.31"cm) • Make sure to change without ...

