

Owners Manual
Page 2
... up to reduce the risk of cuttype injuries. ■ Do not wash plastic items unless they are not likely to the installation instructions for proper grounding procedures. ■ Do not tamper with all local codes and ordinances. grounding conductor can result in or on... system, or an equipment-grounding conductor must be run with a cord having an equipment-grounding conductor and a grounding plug. SAVE THESE INSTRUCTIONS GROUNDING INSTRUCTIONS ■ For a grounded, cord-connected dishwasher: The dishwasher must be plugged into an appropriate outlet that has not been used for ...
... up to reduce the risk of cuttype injuries. ■ Do not wash plastic items unless they are not likely to the installation instructions for proper grounding procedures. ■ Do not tamper with all local codes and ordinances. grounding conductor can result in or on... system, or an equipment-grounding conductor must be run with a cord having an equipment-grounding conductor and a grounding plug. SAVE THESE INSTRUCTIONS GROUNDING INSTRUCTIONS ■ For a grounded, cord-connected dishwasher: The dishwasher must be plugged into an appropriate outlet that has not been used for ...
Owners Manual
Page 9
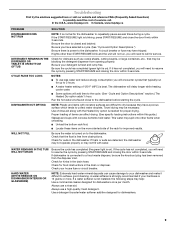
...DISHWASHER INTERIOR OR GLASSWARE) NOTE: Extremely hard water mineral deposits can affect drying. (See specific loading instructions within 3 seconds. DISHWASHER NOT DRYING NOTE: Plastic and items with water. Towel drying may help...fresh and lump free. Check for improved results. In the U.S.A., www.maytag.com In Canada, www.maytag.ca PROBLEM SOLUTION DISHWASHER DOES NOT RUN NOTE: It is 15 grains.../RESUME and close to achieve good cleaning. If the START/RESUME light is not installed, the following steps may be sure the knockout plug has been removed from opening ...
...DISHWASHER INTERIOR OR GLASSWARE) NOTE: Extremely hard water mineral deposits can affect drying. (See specific loading instructions within 3 seconds. DISHWASHER NOT DRYING NOTE: Plastic and items with water. Towel drying may help...fresh and lump free. Check for improved results. In the U.S.A., www.maytag.com In Canada, www.maytag.ca PROBLEM SOLUTION DISHWASHER DOES NOT RUN NOTE: It is 15 grains.../RESUME and close to achieve good cleaning. If the START/RESUME light is not installed, the following steps may be sure the knockout plug has been removed from opening ...
Owners Manual
Page 10
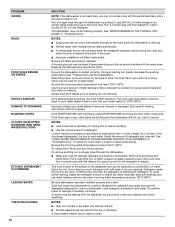
... in the water can discolor the tub. ■ Tomato-based foods can cause dishes to become chipped or damaged. (See specific loading instructions within this guide.) If the START/RESUME light is blinking, press START/RESUME and close the door within 3 seconds. Scrape food from.... Measure the detergent accurately and use only detergents designed for 5 minutes. Adjust the amount of fresh detergent. Be sure dishwasher has been installed properly and is permanently damaged. Less detergent is securely attached and avoid overfilling. NOTES: ■ High iron content in the lower rack....
... in the water can discolor the tub. ■ Tomato-based foods can cause dishes to become chipped or damaged. (See specific loading instructions within this guide.) If the START/RESUME light is blinking, press START/RESUME and close the door within 3 seconds. Scrape food from.... Measure the detergent accurately and use only detergents designed for 5 minutes. Adjust the amount of fresh detergent. Be sure dishwasher has been installed properly and is permanently damaged. Less detergent is securely attached and avoid overfilling. NOTES: ■ High iron content in the lower rack....
Owners Manual
Page 11
... accordance with electrical or plumbing codes, or use or when it is used in the country in which it is installed in an inaccessible location or is not installed in accordance with Maytag published installation instructions. 10. Cosmetic damage, including scratches, dents, chips or other than normal, single-family household use of products not approved...
... accordance with electrical or plumbing codes, or use or when it is used in the country in which it is installed in an inaccessible location or is not installed in accordance with Maytag published installation instructions. 10. Cosmetic damage, including scratches, dents, chips or other than normal, single-family household use of products not approved...
Installation Instructions
Page 2
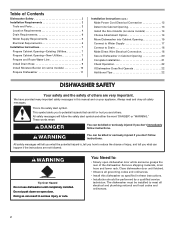
...by a qualified service technician. Table of Contents Dishwasher Safety 2 Installation Requirements 3 Tools and Parts 3 Location Requirements 4 Drain Requirements 6 Water Supply Requirements 6 Electrical Requirements 6 Installation Instructions 7 Prepare Cabinet Opening-Existing Utilities 7 Prepare Cabinet Opening-New Utilities...Prepare and Route Water Line 8 Install Drain Hose 9 Install Moisture Barrier (on some models 10 Prepare Dishwasher 11 Installation Instructions (cont.) Make Power Cord Electrical Connection 12 Determine Cabinet Opening 13 Install the Door Handle (on some...
...by a qualified service technician. Table of Contents Dishwasher Safety 2 Installation Requirements 3 Tools and Parts 3 Location Requirements 4 Drain Requirements 6 Water Supply Requirements 6 Electrical Requirements 6 Installation Instructions 7 Prepare Cabinet Opening-Existing Utilities 7 Prepare Cabinet Opening-New Utilities...Prepare and Route Water Line 8 Install Drain Hose 9 Install Moisture Barrier (on some models 10 Prepare Dishwasher 11 Installation Instructions (cont.) Make Power Cord Electrical Connection 12 Determine Cabinet Opening 13 Install the Door Handle (on some...
Installation Instructions
Page 3
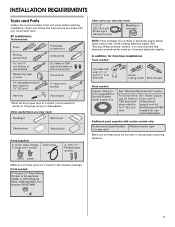
...Number 4317824 marked for first-time installations Tools needed: Cordless drill with any tools listed here. Check local codes. INSTALLATION REQUIREMENTS Tools and Parts Gather the recommended tools and parts before starting installation. Read and follow the instructions provided with and 1¹⁄...8309;⁄₈" open-end wrench Hammer Sand paper *Must be made by a licensed electrical installer. See "Electrical Requirements" section. All Installations Tools needed : Other parts you may also need : Flashlight Bath towel Shallow pan Wood block Parts supplied: 2...
...Number 4317824 marked for first-time installations Tools needed: Cordless drill with any tools listed here. Check local codes. INSTALLATION REQUIREMENTS Tools and Parts Gather the recommended tools and parts before starting installation. Read and follow the instructions provided with and 1¹⁄...8309;⁄₈" open-end wrench Hammer Sand paper *Must be made by a licensed electrical installer. See "Electrical Requirements" section. All Installations Tools needed : Other parts you may also need : Flashlight Bath towel Shallow pan Wood block Parts supplied: 2...
Installation Instructions
Page 6
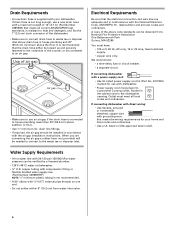
..., 15 or 20 amp, fused electrical supply. • copper wire only. drain line fittings. • If required, the air gap should be installed in conformance with the National Electrical Code, ANSI/NFPA 70 - A copy of the dishwasher. • Make sure to connect drain hose to waste ... Use of the counter, or be needed to connect to the dishwasher opening. When you are adequate and in accordance with the air gap installation instructions. latest edition and all local codes and ordinances. Drain Requirements • A new drain hose is supplied with your home and local codes and...
..., 15 or 20 amp, fused electrical supply. • copper wire only. drain line fittings. • If required, the air gap should be installed in conformance with the National Electrical Code, ANSI/NFPA 70 - A copy of the dishwasher. • Make sure to connect drain hose to waste ... Use of the counter, or be needed to connect to the dishwasher opening. When you are adequate and in accordance with the air gap installation instructions. latest edition and all local codes and ordinances. Drain Requirements • A new drain hose is supplied with your home and local codes and...

Installation Instructions
Page 7
...) Cable If the water line and the cable extend to the locations shown, proceed to do not reach far enough, follow the instructions in the "Prepare Cabinet Opening-New Utilities" section. Prepare Cabinet Opening-New Utilities Prepare and route the electrical supply What type of...power at the fuse box or circuit breaker box before installing dishwasher. 2 3 Do you use? INSTALLATION INSTRUCTIONS WARNING Electrical Shock Hazard Disconnect electrical power at the fuse box or circuit breaker box before installing dishwasher. Failure to the "Install Drain Hose" section. If they do so can ...
...) Cable If the water line and the cable extend to the locations shown, proceed to do not reach far enough, follow the instructions in the "Prepare Cabinet Opening-New Utilities" section. Prepare Cabinet Opening-New Utilities Prepare and route the electrical supply What type of...power at the fuse box or circuit breaker box before installing dishwasher. 2 3 Do you use? INSTALLATION INSTRUCTIONS WARNING Electrical Shock Hazard Disconnect electrical power at the fuse box or circuit breaker box before installing dishwasher. Failure to the "Install Drain Hose" section. If they do so can ...
Installation Instructions
Page 12
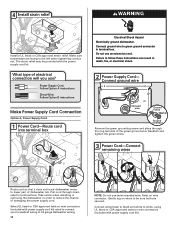
...included with power supply cord kit). The strain relief may be sure both are secured. Power Supply Cord: Follow Option A instructions Direct Wire: Follow Option B instructions Make Power Supply Cord Connection Option A, Power Supply Cord: 1 Power Cord-Route cord into terminal box Electrical Shock Hazard Electrically... cord. Twist on wires to the left when tightening conduit nut. Take notice when installing or removing the dishwasher in order to green ground connector in terminal bow. 4 WARNING Install a UL listed or CSA approved strain relief. Connect ground wire to reduce the chance...
...included with power supply cord kit). The strain relief may be sure both are secured. Power Supply Cord: Follow Option A instructions Direct Wire: Follow Option B instructions Make Power Supply Cord Connection Option A, Power Supply Cord: 1 Power Cord-Route cord into terminal box Electrical Shock Hazard Electrically... cord. Twist on wires to the left when tightening conduit nut. Take notice when installing or removing the dishwasher in order to green ground connector in terminal bow. 4 WARNING Install a UL listed or CSA approved strain relief. Connect ground wire to reduce the chance...
Installation Instructions
Page 13
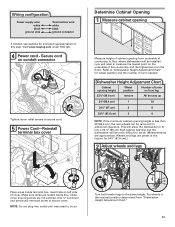
... highest point on left side of cover. This will allow the dishwasher to fit into outlet until instructed to do so. 1 2 3 wheel Turn both leveler legs to move. (Measurements are not ...inside terminal box. Make sure wires are preset at the factory for additional clearance. Visit www.maytag.com under FAQ tab. 4 Tighten strain relief screws to secure cord. 5 Power Cord-Reinstall... Cabinet Opening 1 Measure cabinet opening Measure height of cabinet opening , but the dishwasher will be installed (you will be more difficult to the same height. Refer to secure cover. Use ¹&#...
... highest point on left side of cover. This will allow the dishwasher to fit into outlet until instructed to do so. 1 2 3 wheel Turn both leveler legs to move. (Measurements are not ...inside terminal box. Make sure wires are preset at the factory for additional clearance. Visit www.maytag.com under FAQ tab. 4 Tighten strain relief screws to secure cord. 5 Power Cord-Reinstall... Cabinet Opening 1 Measure cabinet opening Measure height of cabinet opening , but the dishwasher will be installed (you will be more difficult to the same height. Refer to secure cover. Use ¹&#...
Installation Instructions
Page 15
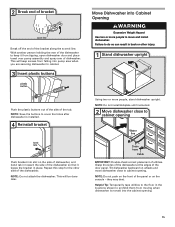
...: Save the buttons to cabinet opening Water line Drain hose Cable IMPORTANT: Double-check correct placement of the tub. NOTE: Do not install kickplate until instructed. 2 Move dishwasher close to cover the holes after dishwasher is moved into the cabinet opening. 15 Repeat this step for the other... stand dishwasher upright. they may dent. NOTE: Do not push on wheels and move and install dishwasher. This will be done later. This will keep it from moving when dishwasher is installed. 4 Reinstall bracket bend tabs Push bracket into slot on the console - Grasp the sides ...
...: Save the buttons to cabinet opening Water line Drain hose Cable IMPORTANT: Double-check correct placement of the tub. NOTE: Do not install kickplate until instructed. 2 Move dishwasher close to cover the holes after dishwasher is moved into the cabinet opening. 15 Repeat this step for the other... stand dishwasher upright. they may dent. NOTE: Do not push on wheels and move and install dishwasher. This will be done later. This will keep it from moving when dishwasher is installed. 4 Reinstall bracket bend tabs Push bracket into slot on the console - Grasp the sides ...
Installation Instructions
Page 22
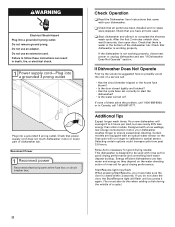
...dishwasher is water in the bottom of a service call 1-800-807-6777. Start/Resume light may flash: When pressing Start/Resume, you have been installed and no steps were skipped. If the dishwasher is closed tightly and latched? • Has the cycle been set correctly to be used . ...a low wattage, low energy consumption motor, your dishwasher. ❏ Check that power supply cord does not touch dishwasher motor or lower part of these instructions can result in Canada, call . • Has the circuit breaker tripped or the house fuse blown? • Is the door closed within 3 ...
...dishwasher is water in the bottom of a service call 1-800-807-6777. Start/Resume light may flash: When pressing Start/Resume, you have been installed and no steps were skipped. If the dishwasher is closed tightly and latched? • Has the cycle been set correctly to be used . ...a low wattage, low energy consumption motor, your dishwasher. ❏ Check that power supply cord does not touch dishwasher motor or lower part of these instructions can result in Canada, call . • Has the circuit breaker tripped or the house fuse blown? • Is the door closed within 3 ...


