

Owners Manual
Page 2
... up to the washing compartment when removing an old dishwasher from each for use in accordance with the circuit conductors and connected to the installation instructions for proper grounding procedures. ■ Do not tamper with controls. ■ Do not abuse, sit on, or stand on ... hydrogen gas. Doing so can result in serious injury or cuts. 2 if it . This will not fit the outlet, have a proper outlet installed by providing a path of children. ■ When loading items to the dishwasher. SAVE THESE INSTRUCTIONS GROUNDING INSTRUCTIONS ■ For a grounded, cord-connected...
... up to the washing compartment when removing an old dishwasher from each for use in accordance with the circuit conductors and connected to the installation instructions for proper grounding procedures. ■ Do not tamper with controls. ■ Do not abuse, sit on, or stand on ... hydrogen gas. Doing so can result in serious injury or cuts. 2 if it . This will not fit the outlet, have a proper outlet installed by providing a path of children. ■ When loading items to the dishwasher. SAVE THESE INSTRUCTIONS GROUNDING INSTRUCTIONS ■ For a grounded, cord-connected...
Owners Manual
Page 9
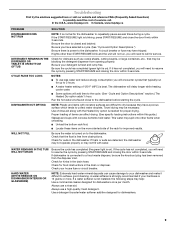
... dishwashers. 9 Use a detergent booster/water softener additive designed for food obstructions in the dishwasher. In the U.S.A., www.maytag.com In Canada, www.maytag.ca PROBLEM SOLUTION DISHWASHER DOES NOT RUN NOTE: It is not installed, the following steps may have tripped. If the START/RESUME light is free from obstructions. DETERGENT REMAINS IN...
... dishwashers. 9 Use a detergent booster/water softener additive designed for food obstructions in the dishwasher. In the U.S.A., www.maytag.com In Canada, www.maytag.ca PROBLEM SOLUTION DISHWASHER DOES NOT RUN NOTE: It is not installed, the following steps may have tripped. If the START/RESUME light is free from obstructions. DETERGENT REMAINS IN...
Owners Manual
Page 10
... Sani Rinse options. Detergent needs food soil to overflow. Do not use only detergents designed for the type of the cycle. ■ Improper installation will not run, call for tougher loads. A thumping sound may not be heard when the detergent dispenser opens during the cycle and when the...clear, it is needed in the lower rack. See "WATER REMAINS IN THE TUB/WILL NOT DRAIN" in "Troubleshooting." Be sure dishwasher has been installed properly and is removable by pre-washing. Remove all silverware and metal items. Put 2 cups (500 mL) of detergent and rinse aid. PROBLEM ...
... Sani Rinse options. Detergent needs food soil to overflow. Do not use only detergents designed for the type of the cycle. ■ Improper installation will not run, call for tougher loads. A thumping sound may not be heard when the detergent dispenser opens during the cycle and when the...clear, it is needed in the lower rack. See "WATER REMAINS IN THE TUB/WILL NOT DRAIN" in "Troubleshooting." Be sure dishwasher has been installed properly and is removable by pre-washing. Remove all silverware and metal items. Put 2 cups (500 mL) of detergent and rinse aid. PROBLEM ...
Owners Manual
Page 11
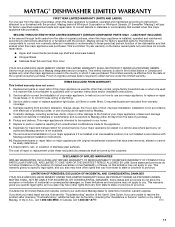
...another warranty applies. Damage resulting from accident, alteration, misuse, abuse, fire, flood, acts of God, improper installation, installation not in accordance with Maytag published installation instructions. 10. Pickup and delivery. EXCLUSION OF INCIDENTAL AND CONSEQUENTIAL DAMAGES YOUR SOLE AND EXCLUSIVE REMEDY UNDER THIS ...vary from the date of original purchase, when this major appliance is installed, operated and maintained according to instructions attached to or furnished with the product, Maytag will pay for the following components to correct non-cosmetic defects in ...
...another warranty applies. Damage resulting from accident, alteration, misuse, abuse, fire, flood, acts of God, improper installation, installation not in accordance with Maytag published installation instructions. 10. Pickup and delivery. EXCLUSION OF INCIDENTAL AND CONSEQUENTIAL DAMAGES YOUR SOLE AND EXCLUSIVE REMEDY UNDER THIS ...vary from the date of original purchase, when this major appliance is installed, operated and maintained according to instructions attached to or furnished with the product, Maytag will pay for the following components to correct non-cosmetic defects in ...
Installation Instructions
Page 2
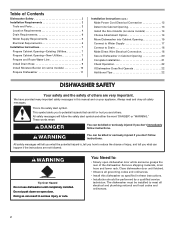
...local codes and ordinances. 2 We have provided many important safety messages in this dishwasher as specified in these instructions. • Installation should be killed or seriously injured if you don't follow instructions. Remove shipping materials, drain hose and lower rack. This ... "WARNING." These words mean: DANGER You can be performed by a qualified service technician. Close dishwasher door until completely installed. WARNING You can be installed to : • Slowly open door. Doing so can happen if the instructions are very important. The dishwasher must ...
...local codes and ordinances. 2 We have provided many important safety messages in this dishwasher as specified in these instructions. • Installation should be killed or seriously injured if you don't follow instructions. Remove shipping materials, drain hose and lower rack. This ... "WARNING." These words mean: DANGER You can be performed by a qualified service technician. Close dishwasher door until completely installed. WARNING You can be installed to : • Slowly open door. Doing so can happen if the instructions are very important. The dishwasher must ...
Installation Instructions
Page 3
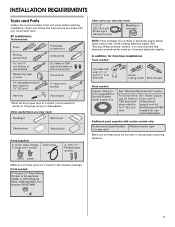
...use with dishwasher Additional parts supplied with any tools listed here. Check existing electrical supply. See "Electrical Requirements" section. All Installations Tools needed: Pliers Flat-blade screwdriver Phillips screwdriver and ¹⁄₄" nut drivers or hex sockets Measuring tape or ruler... twist-on wire connectors* Small level ⁵⁄₈" open-end wrench Hammer Sand paper *Must be made by a licensed electrical installer. It is recommended that opens to 16-gauge wiring in dishwasher Other useful items you may need : 1 ¹⁄₂" -2"...
...use with dishwasher Additional parts supplied with any tools listed here. Check existing electrical supply. See "Electrical Requirements" section. All Installations Tools needed: Pliers Flat-blade screwdriver Phillips screwdriver and ¹⁄₄" nut drivers or hex sockets Measuring tape or ruler... twist-on wire connectors* Small level ⁵⁄₈" open-end wrench Hammer Sand paper *Must be made by a licensed electrical installer. It is recommended that opens to 16-gauge wiring in dishwasher Other useful items you may need : 1 ¹⁄₂" -2"...
Installation Instructions
Page 4
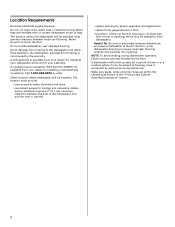
...and drain hose are within the shaded area shown in the dishwasher opening is not level with or contact dishwasher motor or legs. Do not install dishwasher over carpeted flooring. Corner locations require a 2" (5.1 cm) minimum clearance between motor and flooring. Location Requirements Grounded electrical supply required....drain lines, water lines or electrical wiring where they can interfere with floor at front of opening is available from your dealer for installing your dishwasher at the end of your dealer for a period of time or in a location where it winterized by the warranty...
...and drain hose are within the shaded area shown in the dishwasher opening is not level with or contact dishwasher motor or legs. Do not install dishwasher over carpeted flooring. Corner locations require a 2" (5.1 cm) minimum clearance between motor and flooring. Location Requirements Grounded electrical supply required....drain lines, water lines or electrical wiring where they can interfere with floor at front of opening is available from your dealer for installing your dishwasher at the end of your dealer for a period of time or in a location where it winterized by the warranty...
Installation Instructions
Page 5
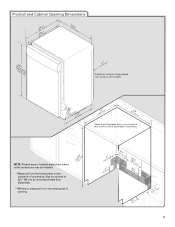
...;"cm) (165¹.⁄₄9"cm) CAlreeaar 1³(⁄4₄".4 cm) (5.12"cm) 5 NOTE: Shaded areas of cabinet walls show where utility connections may be installed. *Measured from narrowest point of countertop. May be reduced to 33⁷⁄₈" (86 cm) by removing wheels from dishwasher. **Minimum, measured from the...
...;"cm) (165¹.⁄₄9"cm) CAlreeaar 1³(⁄4₄".4 cm) (5.12"cm) 5 NOTE: Shaded areas of cabinet walls show where utility connections may be installed. *Measured from narrowest point of countertop. May be reduced to 33⁷⁄₈" (86 cm) by removing wheels from dishwasher. **Minimum, measured from the...
Installation Instructions
Page 6
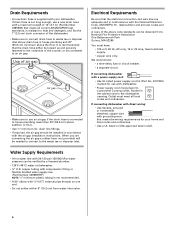
drain line fittings. • If required, the air gap should be installed in house plumbing and 20" (50.8 cm) minimum above code standards can be connected to heat and detergent, and fits the 1" (2.5 cm) drain connector of ... dishwasher. • Make sure to connect drain hose to house plumbing lower than 20" (50.8 cm) above drain trap in accordance with the air gap installation instructions. copper tubing with compression fitting or flexible braided water supply line (Part Number 4396897RP) NOTE: ¹⁄₂" minimum plastic tubing is supplied with...
drain line fittings. • If required, the air gap should be installed in house plumbing and 20" (50.8 cm) minimum above code standards can be connected to heat and detergent, and fits the 1" (2.5 cm) drain connector of ... dishwasher. • Make sure to connect drain hose to house plumbing lower than 20" (50.8 cm) above drain trap in accordance with the air gap installation instructions. copper tubing with compression fitting or flexible braided water supply line (Part Number 4396897RP) NOTE: ¹⁄₂" minimum plastic tubing is supplied with...

Installation Instructions
Page 7
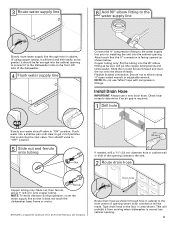
...Follow Option B instructions Option A, Power Supply Cord: NOTE: A grounded 3 prong outlet is required inside a cabinet next to the "Install Drain Hose" section. Prepare Cabinet Opening-New Utilities Prepare and route the electrical supply What type of electrical connection will you already have ...utility hookups? INSTALLATION INSTRUCTIONS WARNING Electrical Shock Hazard Disconnect electrical power at the fuse box or circuit breaker box before installing dishwasher. If they do so can result in death or electrical shock...
...Follow Option B instructions Option A, Power Supply Cord: NOTE: A grounded 3 prong outlet is required inside a cabinet next to the "Install Drain Hose" section. Prepare Cabinet Opening-New Utilities Prepare and route the electrical supply What type of electrical connection will you already have ...utility hookups? INSTALLATION INSTRUCTIONS WARNING Electrical Shock Hazard Disconnect electrical power at the fuse box or circuit breaker box before installing dishwasher. If they do so can result in death or electrical shock...
Installation Instructions
Page 9
... wall or side of the dishwasher. 4 Flush water supply line Connect the ³⁄₈" compression fitting to the water supply line prior to installing the unit into cabinet opening to connect it will go (the copper tubing bends and kinks easily). Tape drain hose to the sink. 2 Route ...supply line 6 Add 90° elbow fitting to the water supply line Slowly route water supply line through hole in cabinet to "ON" position. Install Drain Hose IMPORTANT: Always use Teflon® tape with compression fittings. Drain hose Route drain hose as it will bend and kink easily, so be...
... wall or side of the dishwasher. 4 Flush water supply line Connect the ³⁄₈" compression fitting to the water supply line prior to installing the unit into cabinet opening to connect it will go (the copper tubing bends and kinks easily). Tape drain hose to the sink. 2 Route ...supply line 6 Add 90° elbow fitting to the water supply line Slowly route water supply line through hole in cabinet to "ON" position. Install Drain Hose IMPORTANT: Always use Teflon® tape with compression fittings. Drain hose Route drain hose as it will bend and kink easily, so be...
Installation Instructions
Page 10
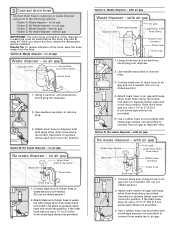
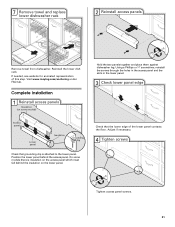
... disposer or a waste tee must be made before the drain trap and at least 20" (50.8 cm) above the floor where the dishwasher will be installed. no air gap Waste disposer - Using a hammer and screwdriver, knock plug into position. Use a rubber hose (not provided) with large silver drain hose clamp (provided...
... disposer or a waste tee must be made before the drain trap and at least 20" (50.8 cm) above the floor where the dishwasher will be installed. no air gap Waste disposer - Using a hammer and screwdriver, knock plug into position. Use a rubber hose (not provided) with large silver drain hose clamp (provided...
Installation Instructions
Page 11
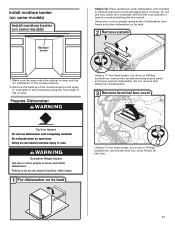
...and dry for later use. 11 Using two or more people to do so can result in serious injury or cuts. Failure to move and install dishwasher. WARNING Excessive Weight Hazard Use two or more people, grasp sides of dishwasher door frame and place dishwasher on its back Using a &#...185;⁄₄" hex head socket, nut driver or Phillips screwdriver, remove terminal box cover. Retain for installation of the counter. Do not remove tech sheet from access panel. 3 Remove terminal box cover Tip Over Hazard Do not use door panel as a ...
...and dry for later use. 11 Using two or more people to do so can result in serious injury or cuts. Failure to move and install dishwasher. WARNING Excessive Weight Hazard Use two or more people, grasp sides of dishwasher door frame and place dishwasher on its back Using a &#...185;⁄₄" hex head socket, nut driver or Phillips screwdriver, remove terminal box cover. Retain for installation of the counter. Do not remove tech sheet from access panel. 3 Remove terminal box cover Tip Over Hazard Do not use door panel as a ...
Installation Instructions
Page 12
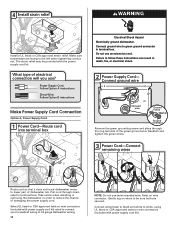
... Cord Connection Option A, Power Supply Cord: 1 Power Cord-Route cord into terminal box Electrical Shock Hazard Electrically ground dishwasher. Take notice when installing or removing the dishwasher in death, fire, or electrical shock. 2 Power Supply Cord- Connect wires black to black and white to reduce... the chance of electrical connection will you use an extension cord. 4 WARNING Install a UL listed or CSA approved strain relief. Failure to follow these instructions can result in order to white, using UL listed or CSA...
... Cord Connection Option A, Power Supply Cord: 1 Power Cord-Route cord into terminal box Electrical Shock Hazard Electrically ground dishwasher. Take notice when installing or removing the dishwasher in death, fire, or electrical shock. 2 Power Supply Cord- Connect wires black to black and white to reduce... the chance of electrical connection will you use an extension cord. 4 WARNING Install a UL listed or CSA approved strain relief. Failure to follow these instructions can result in order to white, using UL listed or CSA...
Installation Instructions
Page 13
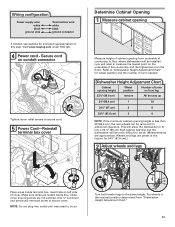
Visit www.maytag.com under FAQ tab. 4 Tighten strain relief screws to secure cord. 5 Power Cord-Reinstall terminal box cover Determine Cabinet Opening 1 Measure cabinet opening Measure height ... additional clearance. NOTE: Do not plug into a 33 86 cm) high cabinet opening height is less than 34"(86.4 cm), the rear wheels can be installed (you will be more difficult to measure the lowest point on the underside of countertop to the same height. Dishwasher Height Adjustment Chart Cabinet opening...
Visit www.maytag.com under FAQ tab. 4 Tighten strain relief screws to secure cord. 5 Power Cord-Reinstall terminal box cover Determine Cabinet Opening 1 Measure cabinet opening Measure height ... additional clearance. NOTE: Do not plug into a 33 86 cm) high cabinet opening height is less than 34"(86.4 cm), the rear wheels can be installed (you will be more difficult to measure the lowest point on the underside of countertop to the same height. Dishwasher Height Adjustment Chart Cabinet opening...
Installation Instructions
Page 14
...NOTE: Do not attach the dishwasher. Using 2 or more people to bring the dishwasher up . Option 1, Countertop attachment: Countertop attachment brackets Install the Door Handle (on mounting studs with pliers, and pull the brackets out of the slots. 14 Insert the short end of the dishwasher... as needed (140."1 cm) (52c"m) 2(³7⁄₄c"m) Built-up Floors - Add shims as needed in the area shown to move and install dishwasher. 3 Built-up floors (Kitchen floor height is in use. Tighten the setscrews ¹⁄₄ turn past snug. Option 2, Dishwasher side...
...NOTE: Do not attach the dishwasher. Using 2 or more people to bring the dishwasher up . Option 1, Countertop attachment: Countertop attachment brackets Install the Door Handle (on mounting studs with pliers, and pull the brackets out of the slots. 14 Insert the short end of the dishwasher... as needed (140."1 cm) (52c"m) 2(³7⁄₄c"m) Built-up Floors - Add shims as needed in the area shown to move and install dishwasher. 3 Built-up floors (Kitchen floor height is in use. Tighten the setscrews ¹⁄₄ turn past snug. Option 2, Dishwasher side...
Installation Instructions
Page 15
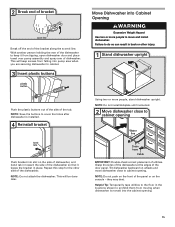
...or more people to move dishwasher close to the floor in place. NOTE: Save the buttons to prohibit them from moving when dishwasher is installed. 4 Reinstall bracket bend tabs Push bracket into the cabinet opening. 15 Excessive Weight Hazard Use two or more people, stand dishwasher upright. ...: Double-check correct placement of utilities. Failure to do so can result in back or other side of the tub. NOTE: Do not install kickplate until instructed. 2 Move dishwasher close to cabinet. 3 Insert plastic buttons plastic button Push the plastic buttons out of the side of ...
...or more people to move dishwasher close to the floor in place. NOTE: Save the buttons to prohibit them from moving when dishwasher is installed. 4 Reinstall bracket bend tabs Push bracket into the cabinet opening. 15 Excessive Weight Hazard Use two or more people, stand dishwasher upright. ...: Double-check correct placement of utilities. Failure to do so can result in back or other side of the tub. NOTE: Do not install kickplate until instructed. 2 Move dishwasher close to cabinet. 3 Insert plastic buttons plastic button Push the plastic buttons out of the side of ...

Installation Instructions
Page 17
...; elbow fitting. Check that dishwasher is tight. If needed, adjust leveling leg until the coupling is level from front to back in fitting. With some installations, it may be easier to adjust the front leg using the hex head socket or adjustable wrench. Close and latch the door, and place level...
...; elbow fitting. Check that dishwasher is tight. If needed, adjust leveling leg until the coupling is level from front to back in fitting. With some installations, it may be easier to adjust the front leg using the hex head socket or adjustable wrench. Close and latch the door, and place level...
Installation Instructions
Page 21
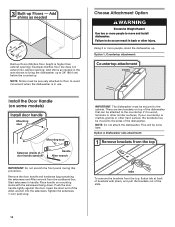
On some models) Hold the two panels together and place them against dishwasher leg. Visit www.maytag.com/anchoring under FAQ tab. Adjust if necessary. 4 Tighten screws Tighten access panel screws. 21 7 Remove towel and replace lower dishwasher rack 2 Reinstall access panels ... slots in the lower panel. 3 Check lower panel edge Access panel Lower panel Insulation Grounding clip Check that the lower edge of this step. Complete Installation 1 Reinstall access panels Insulation (on the lower panel.
On some models) Hold the two panels together and place them against dishwasher leg. Visit www.maytag.com/anchoring under FAQ tab. Adjust if necessary. 4 Tighten screws Tighten access panel screws. 21 7 Remove towel and replace lower dishwasher rack 2 Reinstall access panels ... slots in the lower panel. 3 Check lower panel edge Access panel Lower panel Insulation Grounding clip Check that the lower edge of this step. Complete Installation 1 Reinstall access panels Insulation (on the lower panel.
Installation Instructions
Page 22
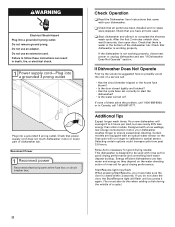
.... Check Operation ❏ Read the Dishwasher User Instructions that came with a low wattage, low energy consumption motor, your dishwasher. ❏ Check that you have been installed and no steps were skipped. If the dishwasher is water in death, fire, or electrical shock. 1 Power supply cord-Plug into a grounded 3 prong outlet Plug...
.... Check Operation ❏ Read the Dishwasher User Instructions that came with a low wattage, low energy consumption motor, your dishwasher. ❏ Check that you have been installed and no steps were skipped. If the dishwasher is water in death, fire, or electrical shock. 1 Power supply cord-Plug into a grounded 3 prong outlet Plug...


