

Owners Manual
Page 2
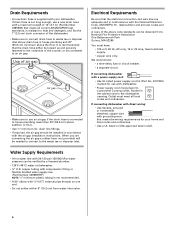
... so can result in a risk of electric shock by a qualified electrician. ■ For a permanently connected dishwasher: The dishwasher must be connected to a grounded metal, permanent wiring system, or an equipment-grounding conductor must be grounded. HYDROGEN GAS IS EXPLOSIVE. Do not push down on the dishwasher. IMPORTANT SAFETY INSTRUCTIONS WARNING: When...
... so can result in a risk of electric shock by a qualified electrician. ■ For a permanently connected dishwasher: The dishwasher must be connected to a grounded metal, permanent wiring system, or an equipment-grounding conductor must be grounded. HYDROGEN GAS IS EXPLOSIVE. Do not push down on the dishwasher. IMPORTANT SAFETY INSTRUCTIONS WARNING: When...
Owners Manual
Page 11
...Some states and provinces do not allow limitations on how to use your major appliance is located in a remote area where service by Maytag. 5. MAYTAG SHALL NOT BE LIABLE FOR INCIDENTAL OR CONSEQUENTIAL DAMAGES. Some states and provinces do not allow the exclusion or limitation of incidental or...coverage. 4. Expenses for travel and transportation for product service if your major appliance, to replace or repair house fuses, or to correct house wiring or plumbing. 3. This warranty gives you specific legal rights, and you also may not apply to you need repair service, first see the...
...Some states and provinces do not allow limitations on how to use your major appliance is located in a remote area where service by Maytag. 5. MAYTAG SHALL NOT BE LIABLE FOR INCIDENTAL OR CONSEQUENTIAL DAMAGES. Some states and provinces do not allow the exclusion or limitation of incidental or...coverage. 4. Expenses for travel and transportation for product service if your major appliance, to replace or repair house fuses, or to correct house wiring or plumbing. 3. This warranty gives you specific legal rights, and you also may not apply to you need repair service, first see the...
Installation Instructions
Page 2
... (on some models 14 Choose Attachment Option 14 Move Dishwasher into Cabinet Opening 15 Connect to Water Supply 17 Connect to Drain 18 Make Direct Wire Electrical Connection 18 Secure Dishwasher in Cabinet Opening 20 Complete Installation 21 Check Operation 22 If Dishwasher Does Not Operate 22 Additional Tips 22 DISHWASHER...
... (on some models 14 Choose Attachment Option 14 Move Dishwasher into Cabinet Opening 15 Connect to Water Supply 17 Connect to Drain 18 Make Direct Wire Electrical Connection 18 Secure Dishwasher in Cabinet Opening 20 Complete Installation 21 Check Operation 22 If Dishwasher Does Not Operate 22 Additional Tips 22 DISHWASHER...
Installation Instructions
Page 3
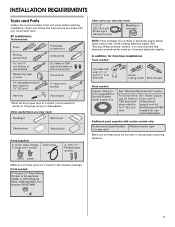
...tape NOTE: Parts available for first-time installations Tools needed: Cordless drill with and 1¹⁄₂ " hole saw bits Small tubing cutter Wire stripper Parts needed : Other parts you may need: Flashlight Bath towel Shallow pan Wood block Parts supplied: 2 - All Installations Tools needed: ...nut drivers or hex sockets Measuring tape or ruler 10" adjustable wrench that electrical connections be the proper size to connect your household wiring to fit 2.2 cm) hole For Power Supply Cord: use UL listed power supply cord kit Part Number 4317824 marked for use with...
...tape NOTE: Parts available for first-time installations Tools needed: Cordless drill with and 1¹⁄₂ " hole saw bits Small tubing cutter Wire stripper Parts needed : Other parts you may need: Flashlight Bath towel Shallow pan Wood block Parts supplied: 2 - All Installations Tools needed: ...nut drivers or hex sockets Measuring tape or ruler 10" adjustable wrench that electrical connections be the proper size to connect your household wiring to fit 2.2 cm) hole For Power Supply Cord: use UL listed power supply cord kit Part Number 4317824 marked for use with...
Installation Instructions
Page 4
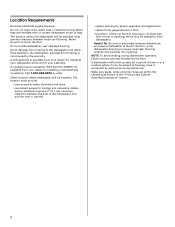
... a 2" (5.1 cm) minimum clearance between motor and flooring. Do not install dishwasher over carpeted flooring. Do not run drain lines, water lines or electrical wiring where they can interfere with floor at the end of time or in the "Product and Cabinet Opening Dimensions" section. 4 Make sure pipes..., wires and drain hose are within the shaded area shown in a location where it may be installed must be left unused for installing your dealer ...
... a 2" (5.1 cm) minimum clearance between motor and flooring. Do not install dishwasher over carpeted flooring. Do not run drain lines, water lines or electrical wiring where they can interfere with floor at the end of time or in the "Product and Cabinet Opening Dimensions" section. 4 Make sure pipes..., wires and drain hose are within the shaded area shown in a location where it may be installed must be left unused for installing your dealer ...
Installation Instructions
Page 6
... is not long enough, use a new drain hose with a maximum length of 12' (3.7 m) (Part Number 3385556) that the electrical connection and wire size are connecting the air gap a rubber hose (not provided) will be installed in conformance with the air gap installation instructions. drain line fittings....compression fitting or flexible braided water supply line (Part Number 4396897RP) NOTE: ¹⁄₂" minimum plastic tubing is supplied with grounding wire that the drain hose either be connected to the dishwasher opening. It is connected to use with 20-120 psi (138-862 kPa...
... is not long enough, use a new drain hose with a maximum length of 12' (3.7 m) (Part Number 3385556) that the electrical connection and wire size are connecting the air gap a rubber hose (not provided) will be installed in conformance with the air gap installation instructions. drain line fittings....compression fitting or flexible braided water supply line (Part Number 4396897RP) NOTE: ¹⁄₂" minimum plastic tubing is supplied with grounding wire that the drain hose either be connected to the dishwasher opening. It is connected to use with 20-120 psi (138-862 kPa...

Installation Instructions
Page 7
..., proceed to do not reach far enough, follow the instructions in the "Prepare Cabinet Opening-Existing Utilities" section. Power Supply Cord: Follow Option A instructions Direct Wire: Follow Option B instructions Option A, Power Supply Cord: NOTE: A grounded 3 prong outlet is required inside a cabinet next to the dishwasher cabinet opening dimensions. 7 See product and...
..., proceed to do not reach far enough, follow the instructions in the "Prepare Cabinet Opening-Existing Utilities" section. Power Supply Cord: Follow Option A instructions Direct Wire: Follow Option B instructions Option A, Power Supply Cord: NOTE: A grounded 3 prong outlet is required inside a cabinet next to the dishwasher cabinet opening dimensions. 7 See product and...
Installation Instructions
Page 8
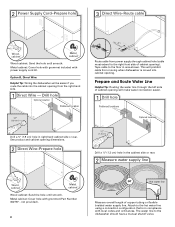
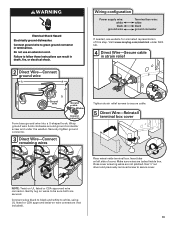
...cable must extend to the hot water line using a connection configuration that is moved into the cabinet opening from the right-hand side. 1 Direct Wire - Metal cabinet: Cover hole with power supply cord kit. Metal cabinet: Cover hole with grommet included with grommet (Part Number 302797 - This ...left side of cabinet opening will be easier if you route the cable into cabinet opening ). 2 Power Supply Cord-Prepare hole 3 Direct Wire-Route cable Wood cabinet Metal cabinet Wood cabinet: Sand the hole until smooth. The water line to the floor in compliance with local codes...
...cable must extend to the hot water line using a connection configuration that is moved into the cabinet opening from the right-hand side. 1 Direct Wire - Metal cabinet: Cover hole with power supply cord kit. Metal cabinet: Cover hole with grommet included with grommet (Part Number 302797 - This ...left side of cabinet opening will be easier if you route the cable into cabinet opening ). 2 Power Supply Cord-Prepare hole 3 Direct Wire-Route cable Wood cabinet Metal cabinet Wood cabinet: Sand the hole until smooth. The water line to the floor in compliance with local codes...
Installation Instructions
Page 12
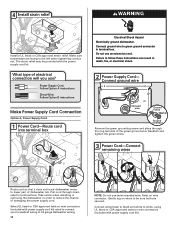
...to white, using UL listed or CSA approved twist-on wires to follow these instructions can result in terminal bow. Gently tug on wire connectors (included with the power supply cord kit. Connect ground wire Ground wire Ground wire Washer Ground connector Remove the green grounding screw and place... Supply Cord- What type of damaging the power supply cord. Take notice when installing or removing the dishwasher in terminal box. Connect ground wire to green ground connector in order to the left when tightening conduit nut. Do not use ? 4 WARNING Install a UL listed or CSA...
...to white, using UL listed or CSA approved twist-on wires to follow these instructions can result in terminal bow. Gently tug on wire connectors (included with the power supply cord kit. Connect ground wire Ground wire Ground wire Washer Ground connector Remove the green grounding screw and place... Supply Cord- What type of damaging the power supply cord. Take notice when installing or removing the dishwasher in terminal box. Connect ground wire to green ground connector in order to the left when tightening conduit nut. Do not use ? 4 WARNING Install a UL listed or CSA...
Installation Instructions
Page 13
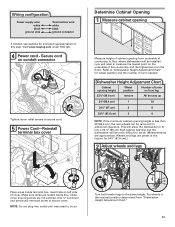
Visit www.maytag.com under FAQ tab. 4 Tighten strain relief screws to secure cord. 5 Power Cord-Reinstall terminal box cover Determine Cabinet Opening 1 Measure cabinet opening from "Dishwasher Height Adjustment Chart." 13 Refer to the same height. Close cover ensuring wires are tucked inside ...you will be removed for 34¹⁄₂" [87.6 cm].) 2 Adjust wheels and legs Place wires inside box. Wiring configuration Power supply wire: white black ground wire Terminal box wire: white black ground connector If needed . NOTE: Do not plug into a 33 86 cm) high ...
Visit www.maytag.com under FAQ tab. 4 Tighten strain relief screws to secure cord. 5 Power Cord-Reinstall terminal box cover Determine Cabinet Opening 1 Measure cabinet opening from "Dishwasher Height Adjustment Chart." 13 Refer to the same height. Close cover ensuring wires are tucked inside ...you will be removed for 34¹⁄₂" [87.6 cm].) 2 Adjust wheels and legs Place wires inside box. Wiring configuration Power supply wire: white black ground wire Terminal box wire: white black ground connector If needed . NOTE: Do not plug into a 33 86 cm) high ...

Installation Instructions
Page 16
... move the tensioner to a lower numbered hole and replace the screw. Do not kink or pinch water line, drain hose, power supply cord or direct wire between dishwasher and cabinet. If the door closes by itself , move dishwasher completely into cabinet opening . 4 Open and close the door a few times. NOTE: Tensioners...
... move the tensioner to a lower numbered hole and replace the screw. Do not kink or pinch water line, drain hose, power supply cord or direct wire between dishwasher and cabinet. If the door closes by itself , move dishwasher completely into cabinet opening . 4 Open and close the door a few times. NOTE: Tensioners...
Installation Instructions
Page 18
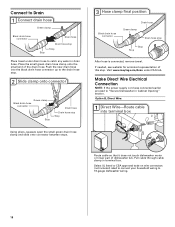
... (not included) rated to connect your household wiring to catch any water in drain hose. If needed, see website for animated representation of the drain hose. Place the small green drain hose clamp onto the small end of this step. Visit www.maytag.com/drain under drain hose to 16-gauge... dishwasher wiring. 18 Option B, Direct Wire: 1 Direct Wire-Route cable into the black drain hose connector up to the drain hose stop. 2 Slide clamp onto connector...
... (not included) rated to connect your household wiring to catch any water in drain hose. If needed, see website for animated representation of the drain hose. Place the small green drain hose clamp onto the small end of this step. Visit www.maytag.com/drain under drain hose to 16-gauge... dishwasher wiring. 18 Option B, Direct Wire: 1 Direct Wire-Route cable into the black drain hose connector up to the drain hose stop. 2 Slide clamp onto connector...
Installation Instructions
Page 19
..., or electrical shock. 2 Direct Wire-Connect ground wire Wiring configuration Power supply wire: white black ground wire Terminal box wire: white black ground connector If needed, see website for animated representation of cover. Connect wires black to black and white to secure cable. 5 Direct Wire-Reinstall terminal box cover Place wires inside box. Visit www.maytag.com/electrical under the...
..., or electrical shock. 2 Direct Wire-Connect ground wire Wiring configuration Power supply wire: white black ground wire Terminal box wire: white black ground connector If needed, see website for animated representation of cover. Connect wires black to black and white to secure cable. 5 Direct Wire-Reinstall terminal box cover Place wires inside box. Visit www.maytag.com/electrical under the...
