
Owners Manual
Page 8
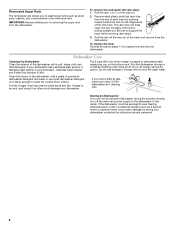
... authorized service personnel. 8 Be sure to support the track while removing rack stops. 3. Remove each plastic push tab rack stop ): 1. Stainless Steel Cleaner and Polish Part Number 31464. Roll the rack all the way out of the rack stop will mix with a soft, damp cloth and mild detergent.
... authorized service personnel. 8 Be sure to support the track while removing rack stops. 3. Remove each plastic push tab rack stop ): 1. Stainless Steel Cleaner and Polish Part Number 31464. Roll the rack all the way out of the rack stop will mix with a soft, damp cloth and mild detergent.
Owners Manual
Page 11
...Guide. Some states and provinces do not allow limitations on how to use of products not approved by Maytag. 5. SECOND THROUGH TENTH YEAR LIMITED WARRANTY (CERTAIN COMPONENT PARTS ONLY - This limited warranty is valid in the United States or Canada and applies only when the ... UNDER THE LIMITED WARRANTY SHALL BE PRODUCT REPAIR AS PROVIDED HEREIN. Service must be easily determined. 11. MAYTAG® DISHWASHER LIMITED WARRANTY FIRST YEAR LIMITED WARRANTY (PARTS AND LABOR) For one year from the date of purchase, when this major appliance is installed, operated ...
...Guide. Some states and provinces do not allow limitations on how to use of products not approved by Maytag. 5. SECOND THROUGH TENTH YEAR LIMITED WARRANTY (CERTAIN COMPONENT PARTS ONLY - This limited warranty is valid in the United States or Canada and applies only when the ... UNDER THE LIMITED WARRANTY SHALL BE PRODUCT REPAIR AS PROVIDED HEREIN. Service must be easily determined. 11. MAYTAG® DISHWASHER LIMITED WARRANTY FIRST YEAR LIMITED WARRANTY (PARTS AND LABOR) For one year from the date of purchase, when this major appliance is installed, operated ...
Installation Instructions
Page 2
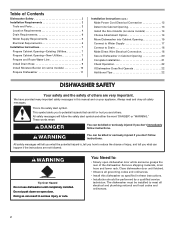
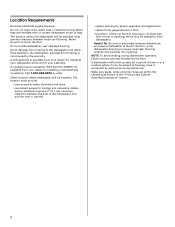
... door while someone grasps the rear of the dishwasher. You Need to: • Slowly open door. Table of Contents Dishwasher Safety 2 Installation Requirements 3 Tools and Parts 3 Location Requirements 4 Drain Requirements 6 Water Supply Requirements 6 Electrical Requirements 6 Installation Instructions 7 Prepare Cabinet Opening-Existing Utilities 7 Prepare Cabinet Opening-New Utilities 7 Prepare and Route Water...
... door while someone grasps the rear of the dishwasher. You Need to: • Slowly open door. Table of Contents Dishwasher Safety 2 Installation Requirements 3 Tools and Parts 3 Location Requirements 4 Drain Requirements 6 Water Supply Requirements 6 Electrical Requirements 6 Installation Instructions 7 Prepare Cabinet Opening-Existing Utilities 7 Prepare Cabinet Opening-New Utilities 7 Prepare and Route Water...
Installation Instructions
Page 3
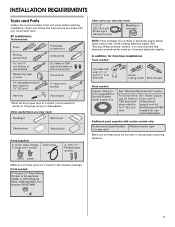
... household wiring to fit 2.2 cm) hole For Power Supply Cord: use UL listed power supply cord kit Part Number 4317824 marked for purchase in plumbing supply stores. Parts needed : Copper tubing O.D. See "Electrical Requirements" section. It is recommended that opens to 1¹⁄&#... (1 large and 1 small) Drain hose 2 - #10 x ¹⁄₂" Phillips-head screws Silver Green Make sure all these parts are included in the literature package. suggested) or flexible braided water supply line See "Electrical Requirements" section For Direct Wire: use UL listed...
... household wiring to fit 2.2 cm) hole For Power Supply Cord: use UL listed power supply cord kit Part Number 4317824 marked for purchase in plumbing supply stores. Parts needed : Copper tubing O.D. See "Electrical Requirements" section. It is recommended that opens to 1¹⁄&#... (1 large and 1 small) Drain hose 2 - #10 x ¹⁄₂" Phillips-head screws Silver Green Make sure all these parts are included in the literature package. suggested) or flexible braided water supply line See "Electrical Requirements" section For Direct Wire: use UL listed...
Installation Instructions
Page 4
... dealer for installing your dealer for loading and unloading dishes. Damage from freezing to the dishwasher and water lines leading to order. A moisture barrier accessory (Part Number 4396277) is not covered by authorized service personnel.
... dealer for installing your dealer for loading and unloading dishes. Damage from freezing to the dishwasher and water lines leading to order. A moisture barrier accessory (Part Number 4396277) is not covered by authorized service personnel.
Installation Instructions
Page 6
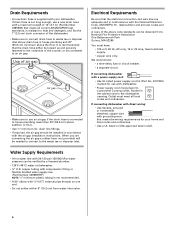
...the dishwasher opening. Outlet must meet all local codes and ordinances. O.D. copper tubing with compression fitting or flexible braided water supply line (Part Number 4396897RP) NOTE: ¹⁄₂" minimum plastic tubing is supplied with your home and local codes and ordinances. • Use... supply. • copper wire only. If connecting dishwasher with a power supply cord: • Use UL listed power supply cord kit (Part No. 4317824) marked for your dishwasher. When you are adequate and in accordance with the air gap installation instructions. Drain Requirements • ...
...the dishwasher opening. Outlet must meet all local codes and ordinances. O.D. copper tubing with compression fitting or flexible braided water supply line (Part Number 4396897RP) NOTE: ¹⁄₂" minimum plastic tubing is supplied with your home and local codes and ordinances. • Use... supply. • copper wire only. If connecting dishwasher with a power supply cord: • Use UL listed power supply cord kit (Part No. 4317824) marked for your dishwasher. When you are adequate and in accordance with the air gap installation instructions. Drain Requirements • ...
Installation Instructions
Page 8
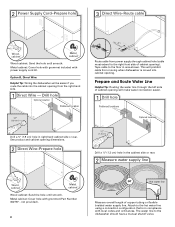
... opening will make water connection easier. 1 Drill hole PrPerfeefrerrereddloloccaations OOpptitoionnaal llolocacattioionnss ¹⁄₂" (1.3 cm) Drill a ¹⁄₂" (1.3 cm) hole in compliance with grommet (Part Number 302797 - Attach to the right front side of cabinet opening). Option B, Direct Wire: Helpful Tip: Wiring the dishwasher will prohibit cable from moving when...
... opening will make water connection easier. 1 Drill hole PrPerfeefrerrereddloloccaations OOpptitoionnaal llolocacattioionnss ¹⁄₂" (1.3 cm) Drill a ¹⁄₂" (1.3 cm) hole in compliance with grommet (Part Number 302797 - Attach to the right front side of cabinet opening). Option B, Direct Wire: Helpful Tip: Wiring the dishwasher will prohibit cable from moving when...
Installation Instructions
Page 12
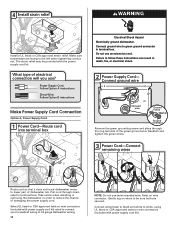
... with the power supply cord kit. Gently tug on wire connectors (included with power supply cord kit) rated to connect your household wiring to lower part of damaging the power supply cord. Select UL listed or CSA approved twist-on wire connector. Pull cord through the ring terminal of electrical connection...
... with the power supply cord kit. Gently tug on wire connectors (included with power supply cord kit) rated to connect your household wiring to lower part of damaging the power supply cord. Select UL listed or CSA approved twist-on wire connector. Pull cord through the ring terminal of electrical connection...
Installation Instructions
Page 18
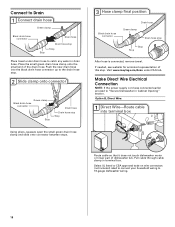
Visit www.maytag.com/drain under drain hose to catch any water in drain hose. Option B, Direct Wire: 1 Direct Wire-Route cable into the black drain hose connector ... Place towel under FAQ tab. Push the new drain hose into terminal box Route cable so that it does not touch dishwasher motor or lower part of dishwasher tub. Select UL listed or CSA approved twist-on wire connectors (not included) rated to connect your household wiring to "Secure Dishwasher in...
Visit www.maytag.com/drain under drain hose to catch any water in drain hose. Option B, Direct Wire: 1 Direct Wire-Route cable into the black drain hose connector ... Place towel under FAQ tab. Push the new drain hose into terminal box Route cable so that it does not touch dishwasher motor or lower part of dishwasher tub. Select UL listed or CSA approved twist-on wire connectors (not included) rated to connect your household wiring to "Secure Dishwasher in...
Installation Instructions
Page 22
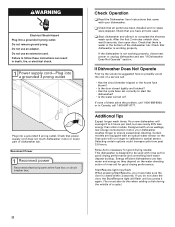
... for good drying results: This dishwasher is designed to 3 hours per load, but use less water and energy so they depend on ? Check that all parts have all tools used with your dishwasher washes longer to ensure exceptional cleaning. Designed with an optical water sensor so the first cycle will average... to complete the shortest wash cycle. Check Operation ❏ Read the Dishwasher User Instructions that power supply cord does not touch dishwasher motor or lower part of the dishwasher tub. WARNING Electrical Shock Hazard Plug into a grounded 3 prong outlet.
... for good drying results: This dishwasher is designed to 3 hours per load, but use less water and energy so they depend on ? Check that all parts have all tools used with your dishwasher washes longer to ensure exceptional cleaning. Designed with an optical water sensor so the first cycle will average... to complete the shortest wash cycle. Check Operation ❏ Read the Dishwasher User Instructions that power supply cord does not touch dishwasher motor or lower part of the dishwasher tub. WARNING Electrical Shock Hazard Plug into a grounded 3 prong outlet.

