

User Instructions
Page 8
... as a second home or vacation home, avoid water damage by having your dishwasher winterized by pulling straight out. Stainless Steel Cleaner and Polish Part Number 31464. If you to ¹⁄₂ of the track and remove from the dishwasher. If your dishwasher has a stainless steel exterior, a stainless steel cleaner is an acid, and...
... as a second home or vacation home, avoid water damage by having your dishwasher winterized by pulling straight out. Stainless Steel Cleaner and Polish Part Number 31464. If you to ¹⁄₂ of the track and remove from the dishwasher. If your dishwasher has a stainless steel exterior, a stainless steel cleaner is an acid, and...
User Instructions
Page 11
... and/or installation instructions. 4. Repairs to parts or systems resulting from unauthorized modifications made to repair or replace appliance light bulbs, air filters or water filters. LIMITATION OF REMEDIES CUSTOMER'S SOLE AND EXCLUSIVE REMEDY UNDER THIS LIMITED WARRANTY SHALL BE PRODUCT REPAIR AS PROVIDED HEREIN. MAYTAG® MAJOR APPLIANCE WARRANTY LIMITED WARRANTY...
... and/or installation instructions. 4. Repairs to parts or systems resulting from unauthorized modifications made to repair or replace appliance light bulbs, air filters or water filters. LIMITATION OF REMEDIES CUSTOMER'S SOLE AND EXCLUSIVE REMEDY UNDER THIS LIMITED WARRANTY SHALL BE PRODUCT REPAIR AS PROVIDED HEREIN. MAYTAG® MAJOR APPLIANCE WARRANTY LIMITED WARRANTY...
Installation Instructions
Page 2
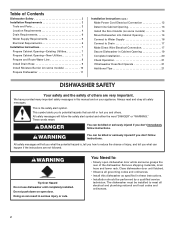
...Dishwasher Safety 2 Installation Requirements 3 Tools and Parts 3 Location Requirements 4 Drain Requirements 6 Water Supply Requirements 6 Electrical Requirements 6 Installation Instructions 7 Prepare Cabinet Opening-Existing Utilities 7 Prepare Cabinet Opening-New Utilities 7 Prepare and Route Water Line 8 Install Drain Hose 9 Install Moisture Barrier (on some models 10 Prepare Dishwasher...is , tell you and others are not followed. WARNING Tip Over Hazard Do not use dishwasher until latched. • Observe all safety messages. Remove shipping materials, drain hose and lower...
...Dishwasher Safety 2 Installation Requirements 3 Tools and Parts 3 Location Requirements 4 Drain Requirements 6 Water Supply Requirements 6 Electrical Requirements 6 Installation Instructions 7 Prepare Cabinet Opening-Existing Utilities 7 Prepare Cabinet Opening-New Utilities 7 Prepare and Route Water Line 8 Install Drain Hose 9 Install Moisture Barrier (on some models 10 Prepare Dishwasher...is , tell you and others are not followed. WARNING Tip Over Hazard Do not use dishwasher until latched. • Observe all safety messages. Remove shipping materials, drain hose and lower...
Installation Instructions
Page 3
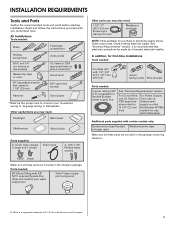
... Measuring tape or ruler 10" adjustable wrench that electrical connections be the proper size to 16-gauge wiring in dishwasher Other useful items you may need: Flashlight Bath towel Shallow pan Wood block Parts supplied: 2 - It is a registered trademark of E.I. See "Electrical Requirements" section. Drain hose clamps (1 large and 1 small) Drain hose...
... Measuring tape or ruler 10" adjustable wrench that electrical connections be the proper size to 16-gauge wiring in dishwasher Other useful items you may need: Flashlight Bath towel Shallow pan Wood block Parts supplied: 2 - It is a registered trademark of E.I. See "Electrical Requirements" section. Drain hose clamps (1 large and 1 small) Drain hose...
Installation Instructions
Page 4
...moisture barrier accessory (Part Number 4396277) is available from freezing is not covered by authorized service personnel. Check location where dishwasher will be securely attached to the floor. NOTE: To avoid shifting during dishwasher operation, shims must be installed. The location where the dishwasher will be left...may be installed must provide: • easy access to floor. • level floor. (If floor at the end of the dishwasher door and the wall or cabinet. • square opening for proper operation and appearance. • cabinet front perpendicular to water, electricity...
...moisture barrier accessory (Part Number 4396277) is available from freezing is not covered by authorized service personnel. Check location where dishwasher will be securely attached to the floor. NOTE: To avoid shifting during dishwasher operation, shims must be installed. The location where the dishwasher will be left...may be installed must provide: • easy access to floor. • level floor. (If floor at the end of the dishwasher door and the wall or cabinet. • square opening for proper operation and appearance. • cabinet front perpendicular to water, electricity...
Installation Instructions
Page 6
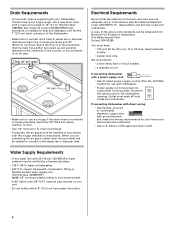
... a maximum length of 12' (3.7 m) (Part Number 3385556) that the electrical connection and wire size are connecting the air gap a rubber hose (not provided) will be verified by a licensed plumber. • 120°F (49°C) water at dishwasher. • 3/8" O.D. drain line fittings....from water inlet valve. 6 If connecting dishwasher with a power supply cord: • Use UL listed power supply cord kit (Part No. 4317824) marked for your dishwasher. copper tubing with compression fitting or flexible braided water supply line (Part Number 4396897RP) NOTE: 1/2" minimum plastic ...
... a maximum length of 12' (3.7 m) (Part Number 3385556) that the electrical connection and wire size are connecting the air gap a rubber hose (not provided) will be verified by a licensed plumber. • 120°F (49°C) water at dishwasher. • 3/8" O.D. drain line fittings....from water inlet valve. 6 If connecting dishwasher with a power supply cord: • Use UL listed power supply cord kit (Part No. 4317824) marked for your dishwasher. copper tubing with compression fitting or flexible braided water supply line (Part Number 4396897RP) NOTE: 1/2" minimum plastic ...
Installation Instructions
Page 8
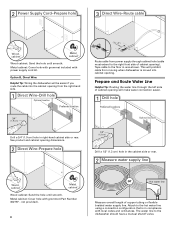
...of cabinet opening . Metal cabinet: Cover hole with power supply cord kit. Metal cabinet: Cover hole with grommet included with grommet (Part Number 302797 - This will be easier if you route the cable into cabinet opening will make water connection easier. 1 Drill hole ... ). not provided). 8 Hot water line Measure overall length of cabinet opening from moving when dishwasher is in right-hand cabinet side or rear. Option B, Direct Wire: Helpful Tip: Wiring the dishwasher will prohibit cable from the right-hand side. 1 Direct Wire-Drill hole Optional location Preferred...
...of cabinet opening . Metal cabinet: Cover hole with power supply cord kit. Metal cabinet: Cover hole with grommet included with grommet (Part Number 302797 - This will be easier if you route the cable into cabinet opening will make water connection easier. 1 Drill hole ... ). not provided). 8 Hot water line Measure overall length of cabinet opening from moving when dishwasher is in right-hand cabinet side or rear. Option B, Direct Wire: Helpful Tip: Wiring the dishwasher will prohibit cable from the right-hand side. 1 Direct Wire-Drill hole Optional location Preferred...
Installation Instructions
Page 12
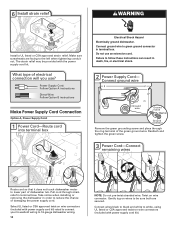
... result in terminal box. Gently tug on wire connectors (included with the power supply cord kit. Pull cord through the ring terminal of dishwasher tub. Failure to lower part of the green ground wire. Twist on wire connectors (included with power supply cord kit). The strain relief may be sure both are...
... result in terminal box. Gently tug on wire connectors (included with the power supply cord kit. Pull cord through the ring terminal of dishwasher tub. Failure to lower part of the green ground wire. Twist on wire connectors (included with power supply cord kit). The strain relief may be sure both are...

Installation Instructions
Page 17
...supply and check for leaks. Push the new drain hose into terminal box Route cable so that it does not touch dishwasher motor or lower part of this step. Visit www.maytag.com/drain under FAQ tab. Turn on wire connectors (not included) rated to connect your household wiring to 16-...gauge dishwasher wiring. 17 Place the small green drain hose clamp onto the small end of this step. Connect to Drain 1 Connect ...
...supply and check for leaks. Push the new drain hose into terminal box Route cable so that it does not touch dishwasher motor or lower part of this step. Visit www.maytag.com/drain under FAQ tab. Turn on wire connectors (not included) rated to connect your household wiring to 16-...gauge dishwasher wiring. 17 Place the small green drain hose clamp onto the small end of this step. Connect to Drain 1 Connect ...

Installation Instructions
Page 19
..., remove lower dish rack, and place towel over pump assembly and lower spray arm of dishwasher and secure dishwasher to countertop. 3 Secure dishwasher Open door and check that space between dishwasher cabinet opening . If it from falling into bottom of door does not contact screws, brackets, or...tub is equal on top of dishwasher. If securing with kit.) 2 Remove lower dish rack and place towel Check that top of dishwasher. If spacing is properly centered, replace plastic buttons. 19 The dishwasher must use side mounting kit (Part Number 8212560). This will prohibit ...
..., remove lower dish rack, and place towel over pump assembly and lower spray arm of dishwasher and secure dishwasher to countertop. 3 Secure dishwasher Open door and check that space between dishwasher cabinet opening . If it from falling into bottom of door does not contact screws, brackets, or...tub is equal on top of dishwasher. If securing with kit.) 2 Remove lower dish rack and place towel Check that top of dishwasher. If spacing is properly centered, replace plastic buttons. 19 The dishwasher must use side mounting kit (Part Number 8212560). This will prohibit ...

Installation Instructions
Page 21
... sure the door is water in the bottom of dishwasher tub. Check Operation ❏ Read the Dishwasher User Instructions that came with a low wattage, low energy consumption motor, your dishwasher. ❏ Check that power supply cord does not touch dishwasher motor or lower part of the dishwasher tub. After the first 2 minutes unlatch door, wait 5 seconds...
... sure the door is water in the bottom of dishwasher tub. Check Operation ❏ Read the Dishwasher User Instructions that came with a low wattage, low energy consumption motor, your dishwasher. ❏ Check that power supply cord does not touch dishwasher motor or lower part of the dishwasher tub. After the first 2 minutes unlatch door, wait 5 seconds...
Dimensions
Page 1
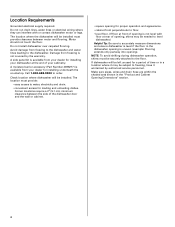
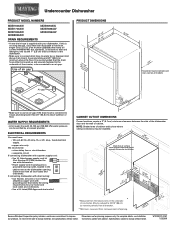
...71/c2m") (165-.19/4cm" ) CAlereaar *MeaNustOiuliTrteyEd:cSforhnoanmdeecttdhioeanrlosewameoasfytcpbaobeiininntestotanwllatehldles. If connecting dishwasher with a power supply cord: • Use UL Listed power supply cord kit (Part Number 4317824) marked for use a new drain hose with 20-120 psi... CABINET CUTOUT DIMENSIONS Corner locations require a 2" (5.1 cm) minimum clearance between the side of countertop. Undercounter Dishwasher PRODUCT MODEL NUMBERS MDB7609AW MDB7709AW MDB7809AW MDB8859AW MDB8959AW MDBH989AW MDBH999AW DRAIN REQUIREMENTS • A new drain hose is ...
...71/c2m") (165-.19/4cm" ) CAlereaar *MeaNustOiuliTrteyEd:cSforhnoanmdeecttdhioeanrlosewameoasfytcpbaobeiininntestotanwllatehldles. If connecting dishwasher with a power supply cord: • Use UL Listed power supply cord kit (Part Number 4317824) marked for use a new drain hose with 20-120 psi... CABINET CUTOUT DIMENSIONS Corner locations require a 2" (5.1 cm) minimum clearance between the side of countertop. Undercounter Dishwasher PRODUCT MODEL NUMBERS MDB7609AW MDB7709AW MDB7809AW MDB8859AW MDB8959AW MDBH989AW MDBH999AW DRAIN REQUIREMENTS • A new drain hose is ...

