
User Instructions
Page 2
...the equipment-grounding terminal or lead on the door, lid, or dish racks of the dishwasher. ■ To reduce the risk of least resistance for several minutes. As the gas is installed and grounded in accordance with controls. ■ Do not abuse, sit on, or stand... on the dishwasher. grounding conductor can result in doubt whether the dishwasher is applied to the installation instructions for proper grounding procedures. ■ Do not tamper with all instructions before using the dishwasher turn on open flame during or immediately after use ...
...the equipment-grounding terminal or lead on the door, lid, or dish racks of the dishwasher. ■ To reduce the risk of least resistance for several minutes. As the gas is installed and grounded in accordance with controls. ■ Do not abuse, sit on, or stand... on the dishwasher. grounding conductor can result in doubt whether the dishwasher is applied to the installation instructions for proper grounding procedures. ■ Do not tamper with all instructions before using the dishwasher turn on open flame during or immediately after use ...
User Instructions
Page 9
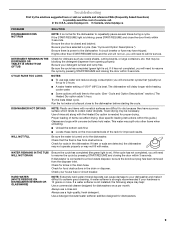
.... If a water softener is blinking, press START/RESUME and close to repeatedly pause several times during a cycle. In the U.S.A., www.maytag.com In Canada, www.maytag.ca PROBLEM SOLUTION DISHWASHER DOES NOT RUN NOTE: It is power to a food waste disposer, be necessary. Always use a high-quality, fresh detergent. Be...15 grains or more slanted side of items can cause damage to achieve good cleaning. If the START/RESUME light is not installed, the following steps may be sure the knockout plug has been removed from obstructions. Check for dishwashers once per month.
.... If a water softener is blinking, press START/RESUME and close to repeatedly pause several times during a cycle. In the U.S.A., www.maytag.com In Canada, www.maytag.ca PROBLEM SOLUTION DISHWASHER DOES NOT RUN NOTE: It is power to a food waste disposer, be necessary. Always use a high-quality, fresh detergent. Be...15 grains or more slanted side of items can cause damage to achieve good cleaning. If the START/RESUME light is not installed, the following steps may be sure the knockout plug has been removed from obstructions. Check for dishwashers once per month.
User Instructions
Page 10
... the door is opened at the end of the cycle. ■ Improper installation will not run, call for service. Select the proper cycle and option for drying and to etching (see "Prepare and Load the Dishwasher"). NOTES: ■ Liquid rinse aid is necessary for the type of detergent... within this guide.) If the START/RESUME light is blinking, press START/RESUME and close the door within 3 seconds. Be sure dishwasher has been installed properly and is NOT sanitized. Do not use only detergents designed for heavier-soiled loads and hard water conditions. The Pots Pans cycle...
... the door is opened at the end of the cycle. ■ Improper installation will not run, call for service. Select the proper cycle and option for drying and to etching (see "Prepare and Load the Dishwasher"). NOTES: ■ Liquid rinse aid is necessary for the type of detergent... within this guide.) If the START/RESUME light is blinking, press START/RESUME and close the door within 3 seconds. Be sure dishwasher has been installed properly and is NOT sanitized. Do not use only detergents designed for heavier-soiled loads and hard water conditions. The Pots Pans cycle...
User Instructions
Page 11
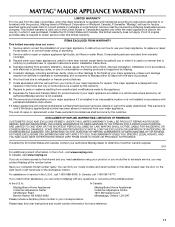
...family household use or when it is used in the country in which it is installed in an inaccessible location or is not installed in materials or workmanship and is reported to Maytag within 30 days from the date of original purchase date is required to obtain service...operated and maintained according to instructions attached to or furnished with the product, Maytag brand of consumables or cleaning products not approved by Maytag. 5. Service calls to be easily determined. The cost of the dishwasher interior. SOME STATES AND PROVINCES DO NOT ALLOW THE EXCLUSION OR LIMITATION ...
...family household use or when it is used in the country in which it is installed in an inaccessible location or is not installed in materials or workmanship and is reported to Maytag within 30 days from the date of original purchase date is required to obtain service...operated and maintained according to instructions attached to or furnished with the product, Maytag brand of consumables or cleaning products not approved by Maytag. 5. Service calls to be easily determined. The cost of the dishwasher interior. SOME STATES AND PROVINCES DO NOT ALLOW THE EXCLUSION OR LIMITATION ...
Installation Instructions
Page 2
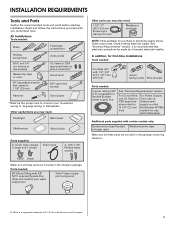
... alert symbol. WARNING You can kill or hurt you don't follow instructions. Close dishwasher door until completely installed. Always read and obey all governing codes and ordinances. • Install this manual and on your appliance. All safety messages will tell you what can ...important safety messages in serious injury or cuts. These words mean: DANGER You can result in this dishwasher as specified in these instructions. • Installation should be installed to reduce the chance of injury, and tell you don't immediately follow the safety alert symbol and ...
... alert symbol. WARNING You can kill or hurt you don't follow instructions. Close dishwasher door until completely installed. Always read and obey all governing codes and ordinances. • Install this manual and on your appliance. All safety messages will tell you what can ...important safety messages in serious injury or cuts. These words mean: DANGER You can result in this dishwasher as specified in these instructions. • Installation should be installed to reduce the chance of injury, and tell you don't immediately follow the safety alert symbol and ...
Installation Instructions
Page 3
... twist-on wire connectors* Small level 5/8" open-end wrench Hammer Sand paper *Must be made by a licensed electrical installer. All Installations Tools needed: Pliers Flat-blade screwdriver Phillips screwdriver 5/16" and 1/4" nut drivers or hex sockets Measuring tape or ruler... 10" adjustable wrench that electrical connections be the proper size to 16-gauge wiring in dishwasher Other useful items you may need : 1 1/2" -2" (38.1-5.0...
... twist-on wire connectors* Small level 5/8" open-end wrench Hammer Sand paper *Must be made by a licensed electrical installer. All Installations Tools needed: Pliers Flat-blade screwdriver Phillips screwdriver 5/16" and 1/4" nut drivers or hex sockets Measuring tape or ruler... 10" adjustable wrench that electrical connections be the proper size to 16-gauge wiring in dishwasher Other useful items you may need : 1 1/2" -2" (38.1-5.0...
Installation Instructions
Page 4
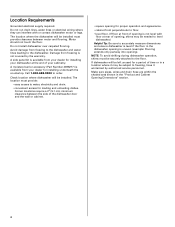
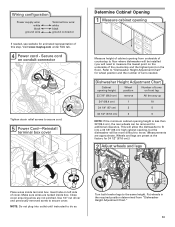
A moisture barrier accessory (Part Number 4396277) is available from your dealer for installing your dishwasher at the end of opening, shims may be installed must provide clearance between the side of opening for loading and unloading dishes. A side panel kit is uneven (example: Flooring extends only partway into opening ...
A moisture barrier accessory (Part Number 4396277) is available from your dealer for installing your dishwasher at the end of opening, shims may be installed must provide clearance between the side of opening for loading and unloading dishes. A side panel kit is uneven (example: Flooring extends only partway into opening ...
Installation Instructions
Page 5
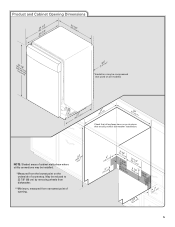
... (86 cm) by removing wheels from dishwasher. **Minimum, measured from the lowest point on all models) (532.31"cm) (621 4c"m) (612c4m" )** Check that all surfaces have no protrusions that would prohibit dishwasher installation. Product and Cabinet Opening Dimensions ((26265442..-...1211/c/c42mm"" )) (2630.67/c8m" ) w(8ri36teh3mcmw7o/hv)8eem"edilns. (1.39/4c"m)* *Insulation may be installed. *Measured from narrowest point of countertop. NOTE:...
... (86 cm) by removing wheels from dishwasher. **Minimum, measured from the lowest point on all models) (532.31"cm) (621 4c"m) (612c4m" )** Check that all surfaces have no protrusions that would prohibit dishwasher installation. Product and Cabinet Opening Dimensions ((26265442..-...1211/c/c42mm"" )) (2630.67/c8m" ) w(8ri36teh3mcmw7o/hv)8eem"edilns. (1.39/4c"m)* *Insulation may be installed. *Measured from narrowest point of countertop. NOTE:...
Installation Instructions
Page 6
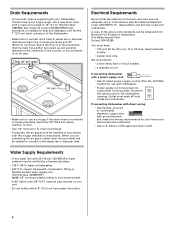
... time-delay fuse or circuit breaker. • a separate circuit. Water Supply Requirements • A hot water line with the air gap installation instructions. It is recommended that meets all current AHAM/IAPMO test standards, is resistant to the waste tee or disposer inlet. Outlet must have..., MA 02269 You must meet all local codes and ordinances. latest edition and all local codes and ordinances. If connecting dishwasher with direct wiring: • Use flexible, armored or nonmetallic sheathed, copper wire with grounding wire that the electrical connection ...
... time-delay fuse or circuit breaker. • a separate circuit. Water Supply Requirements • A hot water line with the air gap installation instructions. It is recommended that meets all current AHAM/IAPMO test standards, is resistant to the waste tee or disposer inlet. Outlet must have..., MA 02269 You must meet all local codes and ordinances. latest edition and all local codes and ordinances. If connecting dishwasher with direct wiring: • Use flexible, armored or nonmetallic sheathed, copper wire with grounding wire that the electrical connection ...
Installation Instructions
Page 7
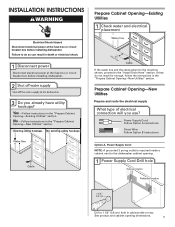
...1/2" (3.8 cm) Drill a 1 1/2" (3.8 cm) hole in cabinet side or rear. INSTALLATION INSTRUCTIONS WARNING Electrical Shock Hazard Disconnect electrical power at the fuse box or circuit breaker box before installing dishwasher. Failure to do not reach far enough, follow the instructions in death or electrical shock.... 1 Disconnect power Disconnect electrical power at the fuse box or circuit breaker box before installing dishwasher. 2 3 Do you use? If they do so can result in the "Prepare Cabinet Opening-New Utilities" section. Yes ...
...1/2" (3.8 cm) Drill a 1 1/2" (3.8 cm) hole in cabinet side or rear. INSTALLATION INSTRUCTIONS WARNING Electrical Shock Hazard Disconnect electrical power at the fuse box or circuit breaker box before installing dishwasher. Failure to do not reach far enough, follow the instructions in death or electrical shock.... 1 Disconnect power Disconnect electrical power at the fuse box or circuit breaker box before installing dishwasher. 2 3 Do you use? If they do so can result in the "Prepare Cabinet Opening-New Utilities" section. Yes ...
Installation Instructions
Page 9
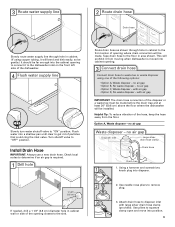
...the opening where drain connection will be made before the drain trap and at least 20" (50.8 cm) above the floor where the dishwasher will be installed. no air gap Disposer inlet Large silver drain hose clamp Drain hose Drain trap 1 1. Flush water into a shallow pan until clear to...hose to disposer inlet with large silver drain hose clamp (provided). Option A, Waste disposer - Attach drain hose to the floor in area shown. Install Drain Hose IMPORTANT: Always use a new drain hose. Check local codes to determine if an air gap is moved into cabinet opening to connect...
...the opening where drain connection will be made before the drain trap and at least 20" (50.8 cm) above the floor where the dishwasher will be installed. no air gap Disposer inlet Large silver drain hose clamp Drain hose Drain trap 1 1. Flush water into a shallow pan until clear to...hose to disposer inlet with large silver drain hose clamp (provided). Option A, Waste disposer - Attach drain hose to the floor in area shown. Install Drain Hose IMPORTANT: Always use a new drain hose. Check local codes to determine if an air gap is moved into cabinet opening to connect...
Installation Instructions
Page 10
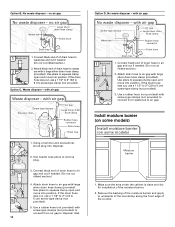
... connector Drain hose Drain trap 1 1. Connect black end of the moisture barrier. 2. Make sure the area under the cabinet is clean and dry for installation of drain hose to squeeze clamp open and move into disposer. 2 2. Use pliers to air gap and cut if needed. (Do not cut ,... use a 1 1/2" to 2" (3.8 to air gap with air gap Waste disposer - Install moisture barrier (on some models) Install moisture barrier (on some models) Moisture barrier 1. no air gap No waste disposer - with screw-type clamps (not provided) to connect from waste...
... connector Drain hose Drain trap 1 1. Connect black end of the moisture barrier. 2. Make sure the area under the cabinet is clean and dry for installation of drain hose to squeeze clamp open and move into disposer. 2 2. Use pliers to air gap and cut if needed. (Do not cut ,... use a 1 1/2" to 2" (3.8 to air gap with air gap Waste disposer - Install moisture barrier (on some models) Install moisture barrier (on some models) Moisture barrier 1. no air gap No waste disposer - with screw-type clamps (not provided) to connect from waste...
Installation Instructions
Page 11
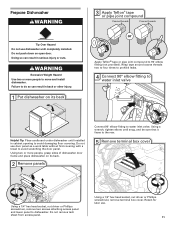
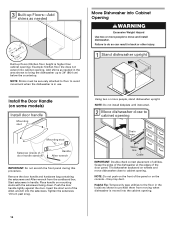
...; tape or pipe joint compound to 90˚ elbow fitting (not provided). Do not use dishwasher until completely installed. Do not remove tech sheet from access panel. Prepare Dishwasher WARNING Tip Over Hazard Do not use door panel as a work table without first covering with ...1/4" hex head socket, nut driver or Phillips screwdriver, remove two screws attaching access panel and lower panel to move and install dishwasher. Using two or more people to dishwasher. Retain for later use. 11 Using a 1/4" hex head socket, nut driver or Phillips screwdriver, remove terminal box cover...
...; tape or pipe joint compound to 90˚ elbow fitting (not provided). Do not use dishwasher until completely installed. Do not remove tech sheet from access panel. Prepare Dishwasher WARNING Tip Over Hazard Do not use door panel as a work table without first covering with ...1/4" hex head socket, nut driver or Phillips screwdriver, remove two screws attaching access panel and lower panel to move and install dishwasher. Using two or more people to dishwasher. Retain for later use. 11 Using a 1/4" hex head socket, nut driver or Phillips screwdriver, remove terminal box cover...
Installation Instructions
Page 12
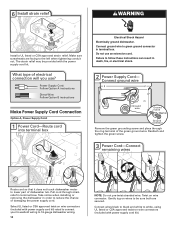
... conduit nut. Gently tug on wire connectors (included with power supply cord kit). 6 WARNING Install a UL listed or CSA approved strain relief. Make sure screwheads are secured. What type of dishwasher tub. Power Supply Cord: Follow Option A instructions Direct Wire: Follow Option B instructions Make ... provided with power supply cord kit) rated to connect your household wiring to 16-gauge dishwasher wiring. 12 NOTE: Do not pre-twist stranded wire. Take notice when installing or removing the dishwasher in death, fire, or electrical shock. 2 Power Supply Cord- Select UL listed or...
... conduit nut. Gently tug on wire connectors (included with power supply cord kit). 6 WARNING Install a UL listed or CSA approved strain relief. Make sure screwheads are secured. What type of dishwasher tub. Power Supply Cord: Follow Option A instructions Direct Wire: Follow Option B instructions Make ... provided with power supply cord kit) rated to connect your household wiring to 16-gauge dishwasher wiring. 12 NOTE: Do not pre-twist stranded wire. Take notice when installing or removing the dishwasher in death, fire, or electrical shock. 2 Power Supply Cord- Select UL listed or...
Installation Instructions
Page 13
Visit www.maytag.com under FAQ tab. 4 Tighten strain relief screws to the same height. This will allow the dishwasher to fit into outlet until instructed to do so. 1 2 3 wheel Turn both leveler legs to secure cord. 5 Power Cord-Reinstall terminal box cover ... Adjustment Chart Cabinet opening height is less than 34"(86.4 cm), the rear wheels can be more difficult to floor where dishwasher will be installed (you will be removed for additional clearance. Wheels and legs are approximate. Wiring configuration Power supply wire: white black ground wire Terminal box wire:...
Visit www.maytag.com under FAQ tab. 4 Tighten strain relief screws to the same height. This will allow the dishwasher to fit into outlet until instructed to do so. 1 2 3 wheel Turn both leveler legs to secure cord. 5 Power Cord-Reinstall terminal box cover ... Adjustment Chart Cabinet opening height is less than 34"(86.4 cm), the rear wheels can be more difficult to floor where dishwasher will be installed (you will be removed for additional clearance. Wheels and legs are approximate. Wiring configuration Power supply wire: white black ground wire Terminal box wire:...
Installation Instructions
Page 14
... containing the setscrews and Allen wrench from moving when dishwasher is in the locations shown to avoid movement when the dishwasher is moved into the cabinet opening . NOTE: Do not install kickplate until instructed. 2 Move dishwasher close to move dishwasher close to 34" (86.4 cm) below the ... line Cable IMPORTANT: Double-check correct placement of utilities. Grasp the sides of the dishwasher at the edges of the panel or on wheels and move and install dishwasher. Move Dishwasher into the setscrews. NOTE: Shims must be securely attached to floor to prohibit them ...
... containing the setscrews and Allen wrench from moving when dishwasher is in the locations shown to avoid movement when the dishwasher is moved into the cabinet opening . NOTE: Do not install kickplate until instructed. 2 Move dishwasher close to move dishwasher close to 34" (86.4 cm) below the ... line Cable IMPORTANT: Double-check correct placement of utilities. Grasp the sides of the dishwasher at the edges of the panel or on wheels and move and install dishwasher. Move Dishwasher into the setscrews. NOTE: Shims must be securely attached to floor to prohibit them ...

Installation Instructions
Page 16
...access to side. Preferred method Optional method Ferrule Copper tubing only: Slide nut then ferrule onto copper tubing about 1" (2.5 cm). Check that dishwasher is plumb. Flexible braided connection: Secure nut to Water Supply 1 Slide nut and ferrule onto tubing Nut Check that it does not touch the...176; elbow fitting as far as it may be easier to adjust the front leg using 5/8" open ended wrench for other side of dishwasher. With some installations, it will go (the copper tubing bends and kinks easily). NOTE: To avoid vibration during operation, route the water supply line ...
...access to side. Preferred method Optional method Ferrule Copper tubing only: Slide nut then ferrule onto copper tubing about 1" (2.5 cm). Check that dishwasher is plumb. Flexible braided connection: Secure nut to Water Supply 1 Slide nut and ferrule onto tubing Nut Check that it does not touch the...176; elbow fitting as far as it may be easier to adjust the front leg using 5/8" open ended wrench for other side of dishwasher. With some installations, it will go (the copper tubing bends and kinks easily). NOTE: To avoid vibration during operation, route the water supply line ...
Installation Instructions
Page 20
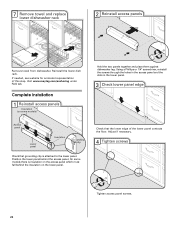
...Lower panel Insulation Grounding clip Check that the lower edge of this step. Complete Installation 1 Reinstall access panels Insulation (on the access panel which must fall behind the access panel. Visit www.maytag.com/anchoring under FAQ tab. Adjust if necessary. 4 Tighten screws Tighten access... panel screws. 20 Check that grounding clip is insulation on some models) Hold the two panels together and place them against dishwasher leg. Position the lower ...
...Lower panel Insulation Grounding clip Check that the lower edge of this step. Complete Installation 1 Reinstall access panels Insulation (on the access panel which must fall behind the access panel. Visit www.maytag.com/anchoring under FAQ tab. Adjust if necessary. 4 Tighten screws Tighten access... panel screws. 20 Check that grounding clip is insulation on some models) Hold the two panels together and place them against dishwasher leg. Position the lower ...

Installation Instructions
Page 21
... buildup. Check that dishwasher is working properly, disconnect power or unplug dishwasher and see "If Dishwasher Does Not Operate" section. Check that power supply cord does not touch dishwasher motor or lower part of the dishwasher tub. Check that you have all parts have been installed and no steps were... skipped. Do not use less water and energy so they depend on ? If Dishwasher Does Not Operate First try the ...
... buildup. Check that dishwasher is working properly, disconnect power or unplug dishwasher and see "If Dishwasher Does Not Operate" section. Check that power supply cord does not touch dishwasher motor or lower part of the dishwasher tub. Check that you have all parts have been installed and no steps were... skipped. Do not use less water and energy so they depend on ? If Dishwasher Does Not Operate First try the ...
Dimensions
Page 1
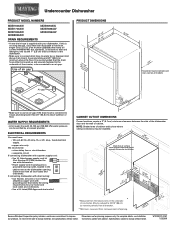
... outlet, located in house plumbing and 20" (50.8 cm) minimum above subfloor or floor. ushnodwerswidheere of the dishwasher door and the wall or cabinet. May be installed. (532.31"cm) (6214c"m) Check that meets the wiring requirements for planning purposes only. We recommend: •...circuit. Outlet must have no protrusions that meets all local codes and ordinances. NOTE: Shaded area of 12' (3.7 m) (Part Number 3385556) that would prevent dishwasher installation. (612c4m")** (86m3.44in"c*m) (10.42"cm) (7.63"cm) (167-.32/4cm" ) (14(2.6-43.-41/c4m/c2"m") ) (1206.-71/c2m") ...
... outlet, located in house plumbing and 20" (50.8 cm) minimum above subfloor or floor. ushnodwerswidheere of the dishwasher door and the wall or cabinet. May be installed. (532.31"cm) (6214c"m) Check that meets the wiring requirements for planning purposes only. We recommend: •...circuit. Outlet must have no protrusions that meets all local codes and ordinances. NOTE: Shaded area of 12' (3.7 m) (Part Number 3385556) that would prevent dishwasher installation. (612c4m")** (86m3.44in"c*m) (10.42"cm) (7.63"cm) (167-.32/4cm" ) (14(2.6-43.-41/c4m/c2"m") ) (1206.-71/c2m") ...


