
User Instructions
Page 1
... can be killed or seriously injured if you and others are not followed. WARNING You can kill or hurt you don't immediately follow instructions. DISHWASHER USER INSTRUCTIONS THANK YOU for additional information. Para obtener acceso a "Instrucciones para el usuario de la lavavajillas" en español, o para... información adicional de su producto visite : www.maytag.com Tenga listo su número de modelo completo. In Canada, visit our website at www.maytag.ca or call us at www.maytag.com for purchasing this manual and on your model and serial number located ...
... can be killed or seriously injured if you and others are not followed. WARNING You can kill or hurt you don't immediately follow instructions. DISHWASHER USER INSTRUCTIONS THANK YOU for additional information. Para obtener acceso a "Instrucciones para el usuario de la lavavajillas" en español, o para... información adicional de su producto visite : www.maytag.com Tenga listo su número de modelo completo. In Canada, visit our website at www.maytag.ca or call us at www.maytag.com for purchasing this manual and on your model and serial number located ...
User Instructions
Page 2
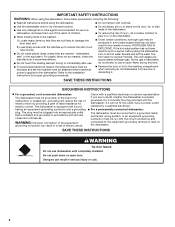
...9632; Do not touch the heating element during this time. ■ Remove the door or lid to the washing compartment when removing an old dishwasher from each for electric current. HYDROGEN GAS IS EXPLOSIVE. This will not fit the outlet, have a proper outlet installed by providing a path of.... ■ Use only detergents or rinse agents recommended for two weeks or more. SAVE THESE INSTRUCTIONS WARNING Tip Over Hazard Do not use dishwasher until completely installed. As the gas is properly grounded. if it . Doing so can result in a risk of the equipment- SAVE THESE...
...9632; Do not touch the heating element during this time. ■ Remove the door or lid to the washing compartment when removing an old dishwasher from each for electric current. HYDROGEN GAS IS EXPLOSIVE. This will not fit the outlet, have a proper outlet installed by providing a path of.... ■ Use only detergents or rinse agents recommended for two weeks or more. SAVE THESE INSTRUCTIONS WARNING Tip Over Hazard Do not use dishwasher until completely installed. As the gas is properly grounded. if it . Doing so can result in a risk of the equipment- SAVE THESE...
User Instructions
Page 3
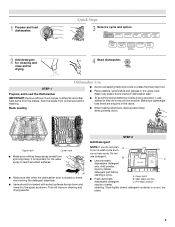
... Make sure nothing keeps spray arm(s) from the dishes. Main Wash section dishwasher detergent C. Store tightly closed no items are secured in the upper rack. Wash only plastic items marked "dishwasher safe." Rack loading ■ When loading silverware, always place sharp items ...pointing down and inward to the spray as shown. It is closed detergent container in better cleaning. B ■ Use automatic dishwasher detergent Hard Water Soft Water Hard Water Soft Water C PRE- Cover latch ■ Fresh automatic B. Pre-Wash section results in a cool...
... Make sure nothing keeps spray arm(s) from the dishes. Main Wash section dishwasher detergent C. Store tightly closed no items are secured in the upper rack. Wash only plastic items marked "dishwasher safe." Rack loading ■ When loading silverware, always place sharp items ...pointing down and inward to the spray as shown. It is closed detergent container in better cleaning. B ■ Use automatic dishwasher detergent Hard Water Soft Water Hard Water Soft Water C PRE- Cover latch ■ Fresh automatic B. Pre-Wash section results in a cool...
User Instructions
Page 4
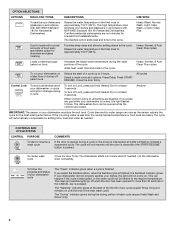
... your water hardness, fill the Main Wash section of the dispenser as shown. Fill the Pre-Wash section to complete. Without rinse aid your dishwasher. ■ Check the rinse aid indicator. Add rinse aid when indicator drops to Medium Water (0-6 grains per U.S. Make sure cap is properly... won't be clean. Select Options (options vary by model) See "Cycle and Option Descriptions" charts in the following section. You can customize your dishwasher until Lock the indicator window looks full. Open the door slowly and add the item. max - 21 3 4 If you use rinse aid for...
... your water hardness, fill the Main Wash section of the dispenser as shown. Fill the Pre-Wash section to complete. Without rinse aid your dishwasher. ■ Check the rinse aid indicator. Add rinse aid when indicator drops to Medium Water (0-6 grains per U.S. Make sure cap is properly... won't be clean. Select Options (options vary by model) See "Cycle and Option Descriptions" charts in the following section. You can customize your dishwasher until Lock the indicator window looks full. Open the door slowly and add the item. max - 21 3 4 If you use rinse aid for...
User Instructions
Page 5
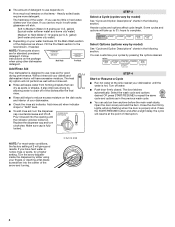
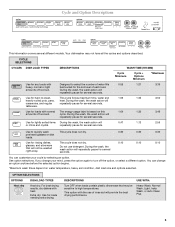
... based on water temperature, heavy soil condition, dish load size and options selected. USE WITH: Heavy Wash, Normal Wash, Light, Insta Wash, or Auto Clean Plus 5 Extra dry: Use for lightly soiled items During the wash, the wash action will or china and crystal. DESCRIPTIONS Turn OFF when loads contain plastic... time, water and 1:09 1:35 3:50 heavily soiled pots, pans, heat. This cycle does not dry. 0:30 0:30 0:30 Use for several different models. Your dishwasher may be washed right away.
... based on water temperature, heavy soil condition, dish load size and options selected. USE WITH: Heavy Wash, Normal Wash, Light, Insta Wash, or Auto Clean Plus 5 Extra dry: Use for lightly soiled items During the wash, the wash action will or china and crystal. DESCRIPTIONS Turn OFF when loads contain plastic... time, water and 1:09 1:35 3:50 heavily soiled pots, pans, heat. This cycle does not dry. 0:30 0:30 0:30 Use for several different models. Your dishwasher may be washed right away.
User Instructions
Page 6
... less than 30 seconds or the CANCEL key is finished, the Sanitized indicator glows. Heavy, Normal, & Auto Clean Plus cycles To run your dishwasher, or cycle and option changes during a cycle. Select a wash cycle and options. Close the door firmly. All cycles Control Lock ...or the water could not be opened during offpeak hours. Certified residential dishwashers are disabled. Heavy Wash, Normal Wash, Light, Insta Wash, or Auto Clean Plus Use for stemware and glass cleaning. Heavy, Normal, & Auto Clean Plus cycles Loads containing tough, baked-on Lock, press and hold Heated ...
... less than 30 seconds or the CANCEL key is finished, the Sanitized indicator glows. Heavy, Normal, & Auto Clean Plus cycles To run your dishwasher, or cycle and option changes during a cycle. Select a wash cycle and options. Close the door firmly. All cycles Control Lock ...or the water could not be opened during offpeak hours. Certified residential dishwashers are disabled. Heavy Wash, Normal Wash, Light, Insta Wash, or Auto Clean Plus Use for stemware and glass cleaning. Heavy, Normal, & Auto Clean Plus cycles Loads containing tough, baked-on Lock, press and hold Heated ...
User Instructions
Page 7
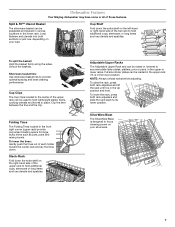
Dishwasher Features Your Maytag dishwasher may have some or all of the upper rack to hold additional cups, stemware or long items such as utensils and spatulas. Stack-Rack Fold ...
Dishwasher Features Your Maytag dishwasher may have some or all of the upper rack to hold additional cups, stemware or long items such as utensils and spatulas. Stack-Rack Fold ...

User Instructions
Page 8
...not be using an air-dry or an energy-saving dry option. Stainless Steel Cleaner and Polish Part Number 31464. Run the dishwasher through a complete washing cycle using the dishwasher during the summer months, turn off the water and power supply to wash larger items such as a second home or vacation ...home, avoid water damage by pushing inward toward the rack on the ridged area of powdered dishwasher detergent and water or use detergent. Roll the rack ¹⁄₃ to removing the upper rack from the end of the way out. 2....
...not be using an air-dry or an energy-saving dry option. Stainless Steel Cleaner and Polish Part Number 31464. Run the dishwasher through a complete washing cycle using the dishwasher during the summer months, turn off the water and power supply to wash larger items such as a second home or vacation ...home, avoid water damage by pushing inward toward the rack on the ridged area of powdered dishwasher detergent and water or use detergent. Roll the rack ¹⁄₃ to removing the upper rack from the end of the way out. 2....
User Instructions
Page 9
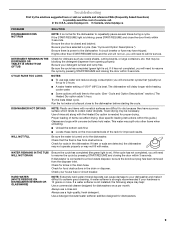
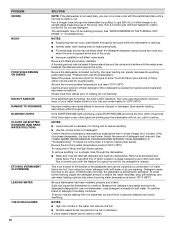
In the U.S.A., www.maytag.com In Canada, www.maytag.ca PROBLEM SOLUTION DISHWASHER DOES NOT RUN NOTE: It is normal for proper drying. A circuit breaker or fuse may have selected a cycle. (See "Cycle and Option Descriptions.") Be sure there is power to the dishwasher. Be sure your hardness is 15... START/RESUME and closing the door within 3 seconds. DETERGENT REMAINS IN THE DISPENSER OR TABLET IS ON BOTTOM OF TUB Check for dishwashers. 9 DISHWASHER NOT DRYING NOTE: Plastic and items with concave bottoms hold water. WATER REMAINS IN THE TUB/ WILL NOT DRAIN Be sure the ...
In the U.S.A., www.maytag.com In Canada, www.maytag.ca PROBLEM SOLUTION DISHWASHER DOES NOT RUN NOTE: It is normal for proper drying. A circuit breaker or fuse may have selected a cycle. (See "Cycle and Option Descriptions.") Be sure there is power to the dishwasher. Be sure your hardness is 15... START/RESUME and closing the door within 3 seconds. DETERGENT REMAINS IN THE DISPENSER OR TABLET IS ON BOTTOM OF TUB Check for dishwashers. 9 DISHWASHER NOT DRYING NOTE: Plastic and items with concave bottoms hold water. WATER REMAINS IN THE TUB/ WILL NOT DRAIN Be sure the ...
User Instructions
Page 10
...the partial load daily until a full load is ready to become chipped or damaged. (See specific loading instructions within 3 seconds. Be sure dishwasher has been installed properly and is due to match the water hardness, stop pre-washing, and use detergent. NOTES: ■ High iron content...See "WATER REMAINS IN THE TUB/WILL NOT DRAIN" in "Troubleshooting." NOTES: ■ Surging sounds can occur periodically throughout the cycle while the dishwasher is draining. ■ Normal water valve hissing may be heard periodically. ■ A normal snap sound may not be heard if items extend ...
...the partial load daily until a full load is ready to become chipped or damaged. (See specific loading instructions within 3 seconds. Be sure dishwasher has been installed properly and is due to match the water hardness, stop pre-washing, and use detergent. NOTES: ■ High iron content...See "WATER REMAINS IN THE TUB/WILL NOT DRAIN" in "Troubleshooting." NOTES: ■ Surging sounds can occur periodically throughout the cycle while the dishwasher is draining. ■ Normal water valve hissing may be heard periodically. ■ A normal snap sound may not be heard if items extend ...
User Instructions
Page 11
..., to correct the installation of the dishwasher interior. Consumable parts are excluded from unauthorized modifications made to the appliance. 9. Repairs when your correspondence. Have your major appliance, to replace or repair house fuses, or to obtain service under these excluded circumstances shall be provided by Maytag. 5. For assistance or service in your...
..., to correct the installation of the dishwasher interior. Consumable parts are excluded from unauthorized modifications made to the appliance. 9. Repairs when your correspondence. Have your major appliance, to replace or repair house fuses, or to obtain service under these excluded circumstances shall be provided by Maytag. 5. For assistance or service in your...
Installation Instructions
Page 2
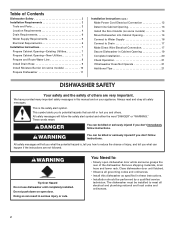
...Need to: • Slowly open door. Always read and obey all governing codes and ordinances. • Install this manual and on open dishwasher door while someone grasps the rear of injury, and tell you don't immediately follow the safety alert symbol and either the word "DANGER" ...Cabinet Opening-New Utilities 7 Prepare and Route Water Line 8 Install Drain Hose 9 Install Moisture Barrier (on some models 10 Prepare Dishwasher 11 Installation Instructions (cont.) Make Power Cord Electrical Connection 12 Determine Cabinet Opening 13 Install the Door Handle (on some models 14 Move...
...Need to: • Slowly open door. Always read and obey all governing codes and ordinances. • Install this manual and on open dishwasher door while someone grasps the rear of injury, and tell you don't immediately follow the safety alert symbol and either the word "DANGER" ...Cabinet Opening-New Utilities 7 Prepare and Route Water Line 8 Install Drain Hose 9 Install Moisture Barrier (on some models 10 Prepare Dishwasher 11 Installation Instructions (cont.) Make Power Cord Electrical Connection 12 Determine Cabinet Opening 13 Install the Door Handle (on some models 14 Move...
Installation Instructions
Page 3
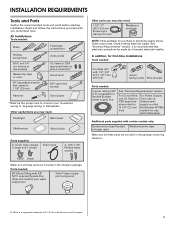
...Green Make sure all these parts are included in the package containing literature. ® Teflon is recommended that opens to 16-gauge wiring in dishwasher Other useful items you may need : 1 1/2" -2" (38.1-5.0 cm) Screw-typ e clamps (3 max) Masking or duct tape NOTE:... braided water supply line See "Electrical Requirements" section For Direct Wire: For Power Supply use UL listed or Cord: use with dishwasher Additional parts supplied with any tools listed here. Check existing electrical supply. Read and follow the instructions provided with certain models only:...
...Green Make sure all these parts are included in the package containing literature. ® Teflon is recommended that opens to 16-gauge wiring in dishwasher Other useful items you may need : 1 1/2" -2" (38.1-5.0 cm) Screw-typ e clamps (3 max) Masking or duct tape NOTE:... braided water supply line See "Electrical Requirements" section For Direct Wire: For Power Supply use UL listed or Cord: use with dishwasher Additional parts supplied with any tools listed here. Check existing electrical supply. Read and follow the instructions provided with certain models only:...
Installation Instructions
Page 4
...: Flooring extends only partway into opening , shims may be subject to freezing, have it winterized by the warranty. Do not install dishwasher over carpeted flooring. Avoid damage from your dealer for installing underneath the countertop. Call 1-800-688-9900 to the floor. Corner locations...floor. (If floor at front of time or in the "Product and Cabinet Opening Dimensions" section. 4 NOTE: To avoid shifting during dishwasher operation, shims must be installed must provide: • easy access to water, electricity and drain. • convenient access for proper operation...
...: Flooring extends only partway into opening , shims may be subject to freezing, have it winterized by the warranty. Do not install dishwasher over carpeted flooring. Avoid damage from your dealer for installing underneath the countertop. Call 1-800-688-9900 to the floor. Corner locations...floor. (If floor at front of time or in the "Product and Cabinet Opening Dimensions" section. 4 NOTE: To avoid shifting during dishwasher operation, shims must be installed must provide: • easy access to water, electricity and drain. • convenient access for proper operation...
Installation Instructions
Page 5
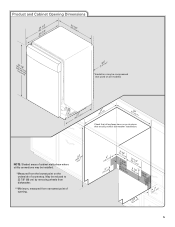
..., measured from the lowest point on all models) (532.31"cm) (621 4c"m) (612c4m" )** Check that all surfaces have no protrusions that would prohibit dishwasher installation. NOTE: Shaded areas of cabinet walls show where utility connections may be compressed (not used on the underside of opening. (8m63.44in"c*m) (10.42"...
..., measured from the lowest point on all models) (532.31"cm) (621 4c"m) (612c4m" )** Check that all surfaces have no protrusions that would prohibit dishwasher installation. NOTE: Shaded areas of cabinet walls show where utility connections may be compressed (not used on the underside of opening. (8m63.44in"c*m) (10.42"...
Installation Instructions
Page 6
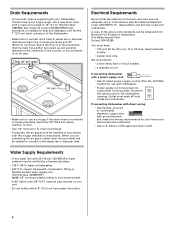
...ordinances. drain line fittings. • If required, the air gap should be verified by a licensed plumber. • 120°F (49°C) water at dishwasher. • 3/8" O.D. Drain Requirements • A new drain hose is not recommended. • A 90° elbow with 3/8" N.P.T. If drain hose is... and wire size are connecting the air gap a rubber hose (not provided) will be needed to connect to the dishwasher opening. If connecting dishwasher with direct wiring: • Use flexible, armored or nonmetallic sheathed, copper wire with grounding wire that meets all current...
...ordinances. drain line fittings. • If required, the air gap should be verified by a licensed plumber. • 120°F (49°C) water at dishwasher. • 3/8" O.D. Drain Requirements • A new drain hose is not recommended. • A 90° elbow with 3/8" N.P.T. If drain hose is... and wire size are connecting the air gap a rubber hose (not provided) will be needed to connect to the dishwasher opening. If connecting dishwasher with direct wiring: • Use flexible, armored or nonmetallic sheathed, copper wire with grounding wire that meets all current...
Installation Instructions
Page 7
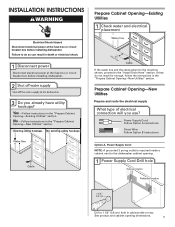
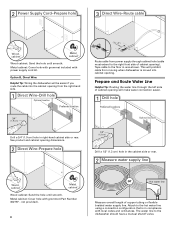
... section. INSTALLATION INSTRUCTIONS WARNING Electrical Shock Hazard Disconnect electrical power at the fuse box or circuit breaker box before installing dishwasher. Existing utility hookups No existing utility hookups Water line Cable Prepare Cabinet Opening-Existing Utilities 1 Check water and electrical ...placement Water line (15.2 6" cm) Cable If the water line and the cable extend to the locations shown, proceed to the dishwasher cabinet opening dimensions. 7 Power Supply Cord: Follow Option A instructions Direct Wire: Follow Option B instructions Option A, Power Supply Cord: ...
... section. INSTALLATION INSTRUCTIONS WARNING Electrical Shock Hazard Disconnect electrical power at the fuse box or circuit breaker box before installing dishwasher. Existing utility hookups No existing utility hookups Water line Cable Prepare Cabinet Opening-Existing Utilities 1 Check water and electrical ...placement Water line (15.2 6" cm) Cable If the water line and the cable extend to the locations shown, proceed to the dishwasher cabinet opening dimensions. 7 Power Supply Cord: Follow Option A instructions Direct Wire: Follow Option B instructions Option A, Power Supply Cord: ...
Installation Instructions
Page 8
... extend to the floor in right-hand cabinet side or rear. Metal cabinet: Cover hole with power supply cord kit. Attach to the dishwasher should have a manual shutoff valve. This will make water connection easier. 1 Drill hole Preferred locations Optional locations 1/2" (1.3 cm) Drill ...cm) hole in compliance with local codes and ordinances. not provided). 8 Hot water line Measure overall length of cabinet opening from moving when dishwasher is in the cabinet side or rear. 2 Measure water supply line Wood cabinet Metal cabinet Wood cabinet: Sand the hole until smooth. 2...
... extend to the floor in right-hand cabinet side or rear. Metal cabinet: Cover hole with power supply cord kit. Attach to the dishwasher should have a manual shutoff valve. This will make water connection easier. 1 Drill hole Preferred locations Optional locations 1/2" (1.3 cm) Drill ...cm) hole in compliance with local codes and ordinances. not provided). 8 Hot water line Measure overall length of cabinet opening from moving when dishwasher is in the cabinet side or rear. 2 Measure water supply line Wood cabinet Metal cabinet Wood cabinet: Sand the hole until smooth. 2...
Installation Instructions
Page 9
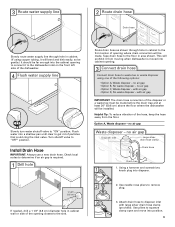
... connection of the disposer or a waste tee must be made . Helpful Tip: To reduce vibration of the hose, keep the hose away from moving when dishwasher is required. 1 Drill hole 1 1/2" (3.8 cm) If needed, drill a 1 1/2" (3.8 cm) diameter hole in cabinet wall or side of the opening closest to the sink....will be far enough into disposer. 2 2. This will be made before the drain trap and at least 20" (50.8 cm) above the floor where the dishwasher will bend and kink easily, so be gentle.) It should be installed. Option A, Waste disposer - Use needle nose pliers to "OFF" position. 3 Route...
... connection of the disposer or a waste tee must be made . Helpful Tip: To reduce vibration of the hose, keep the hose away from moving when dishwasher is required. 1 Drill hole 1 1/2" (3.8 cm) If needed, drill a 1 1/2" (3.8 cm) diameter hole in cabinet wall or side of the opening closest to the sink....will be far enough into disposer. 2 2. This will be made before the drain trap and at least 20" (50.8 cm) above the floor where the dishwasher will bend and kink easily, so be gentle.) It should be installed. Option A, Waste disposer - Use needle nose pliers to "OFF" position. 3 Route...
Installation Instructions
Page 11
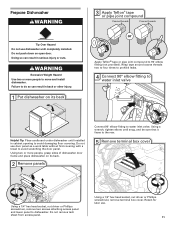
... four times to prohibit leaks. 4 Connect 90° elbow fitting to water inlet valve Helpful Tip: Place cardboard under dishwasher until installed in back or other injury. 1 Put dishwasher on its back. 2 Remove panels Connect 90° elbow fitting to water inlet valve. Do not remove tech sheet... from access panel. Prepare Dishwasher WARNING Tip Over Hazard Do not use door panel as a work table without first covering with a towel to avoid scratching the door ...
... four times to prohibit leaks. 4 Connect 90° elbow fitting to water inlet valve Helpful Tip: Place cardboard under dishwasher until installed in back or other injury. 1 Put dishwasher on its back. 2 Remove panels Connect 90° elbow fitting to water inlet valve. Do not remove tech sheet... from access panel. Prepare Dishwasher WARNING Tip Over Hazard Do not use door panel as a work table without first covering with a towel to avoid scratching the door ...


