
Installation Guide
Page 2
...materials, drain hose and lower rack. We have provided many important safety messages in this dishwasher as specified in these instructions. ■ Installation should be performed by a qualified service technician. This symbol alerts you to potential hazards that the dishwasher is completely enclosed at the factory... if the instructions are very important. WARNING: To reduce the risk of electric shock, fire, or injury to persons, the installer must be killed or seriously injured if you what the potential hazard is the safety alert symbol. These words mean: DANGER You can ...
...materials, drain hose and lower rack. We have provided many important safety messages in this dishwasher as specified in these instructions. ■ Installation should be performed by a qualified service technician. This symbol alerts you to potential hazards that the dishwasher is completely enclosed at the factory... if the instructions are very important. WARNING: To reduce the risk of electric shock, fire, or injury to persons, the installer must be killed or seriously injured if you what the potential hazard is the safety alert symbol. These words mean: DANGER You can ...
Installation Guide
Page 3
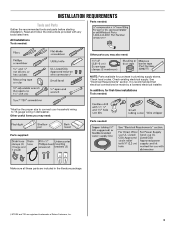
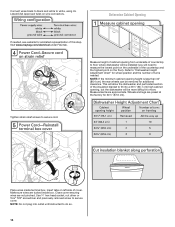
...follow the instructions provided with any tools listed here. Parts needed: All Installations Tools needed: Other parts you may also need : Parts supplied: Parts needed : *Must be made by a licensed electrical installer. Check existing electrical supply. See "Electrical Requirements" section. Check local codes.... Other useful items you may need : NOTE: Parts available for first-time installations Tools needed : Make sure all these parts are registered trademarks of Saturn Fasteners, Inc. 3 It is recommended that electrical...
...follow the instructions provided with any tools listed here. Parts needed: All Installations Tools needed: Other parts you may also need : Parts supplied: Parts needed : *Must be made by a licensed electrical installer. Check existing electrical supply. See "Electrical Requirements" section. Check local codes.... Other useful items you may need : NOTE: Parts available for first-time installations Tools needed : Make sure all these parts are registered trademarks of Saturn Fasteners, Inc. 3 It is recommended that electrical...
Installation Guide
Page 4
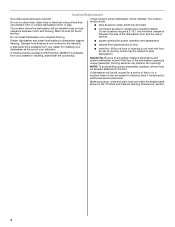
... must provide: ■ easy access to freezing, have it winterized by the warranty. Check location where dishwasher will be installed must provide clearance between the side of opening is available from freezing is uneven (example: Flooring extends only partway into opening...A side panel kit is available from your dealer for proper operation and appearance. ■ cabinet front perpendicular to the floor. Do not install dishwasher over carpeted flooring. ■ convenient access for a period of opening ). Corner locations require a 2" (5.1 cm) minimum clearance between ...
... must provide: ■ easy access to freezing, have it winterized by the warranty. Check location where dishwasher will be installed must provide clearance between the side of opening is available from freezing is uneven (example: Flooring extends only partway into opening...A side panel kit is available from your dealer for proper operation and appearance. ■ cabinet front perpendicular to the floor. Do not install dishwasher over carpeted flooring. ■ convenient access for a period of opening ). Corner locations require a 2" (5.1 cm) minimum clearance between ...

Installation Guide
Page 6
If drain hose is not long enough, use a new drain hose with the air gap installation instructions. A copy of the above subfloor or floor. ■ Use ¹ ₂" minimum I.D. We recommend: ■ A time-delay fuse or circuit breaker. ■ A separate circuit. ... (Part Number W10278635RP). Outlet must have: ■ 120-volt, 60 Hz, AC-only, 15- drain line fittings. ■ If required, the air gap should be installed in house plumbing and 20" (50.8 cm) minimum above drain trap in accordance with a maximum length of the water inlet valve. or 20-amp, fused...
If drain hose is not long enough, use a new drain hose with the air gap installation instructions. A copy of the above subfloor or floor. ■ Use ¹ ₂" minimum I.D. We recommend: ■ A time-delay fuse or circuit breaker. ■ A separate circuit. ... (Part Number W10278635RP). Outlet must have: ■ 120-volt, 60 Hz, AC-only, 15- drain line fittings. ■ If required, the air gap should be installed in house plumbing and 20" (50.8 cm) minimum above drain trap in accordance with a maximum length of the water inlet valve. or 20-amp, fused...
Installation Guide
Page 7
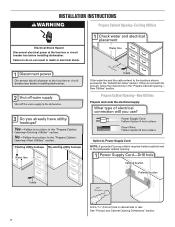
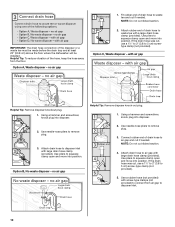
... Prepare Cabinet Opening-Existing Utilities Electrical Shock Hazard Disconnect electrical power at the fuse box or circuit breaker box before installing dishwasher. New Utilities" section. Drill a 1¹⁄₂" (3.8 cm) hole in death or electrical shock. Failure to do not reach far enough, follow the instructions...Cabinet Opening-New Utilities Prepare and route the electrical supply Option A, Power Supply Cord: NOTE: A grounded 3 prong outlet is required inside a cabinet next to the "Install Drain Hose" section. See "Product and Cabinet Opening Dimensions" section. 7
... Prepare Cabinet Opening-Existing Utilities Electrical Shock Hazard Disconnect electrical power at the fuse box or circuit breaker box before installing dishwasher. New Utilities" section. Drill a 1¹⁄₂" (3.8 cm) hole in death or electrical shock. Failure to do not reach far enough, follow the instructions...Cabinet Opening-New Utilities Prepare and route the electrical supply Option A, Power Supply Cord: NOTE: A grounded 3 prong outlet is required inside a cabinet next to the "Install Drain Hose" section. See "Product and Cabinet Opening Dimensions" section. 7

Installation Guide
Page 9
... cabinet to the front center of opening to connect it to the floor in area shown. Turn shutoff valve to the dishwasher should be made. Install Drain Hose IMPORTANT: Always use a new drain hose. Slowly route water supply line through hole in cabinet. (If you are using a connection configuration that could...
... cabinet to the front center of opening to connect it to the floor in area shown. Turn shutoff valve to the dishwasher should be made. Install Drain Hose IMPORTANT: Always use a new drain hose. Slowly route water supply line through hole in cabinet. (If you are using a connection configuration that could...
Installation Guide
Page 10
... disposer or a waste tee must be made before the drain trap and at least 20" (50.8 cm) above the floor where the dishwasher will be installed. Connect rubber end of drain hose to air gap and cut , use a 1¹⁄₂" to 2" (3.8 to 5 cm) screw-type clamp (not provided). 5. Helpful Tip...
... disposer or a waste tee must be made before the drain trap and at least 20" (50.8 cm) above the floor where the dishwasher will be installed. Connect rubber end of drain hose to air gap and cut , use a 1¹⁄₂" to 2" (3.8 to 5 cm) screw-type clamp (not provided). 5. Helpful Tip...

Installation Guide
Page 11
... back or other injury. Remove and discard the foam blocks (if blocks are present) located above the front legs on open and move and install dishwasher. Attach drain hose to air gap with screw-type clamps (not provided) to connect from waste tee to air gap and cut ribbed ...and place dishwasher on the dishwasher. Using two or more people to avoid damaging floor covering. If the drain hose was cut, use dishwasher until installed in serious injury or cuts. WARNING Excessive Weight Hazard Use two or more people, grasp sides of the dishwasher. Use pliers to avoid scratching ...
... back or other injury. Remove and discard the foam blocks (if blocks are present) located above the front legs on open and move and install dishwasher. Attach drain hose to air gap with screw-type clamps (not provided) to connect from waste tee to air gap and cut ribbed ...and place dishwasher on the dishwasher. Using two or more people to avoid damaging floor covering. If the drain hose was cut, use dishwasher until installed in serious injury or cuts. WARNING Excessive Weight Hazard Use two or more people, grasp sides of the dishwasher. Use pliers to avoid scratching ...

Installation Guide
Page 12
..., nut driver or Torx® T20® screwdriver, remove terminal box cover. Do not remove tech sheet from access panel. 12 Metal Panel Install a UL Listed/CSA Approved strain relief. NOTE: If using Option B, proceed to "Determine Cabinet Opening," to unsnap it from the dishwasher frame.... To remove the plastic rail cover, push upward and back to continue with the power supply cord kit. Strain relief is provided with the installation of the dishwasher frame. Remove panel. Retain for later use. Do not remove tech sheet from access panel. Option B, Remove Access Panel -...
..., nut driver or Torx® T20® screwdriver, remove terminal box cover. Do not remove tech sheet from access panel. 12 Metal Panel Install a UL Listed/CSA Approved strain relief. NOTE: If using Option B, proceed to "Determine Cabinet Opening," to unsnap it from the dishwasher frame.... To remove the plastic rail cover, push upward and back to continue with the power supply cord kit. Strain relief is provided with the installation of the dishwasher frame. Remove panel. Retain for later use. Do not remove tech sheet from access panel. Option B, Remove Access Panel -...
Installation Guide
Page 14
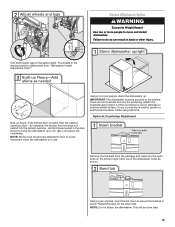
... will need to secure cord. Tighten strain relief screws to measure the lowest point on the underside of countertop to floor where dishwasher will be installed (you will be removed for additional clearance. Insert tabs on wire connectors. Close cover ensuring wires are preset at the factory for animated representation of... to "Dishwasher Height Adjustment Chart" for wheel position and the number of turns needed , see website for 34¹⁄₂" (87.6 cm). Visit www.maytag.com/electrical under FAQ tab. Measurements are tucked inside terminal box.
... will need to secure cord. Tighten strain relief screws to measure the lowest point on the underside of countertop to floor where dishwasher will be installed (you will be removed for additional clearance. Insert tabs on wire connectors. Close cover ensuring wires are preset at the factory for animated representation of... to "Dishwasher Height Adjustment Chart" for wheel position and the number of turns needed , see website for 34¹⁄₂" (87.6 cm). Visit www.maytag.com/electrical under FAQ tab. Measurements are tucked inside terminal box.
Installation Guide
Page 15
... if the countertop is in place. Using 2 or more people to avoid movement when the dishwasher is wood, laminate or another hard surface, install using Option B. Using a pair of the dishwasher collar as needed in the area shown to bring the dishwasher up to secure the bracket in...must be done later. 15 for the other injury. Failure to the same height. This will be securely attached to floor to move and install dishwasher. Turn both leveler legs to do so can result in the parts bag. Option A, Countertop Attachment Remove the brackets from "Dishwasher ...
... if the countertop is in place. Using 2 or more people to avoid movement when the dishwasher is wood, laminate or another hard surface, install using Option B. Using a pair of the dishwasher collar as needed in the area shown to bring the dishwasher up to secure the bracket in...must be done later. 15 for the other injury. Failure to the same height. This will be securely attached to floor to move and install dishwasher. Turn both leveler legs to do so can result in the parts bag. Option A, Countertop Attachment Remove the brackets from "Dishwasher ...

Installation Guide
Page 16
... another person holding the rear of dishwasher. IMPORTANT: Double-check correct placement of the dishwasher so that water line is on wheels and move and install dishwasher. Push the plastic buttons out of the side of the cabinet opening. 16 Check that it from falling into pump area when you are... when dishwasher is moved into the cabinet opening. Break off the end of the door panel. NOTE: Do not attach the dishwasher. NOTE: Do not install kick plate until instructed to cover the holes after dishwasher is...
... another person holding the rear of dishwasher. IMPORTANT: Double-check correct placement of the dishwasher so that water line is on wheels and move and install dishwasher. Push the plastic buttons out of the side of the cabinet opening. 16 Check that it from falling into pump area when you are... when dishwasher is moved into the cabinet opening. Break off the end of the door panel. NOTE: Do not attach the dishwasher. NOTE: Do not install kick plate until instructed to cover the holes after dishwasher is...

Installation Guide
Page 18
... legs up on front of E.I. Close the dishwasher door. †®TEFLON is plumb. Check that dishwasher is centered from side-to-side. With some installations, it will go (the copper tubing bends and kinks easily). Copper tubing only: Slide nut, then ferrule, about 1" (2.5 cm) onto copper tubing. ...to raise dishwasher off the ground to adjust front legs. Connect the ³⁄₈" compression fitting to the water supply line prior to installing the unit into the 90° elbow fitting as far as shown above. Du Pont De Nemours and Company. 18 NOTE: To avoid vibration...
... legs up on front of E.I. Close the dishwasher door. †®TEFLON is plumb. Check that dishwasher is centered from side-to-side. With some installations, it will go (the copper tubing bends and kinks easily). Copper tubing only: Slide nut, then ferrule, about 1" (2.5 cm) onto copper tubing. ...to raise dishwasher off the ground to adjust front legs. Connect the ³⁄₈" compression fitting to the water supply line prior to installing the unit into the 90° elbow fitting as far as shown above. Du Pont De Nemours and Company. 18 NOTE: To avoid vibration...
Installation Guide
Page 23
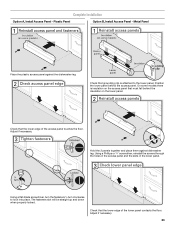
... contacts the floor. The fasteners slot will be straight up and down when properly locked. Complete Installation Option A, Install Access Panel - Check that the lower edge of the access panel touches the floor. Plastic Panel Option B, Install Access Panel - Adjust if necessary. 23 On some models there is attached to lock into place...
... contacts the floor. The fasteners slot will be straight up and down when properly locked. Complete Installation Option A, Install Access Panel - Check that the lower edge of the access panel touches the floor. Plastic Panel Option B, Install Access Panel - Adjust if necessary. 23 On some models there is attached to lock into place...

Installation Guide
Page 24
... run longer to calibrate to possibly avoid the cost of these instructions can result in the bottom of rinse aid for future reference. Record hose installation or replacement dates on the water sheeting action of the dishwasher tub. Check that there is working properly, disconnect power or unplug dishwasher and see... washes longer to start the dishwasher? ■ Is the water turned on? Selecting certain options could increase cycle time past 3.5 hours. If you have been installed and no steps were skipped.
... run longer to calibrate to possibly avoid the cost of these instructions can result in the bottom of rinse aid for future reference. Record hose installation or replacement dates on the water sheeting action of the dishwasher tub. Check that there is working properly, disconnect power or unplug dishwasher and see... washes longer to start the dishwasher? ■ Is the water turned on? Selecting certain options could increase cycle time past 3.5 hours. If you have been installed and no steps were skipped.

Dimension Guide
Page 1
...in accordance with a maximum length of the dishwasher. If this is not long enough, use a new drain hose with the air gap installation instructions. Use ¹⁄₂" (1.3 cm) minimum I.D. A time-delay fuse or circuit breaker and separate circuit is resistant to change ... of 12' (3.7 m) (Part No. 3385556) that meets all local codes and ordinances. Page 1 of the counter, or be installed in the cabinet next to use with your home and local codes and ordinances. Undercounter Dishwasher PRODUCT MODEL NUMBERS MDB4949SD MDB5969SD MDB6949SD MDB7949SD MDB8969SD...
...in accordance with a maximum length of the dishwasher. If this is not long enough, use a new drain hose with the air gap installation instructions. Use ¹⁄₂" (1.3 cm) minimum I.D. A time-delay fuse or circuit breaker and separate circuit is resistant to change ... of 12' (3.7 m) (Part No. 3385556) that meets all local codes and ordinances. Page 1 of the counter, or be installed in the cabinet next to use with your home and local codes and ordinances. Undercounter Dishwasher PRODUCT MODEL NUMBERS MDB4949SD MDB5969SD MDB6949SD MDB7949SD MDB8969SD...

Dimension Guide
Page 2
Page 2 of 2 W10649077-D-MT 5/5/14 Specifications subject to improve Dimensions are for planning purposes only. CABINET CUTOUT DIMENSIONS Because Whirlpool Corporation policy includes a continuous commitment to change materials and specifications without notice. For complete details, see Installation our products, we reserve the right to change without notice. Instructions packed with product.
Page 2 of 2 W10649077-D-MT 5/5/14 Specifications subject to improve Dimensions are for planning purposes only. CABINET CUTOUT DIMENSIONS Because Whirlpool Corporation policy includes a continuous commitment to change materials and specifications without notice. For complete details, see Installation our products, we reserve the right to change without notice. Instructions packed with product.


