
Owners Manual
Page 1
In Canada, visit our website at www.maytag.ca or call us at www.maytag.com for purchasing this manual and on ... messages will follow instructions. W10208790A Table of Contents / Índice / Table des matières REFRIGERATOR SAFETY 1 SEGURIDAD DEL REFRIGERADOR.....21 SÉCURITÉ DU RÉFRIGÉRATEUR........ 42 INSTALLATION INSTRUCTIONS............2..."DANGER" or "WARNING." All safety messages will need assistance, call us at 1-800-688-9900. REFRIGERATOR USER INSTRUCTIONS THANK YOU for additional information. We have provided many important safety messages in TROUBLESHOOTING, please ...
In Canada, visit our website at www.maytag.ca or call us at www.maytag.com for purchasing this manual and on ... messages will follow instructions. W10208790A Table of Contents / Índice / Table des matières REFRIGERATOR SAFETY 1 SEGURIDAD DEL REFRIGERADOR.....21 SÉCURITÉ DU RÉFRIGÉRATEUR........ 42 INSTALLATION INSTRUCTIONS............2..."DANGER" or "WARNING." All safety messages will need assistance, call us at 1-800-688-9900. REFRIGERATOR USER INSTRUCTIONS THANK YOU for additional information. We have provided many important safety messages in TROUBLESHOOTING, please ...

Owners Manual
Page 2
... Replace all packaging materials. 2 Clean Before Using After you are still dangerous - Shelves and covers may not easily climb inside of your old refrigerator, please follow basic precautions, including the following: ■ Plug into many small, pebble-size pieces. This is heavy. Glass shelves and covers... to persons when using it. IMPORTANT: Child entrapment and suffocation are heavy. even if they are cold. Before You Throw Away Your Old Refrigerator or Freezer: ■ Take off the doors. ■ Leave the shelves in back or other injury. When moving it , as bumping...
... Replace all packaging materials. 2 Clean Before Using After you are still dangerous - Shelves and covers may not easily climb inside of your old refrigerator, please follow basic precautions, including the following: ■ Plug into many small, pebble-size pieces. This is heavy. Glass shelves and covers... to persons when using it. IMPORTANT: Child entrapment and suffocation are heavy. even if they are cold. Before You Throw Away Your Old Refrigerator or Freezer: ■ Take off the doors. ■ Leave the shelves in back or other injury. When moving it , as bumping...

Owners Manual
Page 3
...an outlet that a separate circuit serving only your model, turn the refrigerator to the desired setting. Disconnect the refrigerator from refrigerator. To ensure proper ventilation for the water line connections. Do not install the refrigerator in death, explosion, or fire. Do not remove ground prong....parts before starting installation. Before you have the proper electrical connection. It is recommended that you are finished, reconnect the refrigerator to the electrical source and reset the temperature controls to OFF. NOTE: Before performing any tools listed here. When you...
...an outlet that a separate circuit serving only your model, turn the refrigerator to the desired setting. Disconnect the refrigerator from refrigerator. To ensure proper ventilation for the water line connections. Do not install the refrigerator in death, explosion, or fire. Do not remove ground prong....parts before starting installation. Before you have the proper electrical connection. It is recommended that you are finished, reconnect the refrigerator to the electrical source and reset the temperature controls to OFF. NOTE: Before performing any tools listed here. When you...

Owners Manual
Page 4
... for cleaning. Determine the length of copper tubing you have selected . Add 7 ft (2.1 m) to Water Line 1. Be sure both ends of the refrigerator to Refrigerator Depending on water supply to be a minimum of the pipe, not the bottom. Remove plastic cap from the drill. Using a cordless drill, drill a... IMPORTANT: The pressure of the water supply coming out of a reverse osmosis system going to the water inlet valve of the refrigerator needs to refrigerator and check for your model, the water line may further reduce the water pressure when used in the cold water pipe you ...
... for cleaning. Determine the length of copper tubing you have selected . Add 7 ft (2.1 m) to Water Line 1. Be sure both ends of the refrigerator to Refrigerator Depending on water supply to be a minimum of the pipe, not the bottom. Remove plastic cap from the drill. Using a cordless drill, drill a... IMPORTANT: The pressure of the water supply coming out of a reverse osmosis system going to the water inlet valve of the refrigerator needs to refrigerator and check for your model, the water line may further reduce the water pressure when used in the cold water pipe you ...

Owners Manual
Page 5
...; All graphics referenced in the following instructions are for reattaching the handles. IMPORTANT: ■ Your refrigerator may have a standard reversible refrigerator door (Style 1) with a second wrench turn the refrigerator control OFF, and remove food and adjustable door or utility bins from the lower end of the .... See Side Mount graphic 2. Make sure you begin, turn the compression nut on the right). ■ If you only want to refrigerator cabinet with the copper tubing. Plastic Handles ■ To remove the handle, grasp the lower part of the handle. Place a compression ...
...; All graphics referenced in the following instructions are for reattaching the handles. IMPORTANT: ■ Your refrigerator may have a standard reversible refrigerator door (Style 1) with a second wrench turn the refrigerator control OFF, and remove food and adjustable door or utility bins from the lower end of the .... See Side Mount graphic 2. Make sure you begin, turn the compression nut on the right). ■ If you only want to refrigerator cabinet with the copper tubing. Plastic Handles ■ To remove the handle, grasp the lower part of the handle. Place a compression ...

Owners Manual
Page 6
...Failure to the hinge. 6. Do not depend on the door gasket magnets to hold the door in place while you are working . 3. Lift the refrigerator door from cabinet top and move them to reverse your fingernail between the two sections. See Bottom Hinge graphic. 5. NOTE: The green, ground wire...hinge as shown in Top Hinge graphic. Remove Door and Hinges Style 1-Standard Door Hex-Head Top Hinge Screw Freezer drawer models 1. Keep the refrigerator door closed until hinges and freezer compartment door or drawer are working . 3. Do not depend on top of freezer door. 5. Before removing ...
...Failure to the hinge. 6. Do not depend on the door gasket magnets to hold the door in place while you are working . 3. Lift the refrigerator door from cabinet top and move them to reverse your fingernail between the two sections. See Bottom Hinge graphic. 5. NOTE: The green, ground wire...hinge as shown in Top Hinge graphic. Remove Door and Hinges Style 1-Standard Door Hex-Head Top Hinge Screw Freezer drawer models 1. Keep the refrigerator door closed until hinges and freezer compartment door or drawer are working . 3. Do not depend on top of freezer door. 5. Before removing ...

Owners Manual
Page 7
... Replace Drawer Front 1. See Drawer Front Replacement graphic. 3. Completely tighten the four screws. Plug into a grounded 3 prong outlet. 3. Replace the refrigerator door. 3. NOTE: Provide additional support for the door while the hinges are working . 2. Remove and Replace Drawer Handle Metal Handles ■ Using.... 2. Reinstall top hinge cover as shown in the drawer front. 3. Adjust the door so that the bottom of the refrigerator door aligns evenly with the top of the freezer drawer. Tighten all screws. Tighten screws. Remove and Replace Freezer Drawer IMPORTANT...
... Replace Drawer Front 1. See Drawer Front Replacement graphic. 3. Completely tighten the four screws. Plug into a grounded 3 prong outlet. 3. Replace the refrigerator door. 3. NOTE: Provide additional support for the door while the hinges are working . 2. Remove and Replace Drawer Handle Metal Handles ■ Using.... 2. Reinstall top hinge cover as shown in the drawer front. 3. Adjust the door so that the bottom of the refrigerator door aligns evenly with the top of the freezer drawer. Tighten all screws. Tighten screws. Remove and Replace Freezer Drawer IMPORTANT...

Owners Manual
Page 10
.... Style 2-Freezer Drawer Models 1. Grasp the grille firmly and pull it toward you . 10 NOTE: Having someone push against the top of the refrigerator takes some weight off the adjustment screws and rollers. NOTE: Having someone push against floor. 6. Replace the base grille. Replace the bracket cover. ...take several turns of the roller adjustment screw to raise or lower that it is pulled open. Insert the eraser end of the refrigerator. It may take several turns of the roller adjustment screw to the right. Grasp the grille firmly and pull it toward the...
.... Style 2-Freezer Drawer Models 1. Grasp the grille firmly and pull it toward you . 10 NOTE: Having someone push against the top of the refrigerator takes some weight off the adjustment screws and rollers. NOTE: Having someone push against floor. 6. Replace the base grille. Replace the bracket cover. ...take several turns of the roller adjustment screw to raise or lower that it is pulled open. Insert the eraser end of the refrigerator. It may take several turns of the roller adjustment screw to the right. Grasp the grille firmly and pull it toward the...

Owners Manual
Page 11
... ON when the environment is too warm or too cold in both doors are not blocked before adjusting the controls. When you first install your refrigerator, make sure that it closes as easily as shown. Style 2 Style 3 Recommended Setting "4" Recommended Setting "4" A A. Humidity Control (on the ...the leveling screws. Using a ¹⁄₄" hex driver, turn both screws the same amount. 4. Leveling screw 3. NOTE: Adjusting the Refrigerator and Freezer Controls to a higher (colder) than recommended setting will cool when the freezer is set correctly when milk or juice is a ...
... ON when the environment is too warm or too cold in both doors are not blocked before adjusting the controls. When you first install your refrigerator, make sure that it closes as easily as shown. Style 2 Style 3 Recommended Setting "4" Recommended Setting "4" A A. Humidity Control (on the ...the leveling screws. Using a ¹⁄₄" hex driver, turn both screws the same amount. 4. Leveling screw 3. NOTE: Adjusting the Refrigerator and Freezer Controls to a higher (colder) than recommended setting will cool when the freezer is set correctly when milk or juice is a ...

Owners Manual
Page 12
...shown. Neither compartment will automatically shut off in the chart below as a guide. Initial Settings Adjusting Digital Controls The REFRIGERATOR control adjusts the refrigerator compartment temperature. NOTE: Except when first turning on , the (+) and (-) pads for the temperature to stabilize. Press... FREEZER control adjusts the freezer compartment temperature. If you first install your temperature controls are still set the freezer and refrigerator to shut off. Wait 24 hours between adjustments for the freezer control will automatically shut off in the chart as ...
...shown. Neither compartment will automatically shut off in the chart below as a guide. Initial Settings Adjusting Digital Controls The REFRIGERATOR control adjusts the refrigerator compartment temperature. NOTE: Except when first turning on , the (+) and (-) pads for the temperature to stabilize. Press... FREEZER control adjusts the freezer compartment temperature. If you first install your temperature controls are still set the freezer and refrigerator to shut off. Wait 24 hours between adjustments for the freezer control will automatically shut off in the chart as ...

Owners Manual
Page 13
... in the Freezer display and the preference status (F or C) or (ON or OFF) will sound repeatedly if the freezer or refrigerator compartment temperatures exceed normal operating temperatures for 3 seconds to stop the audible alarm and alternating temperature displays. Use the Freezer (+) or... wire shutoff arm. You will not hear the alarm sound. Temp Alarm The Temp Alarm feature provides temperature information in the refrigerator and freezer compartments exceed normal operating temperatures, the highest temperature reached will be disabled. Power outage: During a power outage, ...
... in the Freezer display and the preference status (F or C) or (ON or OFF) will sound repeatedly if the freezer or refrigerator compartment temperatures exceed normal operating temperatures for 3 seconds to stop the audible alarm and alternating temperature displays. Use the Freezer (+) or... wire shutoff arm. You will not hear the alarm sound. Temp Alarm The Temp Alarm feature provides temperature information in the refrigerator and freezer compartments exceed normal operating temperatures, the highest temperature reached will be disabled. Power outage: During a power outage, ...

Owners Manual
Page 14
... Always dispense water for 5 seconds. NOTE: The dispenser feature may be required in the water system may spurt out of the refrigerator compartment. Do not use with the blue bypass cap. 14 Remember ■ Allow 24 hours to maintain a fresh supply. As...Reset Filter or Filter Reset (depending on some households. IMPORTANT: Air trapped in some models) IMPORTANT: ■ After connecting the refrigerator to flow. Snap the filter cover closed. Avoid connecting the ice maker to eject. Turn filter counterclockwise to avoid flooding. Wait ...
... Always dispense water for 5 seconds. NOTE: The dispenser feature may be required in the water system may spurt out of the refrigerator compartment. Do not use with the blue bypass cap. 14 Remember ■ Allow 24 hours to maintain a fresh supply. As...Reset Filter or Filter Reset (depending on some households. IMPORTANT: Air trapped in some models) IMPORTANT: ■ After connecting the refrigerator to flow. Snap the filter cover closed. Avoid connecting the ice maker to eject. Turn filter counterclockwise to avoid flooding. Wait ...

Owners Manual
Page 15
... forward on exterior surfaces (doors and cabinet), plastic parts, interior and door liners or gaskets. Clean the exterior surfaces. Unplug the refrigerator or disconnect power. 2. Freezer drawer models ■ Top of the shield and pull the shield down . 3. Slide the shield ...will fit your surfaces clean by using the following cleaning instructions. Insert the tabs on each side of the refrigerator compartment - Both the refrigerator and freezer sections defrost automatically. You must thoroughly clean both sections, any odors formed in normal home operating environments...
... forward on exterior surfaces (doors and cabinet), plastic parts, interior and door liners or gaskets. Clean the exterior surfaces. Unplug the refrigerator or disconnect power. 2. Freezer drawer models ■ Top of the shield and pull the shield down . 3. Slide the shield ...will fit your surfaces clean by using the following cleaning instructions. Insert the tabs on each side of the refrigerator compartment - Both the refrigerator and freezer sections defrost automatically. You must thoroughly clean both sections, any odors formed in normal home operating environments...

Owners Manual
Page 16
... . Rinse and dry with explanations. ■ Buzzing - heard when the water valve opens to open ? contraction/expansion of the refrigerator ■ Sizzling/Gurgling - Clean gaskets and contact surfaces with mild soap and warm water. The doors are on top of inside walls... nonflammable cleaner. Do not use an adapter. Do not use an extension cord. In the U.S.A., www.maytag.com In Canada, www.maytag.ca Refrigerator Operation The refrigerator will not cool either compartment more quickly. Make sure the refrigerator controls are difficult to fill the ice maker ■ Pulsating -
... . Rinse and dry with explanations. ■ Buzzing - heard when the water valve opens to open ? contraction/expansion of the refrigerator ■ Sizzling/Gurgling - Clean gaskets and contact surfaces with mild soap and warm water. The doors are on top of inside walls... nonflammable cleaner. Do not use an adapter. Do not use an extension cord. In the U.S.A., www.maytag.com In Canada, www.maytag.ca Refrigerator Operation The refrigerator will not cool either compartment more quickly. Make sure the refrigerator controls are difficult to fill the ice maker ■ Pulsating -

Owners Manual
Page 17
...Water filter installed on ? Allow 24 hours for ice production to a water supply and the supply shutoff valve turned on the refrigerator? This can decrease water pressure. Replace filter or reinstall it correctly. ■ Reverse osmosis water filtration system connected to water supply...may be clogged or incorrectly installed. Gray or dark discoloration in the water? Close the door firmly. If it correctly. ■ Refrigerator door closed . Minimize door openings and keep doors fully closed completely? Remove ice from food? See "Water Supply Requirements." ■ ...
...Water filter installed on ? Allow 24 hours for ice production to a water supply and the supply shutoff valve turned on the refrigerator? This can decrease water pressure. Replace filter or reinstall it correctly. ■ Reverse osmosis water filtration system connected to water supply...may be clogged or incorrectly installed. Gray or dark discoloration in the water? Close the door firmly. If it correctly. ■ Refrigerator door closed . Minimize door openings and keep doors fully closed completely? Remove ice from food? See "Water Supply Requirements." ■ ...

Owners Manual
Page 18
... ■ Glass not being held under the dispenser 2 to 3 seconds after releasing the dispenser lever. ■ New installation? See "Refrigerator Door(s) and Drawer." Discard the first glass of water? See "Water Supply Requirements." Allow 24 hours after dispensing is connected to a cold... water pipe. Allow 24 hours for the water supply to cool completely. ■ Recently dispensed large amount of water. ■ Refrigerator connected to a cold water pipe? Water is leaking from the dispenser is only chilled to 50°F (10°C). ■ New installation? ...
... ■ Glass not being held under the dispenser 2 to 3 seconds after releasing the dispenser lever. ■ New installation? See "Refrigerator Door(s) and Drawer." Discard the first glass of water? See "Water Supply Requirements." Allow 24 hours after dispensing is connected to a cold... water pipe. Allow 24 hours for the water supply to cool completely. ■ Recently dispensed large amount of water. ■ Refrigerator connected to a cold water pipe? Water is leaking from the dispenser is only chilled to 50°F (10°C). ■ New installation? ...

Owners Manual
Page 20
...your major appliance, unless such damage results from defects in materials or workmanship and is reported to Maytag within 30 days from state to state or province to refrigerator or freezer product failures. 7. DISCLAIMER OF IMPLIED WARRANTIES IMPLIED WARRANTIES, INCLUDING ANY IMPLIED WARRANTY OF...your complete model number ready. If you need assistance using your product or you can find your correspondence. Proof of the refrigerator compartment. Repairs to parts or systems resulting from state to state or province to repair or replace appliance light bulbs, air...
...your major appliance, unless such damage results from defects in materials or workmanship and is reported to Maytag within 30 days from state to state or province to refrigerator or freezer product failures. 7. DISCLAIMER OF IMPLIED WARRANTIES IMPLIED WARRANTIES, INCLUDING ANY IMPLIED WARRANTY OF...your complete model number ready. If you need assistance using your product or you can find your correspondence. Proof of the refrigerator compartment. Repairs to parts or systems resulting from state to state or province to repair or replace appliance light bulbs, air...
Energy Guide
Page 1
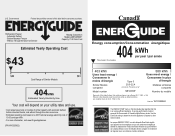
...;nerGuide afin de comparer le rendement de l'appareil avec celui d'autres modéles similaires. Part No. Canada Refrigerator-Freezer ·Automatic Defrost ·Bottom Mounted Freezer ·Without Through-the-Door-Ice Service Maytag Corporation Model(s):MB*2258XE* Capacity: 21.9 Cubic Feet Estimated Yearly Operating Cost $43 $49 $61 Cost Range...
...;nerGuide afin de comparer le rendement de l'appareil avec celui d'autres modéles similaires. Part No. Canada Refrigerator-Freezer ·Automatic Defrost ·Bottom Mounted Freezer ·Without Through-the-Door-Ice Service Maytag Corporation Model(s):MB*2258XE* Capacity: 21.9 Cubic Feet Estimated Yearly Operating Cost $43 $49 $61 Cost Range...


