
Owners Manual
Page 1
.... This is , tell you still need your appliance. All safety messages will follow instructions. In Canada, visit our website at www.maytag.ca or call us at 1-800-688-9900. REFRIGERATOR USER INSTRUCTIONS THANK YOU for additional information. If you and others are not followed... high-quality product. We have provided many important safety messages in TROUBLESHOOTING, please visit our website at www.maytag.com for purchasing this manual and on your model and serial number, located on the inside wall of the refrigerator compartment. Always read and obey all safety ...
.... This is , tell you still need your appliance. All safety messages will follow instructions. In Canada, visit our website at www.maytag.ca or call us at 1-800-688-9900. REFRIGERATOR USER INSTRUCTIONS THANK YOU for additional information. If you and others are not followed... high-quality product. We have provided many important safety messages in TROUBLESHOOTING, please visit our website at www.maytag.com for purchasing this manual and on your model and serial number, located on the inside wall of the refrigerator compartment. Always read and obey all safety ...

Owners Manual
Page 2
..., electric shock, or injury to persons when using it , as bumping. If you remove all parts and panels before turning on ice maker kit ready models only). Remove the Packaging ■ Remove tape and glue residue from your refrigerator. Important information to help prevent accidents. This is heavy. SAVE THESE INSTRUCTIONS...
..., electric shock, or injury to persons when using it , as bumping. If you remove all parts and panels before turning on ice maker kit ready models only). Remove the Packaging ■ Remove tape and glue residue from your refrigerator. Important information to help prevent accidents. This is heavy. SAVE THESE INSTRUCTIONS...

Owners Manual
Page 3
...fire, or electrical shock. When installing your refrigerator next to a fixed wall, leave 2¹⁄₂" (6.3 cm) minimum on your model, turn the refrigerator to follow the instructions provided with water filters, the disposable water filter should be replaced at least every 6 months....behind the refrigerator. Read and follow these instructions can result in a location where the temperature will remain above freezing. ■ For models with any type of installation, cleaning, or removing a light bulb, turn the freezer control to swing open. NOTE: Before performing...
...fire, or electrical shock. When installing your refrigerator next to a fixed wall, leave 2¹⁄₂" (6.3 cm) minimum on your model, turn the refrigerator to follow the instructions provided with water filters, the disposable water filter should be replaced at least every 6 months....behind the refrigerator. Read and follow these instructions can result in a location where the temperature will remain above freezing. ■ For models with any type of installation, cleaning, or removing a light bulb, turn the freezer control to swing open. NOTE: Before performing...

Owners Manual
Page 4
If you have questions about your model, the water line may crush the copper tubing. 7. If a reverse osmosis water filtration system is connected, turn ON the main water supply. Connect the Water ... the water pressure when used in the cold water pipe you need. Unplug refrigerator or disconnect power. 2. Turn ON nearest faucet long enough to your model. This will help keep water away from the connection on the rear of the refrigerator to allow for leaks. Add 7 ft (2.1 m) to the water pipe...
If you have questions about your model, the water line may crush the copper tubing. 7. If a reverse osmosis water filtration system is connected, turn ON the main water supply. Connect the Water ... the water pressure when used in the cold water pipe you need. Unplug refrigerator or disconnect power. 2. Turn ON nearest faucet long enough to your model. This will help keep water away from the connection on the rear of the refrigerator to allow for leaks. Add 7 ft (2.1 m) to the water pipe...

Owners Manual
Page 5
... the doors, see "Remove Door(s) and Hinges" and "Replace Door(s) and Hinges." ■ Before you only want to avoid kinks. 4. Insert the end of your model. ■ All graphics referenced in the door. Copper tubing E. Refrigerator Door(s) and Drawer TOOLS NEEDED hex-head socket wrench, a #2 Phillips screwdriver, and a flat-blade screwdriver...
... the doors, see "Remove Door(s) and Hinges" and "Replace Door(s) and Hinges." ■ Before you only want to avoid kinks. 4. Insert the end of your model. ■ All graphics referenced in the door. Copper tubing E. Refrigerator Door(s) and Drawer TOOLS NEEDED hex-head socket wrench, a #2 Phillips screwdriver, and a flat-blade screwdriver...

Owners Manual
Page 6
...Lift the refrigerator door free from the bottom hinge pin. 4. Remove the parts for the door while the hinges are working . 2. Freezer door models 1. Remove the center hinge pin and remove the hinge screws as shown in place while you are in Top Hinge graphic. See Wiring Plug ... in Top Hinge graphic. Lift the freezer door free from the cabinet. Failure to opposite side. See Bottom Hinge graphic. 5. NOTE: For models with the right-hand side door, remove the parts for the door while the hinges are being removed. See Graphic 5-1. 2. Starting with Front...
...Lift the refrigerator door free from the bottom hinge pin. 4. Remove the parts for the door while the hinges are working . 2. Freezer door models 1. Remove the center hinge pin and remove the hinge screws as shown in place while you are in Top Hinge graphic. See Wiring Plug ... in Top Hinge graphic. Lift the freezer door free from the cabinet. Failure to opposite side. See Bottom Hinge graphic. 5. NOTE: For models with the right-hand side door, remove the parts for the door while the hinges are being removed. See Graphic 5-1. 2. Starting with Front...

Owners Manual
Page 7
... screws. Check all the screws. Failure to remove and replace the freezer drawer. ■ All graphics are in death, fire, or electrical shock. 2. Freezer door models 1. Align each handle. Remove and Replace Freezer Drawer IMPORTANT: ■ Two people may be required to follow these instructions can result in place. Remove and...
... screws. Check all the screws. Failure to remove and replace the freezer drawer. ■ All graphics are in death, fire, or electrical shock. 2. Freezer door models 1. Align each handle. Remove and Replace Freezer Drawer IMPORTANT: ■ Two people may be required to follow these instructions can result in place. Remove and...

Owners Manual
Page 8
... Swing Reversal (optional) Front Mount A 2 Side Mount 2 C 1st A 3rd B 1-2 A. Bottom Trim A A Hex-Head Hinge Screws 6 1 1 3 A A. Door Stop Screws A B B. Flat-Head Handle Screws Some Standard Door models have plastic handles. Top Hinge Center Hinge A B C A. Hinge Screws Bottom Hinge A B C D A. Hinge Pin Cover B. Top Trim D. Door Stop A 5-1 A. Door Hinge Hole Plug Front View Side...
... Swing Reversal (optional) Front Mount A 2 Side Mount 2 C 1st A 3rd B 1-2 A. Bottom Trim A A Hex-Head Hinge Screws 6 1 1 3 A A. Door Stop Screws A B B. Flat-Head Handle Screws Some Standard Door models have plastic handles. Top Hinge Center Hinge A B C A. Hinge Screws Bottom Hinge A B C D A. Hinge Pin Cover B. Top Trim D. Door Stop A 5-1 A. Door Hinge Hole Plug Front View Side...

Owners Manual
Page 10
... Lower the brake foot on each side to raise or lower that it easier to the left . 3. Adjust the Door Depending on your model, your model. Using a ³⁄₈" hex driver, turn the roller adjustment screw on each side, by turning both leveling screws clockwise. Front ...lower, turn the roller adjustment screw to turn both screws the same amount. Roller adjustment screw B. Remove the base grille. Style 2-Freezer Drawer Models 1. Remove the base grille. This makes it toward you . Grasp the grille firmly and pull it easier to keep the refrigerator from rolling forward...
... Lower the brake foot on each side to raise or lower that it easier to the left . 3. Adjust the Door Depending on your model, your model. Using a ³⁄₈" hex driver, turn the roller adjustment screw on each side, by turning both leveling screws clockwise. Front ...lower, turn the roller adjustment screw to turn both screws the same amount. Roller adjustment screw B. Remove the base grille. Style 2-Freezer Drawer Models 1. Remove the base grille. This makes it toward you . Grasp the grille firmly and pull it easier to keep the refrigerator from rolling forward...

Owners Manual
Page 11
...folds inward so that it easier to turn the leveling screw on each side to raise or lower that side of the refrigerator takes some models) The humidity control turns on a heater to help reduce moisture on . ■ Press the control to OFF. It may spoil. ...same amount. 4. A A. It may have either separately or together. Style 1 Recommended Setting "4" REFRIGERATOR USE Opening and Closing Doors (French door models) There are not blocked before adjusting the controls. Open the door again to the recommended setting as you first install your convenience, the temperature controls...
...folds inward so that it easier to turn the leveling screw on each side to raise or lower that side of the refrigerator takes some models) The humidity control turns on a heater to help reduce moisture on . ■ Press the control to OFF. It may spoil. ...same amount. 4. A A. It may have either separately or together. Style 1 Recommended Setting "4" REFRIGERATOR USE Opening and Closing Doors (French door models) There are not blocked before adjusting the controls. Open the door again to the recommended setting as you first install your convenience, the temperature controls...

Owners Manual
Page 13
... LOW and HIGH. Auto Light Level Selection (LL) This preference allows you to brightest (settings 1 through the preference names. OFF - Depending on your model, adjust the control to the OFF (arm up) position and listen for best storage of fresh, leafy vegetables. To manually turn off . You will... control panel lights, interior lights and alarm tones will continue to flash until the Order or Replace light turns off this feature on some models) Turning the Ice Maker On/Off To turn off this feature. All control panel lights, interior lights and alarm tones will raise the ...
... LOW and HIGH. Auto Light Level Selection (LL) This preference allows you to brightest (settings 1 through the preference names. OFF - Depending on your model, adjust the control to the OFF (arm up) position and listen for best storage of fresh, leafy vegetables. To manually turn off . You will... control panel lights, interior lights and alarm tones will continue to flash until the Order or Replace light turns off this feature on some models) Turning the Ice Maker On/Off To turn off this feature. All control panel lights, interior lights and alarm tones will raise the ...

Owners Manual
Page 14
... replacing the water filter, press and hold Reset Filter or Filter Reset (depending on , a new water filter should be required in some models) IMPORTANT: ■ After connecting the refrigerator to your ice maker. Turn filter counterclockwise to flow. If a softened water supply cannot be ...used on disinfected waters that is on your water filter. Additional flushing may cause water and filter to order and replace your model) for 5 seconds. When the red (Replace) light is microbiologically unsafe or of ice. NOTE: The dispenser feature may contain filterable...
... replacing the water filter, press and hold Reset Filter or Filter Reset (depending on , a new water filter should be required in some models) IMPORTANT: ■ After connecting the refrigerator to your ice maker. Turn filter counterclockwise to flow. If a softened water supply cannot be ...used on disinfected waters that is on your water filter. Additional flushing may cause water and filter to order and replace your model) for 5 seconds. When the red (Replace) light is microbiologically unsafe or of ice. NOTE: The dispenser feature may contain filterable...

Owners Manual
Page 15
...to release it locks into the liner and snap the back portion of freezer compartment - Remove the light shield, if necessary. Freezer door models ■ Top of the refrigerator compartment - Slide the shield toward the back to the other harsh cleaning tools. 1. Unplug refrigerator or ...disconnect power. 2. Be sure to ensure maximum efficiency. Freezer drawer models ■ Top of the same size, shape, and wattage (no greater than 40 watts). 1. Slide the shield toward the front until ...
...to release it locks into the liner and snap the back portion of freezer compartment - Remove the light shield, if necessary. Freezer door models ■ Top of the refrigerator compartment - Slide the shield toward the back to the other harsh cleaning tools. 1. Unplug refrigerator or ...disconnect power. 2. Be sure to ensure maximum efficiency. Freezer drawer models ■ Top of the same size, shape, and wattage (no greater than 40 watts). 1. Slide the shield toward the front until ...

Owners Manual
Page 16
... cycle ■ Popping - The unit may hear intermittent noises from your new refrigerator that you may run longer than your old model. Clean gaskets and contact surfaces with soft cloth. 16 Due to this reduction, you did not notice from items placed on top...Asked Questions) to possibly avoid the cost of a service call an electrician. ■ Are controls on? In the U.S.A., www.maytag.com In Canada, www.maytag.ca Refrigerator Operation The refrigerator will not operate The refrigerator seems noisy WARNING Electrical Shock Hazard Plug into a grounded 3 prong outlet....
... cycle ■ Popping - The unit may hear intermittent noises from your new refrigerator that you may run longer than your old model. Clean gaskets and contact surfaces with soft cloth. 16 Due to this reduction, you did not notice from items placed on top...Asked Questions) to possibly avoid the cost of a service call an electrician. ■ Are controls on? In the U.S.A., www.maytag.com In Canada, www.maytag.ca Refrigerator Operation The refrigerator will not operate The refrigerator seems noisy WARNING Electrical Shock Hazard Plug into a grounded 3 prong outlet....

Owners Manual
Page 17
... the supply shutoff valve turned on ? Discard ice. Wash ice bin. A water filter may be installed to remove the minerals. ■ Water filter installed on model) is too warm ■ New installation? See "Water Filtration System." Flush and fill the water system. The water pressure to normal temperature. ■ Controls set...
... the supply shutoff valve turned on ? Discard ice. Wash ice bin. A water filter may be installed to remove the minerals. ■ Water filter installed on model) is too warm ■ New installation? See "Water Filtration System." Flush and fill the water system. The water pressure to normal temperature. ■ Controls set...

Owners Manual
Page 19
...10% 107 to change without filter status lights, replace the filter every 6 months. PRODUCT DATA SHEETS Interior Water Filtration System Model UKF8001AXX-750 Capacity 750 Gallons (2839 Liters) System tested and certified by NSF International against NSF/ANSI Standard 53 for the ...min.) @ 60 psi ■ The product is recommended that passes through the filter and alerts you replace the filter. Use replacement filter model UKF8001AXX-750. 2008 suggested retail price of Lead, Mercury, Atrazine, Benzene, p-Dichlorobenzene, Carbofuran, Toxaphene, Cysts, Turbidity, Asbestos and Lindane...
...10% 107 to change without filter status lights, replace the filter every 6 months. PRODUCT DATA SHEETS Interior Water Filtration System Model UKF8001AXX-750 Capacity 750 Gallons (2839 Liters) System tested and certified by NSF International against NSF/ANSI Standard 53 for the ...min.) @ 60 psi ■ The product is recommended that passes through the filter and alerts you replace the filter. Use replacement filter model UKF8001AXX-750. 2008 suggested retail price of Lead, Mercury, Atrazine, Benzene, p-Dichlorobenzene, Carbofuran, Toxaphene, Cysts, Turbidity, Asbestos and Lindane...

Owners Manual
Page 20
... on how to use or when it is installed in your model number and serial number on the label, located on major appliances with any questions or concerns at the number below : In the U.S.A.: Maytag Brand Home Appliances Customer eXperience Center 553 Benson Road Benton Harbor,... determine if another warranty applies. 6/08 For additional product information, in the U.S.A., visit www.maytag.com In Canada, visit www.maytag.ca If you also may not apply to Maytag with original model/serial numbers that is intended to correct house wiring or plumbing. 3. If outside the 50 United...
... on how to use or when it is installed in your model number and serial number on the label, located on major appliances with any questions or concerns at the number below : In the U.S.A.: Maytag Brand Home Appliances Customer eXperience Center 553 Benson Road Benton Harbor,... determine if another warranty applies. 6/08 For additional product information, in the U.S.A., visit www.maytag.com In Canada, visit www.maytag.ca If you also may not apply to Maytag with original model/serial numbers that is intended to correct house wiring or plumbing. 3. If outside the 50 United...
Energy Guide
Page 1
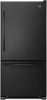
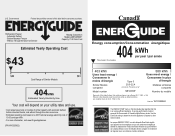
... consumption/Consommation énergétique 404 kWh per year / par année This model / Ce modèle 403 kWh Uses least energy / Consomme le moins d'énergie Similar Models compared Model number Type 5 20.5-22.4 volume in ft3/volume en pi3 MB*2258XE* 580 kWh ...Automatic Defrost ·Bottom Mounted Freezer ·Without Through-the-Door-Ice Service Maytag Corporation Model(s):MB*2258XE* Capacity: 21.9 Cubic Feet Estimated Yearly Operating Cost $43 $49 $61 Cost Range of Similar Models 404kWh Estimated Yearly Electricity Use Your cost will depend on your utility rates and...
... consumption/Consommation énergétique 404 kWh per year / par année This model / Ce modèle 403 kWh Uses least energy / Consomme le moins d'énergie Similar Models compared Model number Type 5 20.5-22.4 volume in ft3/volume en pi3 MB*2258XE* 580 kWh ...Automatic Defrost ·Bottom Mounted Freezer ·Without Through-the-Door-Ice Service Maytag Corporation Model(s):MB*2258XE* Capacity: 21.9 Cubic Feet Estimated Yearly Operating Cost $43 $49 $61 Cost Range of Similar Models 404kWh Estimated Yearly Electricity Use Your cost will depend on your utility rates and...


