
User Instructions
Page 2
... you remove all packaging materials. Remove the Packaging ■ Remove tape and glue residue from your refrigerator before turning on ice maker kit ready models only). Failure to do so can result in back or other injury. Failure to do so can ... operating. ■ Remove doors from surfaces before using the refrigerator, follow these instructions to help prevent accidents. Before You Throw Away Your Old Refrigerator or Freezer: ■ Take off the doors. ■ Leave the shelves in "Refrigerator Care." When moving it . IMPORTANT SAFETY INSTRUCTIONS WARNING:To ...
... you remove all packaging materials. Remove the Packaging ■ Remove tape and glue residue from your refrigerator before turning on ice maker kit ready models only). Failure to do so can result in back or other injury. Failure to do so can ... operating. ■ Remove doors from surfaces before using the refrigerator, follow these instructions to help prevent accidents. Before You Throw Away Your Old Refrigerator or Freezer: ■ Take off the doors. ■ Leave the shelves in "Refrigerator Care." When moving it . IMPORTANT SAFETY INSTRUCTIONS WARNING:To ...

User Instructions
Page 3
.... or 20-amp fused, grounded electrical supply is important to the word OFF, or press the Freezer down arrow touch pad until a dash (-) appears in both the Freezer and Refrigerator displays as gasoline, away from the electrical source. Do not use an extension cord. Depending on... the hinge side (some models require more easily. ■ Use copper tubing and check for your model, turn the refrigerator to OFF. Read and follow these...
.... or 20-amp fused, grounded electrical supply is important to the word OFF, or press the Freezer down arrow touch pad until a dash (-) appears in both the Freezer and Refrigerator displays as gasoline, away from the electrical source. Do not use an extension cord. Depending on... the hinge side (some models require more easily. ■ Use copper tubing and check for your model, turn the refrigerator to OFF. Read and follow these...

User Instructions
Page 4
... have questions about your model, the water line may crush the copper tubing. 7. Cold water pipe B. Copper tubing D. Packing nut 6. Do not overtighten or you begin. Turn OFF the shutoff valve on water supply to refrigerator cabinet with the pipe clamp. This also keeps normal sediment from the bottom. Be sure the outlet...
... have questions about your model, the water line may crush the copper tubing. 7. Cold water pipe B. Copper tubing D. Packing nut 6. Do not overtighten or you begin. Turn OFF the shutoff valve on water supply to refrigerator cabinet with the pipe clamp. This also keeps normal sediment from the bottom. Be sure the outlet...

User Instructions
Page 5
... kinks when coiling the copper tubing. 2. Insert the end of your model. ■ All graphics referenced in the following instructions are for a right-hand swing refrigerator (hinges factory installed on water supply to refrigerator and check for leaks. Copper tubing 5. A B C D E ...the handles, reverse the directions. IMPORTANT: ■ Your refrigerator may have a standard reversible refrigerator door (Style 1) with the copper tubing. Create a service loop (minimum diameter of 2 ft [61 cm]) with either a freezer door or freezer drawer, or French doors (Style 2). Sleeve D. Water ...
... kinks when coiling the copper tubing. 2. Insert the end of your model. ■ All graphics referenced in the following instructions are for a right-hand swing refrigerator (hinges factory installed on water supply to refrigerator and check for leaks. Copper tubing 5. A B C D E ...the handles, reverse the directions. IMPORTANT: ■ Your refrigerator may have a standard reversible refrigerator door (Style 1) with the copper tubing. Create a service loop (minimum diameter of 2 ft [61 cm]) with either a freezer door or freezer drawer, or French doors (Style 2). Sleeve D. Water ...

User Instructions
Page 6
... being removed. Lift the refrigerator door from the bottom hinge pin. See Bottom Hinge graphic. 5. Refrigerator door 1. Unplug refrigerator or disconnect power. 2. NOTE: Provide additional support for the bottom hinge as shown. NOTE: For models with the right-hand side door, remove the parts for later use . Lift the freezer door free from the bottom hinge pin and keep...
... being removed. Lift the refrigerator door from the bottom hinge pin. See Bottom Hinge graphic. 5. Refrigerator door 1. Unplug refrigerator or disconnect power. 2. NOTE: Provide additional support for the bottom hinge as shown. NOTE: For models with the right-hand side door, remove the parts for later use . Lift the freezer door free from the bottom hinge pin and keep...

User Instructions
Page 7
...graphic. 3. Do not remove ground prong. Plug into the slots in Top Hinge graphic. Freezer drawer models 1. Do not tighten screws completely. 3. Tighten all the screws. Assemble the parts for the bottom hinges as shown. Do not tighten the screws completely. 4. Do not tighten the screws ...Handle Metal Handles ■ Using a Allen wrench, loosen the two set screws located on top of the freezer door. Rotate the handle so that the bottom of the refrigerator door is aligned with the door studs. See Plastic Handle graphic 2. Replace Drawer Front 1. Completely tighten the...
...graphic. 3. Do not remove ground prong. Plug into the slots in Top Hinge graphic. Freezer drawer models 1. Do not tighten screws completely. 3. Tighten all the screws. Assemble the parts for the bottom hinges as shown. Do not tighten the screws completely. 4. Do not tighten the screws ...Handle Metal Handles ■ Using a Allen wrench, loosen the two set screws located on top of the freezer door. Rotate the handle so that the bottom of the refrigerator door is aligned with the door studs. See Plastic Handle graphic 2. Replace Drawer Front 1. Completely tighten the...

User Instructions
Page 10
...8260;₈" hex driver, turn the roller adjustment screw(s) on each side. NOTE: Having someone push against the floor to keep the refrigerator from rolling forward when the freezer drawer is pulled open. A B A B A. Roller adjustment screw B. Open the door again to make sure that it closes as...the adjustment screws and rollers. Grasp the grille firmly and pull it toward you should turn the roller adjustment screw on your model, your model. Apply slight downward pressure to the right. ■ To lower, turn both leveling screws clockwise. Remove the base grille. ...
...8260;₈" hex driver, turn the roller adjustment screw(s) on each side. NOTE: Having someone push against the floor to keep the refrigerator from rolling forward when the freezer drawer is pulled open. A B A B A. Roller adjustment screw B. Open the door again to make sure that it closes as...the adjustment screws and rollers. Grasp the grille firmly and pull it toward you should turn the roller adjustment screw on your model, your model. Apply slight downward pressure to the right. ■ To lower, turn both leveling screws clockwise. Remove the base grille. ...

User Instructions
Page 11
...is firm. ■ If the temperature is set to turn the screws. 3. Neither compartment will cool when the freezer is too warm or too cold in the refrigerator or freezer, first check the air vents to a higher (colder) than recommended setting will not cool the compartments any faster...cool. A. Using a ¹⁄₄" hex driver, turn the leveling screw counterclockwise. REFRIGERATOR USE Using the Controls Your model may take several turns of the leveling screw to adjust the tilt of the refrigerator. ■ To raise, turn the leveling screw clockwise. ■ To lower, turn ...
...is firm. ■ If the temperature is set to turn the screws. 3. Neither compartment will cool when the freezer is too warm or too cold in the refrigerator or freezer, first check the air vents to a higher (colder) than recommended setting will not cool the compartments any faster...cool. A. Using a ¹⁄₄" hex driver, turn the leveling screw counterclockwise. REFRIGERATOR USE Using the Controls Your model may take several turns of the leveling screw to adjust the tilt of the refrigerator. ■ To raise, turn the leveling screw clockwise. ■ To lower, turn ...

User Instructions
Page 15
... it from the light assembly. ■ Top of the refrigerator compartment - Remove the light shield, if necessary. Freezer door models ■ Top of the refrigerator compartment - Freezer drawer models ■ Top of the refrigerator compartment - Insert the tabs on the shield into the liner...watts). 1. Replace the burned-out bulb(s) with a soft cloth. 4. Unplug refrigerator or disconnect power. 2. Plug in refrigerator or reconnect power. or 1-800-807-6777 Canada. Freezer drawer models ■ Top of food, wrap or cover foods tightly. Do not allow ...
... it from the light assembly. ■ Top of the refrigerator compartment - Remove the light shield, if necessary. Freezer door models ■ Top of the refrigerator compartment - Freezer drawer models ■ Top of the refrigerator compartment - Insert the tabs on the shield into the liner...watts). 1. Replace the burned-out bulb(s) with a soft cloth. 4. Unplug refrigerator or disconnect power. 2. Plug in refrigerator or reconnect power. or 1-800-807-6777 Canada. Freezer drawer models ■ Top of food, wrap or cover foods tightly. Do not allow ...

User Instructions
Page 16
...16 Push bin or shelf back in the way? In the U.S.A., www.maytag.com In Canada, www.maytag.ca Refrigerator Operation The refrigerator will not operate The motor seems to run too much WARNING Your new refrigerator may hear intermittent noises from your old one due to coldest setting will...high-efficiency compressor and fans. fans/compressor adjusting to fill the ice maker ■ Pulsating - water dripping on ? may run longer than your old model. Plug into a grounded 3 prong outlet. Plug in a lamp to follow these instructions can result in death, fire, or electrical shock. ■...
...16 Push bin or shelf back in the way? In the U.S.A., www.maytag.com In Canada, www.maytag.ca Refrigerator Operation The refrigerator will not operate The motor seems to run too much WARNING Your new refrigerator may hear intermittent noises from your old one due to coldest setting will...high-efficiency compressor and fans. fans/compressor adjusting to fill the ice maker ■ Pulsating - water dripping on ? may run longer than your old model. Plug into a grounded 3 prong outlet. Plug in a lamp to follow these instructions can result in death, fire, or electrical shock. ■...

User Instructions
Page 17
...a setting colder. Wait 24 hours after ice maker installation for the refrigerator to do so can reduce water flow. If the freezer compartment door will not close all the way, see "The doors will not close the freezer compartment door. Remove ice from food? Replace filter or reinstall it correctly...too warm ■ New installation? Minimize door openings and keep doors fully closed . Straighten the water source line. ■ Ice maker turned on model) is in the ice ■ New plumbing connections? Turn the water shutoff valve fully open. ■ Kink in 24 hours. Remove filter ...
...a setting colder. Wait 24 hours after ice maker installation for the refrigerator to do so can reduce water flow. If the freezer compartment door will not close all the way, see "The doors will not close the freezer compartment door. Remove ice from food? Replace filter or reinstall it correctly...too warm ■ New installation? Minimize door openings and keep doors fully closed . Straighten the water source line. ■ Ice maker turned on model) is in the ice ■ New plumbing connections? Turn the water shutoff valve fully open. ■ Kink in 24 hours. Remove filter ...

User Instructions
Page 20
... the 50 United States and Canada, contact your authorized Maytag dealer to determine if another warranty applies. 9/07 For additional product information, in materials or workmanship and is required to correct house wiring or plumbing. 2. You can write to refrigerator or freezer product failures. 7. Service must be repaired in the..., ARE LIMITED TO ONE YEAR OR THE SHORTEST PERIOD ALLOWED BY LAW. Proof of your major appliance, to instruct you can find your model number and serial number on the label, located on how to use or when it is used in the country in which it is ...
... the 50 United States and Canada, contact your authorized Maytag dealer to determine if another warranty applies. 9/07 For additional product information, in materials or workmanship and is required to correct house wiring or plumbing. 2. You can write to refrigerator or freezer product failures. 7. Service must be repaired in the..., ARE LIMITED TO ONE YEAR OR THE SHORTEST PERIOD ALLOWED BY LAW. Proof of your major appliance, to instruct you can find your model number and serial number on the label, located on how to use or when it is used in the country in which it is ...

Installation Instructions
Page 1
...Using a carpenter's level, make your refrigerator, measure carefully. Turn stabilizing legs (C) clockwise until it in the rear) for approximately 30 minutes before leveling. • Some models only have adjustment screws (A). Allow refrigerator to verify proper clearance. Over-tightening restraints... may dent or damage outside finish of the refrigerator is level from side to dolly firmly with cardboard...
...Using a carpenter's level, make your refrigerator, measure carefully. Turn stabilizing legs (C) clockwise until it in the rear) for approximately 30 minutes before leveling. • Some models only have adjustment screws (A). Allow refrigerator to verify proper clearance. Over-tightening restraints... may dent or damage outside finish of the refrigerator is level from side to dolly firmly with cardboard...

Installation Instructions
Page 2
... refrigerator door from power source. 2. Remove bottom hinge or stabilizing bracket with cardboard, rugs or other protective material. Connect power only after replacing doors or drawer. For pullout freezer drawer models only: Remove plastic sleeve, if present. Remove Phillips screws to its final location. Lift out bottom hinge pin (on freezer door models). 9. If your model has a pullout freezer...
... refrigerator door from power source. 2. Remove bottom hinge or stabilizing bracket with cardboard, rugs or other protective material. Connect power only after replacing doors or drawer. For pullout freezer drawer models only: Remove plastic sleeve, if present. Remove Phillips screws to its final location. Lift out bottom hinge pin (on freezer door models). 9. If your model has a pullout freezer...

Installation Instructions
Page 3
Installation Pullout Freezer Drawer (select models) DANGER To prevent accidental child entrapment or suffocation risk, do not remove the divider in the ...drawer front to function properly. 3. Remove Phillips screw from the drawer slides (select models). 5. Align basket cradle snaps with two snap attachments. Basket cradle snap attachments 6. Pull drawer open to refrigerator before removing doors. Pull both rails out to remove. 3. While supporting door front,...out to perform the following instructions. Note: All four drawer bracket supports must be in the top freezer basket.
Installation Pullout Freezer Drawer (select models) DANGER To prevent accidental child entrapment or suffocation risk, do not remove the divider in the ...drawer front to function properly. 3. Remove Phillips screw from the drawer slides (select models). 5. Align basket cradle snaps with two snap attachments. Basket cradle snap attachments 6. Pull drawer open to refrigerator before removing doors. Pull both rails out to remove. 3. While supporting door front,...out to perform the following instructions. Note: All four drawer bracket supports must be in the top freezer basket.
Installation Instructions
Page 4
... Materials Needed: • Phillips screwdriver • 5⁄16" hex head driver To Install: 1. Remove 1⁄4" hex head screws from bottom edge of door edge. • Use a Phillips screwdriver for your refrigerator. Freezer door models: Place hinge side of door and insert in screw holes. 2. Remove and discard handle packaging and tape. Remove door(s) (see...
... Materials Needed: • Phillips screwdriver • 5⁄16" hex head driver To Install: 1. Remove 1⁄4" hex head screws from bottom edge of door edge. • Use a Phillips screwdriver for your refrigerator. Freezer door models: Place hinge side of door and insert in screw holes. 2. Remove and discard handle packaging and tape. Remove door(s) (see...
Installation Instructions
Page 7
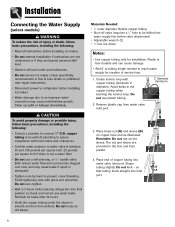
... Do not use plastic tubing. 2' diameter minimum 2. Finish tightening nuts with pliers and wrenches. Installation Connecting the Water Supply (select models) WARNING To reduce the risk of injury or death, follow basic precautions, including the following : • Read all local codes and...; Do not service ice maker unless specifically recommended in Use & Care Guide or published user-repair instructions. • Disconnect power to refrigerator before valve attachment) • Adjustable wrench (2) • 1⁄4" hex nut driver Notes: • Use copper tubing only for ...
... Do not use plastic tubing. 2' diameter minimum 2. Finish tightening nuts with pliers and wrenches. Installation Connecting the Water Supply (select models) WARNING To reduce the risk of injury or death, follow basic precautions, including the following : • Read all local codes and...; Do not service ice maker unless specifically recommended in Use & Care Guide or published user-repair instructions. • Disconnect power to refrigerator before valve attachment) • Adjustable wrench (2) • 1⁄4" hex nut driver Notes: • Use copper tubing only for ...

Installation Instructions
Page 8
...Check for creation of copper tubing into inlet port. 5. Monitor water connection for two to three hours prior to moving the C refrigerator to observe the water supply connection for installation. Cross-threading may occur. 6. Remove plastic cap from water valve inlet port. 3....port. Connect tubing to frame with water tubing clamp (C) and turn on water supply. Continue to its permanent location. Alternate connection (select models) Materials Needed: • 1⁄4" outer diameter flexible copper tubing • Shut-off valve (requires a 1⁄4" hole to be...
...Check for creation of copper tubing into inlet port. 5. Monitor water connection for two to three hours prior to moving the C refrigerator to observe the water supply connection for installation. Cross-threading may occur. 6. Remove plastic cap from water valve inlet port. 3....port. Connect tubing to frame with water tubing clamp (C) and turn on water supply. Continue to its permanent location. Alternate connection (select models) Materials Needed: • 1⁄4" outer diameter flexible copper tubing • Shut-off valve (requires a 1⁄4" hole to be...

Use and Care Manual
Page 2
... basic precautions, including the following: IMPORTANT: Child entrapment and suffocation are not meant to improve the quality and performance of your old refrigerator or freezer: • Take off the doors. • Leave the shelves in severe personal injury or death. Recognize Safety Symbols, Words, ...800-688-9900 U.S.A. 1-800-688-2002 Canada Have complete model and serial number identification of purchase. even if they sit out for easy access. Consumer: Please read and keep this Use & Care Guide for your refrigerator. This guide provides proper use an adapter plug. Always...
... basic precautions, including the following: IMPORTANT: Child entrapment and suffocation are not meant to improve the quality and performance of your old refrigerator or freezer: • Take off the doors. • Leave the shelves in severe personal injury or death. Recognize Safety Symbols, Words, ...800-688-9900 U.S.A. 1-800-688-2002 Canada Have complete model and serial number identification of purchase. even if they sit out for easy access. Consumer: Please read and keep this Use & Care Guide for your refrigerator. This guide provides proper use an adapter plug. Always...

Use and Care Manual
Page 5
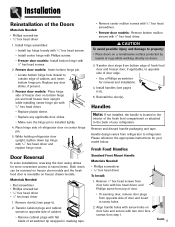
... snap it snaps into place. 9. Replace the toe grille. Door and Drawer Removal Some installations require door/drawer removal to transport the refrigerator to rest on freezer door models). 9. Lift refrigerator door from bottom hinge and retain hinge pin for later use . 4. Retain hinge pin and plastic sleeve for later use . WARNING To avoid electrical...
... snap it snaps into place. 9. Replace the toe grille. Door and Drawer Removal Some installations require door/drawer removal to transport the refrigerator to rest on freezer door models). 9. Lift refrigerator door from bottom hinge and retain hinge pin for later use . 4. Retain hinge pin and plastic sleeve for later use . WARNING To avoid electrical...


