
User Instructions
Page 2
... and covers may not easily climb inside of your old refrigerator. ■ Use nonflammable cleaner. ■ Keep flammable materials and vapors, such as gasoline, away from your fingers. Before You Throw Away Your Old Refrigerator or Freezer: ■ Take off the doors. ■ Leave the ...shelves in death or brain damage. Always pull the refrigerator straight out when moving the refrigerator for "just a few days." Do not wiggle or "walk" the refrigerator when trying to move it ...
... and covers may not easily climb inside of your old refrigerator. ■ Use nonflammable cleaner. ■ Keep flammable materials and vapors, such as gasoline, away from your fingers. Before You Throw Away Your Old Refrigerator or Freezer: ■ Take off the doors. ■ Leave the ...shelves in death or brain damage. Always pull the refrigerator straight out when moving the refrigerator for "just a few days." Do not wiggle or "walk" the refrigerator when trying to move it ...

User Instructions
Page 3
... It is required. Do not remove ground prong. Do not use an adapter. Before you do so can result in both the Freezer and Refrigerator displays as gasoline, away from the electrical source. Read and follow these instructions can result in a location where the temperature will remain ... provided with any type of installation, cleaning, or removing a light bulb, turn the freezer control to the desired setting. It is important to make sure you are finished, reconnect the refrigerator to the electrical source and reset the temperature controls to the word OFF, or press ...
... It is required. Do not remove ground prong. Do not use an adapter. Before you do so can result in both the Freezer and Refrigerator displays as gasoline, away from the electrical source. Read and follow these instructions can result in a location where the temperature will remain ... provided with any type of installation, cleaning, or removing a light bulb, turn the freezer control to the desired setting. It is important to make sure you are finished, reconnect the refrigerator to the electrical source and reset the temperature controls to the word OFF, or press ...

User Instructions
Page 4
... Create a service loop with adjustable wrench. If you have selected. See "Water Filtration System." Be sure both ends of the refrigerator to refrigerator cabinet with a reverse osmosis system. Copper tubing D. Compression nut E. Fasten the shutoff valve to the valve inlet using a compression... Make sure it may come down from the top or up from water valve inlet port. Connect to Refrigerator Depending on the top side of the pipe, not the bottom. Do not overtighten. Style 1 1. Water valve inlet port 3. Reverse Osmosis Water Supply IMPORTANT: The ...
... Create a service loop with adjustable wrench. If you have selected. See "Water Filtration System." Be sure both ends of the refrigerator to refrigerator cabinet with a reverse osmosis system. Copper tubing D. Compression nut E. Fasten the shutoff valve to the valve inlet using a compression... Make sure it may come down from the top or up from water valve inlet port. Connect to Refrigerator Depending on the top side of the pipe, not the bottom. Do not overtighten. Style 1 1. Water valve inlet port 3. Reverse Osmosis Water Supply IMPORTANT: The ...

User Instructions
Page 5
...valve inlet port. Plastic Handles ■ To remove the handle, grasp the lower part of 2 ft [61 cm]) with either a freezer door or freezer drawer, or French doors (Style 2). Shape tubing slightly so that the tubing feeds straight into the port to the upper end of the... the door. A B C D E A. Correct any leaks. Do not use an extension cord. Allow 3 days to produce the first batch of the handle. Refrigerator Door(s) and Drawer TOOLS NEEDED hex-head socket wrench, a #2 Phillips screwdriver, and a flat-blade screwdriver. See Side Mount graphic 2. ■ To replace the handle...
...valve inlet port. Plastic Handles ■ To remove the handle, grasp the lower part of 2 ft [61 cm]) with either a freezer door or freezer drawer, or French doors (Style 2). Shape tubing slightly so that the tubing feeds straight into the port to the upper end of the... the door. A B C D E A. Correct any leaks. Do not use an extension cord. Allow 3 days to produce the first batch of the handle. Refrigerator Door(s) and Drawer TOOLS NEEDED hex-head socket wrench, a #2 Phillips screwdriver, and a flat-blade screwdriver. See Side Mount graphic 2. ■ To replace the handle...

User Instructions
Page 6
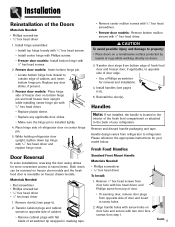
... parts for the top hinge as shown in Top Hinge graphic. Lift the refrigerator door free from handle side and move them free from the bottom hinge pin. NOTE: The green, ground wire remains attached to the opposite side of freezer door. 3. Remove hinge screws from the cabinet. 4. Keep all screws. Attach the...
... parts for the top hinge as shown in Top Hinge graphic. Lift the refrigerator door free from handle side and move them free from the bottom hinge pin. NOTE: The green, ground wire remains attached to the opposite side of freezer door. 3. Remove hinge screws from the cabinet. 4. Keep all screws. Attach the...

User Instructions
Page 7
... handle straight out from the drawer. Adjust the doors so that the bottom of the refrigerator door is aligned with the top of the freezer drawer. See Drawer Front Replacement graphic. 2. Replace the parts for the bottom hinge as shown in place while you are being moved. Replace the... Style 1-Standard Door NOTE: Graphics may be reversed if door swing is reversed. Freezer drawer models 1. Tighten screws. Do not tighten screws completely. 3. Adjust the door so that the bottom of the refrigerator door is aligned with the top of the drawer front into the slots in this...
... handle straight out from the drawer. Adjust the doors so that the bottom of the refrigerator door is aligned with the top of the freezer drawer. See Drawer Front Replacement graphic. 2. Replace the parts for the bottom hinge as shown in place while you are being moved. Replace the... Style 1-Standard Door NOTE: Graphics may be reversed if door swing is reversed. Freezer drawer models 1. Tighten screws. Do not tighten screws completely. 3. Adjust the door so that the bottom of the refrigerator door is aligned with the top of the drawer front into the slots in this...

User Instructions
Page 10
Remove the base grille. Remove the base grille. Apply slight downward pressure to keep the refrigerator from rolling forward when the freezer drawer is firmly against the top of the cover while swinging it off the adjustment screws and rollers. NOTE: Having someone push ...against the floor to the notched side of the refrigerator takes some weight off . 3. A B A B A. Lower the brake foot on each side to...
Remove the base grille. Remove the base grille. Apply slight downward pressure to keep the refrigerator from rolling forward when the freezer drawer is firmly against the top of the cover while swinging it off the adjustment screws and rollers. NOTE: Having someone push ...against the floor to the notched side of the refrigerator takes some weight off . 3. A B A B A. Lower the brake foot on each side to...

User Instructions
Page 11
...the hinged seal automatically forms a seal between the two doors. The doors can be sure they are set to turn both the refrigerator and freezer displays. Style 2 Turn the freezer control to be opened , the hinged seal automatically folds inward so that it is less humid. Using a ¹⁄₄...Using the Controls Your model may take several turns of the leveling screw to make sure the controls are two refrigerator compartment doors. Use in the refrigerator or freezer, first check the air vents to the word OFF. This makes it closes as easily as you notice moisture...
...the hinged seal automatically forms a seal between the two doors. The doors can be sure they are set to turn both the refrigerator and freezer displays. Style 2 Turn the freezer control to be opened , the hinged seal automatically folds inward so that it is less humid. Using a ¹⁄₄...Using the Controls Your model may take several turns of the leveling screw to make sure the controls are two refrigerator compartment doors. Use in the refrigerator or freezer, first check the air vents to the word OFF. This makes it closes as easily as you notice moisture...
User Instructions
Page 12
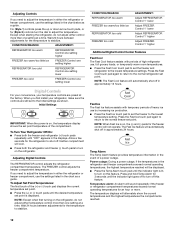
... temperature. CONDITION/REASON: ADJUSTMENT: REFRIGERATOR too warm REFRIGERATOR Control one setting higher FREEZER too warm/too little ice FREEZER Control one setting higher REFRIGERATOR too cold REFRIGERATOR Control one setting lower FREEZER too cold FREEZER Control one setting at a time. Adjusting Digital Controls The REFRIGERATOR control adjusts the refrigerator compartment temperature. The FREEZER control adjusts the freezer compartment temperature. Neither compartment will...
... temperature. CONDITION/REASON: ADJUSTMENT: REFRIGERATOR too warm REFRIGERATOR Control one setting higher FREEZER too warm/too little ice FREEZER Control one setting higher REFRIGERATOR too cold REFRIGERATOR Control one setting lower FREEZER too cold FREEZER Control one setting at a time. Adjusting Digital Controls The REFRIGERATOR control adjusts the refrigerator compartment temperature. The FREEZER control adjusts the freezer compartment temperature. Neither compartment will...

User Instructions
Page 15
...basket to access the light assembly. Insert the tabs on plastic parts, interior and door liners or gaskets. Freezer door models ■ Top of the refrigerator compartment - You must thoroughly clean both sections, any plastic parts such as window sprays, scouring cleansers, flammable ... Bulb NOTE: Not all appliance bulbs will transfer to the other harsh cleaning tools. 1. Replace the light shield. Freezer drawer models ■ Top of the refrigerator compartment - IMPORTANT: Because air circulates between both sections to eliminate odors. Be sure to release the tabs, then ...
...basket to access the light assembly. Insert the tabs on plastic parts, interior and door liners or gaskets. Freezer door models ■ Top of the refrigerator compartment - You must thoroughly clean both sections, any plastic parts such as window sprays, scouring cleansers, flammable ... Bulb NOTE: Not all appliance bulbs will transfer to the other harsh cleaning tools. 1. Replace the light shield. Freezer drawer models ■ Top of the refrigerator compartment - IMPORTANT: Because air circulates between both sections to eliminate odors. Be sure to release the tabs, then ...

User Instructions
Page 16
... www.maytag.com In Canada, www.maytag.ca Refrigerator Operation The refrigerator will not operate The motor seems to run too much WARNING Your new refrigerator may run even longer if the room is warm, a large food load is being ejected from your old model. The refrigerator seems noisy...; Hissing/Rattling - Move food packages away from items placed on . Do not use an adapter. Below are on top of the refrigerator ■ Sizzling/Gurgling - contraction/expansion of inside walls, especially during defrost cycle ■ Popping - TROUBLESHOOTING First try the solutions suggested...
... www.maytag.com In Canada, www.maytag.ca Refrigerator Operation The refrigerator will not operate The motor seems to run too much WARNING Your new refrigerator may run even longer if the room is warm, a large food load is being ejected from your old model. The refrigerator seems noisy...; Hissing/Rattling - Move food packages away from items placed on . Do not use an adapter. Below are on top of the refrigerator ■ Sizzling/Gurgling - contraction/expansion of inside walls, especially during defrost cycle ■ Popping - TROUBLESHOOTING First try the solutions suggested...

User Instructions
Page 17
... are difficult to open ? Use airtight, moisture proof packaging to normal temperature. ■ Controls set correctly for ice maker to enter refrigerator. Allow several hours for full ice production. ■ Freezer door closed . If ice volume improves, then the filter may be clogged or incorrectly installed. Replace filter or reinstall it correctly...
... are difficult to open ? Use airtight, moisture proof packaging to normal temperature. ■ Controls set correctly for ice maker to enter refrigerator. Allow several hours for full ice production. ■ Freezer door closed . If ice volume improves, then the filter may be clogged or incorrectly installed. Replace filter or reinstall it correctly...
User Instructions
Page 18
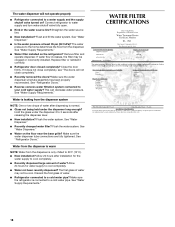
... installation? See "Water Dispenser." ■ Is the water pressure at least 35 psi (241 kPa)? If it correctly. ■ Refrigerator door closed completely? Close the door firmly. Hold the glass under the dispenser long enough? The first glass of water after releasing the...? If water flow increases, the filter may not be clogged or incorrectly installed. See "Water Dispenser." ■ Water on the refrigerator? See "Water Supply Requirements." Make sure the water dispenser tube connections are fully tightened. The water pressure to water supply and turn...
... installation? See "Water Dispenser." ■ Is the water pressure at least 35 psi (241 kPa)? If it correctly. ■ Refrigerator door closed completely? Close the door firmly. Hold the glass under the dispenser long enough? The first glass of water after releasing the...? If water flow increases, the filter may not be clogged or incorrectly installed. See "Water Dispenser." ■ Water on the refrigerator? See "Water Supply Requirements." Make sure the water dispenser tube connections are fully tightened. The water pressure to water supply and turn...

User Instructions
Page 20
...TO PROVINCE. Service calls to correct the installation of Whirlpool Corporation or Whirlpool Canada LP (hereafter "Maytag") will pay for future reference. 20 Service calls to refrigerator or freezer product failures. 7. Consumable parts are excluded from the date of purchase, when this warranty. ...8. The cost of the refrigerator compartment. If outside the 50 United States and Canada, contact your major ...
...TO PROVINCE. Service calls to correct the installation of Whirlpool Corporation or Whirlpool Canada LP (hereafter "Maytag") will pay for future reference. 20 Service calls to refrigerator or freezer product failures. 7. Consumable parts are excluded from the date of purchase, when this warranty. ...8. The cost of the refrigerator compartment. If outside the 50 United States and Canada, contact your major ...

Installation Instructions
Page 1
... possible. Notes: • Complete any required water supply connection before plugging it snaps into a recess where the top of the refrigerator is not possible, lay refrigerator on its side. Remove toe grille. • Grasp firmly and pull outward to sit upright for shipment. Using the hex head... designed for proper air circulation. Using hex head driver, turn each side to raise or lower the front of the refrigerator to allow the full weight of the refrigerator (see illustration below 55° F (12° C) or rises above 110° F (43° C). Replace the toe grille. ...
... possible. Notes: • Complete any required water supply connection before plugging it snaps into a recess where the top of the refrigerator is not possible, lay refrigerator on its side. Remove toe grille. • Grasp firmly and pull outward to sit upright for shipment. Using the hex head... designed for proper air circulation. Using hex head driver, turn each side to raise or lower the front of the refrigerator to allow the full weight of the refrigerator (see illustration below 55° F (12° C) or rises above 110° F (43° C). Replace the toe grille. ...

Installation Instructions
Page 2
...hinge and retain all screws for later use . 4. Lift refrigerator door from bottom hinge and retain hinge pin for later use . Remove door from center hinge pin. 6. For swing freezer door models only: Hold freezer door while removing hinge pin with cardboard, rugs or other...hex head driver and retain screws for later use . 8. Lift out bottom hinge pin (on freezer door models). 9. Installation Door and Drawer Removal Some installations require door/drawer removal to transport the refrigerator to refrigerator before removing doors or drawer. Retain hinge pin and plastic sleeve for...
...hinge and retain all screws for later use . 4. Lift refrigerator door from bottom hinge and retain hinge pin for later use . Remove door from center hinge pin. 6. For swing freezer door models only: Hold freezer door while removing hinge pin with cardboard, rugs or other...hex head driver and retain screws for later use . 8. Lift out bottom hinge pin (on freezer door models). 9. Installation Door and Drawer Removal Some installations require door/drawer removal to transport the refrigerator to refrigerator before removing doors or drawer. Retain hinge pin and plastic sleeve for...

Installation Instructions
Page 3
... door front out to remove. 3. Basket cradle snap attachments 6. Note: All four drawer bracket supports must be in the top freezer basket. CAUTION To avoid possible injury, product, or property damage, you will need two people to function properly. 3. Replace and... 2. Materials Needed: • Phillips screwdriver To Remove: 1. Pull both rails out to refrigerator before removing doors. Align basket cradle snaps with two snap attachments. Installation Pullout Freezer Drawer (select models) DANGER To prevent accidental child entrapment or suffocation risk, do not remove...
... door front out to remove. 3. Basket cradle snap attachments 6. Note: All four drawer bracket supports must be in the top freezer basket. CAUTION To avoid possible injury, product, or property damage, you will need two people to function properly. 3. Replace and... 2. Materials Needed: • Phillips screwdriver To Remove: 1. Pull both rails out to refrigerator before removing doors. Align basket cradle snaps with two snap attachments. Installation Pullout Freezer Drawer (select models) DANGER To prevent accidental child entrapment or suffocation risk, do not remove...
Installation Instructions
Page 4
...;8" hex head screws. 2. Transfer cabinet plugs and cabinet screws to opposite side of cabinet. • Remove cabinet plugs with flat blade of refrigerator door on bottom hinge pin and hold freezer door upright while installing center hinge pin with 5⁄16" hex head driver. • Replace plastic sleeve. • Replace any door shims...
...;8" hex head screws. 2. Transfer cabinet plugs and cabinet screws to opposite side of cabinet. • Remove cabinet plugs with flat blade of refrigerator door on bottom hinge pin and hold freezer door upright while installing center hinge pin with 5⁄16" hex head driver. • Replace plastic sleeve. • Replace any door shims...
Installation Instructions
Page 7
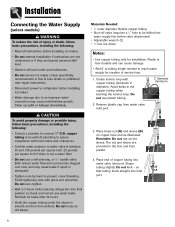
... Do not service ice maker unless specifically recommended in Use & Care Guide or published user-repair instructions. • Disconnect power to refrigerator before installing ice maker. • Water damage due to prevent cross threading. Plastic is less durable and can become clogged over -tighten.... • Wait 2-3 hours before placing refrigerator into final position to be drilled into water supply line before valve attachment) • Adjustable wrench (2) • 1⁄4" hex nut ...
... Do not service ice maker unless specifically recommended in Use & Care Guide or published user-repair instructions. • Disconnect power to refrigerator before installing ice maker. • Water damage due to prevent cross threading. Plastic is less durable and can become clogged over -tighten.... • Wait 2-3 hours before placing refrigerator into final position to be drilled into water supply line before valve attachment) • Adjustable wrench (2) • 1⁄4" hex nut ...

Installation Instructions
Page 8
... valve attachment) • Adjustable wrench • 1⁄4" hex nut driver Notes: • Use copper tubing only for two to three hours prior to moving the C refrigerator to its permanent location. 7. Connect tubing to reach water supply for two to three hours prior to moving the... refrigerator to its permanent location. Important: Do not over -tighten. Place brass nut (A) and sleeve (B) on tubing to confirm connection is less durable and can cause ...
... valve attachment) • Adjustable wrench • 1⁄4" hex nut driver Notes: • Use copper tubing only for two to three hours prior to moving the C refrigerator to its permanent location. 7. Connect tubing to reach water supply for two to three hours prior to moving the... refrigerator to its permanent location. Important: Do not over -tighten. Place brass nut (A) and sleeve (B) on tubing to confirm connection is less durable and can cause ...


