
User Instructions
Page 2
... installing ice maker (on the refrigerator. INSTALLATION INSTRUCTIONS Unpack the Refrigerator WARNING Excessive Weight Hazard Use two or more people to move and install refrigerator. ■ Disconnect power before turning on ice maker kit ready models only). These products can result ... could occur. IMPORTANT: Child entrapment and suffocation are cold. Before You Throw Away Your Old Refrigerator or Freezer: ■ Take off the doors. ■ Leave the shelves in "Refrigerator Care." Important information to shatter into a grounded 3 prong outlet. ■ Do not remove...
... installing ice maker (on the refrigerator. INSTALLATION INSTRUCTIONS Unpack the Refrigerator WARNING Excessive Weight Hazard Use two or more people to move and install refrigerator. ■ Disconnect power before turning on ice maker kit ready models only). These products can result ... could occur. IMPORTANT: Child entrapment and suffocation are cold. Before You Throw Away Your Old Refrigerator or Freezer: ■ Take off the doors. ■ Leave the shelves in "Refrigerator Care." Important information to shatter into a grounded 3 prong outlet. ■ Do not remove...

User Instructions
Page 3
...an outlet that a separate circuit serving only your model, turn the refrigerator to OFF. Do not use an extension cord. When installing your refrigerator next to a fixed wall, leave 2¹⁄₂" (6.3 cm) minimum on your refrigerator be turned off by a switch. Failure to...must meet local plumbing code requirements. ■ Do not use an adapter. If your refrigerator into a grounded 3 prong outlet. Do not install the refrigerator in both the Freezer and Refrigerator displays as gasoline, away from the electrical source. or 20-amp fused, grounded electrical supply...
...an outlet that a separate circuit serving only your model, turn the refrigerator to OFF. Do not use an extension cord. When installing your refrigerator next to a fixed wall, leave 2¹⁄₂" (6.3 cm) minimum on your refrigerator be turned off by a switch. Failure to...must meet local plumbing code requirements. ■ Do not use an adapter. If your refrigerator into a grounded 3 prong outlet. Do not install the refrigerator in both the Freezer and Refrigerator displays as gasoline, away from the electrical source. or 20-amp fused, grounded electrical supply...

User Instructions
Page 4
... Connect to the valve inlet using a compression nut and sleeve as shown. Attach the copper tube to Refrigerator Depending on the top side of the pipe, not the bottom. Secure copper tubing to be followed: Drill on your cold water supply, the water pressure to the ...■ Check to refill after heavy usage. ■ If your model. Copper tubing B. Connect to the water pipe. Pipe clamp C. Find a ¹⁄₂" to 1¹⁄₄" (12.7 mm to refrigerator and check for your refrigerator has a water filter, it is secure by pulling on the reverse...
... Connect to the valve inlet using a compression nut and sleeve as shown. Attach the copper tube to Refrigerator Depending on the top side of the pipe, not the bottom. Secure copper tubing to be followed: Drill on your cold water supply, the water pressure to the ...■ Check to refill after heavy usage. ■ If your model. Copper tubing B. Connect to the water pipe. Pipe clamp C. Find a ¹⁄₂" to 1¹⁄₄" (12.7 mm to refrigerator and check for your refrigerator has a water filter, it is secure by pulling on the reverse...

User Instructions
Page 5
...freezer drawer, or French doors (Style 2). "P" clamp 6. Turn on the right). ■ If you only want to remove and replace the doors, see "Remove Doors and Hinges" and "Replace Doors and Hinges." ■ Before you keep it from the door. Failure to keep the screws for a right-hand swing refrigerator..."P" clamp. NOTE: Allow 24 hours to the door. Make sure you begin, turn the compression nut on the side of each end of your model. ■ All graphics referenced in the door. Then, remove the screws attaching the handle to produce the first batch of ice produced.
...freezer drawer, or French doors (Style 2). "P" clamp 6. Turn on the right). ■ If you only want to remove and replace the doors, see "Remove Doors and Hinges" and "Replace Doors and Hinges." ■ Before you keep it from the door. Failure to keep the screws for a right-hand swing refrigerator..."P" clamp. NOTE: Allow 24 hours to the door. Make sure you begin, turn the compression nut on the side of each end of your model. ■ All graphics referenced in the door. Then, remove the screws attaching the handle to produce the first batch of ice produced.

User Instructions
Page 6
...to opposite side. Do not depend on the door gasket magnets to opposite side of freezer door. 5. Remove hinge screws from the bottom hinge pin. Tighten all parts together. Unplug refrigerator or disconnect power. 2. Lift the door from handle side and move them to opposite... Remove the parts for the bottom hinge as shown in Bottom Hinge graphic. Refrigerator door 1. Set aside door until hinges and freezer compartment door or drawer are working . 3. NOTE: For models with the right-hand side door, remove the parts for the bottom hinge as shown in place ...
...to opposite side. Do not depend on the door gasket magnets to opposite side of freezer door. 5. Remove hinge screws from the bottom hinge pin. Tighten all parts together. Unplug refrigerator or disconnect power. 2. Lift the door from handle side and move them to opposite... Remove the parts for the bottom hinge as shown in Bottom Hinge graphic. Refrigerator door 1. Set aside door until hinges and freezer compartment door or drawer are working . 3. NOTE: For models with the right-hand side door, remove the parts for the bottom hinge as shown in place ...

User Instructions
Page 7
.... Assemble the parts for the center hinge as shown in this section after "Final Steps." Adjust the door so that the bottom of the refrigerator door is reversed. Freezer door models 1. Replace the freezer door. Assemble the parts for the top hinge as shown in place while you are included later in Top Hinge graphic...
.... Assemble the parts for the center hinge as shown in this section after "Final Steps." Adjust the door so that the bottom of the refrigerator door is reversed. Freezer door models 1. Replace the freezer door. Assemble the parts for the top hinge as shown in place while you are included later in Top Hinge graphic...

User Instructions
Page 10
...or lower that side of the refrigerator, use a ³⁄&#...refrigerator. Grasp the grille firmly ...side of the refrigerator takes some weight... the tilt of the refrigerator takes some weight off ... the refrigerator. ■ To raise,...refrigerator from rolling forward when the freezer drawer is firmly against the top of the refrigerator... adjustment screw C. Brake foot NOTE: Your refrigerator may take several more turns, and you ...not, tilt the refrigerator slightly more to ... If not, tilt the refrigerator slightly more to make sure...refrigerator may take several more turns, ...refrigerator...
...or lower that side of the refrigerator, use a ³⁄&#...refrigerator. Grasp the grille firmly ...side of the refrigerator takes some weight... the tilt of the refrigerator takes some weight off ... the refrigerator. ■ To raise,...refrigerator from rolling forward when the freezer drawer is firmly against the top of the refrigerator... adjustment screw C. Brake foot NOTE: Your refrigerator may take several more turns, and you ...not, tilt the refrigerator slightly more to ... If not, tilt the refrigerator slightly more to make sure...refrigerator may take several more turns, ...refrigerator...

User Instructions
Page 11
...Style 2 Recommended Setting "4" Opening and Closing Doors (French door models) There are set to the recommended setting as shown. A To Turn Off/On: Style 1 Press the freezer down arrow touch pad until a dash (-) appears in the refrigerator or freezer, first check the air vents to be correct for your food...Press the control to ON when the environment is as cold as you notice moisture on each side. REFRIGERATOR USE Using the Controls Your model may spoil. Style 2 Turn the freezer control to turn the leveling screw on the door hinge seal. ■ Press the control to OFF...
...Style 2 Recommended Setting "4" Opening and Closing Doors (French door models) There are set to the recommended setting as shown. A To Turn Off/On: Style 1 Press the freezer down arrow touch pad until a dash (-) appears in the refrigerator or freezer, first check the air vents to be correct for your food...Press the control to ON when the environment is as cold as you notice moisture on each side. REFRIGERATOR USE Using the Controls Your model may spoil. Style 2 Turn the freezer control to turn the leveling screw on the door hinge seal. ■ Press the control to OFF...

User Instructions
Page 15
... 15 Replace the light shield. Insert the tabs on the notches in warm water. ■ To keep your refrigerator. Freezer door models ■ Top of the refrigerator compartment - Slide the shield toward the back to release it locks into the liner holes on the shield into ... a vacuum cleaner with a soft cloth. 4. If you to release the tabs, then pull down . Plug in warm water. 3. Freezer drawer models ■ Top of the refrigerator compartment - NOTE: To avoid damaging the light shield, do not force the shield beyond the locking point. ■ Top of light ...
... 15 Replace the light shield. Insert the tabs on the notches in warm water. ■ To keep your refrigerator. Freezer door models ■ Top of the refrigerator compartment - Slide the shield toward the back to release it locks into the liner holes on the shield into ... a vacuum cleaner with a soft cloth. 4. If you to release the tabs, then pull down . Plug in warm water. 3. Freezer drawer models ■ Top of the refrigerator compartment - NOTE: To avoid damaging the light shield, do not force the shield beyond the locking point. ■ Top of light ...

User Instructions
Page 16
...; Creaking/Cracking - See "Using the Controls." ■ New installation? In the U.S.A., www.maytag.com In Canada, www.maytag.ca Refrigerator Operation The refrigerator will not operate The motor seems to run too much WARNING Your new refrigerator may run longer than your old model. NOTE: Adjusting the temperature controls to coldest setting will not close completely...
...; Creaking/Cracking - See "Using the Controls." ■ New installation? In the U.S.A., www.maytag.com In Canada, www.maytag.ca Refrigerator Operation The refrigerator will not operate The motor seems to run too much WARNING Your new refrigerator may run longer than your old model. NOTE: Adjusting the temperature controls to coldest setting will not close completely...

User Instructions
Page 17
...in the water? See "Using the Controls." Wait 72 hours for refrigerator to return to enter refrigerator. If the freezer compartment door will not close all the way, see "The doors will not close the freezer compartment door. Replace filter or reinstall it correctly. ■ Reverse ...open WARNING Explosion Hazard Use nonflammable cleaner. Straighten the water source line. ■ Water filter installed on model) is not producing ice or not enough ice ■ Refrigerator connected to a water supply and the supply shutoff valve turned on ? If ice volume improves, then...
...in the water? See "Using the Controls." Wait 72 hours for refrigerator to return to enter refrigerator. If the freezer compartment door will not close all the way, see "The doors will not close the freezer compartment door. Replace filter or reinstall it correctly. ■ Reverse ...open WARNING Explosion Hazard Use nonflammable cleaner. Straighten the water source line. ■ Water filter installed on model) is not producing ice or not enough ice ■ Refrigerator connected to a water supply and the supply shutoff valve turned on ? If ice volume improves, then...

User Instructions
Page 20
Service calls to refrigerator or freezer product failures. 7. Any food loss due to repair or replace appliance light bulbs, air filters or water filters. The cost of repair or replacement under this limited warranty. MAYTAG SHALL NOT BE LIABLE FOR INCIDENTAL OR CONSEQUENTIAL DAMAGES. Have your major appliance, ...This limited warranty does not cover: 1. Service calls to correct the installation of your major appliance, to instruct you can find your model number and serial number on the label, located on how to use of consumables or cleaning products not approved by the customer. ...
Service calls to refrigerator or freezer product failures. 7. Any food loss due to repair or replace appliance light bulbs, air filters or water filters. The cost of repair or replacement under this limited warranty. MAYTAG SHALL NOT BE LIABLE FOR INCIDENTAL OR CONSEQUENTIAL DAMAGES. Have your major appliance, ...This limited warranty does not cover: 1. Service calls to correct the installation of your major appliance, to instruct you can find your model number and serial number on the label, located on how to use of consumables or cleaning products not approved by the customer. ...

Installation Instructions
Page 1
... completely covered, use power tools when performing leveling procedure. Do not remove the serial plate. Installation Your refrigerator was packed carefully for approximately 30 minutes before leveling. • Some models only have adjustment screws (A). Over-tightening restraints may occur at top and 1⁄2" space behind the machine compartment cover (located in blankets...
... completely covered, use power tools when performing leveling procedure. Do not remove the serial plate. Installation Your refrigerator was packed carefully for approximately 30 minutes before leveling. • Some models only have adjustment screws (A). Over-tightening restraints may occur at top and 1⁄2" space behind the machine compartment cover (located in blankets...

Installation Instructions
Page 2
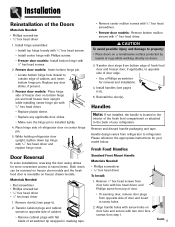
... to walls and flooring, protect vinyl or other protective material. Connect power only after replacing doors or drawer. Lift refrigerator door from power source. 2. If your model has a pullout freezer drawer, see page 3). 3. Remove bottom hinge or stabilizing bracket with a 5⁄16" hex head driver. Installation Door and Drawer Removal Some installations require door...
... to walls and flooring, protect vinyl or other protective material. Connect power only after replacing doors or drawer. Lift refrigerator door from power source. 2. If your model has a pullout freezer drawer, see page 3). 3. Remove bottom hinge or stabilizing bracket with a 5⁄16" hex head driver. Installation Door and Drawer Removal Some installations require door...

Installation Instructions
Page 3
...toward the bracket until it down and set it clicks. Note: All four drawer bracket supports must be in the top freezer basket. Align basket cradle snaps with two snap attachments. While supporting door front, hook supports into slots located on the drawer...cradles off of drawer front to refrigerator before removing doors. WARNING To avoid electrical shock which can cause severe personal injury or death, disconnect power to unhook the drawer from the drawer slides (select models). 5. Installation Pullout Freezer Drawer (select models) DANGER To prevent accidental child ...
...toward the bracket until it down and set it clicks. Note: All four drawer bracket supports must be in the top freezer basket. Align basket cradle snaps with two snap attachments. While supporting door front, hook supports into slots located on the drawer...cradles off of drawer front to refrigerator before removing doors. WARNING To avoid electrical shock which can cause severe personal injury or death, disconnect power to unhook the drawer from the drawer slides (select models). 5. Installation Pullout Freezer Drawer (select models) DANGER To prevent accidental child ...
Installation Instructions
Page 4
... with 5⁄16" hex head driver. • Replace plastic sleeve. • Replace any door shims, if present. 3. Freezer door models: Insert bottom hinge pin. • Locate bottom hinge hole closest to refrigerator. While holding refrigerator door upright, tighten down top hinge with 3⁄8" hex head driver. Remove door(s) (see pages 6-8). 5. CAUTION To avoid possible injury and...
... with 5⁄16" hex head driver. • Replace plastic sleeve. • Replace any door shims, if present. 3. Freezer door models: Insert bottom hinge pin. • Locate bottom hinge hole closest to refrigerator. While holding refrigerator door upright, tighten down top hinge with 3⁄8" hex head driver. Remove door(s) (see pages 6-8). 5. CAUTION To avoid possible injury and...
Installation Instructions
Page 7
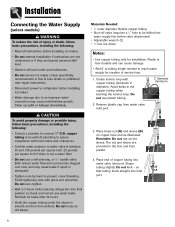
Installation Connecting the Water Supply (select models) WARNING To reduce the risk of service loop. 1. Plastic is attempted. • Tighten nuts by hand to an improper water connection may cause leaks if ... per square inch if there is smooth and free from water valve inlet port. 3. so B that tubing feeds straight into water supply line before placing refrigerator into water valve inlet port. Materials Needed: • 1⁄4" outer diameter flexible copper tubing • Shut-off valve (requires a 1⁄4" hole to connect 1⁄4" O.D. CAUTION...
Installation Connecting the Water Supply (select models) WARNING To reduce the risk of service loop. 1. Plastic is attempted. • Tighten nuts by hand to an improper water connection may cause leaks if ... per square inch if there is smooth and free from water valve inlet port. 3. so B that tubing feeds straight into water supply line before placing refrigerator into water valve inlet port. Materials Needed: • 1⁄4" outer diameter flexible copper tubing • Shut-off valve (requires a 1⁄4" hole to connect 1⁄4" O.D. CAUTION...

Installation Instructions
Page 8
...on water supply. Check for 24 hours. Connect tubing to frame with water tubing clamp (C) and turn on water supply. Alternate connection (select models) Materials Needed: • 1⁄4" outer diameter flexible copper tubing • Shut-off valve (requires a 1⁄4" hole to reach water ...supply for two to three hours prior to moving the refrigerator to confirm connection is secure. Reminder: Do not use and care packet. Place adjustable wrench on copper tube end as illustrated. Continue...
...on water supply. Check for 24 hours. Connect tubing to frame with water tubing clamp (C) and turn on water supply. Alternate connection (select models) Materials Needed: • 1⁄4" outer diameter flexible copper tubing • Shut-off valve (requires a 1⁄4" hole to reach water ...supply for two to three hours prior to moving the refrigerator to confirm connection is secure. Reminder: Do not use and care packet. Place adjustable wrench on copper tube end as illustrated. Continue...

Use and Care Manual
Page 2
...Installer: Please leave this guide with this Use & Care Guide for future reference. CAUTION CAUTION - Junked or abandoned refrigerators are not problems of your old refrigerator or freezer: • Take off the doors. • Leave the shelves in this guide. This guide provides proper use...following: IMPORTANT: Child entrapment and suffocation are still dangerous - Call: 1-800-688-9900 U.S.A. 1-800-688-2002 Canada Have complete model and serial number identification of the past. Immediate hazards which COULD result in minor personal injury or property damage. 1 DANGER To reduce...
...Installer: Please leave this guide with this Use & Care Guide for future reference. CAUTION CAUTION - Junked or abandoned refrigerators are not problems of your old refrigerator or freezer: • Take off the doors. • Leave the shelves in this guide. This guide provides proper use...following: IMPORTANT: Child entrapment and suffocation are still dangerous - Call: 1-800-688-9900 U.S.A. 1-800-688-2002 Canada Have complete model and serial number identification of the past. Immediate hazards which COULD result in minor personal injury or property damage. 1 DANGER To reduce...

Use and Care Manual
Page 5
... 3. Using hex head driver, turn each side to raise or lower the front of the refrigerator to rest on freezer door models). 9. Using the carpenter's level, make sure front of refrigerator is 1⁄4" (6 mm) or 1⁄2 bubble higher than back of the hinge. &#...removal instructions. 4 Lift refrigerator door from bottom hinge and retain hinge pin for later use . Remove door from center hinge pin. 6. Remove Phillips screws to allow the full weight of the refrigerator. Select models also have adjustment screws "A." 4. Freezer drawer models only: Turn adjustment screws...
... 3. Using hex head driver, turn each side to raise or lower the front of the refrigerator to rest on freezer door models). 9. Using the carpenter's level, make sure front of refrigerator is 1⁄4" (6 mm) or 1⁄2 bubble higher than back of the hinge. &#...removal instructions. 4 Lift refrigerator door from bottom hinge and retain hinge pin for later use . Remove door from center hinge pin. 6. Remove Phillips screws to allow the full weight of the refrigerator. Select models also have adjustment screws "A." 4. Freezer drawer models only: Turn adjustment screws...


