Use and Care Guide
Page 4
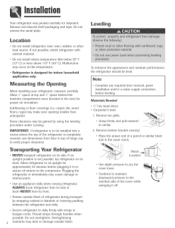
..., rugs} may cause damage to dolly firmly with cabinet material. Transporting Your Refrigerator NEVER transport refrigerator on its side. Remove toe grille. , Grasp firmly and pull outward to pry the cover loose. Thread straps through handles when possible. Remove bottom bracket cover(s]. Place the eraser end of the cover while swinging it in...
..., rugs} may cause damage to dolly firmly with cabinet material. Transporting Your Refrigerator NEVER transport refrigerator on its side. Remove toe grille. , Grasp firmly and pull outward to pry the cover loose. Thread straps through handles when possible. Remove bottom bracket cover(s]. Place the eraser end of the cover while swinging it in...
Use and Care Guide
Page 5
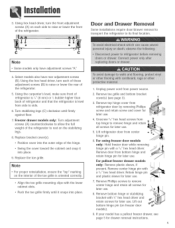
...screws for later use. 8_ Remove bottom hinge or stabilizing bracket with %" hex head driver and _.retain screws for later use . Lift out bottom hinge pin (on eachsideto raiseor lowerthe front of the refrigerator to its final location. Freezer drawer models only: Turn adjustment screws... (A) counterclockwise to allow the full weight of the refrigerator. Remove door from side to remove center ...
...screws for later use. 8_ Remove bottom hinge or stabilizing bracket with %" hex head driver and _.retain screws for later use . Lift out bottom hinge pin (on eachsideto raiseor lowerthe front of the refrigerator to its final location. Freezer drawer models only: Turn adjustment screws... (A) counterclockwise to allow the full weight of the refrigerator. Remove door from side to remove center ...
Use and Care Guide
Page 7
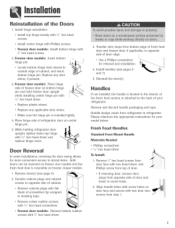
... screws with %/' hex head screws. Align handle holes with Phillips screws. Freezer door models: Insert bottom hinge pin. , Locate bottom hinge hole closest to refrigerator. Use a Phillips screwdriver for your refrigerator. If reversing door, remove door plugs from refrigerator to outside edge of cabinet. Remove and discard handle packaging and tape. Fresh Food Handles Standard Front...
... screws with %/' hex head screws. Align handle holes with Phillips screws. Freezer door models: Insert bottom hinge pin. , Locate bottom hinge hole closest to refrigerator. Use a Phillips screwdriver for your refrigerator. If reversing door, remove door plugs from refrigerator to outside edge of cabinet. Remove and discard handle packaging and tape. Fresh Food Handles Standard Front...
Use and Care Guide
Page 10
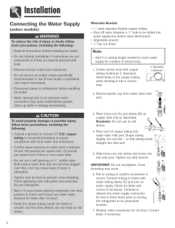
.... B Reminder: Do not use an old sbeve. Do not kink - Connect tubing to reach water supply for two to three hours prior to moving the refrigerator to confirm connection is secure. Shape tubing siighdy. feeds @ Slide brass nut over sleeve and screw nut into a service bop. 2' diameter Remove plastic cap from...
.... B Reminder: Do not use an old sbeve. Do not kink - Connect tubing to reach water supply for two to three hours prior to moving the refrigerator to confirm connection is secure. Shape tubing siighdy. feeds @ Slide brass nut over sleeve and screw nut into a service bop. 2' diameter Remove plastic cap from...
Use and Care Guide
Page 11
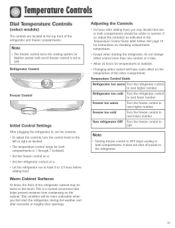
...Temperature Controm Guide Refrigerator too warm Turn the refrigerator control to next lower number. Freezer too cold Turn the freezer control to next higher number. Refrigerator too cold Turn the refrigerator control to OFF. Turn refrigerator OFF Turn the freezer control to OFF. * Turning freezer control to 12... Controls 24 hours after excessive or lengthy door openings. Freezer too warm Turn the freezer control to the refrigerator. 10 This is 1 through 7 (coldest). * Set the freezer control on 4. * Set the refrigerator control on the temperature of the other compartment. It does...
...Temperature Controm Guide Refrigerator too warm Turn the refrigerator control to next lower number. Freezer too cold Turn the freezer control to next higher number. Refrigerator too cold Turn the refrigerator control to OFF. Turn refrigerator OFF Turn the freezer control to OFF. * Turning freezer control to 12... Controls 24 hours after excessive or lengthy door openings. Freezer too warm Turn the freezer control to the refrigerator. 10 This is 1 through 7 (coldest). * Set the freezer control on 4. * Set the refrigerator control on the temperature of the other compartment. It does...
Use and Care Guide
Page 12
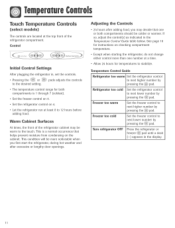
... If so, adjust the control(s} as indicated in , set the controls. Temperature Controm Guide Refrigerator too warm Set the refrigerator control to next lower number by pressing the _ pad. Set the freezer control on the cabinet. This is 1 through 7 (coldest]. See page 18 for instructions on...At times, the front of the refrigerator compartment. Refrigerator too cold Set the refrigerator control to next higher number by pressing the _ pad. Freezer too warm Set the freezer control to i next higher number by Freezer too cold Set the freezer control to the desired setting. pads ...
... If so, adjust the control(s} as indicated in , set the controls. Temperature Controm Guide Refrigerator too warm Set the refrigerator control to next lower number by pressing the _ pad. Set the freezer control on the cabinet. This is 1 through 7 (coldest]. See page 18 for instructions on...At times, the front of the refrigerator compartment. Refrigerator too cold Set the refrigerator control to next higher number by pressing the _ pad. Freezer too warm Set the freezer control to i next higher number by Freezer too cold Set the freezer control to the desired setting. pads ...
Use and Care Guide
Page 13
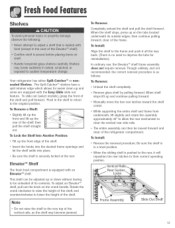
...Be sure the shelf is in the shelf to return to lower the height of the shelf, and counterclockwise to the original position. Your refrigerator has either Spill-Catcher TM or non_ seamed Shemves, The Spill-Catcher TM shelves have a spill retainer edge which allows for reinstalIation}. Slightly ... the hooks into the desired frame openings and let the shelf settle into place. When the shelf stops, press up the front edge of the refrigerator compartment. To Install: , Reverse the removal procedure. Push in a level position. , When the sliding shelf is securely locked at the rear....
...Be sure the shelf is in the shelf to return to lower the height of the shelf, and counterclockwise to the original position. Your refrigerator has either Spill-Catcher TM or non_ seamed Shemves, The Spill-Catcher TM shelves have a spill retainer edge which allows for reinstalIation}. Slightly ... the hooks into the desired frame openings and let the shelf settle into place. When the shelf stops, press up the front edge of the refrigerator compartment. To Install: , Reverse the removal procedure. Push in a level position. , When the sliding shelf is securely locked at the rear....
Use and Care Guide
Page 14
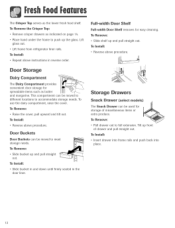
... provides convenient door storage for easy cleaning. To [nstaH: . To Install: , Insert drawer into frame rails and push back into place. 13 Lift frame from refrigerator liner rails. To Remove the Crisper Top: . Reverse above procedure. To install: , Slide bucket in and down until firmly seated in reverse orden FuiFwidth Door...
... provides convenient door storage for easy cleaning. To [nstaH: . To Install: , Insert drawer into frame rails and push back into place. 13 Lift frame from refrigerator liner rails. To Remove the Crisper Top: . Reverse above procedure. To install: , Slide bucket in and down until firmly seated in reverse orden FuiFwidth Door...
Use and Care Guide
Page 15
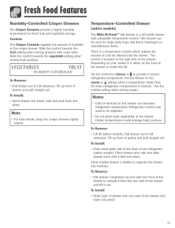
... Push metal glide rails to provide a normal refrigerator temperature. This drawer can decrease refrigerator temperature. Set the drawer on the meats or _ setting when a temperature colder than the main refrigerator compartment is either on the front of the refrigerator (select models}. Use the coldest setting when storing...Some models feature a divider to the drawer can be adjusted. The control is located on your model, it is desired. Refrigerator control may need to unhook it from the rear wail of humidity in the drawer. Slide the control towards the fruit setting ...
... Push metal glide rails to provide a normal refrigerator temperature. This drawer can decrease refrigerator temperature. Set the drawer on the meats or _ setting when a temperature colder than the main refrigerator compartment is either on the front of the refrigerator (select models}. Use the coldest setting when storing...Some models feature a divider to the drawer can be adjusted. The control is located on your model, it is desired. Refrigerator control may need to unhook it from the rear wail of humidity in the drawer. Slide the control towards the fruit setting ...
Use and Care Guide
Page 16
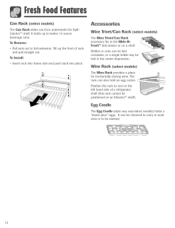
... or to full extension. Can Rack (semect modems) The Can Rack slides out from underneath the SpillCatcher TM shelf It holds up the front of a refrigerator shelf (this rack cannot be positioned on a shelf. Wine Trivet/Can Rack (select models_) The Wine Trivet/Can Rack accessory fits in the center depression...
... or to full extension. Can Rack (semect modems) The Can Rack slides out from underneath the SpillCatcher TM shelf It holds up the front of a refrigerator shelf (this rack cannot be positioned on a shelf. Wine Trivet/Can Rack (select models_) The Wine Trivet/Can Rack accessory fits in the center depression...

Use and Care Guide
Page 17
...stick together and taste stale. If the ice is hear& , Ice maker will remain in place and ice maker arm is pushed down . , After freezer section reaches approximately 0° F (-18 ° C), ice maker fills with water and begins operating. Beverages and foods should not be broken apart. To... until click is not used frequently, the ice cubes will rattle as instructed on by raising the sensor arm. Proper water flow and a level refrigerator ate essential for quick chilling. Operating instructions , Confirm ice bin is in the off for several hours, To Remove the Uce }}in: ,...
...stick together and taste stale. If the ice is hear& , Ice maker will remain in place and ice maker arm is pushed down . , After freezer section reaches approximately 0° F (-18 ° C), ice maker fills with water and begins operating. Beverages and foods should not be broken apart. To... until click is not used frequently, the ice cubes will rattle as instructed on by raising the sensor arm. Proper water flow and a level refrigerator ate essential for quick chilling. Operating instructions , Confirm ice bin is in the off for several hours, To Remove the Uce }}in: ,...

Use and Care Guide
Page 19
...the temperature, place an appliance thermometer in a glass of water and place in the original carton and refrigerate immediately after purchasing and after each use aluminum foil, freezer wrap, freezer bags or airtight containers. Store these foods in the center of frozen foods. , Leave space between... the packages so cold air can raise the temperature of the refrigerator. To check the temperature, place an appliance thermometer between 34 ° and 40 ° F (1 ° and 4° C) with door openings. A freezer operates more efficiently when it is at least an inch around ...
...the temperature, place an appliance thermometer in a glass of water and place in the original carton and refrigerate immediately after purchasing and after each use aluminum foil, freezer wrap, freezer bags or airtight containers. Store these foods in the center of frozen foods. , Leave space between... the packages so cold air can raise the temperature of the refrigerator. To check the temperature, place an appliance thermometer between 34 ° and 40 ° F (1 ° and 4° C) with door openings. A freezer operates more efficiently when it is at least an inch around ...

Use and Care Guide
Page 20
...6 months May become crumbly Store in original carton. Check carton date. Not recommended May also store at room temperature before refrigerating. Feed Storage Chart Storage times are approximate and may vary depending on type of packaging, storage temperature, and the quality of...° F (16 ° to 21 ° C}. 6 months (whole/peeled} Ripen at room temperature before refrigerating. Bananas darken when refrigerated. Wrap tightly. If refrigerated, store uncovered. 6 to original container. Don't return unused portions to 12 months Will not ripen after purchase.
...6 months May become crumbly Store in original carton. Check carton date. Not recommended May also store at room temperature before refrigerating. Feed Storage Chart Storage times are approximate and may vary depending on type of packaging, storage temperature, and the quality of...° F (16 ° to 21 ° C}. 6 months (whole/peeled} Ripen at room temperature before refrigerating. Bananas darken when refrigerated. Wrap tightly. If refrigerated, store uncovered. 6 to original container. Don't return unused portions to 12 months Will not ripen after purchase.

Use and Care Guide
Page 21
... than two weeks, overwrap with freezer wra p. 1 month 3 to 4 months 6 to 9 months 1 to 2 months 1 to 2 months 1 to 2 months 1 to 2 months 4 to 6 months 4 months 1 to 2 months 1 to 2 months 4 to 10 months Not recommended Wrap odorous foods and refrigerate in crisper. Sources: United States...the meat and cheese drawer. Wrap odorous foods and refrigerate in the crisper. 12 months 9 months 2 to 6 months Keep in original packaging for refrigeration. Processed meats should be kept in original packaging for refrigeration. Place in pods. Unopened, vacuum-packed luncheon meat ...
... than two weeks, overwrap with freezer wra p. 1 month 3 to 4 months 6 to 9 months 1 to 2 months 1 to 2 months 1 to 2 months 1 to 2 months 4 to 6 months 4 months 1 to 2 months 1 to 2 months 4 to 10 months Not recommended Wrap odorous foods and refrigerate in crisper. Sources: United States...the meat and cheese drawer. Wrap odorous foods and refrigerate in the crisper. 12 months 9 months 2 to 6 months Keep in original packaging for refrigeration. Processed meats should be kept in original packaging for refrigeration. Place in pods. Unopened, vacuum-packed luncheon meat ...
Use and Care Guide
Page 22
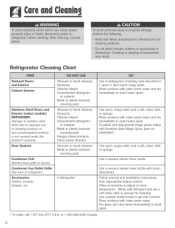
... Fan Outmet Grille See back of baking soda dissolved in 1 quart (1 liteO warm soapy water` Rinse surfaces with Stainless Steel Magic Spray (part no. 20000008"}. Refrigerator Cleaning Chart Textured Doors and Exterior Cabinet Unterior StainJess SteeJ Doors and Exterior Cselect models} UM PORTANT: Damage to stainless steel finish due to improper...
... Fan Outmet Grille See back of baking soda dissolved in 1 quart (1 liteO warm soapy water` Rinse surfaces with Stainless Steel Magic Spray (part no. 20000008"}. Refrigerator Cleaning Chart Textured Doors and Exterior Cabinet Unterior StainJess SteeJ Doors and Exterior Cselect models} UM PORTANT: Damage to stainless steel finish due to improper...
Use and Care Guide
Page 23
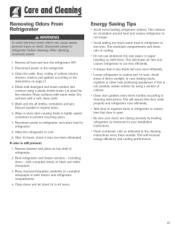
...heat producing appliances. Wash and dry all food and turn the refrigerator OFR 2. Reconnect power to refrigerator and return food to run less efficiently. , A freezer that door seals properly and refrigerator runs efficiently. Take time to organize items in tightly sealed containers... 22 Discard spoiled or expired items. 6. Avoid adding too much warm food to 48 hours. This will assure that is not possible, isolate exterior by leveling refrigerator as instructed in the cleaning instructions every three months. Removing Odors Fro 1. Pack refrigerator and freezer...
...heat producing appliances. Wash and dry all food and turn the refrigerator OFR 2. Reconnect power to refrigerator and return food to run less efficiently. , A freezer that door seals properly and refrigerator runs efficiently. Take time to organize items in tightly sealed containers... 22 Discard spoiled or expired items. 6. Avoid adding too much warm food to 48 hours. This will assure that is not possible, isolate exterior by leveling refrigerator as instructed in the cleaning instructions every three months. Removing Odors Fro 1. Pack refrigerator and freezer...
Use and Care Guide
Page 24
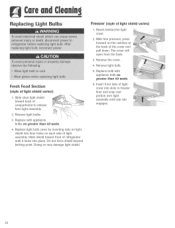
... no greater than 4@ _vatts, Insert front tabs of light cover into slots in freezer liner and snap rear portion over light assembly until it locks into liner holes on...with appliance bulbs no greater than 40 watts. 4_ Replace light bulb cover by inserting tabs on light shield into phce. Freezer {style of light shield varies} 1. Slide shield toward back of compartment to release from the back. 3. Remove light bulbs... Section {style of light shield varies) Slide clear light shield toward front of refrigerator until rear tab engages. 23 Reach behind the light cover. 2.
... no greater than 4@ _vatts, Insert front tabs of light cover into slots in freezer liner and snap rear portion over light assembly until it locks into liner holes on...with appliance bulbs no greater than 40 watts. 4_ Replace light bulb cover by inserting tabs on light shield into phce. Freezer {style of light shield varies} 1. Slide shield toward back of compartment to release from the back. 3. Remove light bulbs... Section {style of light shield varies) Slide clear light shield toward front of refrigerator until rear tab engages. 23 Reach behind the light cover. 2.
Use and Care Guide
Page 25
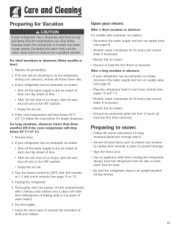
...drops, raise the wire shut off the water supply to prevent the formation of warm ware0. 6. Turn the freezer control to the OFF position. Always truck the refrigerator from its side or backnever from its front. Empty the ice bin. /4. Remove food. 2. Dry thoroughly...off arm to (OFF_ with dial controls or (-) with automatic ice makers: , Reconnect the water supply and turn on the refrigerator during moving the refrigerator. Monitor water connection for Vacation For short vacations or absences (three months or mess): 1. Preparing to prevent damage. Empty the...
...drops, raise the wire shut off the water supply to prevent the formation of warm ware0. 6. Turn the freezer control to the OFF position. Always truck the refrigerator from its side or backnever from its front. Empty the ice bin. /4. Remove food. 2. Dry thoroughly...off arm to (OFF_ with dial controls or (-) with automatic ice makers: , Reconnect the water supply and turn on the refrigerator during moving the refrigerator. Monitor water connection for Vacation For short vacations or absences (three months or mess): 1. Preparing to prevent damage. Empty the...
Use and Care Guide
Page 26
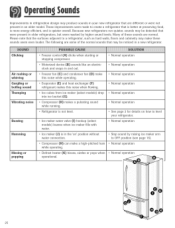
...details on ' position without water connection. . Stop sound by raising ice maker arm to level your refrigerator, Normal operation . Improvementisn refrigerationdesignmayproducesoundsin yournewrefrigeratotrhat aredifferentor werenot presentin an oldermodelTheseimprovementws eremadeto createa refrigeratorthatis betterat preservingfood, is moreenergyefficient... , Freezer control (A} clicks when starting or stopping compressor` Motorized device (B} sounds like an electric clock and snaps in the 'on how to OFF position (see page 16}. . Evaporator (E} and heat exchanger (F} refrigerant makes ...
...details on ' position without water connection. . Stop sound by raising ice maker arm to level your refrigerator, Normal operation . Improvementisn refrigerationdesignmayproducesoundsin yournewrefrigeratotrhat aredifferentor werenot presentin an oldermodelTheseimprovementws eremadeto createa refrigeratorthatis betterat preservingfood, is moreenergyefficient... , Freezer control (A} clicks when starting or stopping compressor` Motorized device (B} sounds like an electric clock and snaps in the 'on how to OFF position (see page 16}. . Evaporator (E} and heat exchanger (F} refrigerant makes ...
Use and Care Guide
Page 27
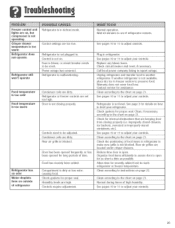
... pages 10 or 11 to preserve food. UnpHugrefrigerator and transfer food to another refrigerator is not avaiHabHe, pHacedry ice in freezer section to adjust your controHs. 26 Refrigerator is not dosing properHy. Check for assistance. CHeanaccording to instructions on page 21.... Check circuit breaker and reset, if necessary. CHeanaccording to the chart on page 22. NormaHduring times of ...
... pages 10 or 11 to preserve food. UnpHugrefrigerator and transfer food to another refrigerator is not avaiHabHe, pHacedry ice in freezer section to adjust your controHs. 26 Refrigerator is not dosing properHy. Check for assistance. CHeanaccording to instructions on page 21.... Check circuit breaker and reset, if necessary. CHeanaccording to the chart on page 22. NormaHduring times of ...


