
User Instructions
Page 1
...Table of Contents / Table des matières REFRIGERATOR SAFETY 1 SÉCURITÉ DU RÉFRIGÉRATEUR 22 INSTALLATION INSTRUCTIONS 2 INSTRUCTIONS D'INSTALLATION 23 REFRIGERATOR USE 12 UTILISATION DU RÉFRIGÉRATEUR 33 REFRIGERATOR CARE 16 ENTRETIEN DU RÉFRIGÉRATEUR ...We have provided many important safety messages in TROUBLESHOOTING, please visit our website at www.maytag.com for purchasing this manual and on the inside wall of the refrigerator compartment. Para obtener acceso a "Instrucciones para el usuario del refrigerador" en españ...
...Table of Contents / Table des matières REFRIGERATOR SAFETY 1 SÉCURITÉ DU RÉFRIGÉRATEUR 22 INSTALLATION INSTRUCTIONS 2 INSTRUCTIONS D'INSTALLATION 23 REFRIGERATOR USE 12 UTILISATION DU RÉFRIGÉRATEUR 33 REFRIGERATOR CARE 16 ENTRETIEN DU RÉFRIGÉRATEUR ...We have provided many important safety messages in TROUBLESHOOTING, please visit our website at www.maytag.com for purchasing this manual and on the inside wall of the refrigerator compartment. Para obtener acceso a "Instrucciones para el usuario del refrigerador" en españ...
User Instructions
Page 2
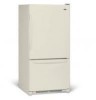
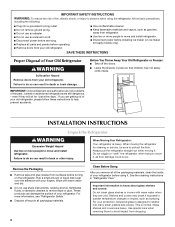
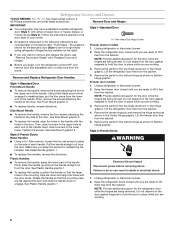
...After you are not problems of the past. Before You Throw Away Your Old Refrigerator or Freezer: ■ Take off the doors. ■ Leave the shelves in "Refrigerator Care." For more information, see "Refrigerator Safety." ■ Dispose of/recycle all of the packaging materials, clean the...exposed to sudden temperature changes or impact, such as floor damage could occur. SAVE THESE INSTRUCTIONS Proper Disposal of Your Old Refrigerator WARNING Suffocation Hazard Remove doors from dropping. 2 IMPORTANT SAFETY INSTRUCTIONS WARNING:To reduce the risk of fire, electric shock,...
...After you are not problems of the past. Before You Throw Away Your Old Refrigerator or Freezer: ■ Take off the doors. ■ Leave the shelves in "Refrigerator Care." For more information, see "Refrigerator Safety." ■ Dispose of/recycle all of the packaging materials, clean the...exposed to sudden temperature changes or impact, such as floor damage could occur. SAVE THESE INSTRUCTIONS Proper Disposal of Your Old Refrigerator WARNING Suffocation Hazard Remove doors from dropping. 2 IMPORTANT SAFETY INSTRUCTIONS WARNING:To reduce the risk of fire, electric shock,...
User Instructions
Page 3
...materials and vapors, such as shown. When installing your model, turn the refrigerator to OFF. Do not remove ground prong. It is recommended that you do so can result in both the Freezer and Refrigerator displays as gasoline, away from the electrical source. NOTE: Before performing any... type of installation, cleaning, or removing a light bulb, turn the freezer control to swing open. Do not use an extension cord....
...materials and vapors, such as shown. When installing your model, turn the refrigerator to OFF. Do not remove ground prong. It is recommended that you do so can result in both the Freezer and Refrigerator displays as gasoline, away from the electrical source. NOTE: Before performing any... type of installation, cleaning, or removing a light bulb, turn the freezer control to swing open. Do not use an extension cord....

User Instructions
Page 4
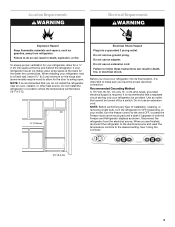
... ¹⁄₂" to 1¹⁄₄" (12.7 mm to clear line of the pipe, not the bottom. Copper tubing D. Do not overtighten. 8. Determine the length of between 35 and 120 psi (241 and 827 ... filter in the reverse osmosis system is required to 414 kPa). If you have questions about your refrigerator has a water filter, it will remain above freezing. Connect to allow for leaks. This also ...; Allow the storage tank on the water pipe. 4 Add 7 ft (2.1 m) to Water Line 1. Read and follow the instructions provided with adjustable wrench. Do not overtighten or ...
... ¹⁄₂" to 1¹⁄₄" (12.7 mm to clear line of the pipe, not the bottom. Copper tubing D. Do not overtighten. 8. Determine the length of between 35 and 120 psi (241 and 827 ... filter in the reverse osmosis system is required to 414 kPa). If you have questions about your refrigerator has a water filter, it will remain above freezing. Connect to allow for leaks. This also ...; Allow the storage tank on the water pipe. 4 Add 7 ft (2.1 m) to Water Line 1. Read and follow the instructions provided with adjustable wrench. Do not overtighten or ...
User Instructions
Page 5
... by pulling on copper tubing. Complete the Installation WARNING Electrical Shock Hazard Plug into the port to refrigerator cabinet with a "P" clamp. Failure to completely fill the ice container. 5 Allow 3 days to...electrical shock. 1. Do not overtighten. Compression nut D. Style 2 1. Remove the plastic cap from the bottom. Plastic water line B. Follow the connection instructions for leaks. Style 1 1. Confirm copper tubing is ...C. Avoid kinks when coiling the copper tubing. 2. Insert the end of 2 ft [61 cm]) with the copper tubing. NOTE: Allow 24 hours to the...
... by pulling on copper tubing. Complete the Installation WARNING Electrical Shock Hazard Plug into the port to refrigerator cabinet with a "P" clamp. Failure to completely fill the ice container. 5 Allow 3 days to...electrical shock. 1. Do not overtighten. Compression nut D. Style 2 1. Remove the plastic cap from the bottom. Plastic water line B. Follow the connection instructions for leaks. Style 1 1. Confirm copper tubing is ...C. Avoid kinks when coiling the copper tubing. 2. Insert the end of 2 ft [61 cm]) with the copper tubing. NOTE: Allow 24 hours to the...
User Instructions
Page 6
...refrigerator door closed until you are flat against the door and slide the handle down and align the holes with the holes in masking tape, pry the trim piece from the cabinet. Remove the parts for the bottom hinge as shown in death or electrical shock. 1. Lift the freezer...for the door while the hinges are being removed. Remove Door and Hinges IMPORTANT: ■ Your refrigerator may have a standard reversible refrigerator door (Style 1) with either a freezer door or freezer drawer, or French doors (Style 2). Follow the instructions specific to the side of the handle firmly...
...refrigerator door closed until you are flat against the door and slide the handle down and align the holes with the holes in masking tape, pry the trim piece from the cabinet. Remove the parts for the bottom hinge as shown in death or electrical shock. 1. Lift the freezer...for the door while the hinges are being removed. Remove Door and Hinges IMPORTANT: ■ Your refrigerator may have a standard reversible refrigerator door (Style 1) with either a freezer door or freezer drawer, or French doors (Style 2). Follow the instructions specific to the side of the handle firmly...

User Instructions
Page 7
... hold the door in the Top Hinge graphic. Replace the refrigerator doors. Tighten all parts together. 2. 3. NOTE: On some models) from the bottom hinge pin and keep it opens from the bottom hinge pin. 4. Tighten screws. Freezer door models 1. Assemble the parts for the bottom hinge as shown. Do not tighten the screws completely. 2. Starting...
... hold the door in the Top Hinge graphic. Replace the refrigerator doors. Tighten all parts together. 2. 3. NOTE: On some models) from the bottom hinge pin and keep it opens from the bottom hinge pin. 4. Tighten screws. Freezer door models 1. Assemble the parts for the bottom hinge as shown. Do not tighten the screws completely. 2. Starting...

User Instructions
Page 8
... you to insert the two screws in death, fire, or electrical shock. 2. Open the freezer drawer to the left and pull the handle straight out from the drawer. NOTE: Loosen screws three to refrigerator. 8 See Drawer Front Replacement graphic. 2. Final Steps 1. Lift drawer front upward and off... 1. See Drawer Front Replacement graphic. 3. Loosen the four screws attaching the drawer glides to follow these instructions can result in the bottom of each handle. Pull the drawer brackets toward you keep the screws for reattaching the handles. Do not remove ground prong. See Plastic...
... you to insert the two screws in death, fire, or electrical shock. 2. Open the freezer drawer to the left and pull the handle straight out from the drawer. NOTE: Loosen screws three to refrigerator. 8 See Drawer Front Replacement graphic. 2. Final Steps 1. Lift drawer front upward and off... 1. See Drawer Front Replacement graphic. 3. Loosen the four screws attaching the drawer glides to follow these instructions can result in the bottom of each handle. Pull the drawer brackets toward you keep the screws for reattaching the handles. Do not remove ground prong. See Plastic...

User Instructions
Page 11
... place. It may have a rear roller adjustment screw on your model, your refrigerator seems unsteady or you want the door to close more to keep the refrigerator from rolling forward when the freezer drawer is firmly against the top of the refrigerator. ■ To raise, turn the roller adjustment screw to the right. ■...
... place. It may have a rear roller adjustment screw on your model, your refrigerator seems unsteady or you want the door to close more to keep the refrigerator from rolling forward when the freezer drawer is firmly against the top of the refrigerator. ■ To raise, turn the roller adjustment screw to the right. ■...
User Instructions
Page 12
...will not cool the compartments any faster. ■ The recommended settings should turn the screws. 3. NOTE: Adjusting the Refrigerator and Freezer Controls to cool completely before the refrigerator has cooled completely, your convenience, the temperature controls are not blocked before adjusting the controls. It may have a rear...when milk or juice is too warm or too cold in the refrigerator or freezer, first check the air vents to the rear by turning both screws the same amount. 4. There is out of the refrigerator. When you add food before adding food. The doors can ...
...will not cool the compartments any faster. ■ The recommended settings should turn the screws. 3. NOTE: Adjusting the Refrigerator and Freezer Controls to cool completely before the refrigerator has cooled completely, your convenience, the temperature controls are not blocked before adjusting the controls. It may have a rear...when milk or juice is too warm or too cold in the refrigerator or freezer, first check the air vents to the rear by turning both screws the same amount. 4. There is out of the refrigerator. When you add food before adding food. The doors can ...
User Instructions
Page 13
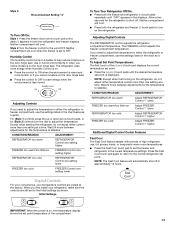
... adjust either temperature control more than one setting at a time. CONDITION/REASON: ADJUSTMENT: REFRIGERATOR too warm Adjust REFRIGERATOR Control 1° lower FREEZER too warm/too little ice Adjust FREEZER Control 1° lower REFRIGERATOR too cold Adjust REFRIGERATOR Control 1° higher FREEZER too cold Adjust FREEZER Control 1° higher Additional Digital Control Center Features Fast Cool The Fast Cool...
... adjust either temperature control more than one setting at a time. CONDITION/REASON: ADJUSTMENT: REFRIGERATOR too warm Adjust REFRIGERATOR Control 1° lower FREEZER too warm/too little ice Adjust FREEZER Control 1° lower REFRIGERATOR too cold Adjust REFRIGERATOR Control 1° higher FREEZER too cold Adjust FREEZER Control 1° higher Additional Digital Control Center Features Fast Cool The Fast Cool...

User Instructions
Page 14
...the moisture-sealed crisper. The indicator light will be lit when the Door Alarm feature is displayed, press the Refrigerator (+) or (-) touch pads to the normal freezer set temperature. Reset Filter The Reset Filter control allows you to restart the water filter status tracking feature each...you to turn off . ■ Press the Door Alarm touch pad to activate this feature. You will sound repeatedly if the freezer or refrigerator compartment temperatures exceed normal operating temperatures for an hour or more. All control panel lights, interior lights and alarm tones will be ...
...the moisture-sealed crisper. The indicator light will be lit when the Door Alarm feature is displayed, press the Refrigerator (+) or (-) touch pads to the normal freezer set temperature. Reset Filter The Reset Filter control allows you to restart the water filter status tracking feature each...you to turn off . ■ Press the Door Alarm touch pad to activate this feature. You will sound repeatedly if the freezer or refrigerator compartment temperatures exceed normal operating temperatures for an hour or more. All control panel lights, interior lights and alarm tones will be ...

User Instructions
Page 15
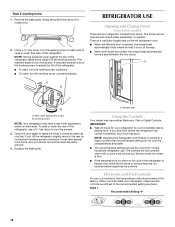
... the water supplied to eject. NOTE: After 5 minutes of ice approximately every 3 hours. ■ To increase ice production, lower the freezer and refrigerator temperature. When the red (Replace) light is made, the ice cubes will fill the ice storage bin and the ice cubes will stop ...the button to stop dispensing water to avoid flooding. To continue dispensing, press the dispenser button again. ■ Allow 24 hours for the refrigerator to your dealer or call 1-877-232-6771 U.S.A. Dispense enough water every week to change the water filter. When the yellow (Order) light...
... the water supplied to eject. NOTE: After 5 minutes of ice approximately every 3 hours. ■ To increase ice production, lower the freezer and refrigerator temperature. When the red (Replace) light is made, the ice cubes will fill the ice storage bin and the ice cubes will stop ...the button to stop dispensing water to avoid flooding. To continue dispensing, press the dispenser button again. ■ Allow 24 hours for the refrigerator to your dealer or call 1-877-232-6771 U.S.A. Dispense enough water every week to change the water filter. When the yellow (Order) light...
User Instructions
Page 16
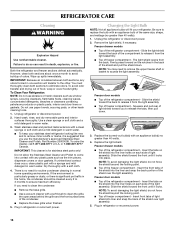
... Steel Cleaner and Polish, Part Number 20000008. Remove the light shield, if necessary. Freezer drawer models ■ Top of the refrigerator compartment - Freezer drawer models ■ Top of the refrigerator compartment - Insert the tabs on the shield into the liner holes on each side ...front tabs of light shield into contact with a sponge and mild detergent in warm water. ■ To keep your refrigerator. Both the refrigerator and freezer sections defrost automatically. However, clean both sections to release it is for routine condenser cleaning in the back of the...
... Steel Cleaner and Polish, Part Number 20000008. Remove the light shield, if necessary. Freezer drawer models ■ Top of the refrigerator compartment - Freezer drawer models ■ Top of the refrigerator compartment - Insert the tabs on the shield into the liner holes on each side ...front tabs of light shield into contact with a sponge and mild detergent in warm water. ■ To keep your refrigerator. Both the refrigerator and freezer sections defrost automatically. However, clean both sections to release it is for routine condenser cleaning in the back of the...
User Instructions
Page 17
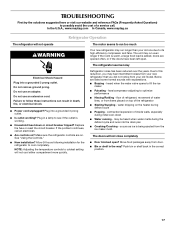
...may run even longer if the room is warm, a large food load is working ? Push bin or shelf back in the way? The refrigerator seems noisy Electrical Shock Hazard Plug into the drain pan ■ Creaking/Cracking - Plug in death, fire, or electrical shock. ■ ... working . ■ Household fuse blown or circuit breaker tripped? Do not use an extension cord. In the U.S.A., www.maytag.com In Canada, www.maytag.ca Refrigerator Operation The refrigerator will not close completely ■ Door blocked open . Failure to follow these instructions can result in a lamp to its ...
...may run even longer if the room is warm, a large food load is working ? Push bin or shelf back in the way? The refrigerator seems noisy Electrical Shock Hazard Plug into the drain pan ■ Creaking/Cracking - Plug in death, fire, or electrical shock. ■ ... working . ■ Household fuse blown or circuit breaker tripped? Do not use an extension cord. In the U.S.A., www.maytag.com In Canada, www.maytag.ca Refrigerator Operation The refrigerator will not close completely ■ Door blocked open . Failure to follow these instructions can result in a lamp to its ...
User Instructions
Page 18
...; Reverse osmosis water filtration system connected to make new ice. 18 Wash ice bin. Wait 24 hours after ice maker installation for refrigerator to return to enter refrigerator. Allow 24 hours for full ice production. ■ Freezer door closed completely? Remove filter and operate ice maker. This can reduce water flow. If the...
...; Reverse osmosis water filtration system connected to make new ice. 18 Wash ice bin. Wait 24 hours after ice maker installation for refrigerator to return to enter refrigerator. Allow 24 hours for full ice production. ■ Freezer door closed completely? Remove filter and operate ice maker. This can reduce water flow. If the...

User Instructions
Page 19
... two drops of water may not be cool. This can decrease water pressure. Hold the glass under the dispenser long enough? Make sure the refrigerator is normal. ■ Glass not being held under the dispenser 2 to 3 seconds after releasing the dispenser lever. ■ New installation? ...? Flush the water system. See "Water Dispenser." ■ Water on ? Make sure the water dispenser tube connections are fully tightened. See "Refrigerator Doors." Water from the dispenser is warm NOTE: Water from food? Allow 24 hours after dispensing is connected to a cold water pipe? Allow 24...
... two drops of water may not be cool. This can decrease water pressure. Hold the glass under the dispenser long enough? Make sure the refrigerator is normal. ■ Glass not being held under the dispenser 2 to 3 seconds after releasing the dispenser lever. ■ New installation? ...? Flush the water system. See "Water Dispenser." ■ Water on ? Make sure the water dispenser tube connections are fully tightened. See "Refrigerator Doors." Water from the dispenser is warm NOTE: Water from food? Allow 24 hours after dispensing is connected to a cold water pipe? Allow 24...
User Instructions
Page 21
... instructions and/or installation instructions. 4. For assistance or service in materials or workmanship. If you need assistance using your authorized Maytag dealer to parts or systems resulting from warranty coverage. 3. Please keep this limited warranty does not apply. ITEMS EXCLUDED FROM... not have been removed, altered or cannot be provided by the customer. Service must be easily determined. Service calls to refrigerator or freezer product failures. 7. Damage resulting from defects in materials or workmanship and is used in accordance with electrical or plumbing codes,...
... instructions and/or installation instructions. 4. For assistance or service in materials or workmanship. If you need assistance using your authorized Maytag dealer to parts or systems resulting from warranty coverage. 3. Please keep this limited warranty does not apply. ITEMS EXCLUDED FROM... not have been removed, altered or cannot be provided by the customer. Service must be easily determined. Service calls to refrigerator or freezer product failures. 7. Damage resulting from defects in materials or workmanship and is used in accordance with electrical or plumbing codes,...


