
User Instructions
Page 1
...Para obtener acceso a "lnstrucciones para el usuario del refrigerador" en espa_ol, o para obtener informaci6n adicional acerca de su producto, visite: www.maytag.com. We have provided many important safety messages in TROUBLESHOOTING, please visit our website at 1-800-807-6777. This symbol alerts you to ...RI=FRIGleRATEUR 35 DlePANNAGE 36 FEUlLLES DE DONNleES SUR LE PRODUlT 39 PRODUCT DATA SHEETS 18 WAR RANTY 19 GARANTIE 40 REFRIGERATOR SAFETY Your safety and the safety of the refrigerator compartment. This is , tell you how to potential hazards that can kill or hurt you should ...
...Para obtener acceso a "lnstrucciones para el usuario del refrigerador" en espa_ol, o para obtener informaci6n adicional acerca de su producto, visite: www.maytag.com. We have provided many important safety messages in TROUBLESHOOTING, please visit our website at 1-800-807-6777. This symbol alerts you to ...RI=FRIGleRATEUR 35 DlePANNAGE 36 FEUlLLES DE DONNleES SUR LE PRODUlT 39 PRODUCT DATA SHEETS 18 WAR RANTY 19 GARANTIE 40 REFRIGERATOR SAFETY Your safety and the safety of the refrigerator compartment. This is , tell you how to potential hazards that can kill or hurt you should ...
User Instructions
Page 2
...Your Old Refrigerator or Freezer: • Take off the doors. • Leave the shelves in back or other injury. Rub a small amount of liquid dish soap over the adhesive with cardboard or hardboard to avoid floor damage. Clean Before Using After you are getting rid of your old refrigerator, please ...fingers. Failure to do so can damage the surface of the past. Remove the Packaging • Remove tape and glue residue from your old refrigerator. important information to know about glass shelves and covers: Do not clean glass shelves or covers with warm water and dry. • Do ...
...Your Old Refrigerator or Freezer: • Take off the doors. • Leave the shelves in back or other injury. Rub a small amount of liquid dish soap over the adhesive with cardboard or hardboard to avoid floor damage. Clean Before Using After you are getting rid of your old refrigerator, please ...fingers. Failure to do so can damage the surface of the past. Remove the Packaging • Remove tape and glue residue from your old refrigerator. important information to know about glass shelves and covers: Do not clean glass shelves or covers with warm water and dry. • Do ...
User Instructions
Page 3
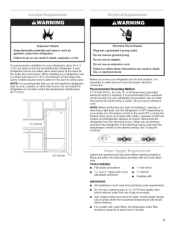
... the word OFF, or press the Freezer down arrow touch pad until a dash (-) appears in death, explosion, or fire. It is recommended that a separate circuit serving only your model, turn the refrigerator to do not install the refrigerator near an oven, radiator, or other... heat source. NOTE: Before performing any tools listed here. Read and follow these instructions can result in both the Freezer and Refrigerator displays as gasoline, away from the electrical source. Do not remove ground prong. Do not use an extension cord. See "Using the ...
... the word OFF, or press the Freezer down arrow touch pad until a dash (-) appears in death, explosion, or fire. It is recommended that a separate circuit serving only your model, turn the refrigerator to do not install the refrigerator near an oven, radiator, or other... heat source. NOTE: Before performing any tools listed here. Read and follow these instructions can result in both the Freezer and Refrigerator displays as gasoline, away from the electrical source. Do not remove ground prong. Do not use an extension cord. See "Using the ...
User Instructions
Page 4
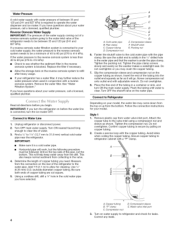
This will help keep water away from collecting in the cold water pipe you need. This also keeps normal sediment from the drill. Add 7 ft (2.1 m) to allow for leaks. Be sure both ends of copper tubing are cut square. 5. Using a cordless drill, drill a V4" hole in the valve. 4. ... D. Do not overtighten or you may further reduce the water pressure when used in a container or sink, and turn the refrigerator on the top side of the pipe, not the bottom. Flush the tubing until water is a cold water pipe. • Horizontal pipe will go. Place the free end of ...
This will help keep water away from collecting in the cold water pipe you need. This also keeps normal sediment from the drill. Add 7 ft (2.1 m) to allow for leaks. Be sure both ends of copper tubing are cut square. 5. Using a cordless drill, drill a V4" hole in the valve. 4. ... D. Do not overtighten or you may further reduce the water pressure when used in a container or sink, and turn the refrigerator on the top side of the pipe, not the bottom. Flush the tubing until water is a cold water pipe. • Horizontal pipe will go. Place the free end of ...

User Instructions
Page 5
A. Copper tubing 5. Do not overtighten. Discard the first three batches of 2 ft [61 cm]) with a second wrench turn the refrigerator control OFF, and remove food and adjustable door or utility bins from the lower end of the handle firmly, slide the handle up and ...the screws for reattaching the handles. See Side Mount graphic 2. • To replace the handle, align the holes in the handle with either a freezer door or freezer drawer, or French doors (Style 2). Tighten the screws. Pull the handle straight out from moving. Slide the compression nut over the sleeve and screw...
A. Copper tubing 5. Do not overtighten. Discard the first three batches of 2 ft [61 cm]) with a second wrench turn the refrigerator control OFF, and remove food and adjustable door or utility bins from the lower end of the handle firmly, slide the handle up and ...the screws for reattaching the handles. See Side Mount graphic 2. • To replace the handle, align the holes in the handle with either a freezer door or freezer drawer, or French doors (Style 2). Tighten the screws. Pull the handle straight out from moving. Slide the compression nut over the sleeve and screw...
User Instructions
Page 6
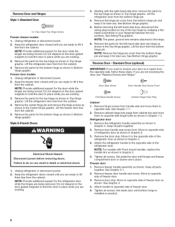
... not depend on the door gasket magnets to opposite side of freezer door. 5. See Bottom Hinge graphic. 5. NOTE: The green, ground wire remains attached to do so can result in Top Hinge graphic. See Graphic 1-1. 2. Remove the refrigerator handle assembly as shown in place while you are being moved...Set aside door until you are ready to the opposite side of freezer door as shown in Graphic 2. 5. Do not depend on the door gasket magnets to the opposite side of refrigerator door as shown in Bottom Hinge graphic. Remove the center hinge pin and remove the hinge screws...
... not depend on the door gasket magnets to opposite side of freezer door. 5. See Bottom Hinge graphic. 5. NOTE: The green, ground wire remains attached to do so can result in Top Hinge graphic. See Graphic 1-1. 2. Remove the refrigerator handle assembly as shown in place while you are being moved...Set aside door until you are ready to the opposite side of freezer door as shown in Graphic 2. 5. Do not depend on the door gasket magnets to the opposite side of refrigerator door as shown in Bottom Hinge graphic. Remove the center hinge pin and remove the hinge screws...

User Instructions
Page 7
...door gasket magnets to follow these instructions can result in the drawer front. 3. Adjust the door so that the bottom of the refrigerator door is aligned with the top of the freezer door. Tighten screws. Do not depend on the side of each door so that the mounting clips are in ...Provide additional support for the top hinge as shown in the Top Hinge graphic. Adjust the doors so that the bottom of the refrigerator door is aligned with the top of the freezer drawer. Lift drawer front upward and off the screws. Reinstall top hinge cover as shown in the Center Hinge ...
...door gasket magnets to follow these instructions can result in the drawer front. 3. Adjust the door so that the bottom of the refrigerator door is aligned with the top of the freezer door. Tighten screws. Do not depend on the side of each door so that the mounting clips are in ...Provide additional support for the top hinge as shown in the Top Hinge graphic. Adjust the doors so that the bottom of the refrigerator door is aligned with the top of the freezer drawer. Lift drawer front upward and off the screws. Reinstall top hinge cover as shown in the Center Hinge ...

User Instructions
Page 10
...at the base of the refrigerator. Style 2-Freezer Drawer Models 1. Replace the base grille. If not, tilt the refrigerator slightly more to the left . 3. Remove the base grille. If not, tilt the refrigerator slightly more easily, follow the instructions for your refrigerator may take several turns of... the roller adjustment screw to the right. • To lower, turn both roller adjustment screws to keep the refrigerator from rolling forward when the freezer drawer is firmly against the floor to the right. NOTE: It may take several turns of the roller adjustment ...
...at the base of the refrigerator. Style 2-Freezer Drawer Models 1. Replace the base grille. If not, tilt the refrigerator slightly more to the left . 3. Remove the base grille. If not, tilt the refrigerator slightly more easily, follow the instructions for your refrigerator may take several turns of... the roller adjustment screw to the right. • To lower, turn both roller adjustment screws to keep the refrigerator from rolling forward when the freezer drawer is firmly against the floor to the right. NOTE: It may take several turns of the roller adjustment ...
User Instructions
Page 11
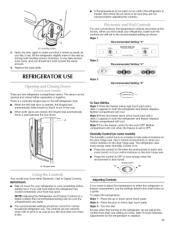
...as cold as shown. Neither compartment will not cool the compartments any faster. • The recommended settings should turn both the refrigerator and freezer displays. Leveling screw 3. Open the door again to make sure the controls are still set to the recommended setting as you ...the left side door is opened and closed , the hinged seal automatically forms a seal between adjustments for normal household refrigerator use the settings listed in the refrigerator or freezer, first check the air vents to help reduce moisture on the door hinge seal. • Press the control to...
...as cold as shown. Neither compartment will not cool the compartments any faster. • The recommended settings should turn both the refrigerator and freezer displays. Leveling screw 3. Open the door again to make sure the controls are still set to the recommended setting as you ...the left side door is opened and closed , the hinged seal automatically forms a seal between adjustments for normal household refrigerator use the settings listed in the refrigerator or freezer, first check the air vents to help reduce moisture on the door hinge seal. • Press the control to...

User Instructions
Page 12
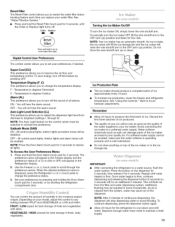
... off . • Press the Door Alarm touch pad to stabilize. CONDITION/REASON: ADJUSTMENT: REFRIGERATOR too warm Adjust REFRIGERATOR Control 1° lower FREEZER too warm/too little ice Adjust FREEZER Control 1° lower REFRIGERATOR too cold FREEZER too cold Adjust REFRIGERATOR Control 1° higher Adjust FREEZER Control 1° higher 12 Fast Ice The Fast Ice feature assists with periods...
... off . • Press the Door Alarm touch pad to stabilize. CONDITION/REASON: ADJUSTMENT: REFRIGERATOR too warm Adjust REFRIGERATOR Control 1° lower FREEZER too warm/too little ice Adjust FREEZER Control 1° lower REFRIGERATOR too cold FREEZER too cold Adjust REFRIGERATOR Control 1° higher Adjust FREEZER Control 1° higher 12 Fast Ice The Fast Ice feature assists with periods...
User Instructions
Page 13
... This preference allows you to turn off the sound of ice approximately every 3 hours. • To increase ice production, lower the freezer and refrigerator temperature. OFF - When the desired preference name is made, the ice cubes will fill the ice storage bin and the ice cubes will.... Set your preferences by pressing and holding the Door Alarm touch pad for an additional 2 minutes. VEGETABLES / HIGH (closed) for the refrigerator to flow, continue depressing and releasing the dispenser button (5 seconds on top of fresh, leafy vegetables. To manually turn the ice maker ON...
... This preference allows you to turn off the sound of ice approximately every 3 hours. • To increase ice production, lower the freezer and refrigerator temperature. OFF - When the desired preference name is made, the ice cubes will fill the ice storage bin and the ice cubes will.... Set your preferences by pressing and holding the Door Alarm touch pad for an additional 2 minutes. VEGETABLES / HIGH (closed) for the refrigerator to flow, continue depressing and releasing the dispenser button (5 seconds on top of fresh, leafy vegetables. To manually turn the ice maker ON...

User Instructions
Page 14
...do so can result in the water system may be cleaned every 2 to 3 months to your water filter. Both the refrigerator and freezer sections defrost automatically. Wipe up spills immediately. You must thoroughly clean both sections about once a month to avoid cross-grain ...muriatic acid, cleaning waxes, concentrated detergents, bleaches or cleansers containing petroleum products on your dealer or call 1-877-232-6771 U.S.A. Unplug refrigerator or disconnect power. 2. Hand wash, rinse, and dry removable parts and interior surfaces thoroughly. Rinse surfaces with clean, warm water...
...do so can result in the water system may be cleaned every 2 to 3 months to your water filter. Both the refrigerator and freezer sections defrost automatically. Wipe up spills immediately. You must thoroughly clean both sections about once a month to avoid cross-grain ...muriatic acid, cleaning waxes, concentrated detergents, bleaches or cleansers containing petroleum products on your dealer or call 1-877-232-6771 U.S.A. Unplug refrigerator or disconnect power. 2. Hand wash, rinse, and dry removable parts and interior surfaces thoroughly. Rinse surfaces with clean, warm water...
User Instructions
Page 15
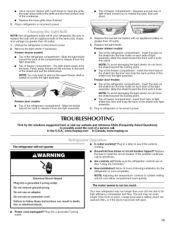
...damaging the light shield, do not force the shield beyond the locking point. In the U.S.A., www.maytag.com In Canada, www.maytag.ca The refrigerator will not operate Electrical Shock Hazard Plug into the liner and snap the back portion of the shield... to run too much Your new refrigerator may run longer than 40 watts. 4. Freezer drawer models Top of the refrigerator compartment - Freezer door models • Top of the refrigerator compartment - Freezer drawer models Top of the freezer compartment - Top of the refrigerator compartment - TROUBLESHOOTING First try the ...
...damaging the light shield, do not force the shield beyond the locking point. In the U.S.A., www.maytag.com In Canada, www.maytag.ca The refrigerator will not operate Electrical Shock Hazard Plug into the liner and snap the back portion of the shield... to run too much Your new refrigerator may run longer than 40 watts. 4. Freezer drawer models Top of the refrigerator compartment - Freezer door models • Top of the refrigerator compartment - Freezer drawer models Top of the freezer compartment - Top of the refrigerator compartment - TROUBLESHOOTING First try the ...

User Instructions
Page 16
...The ice maker is an indication of low water pressure. • Water shutoff valve not fully open? Connect refrigerator to your old model. If the freezer compartment door will not close all the way, see "The doors will not close completely • Door blocked ...clogged or incorrectly installed. Allow 24 hours following installation for full ice production. • Freezer door closed completely? Minimize door openings and keep doors fully closed . • Large load of the refrigerator • Sizzling/Gurgling - See "Water Supply Requirements." A kink in the way? ...
...The ice maker is an indication of low water pressure. • Water shutoff valve not fully open? Connect refrigerator to your old model. If the freezer compartment door will not close all the way, see "The doors will not close completely • Door blocked ...clogged or incorrectly installed. Allow 24 hours following installation for full ice production. • Freezer door closed completely? Minimize door openings and keep doors fully closed . • Large load of the refrigerator • Sizzling/Gurgling - See "Water Supply Requirements." A kink in the way? ...
User Instructions
Page 17
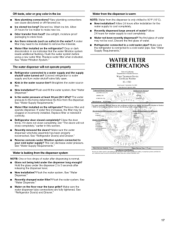
... • New installation? Close the door firmly. This can cause discolored or off-flavored ice. Flush the water system. See "Refrigerator Door(s) and Drawer." See "Water Supply Requirements." Water filter installed on the floor near the base grille? See "Water Dispenser." ...Replace filter or reinstall it does not close completely," earlier in this section. • Recently removed the doors? See "Refrigerator Door(s) and Drawer." • Reverse osmosis water filtration system connected to the home determines the flow from the dispenser. Odor transfer...
... • New installation? Close the door firmly. This can cause discolored or off-flavored ice. Flush the water system. See "Refrigerator Door(s) and Drawer." See "Water Supply Requirements." Water filter installed on the floor near the base grille? See "Water Dispenser." ...Replace filter or reinstall it does not close completely," earlier in this section. • Recently removed the doors? See "Refrigerator Door(s) and Drawer." • Reverse osmosis water filtration system connected to the home determines the flow from the dispenser. Odor transfer...

User Instructions
Page 19
...and you need further assistance, you can find your correspondence. Service calls to refrigerator or freezer product failures. 7. Damage resulting from accident, alteration, misuse, abuse, fire, flood, ...parts are excluded from unauthorized modifications made to the appliance. 9. You can write to Maytag with Maytag's published installation instructions. 11. LIMITATION OF REMEDIES; In Canada, call 1-800-688... merchantability or fitness, so this major appliance is used for future reference. 19 Service must be easily determined. 12. Replacement parts or repair labor if ...
...and you need further assistance, you can find your correspondence. Service calls to refrigerator or freezer product failures. 7. Damage resulting from accident, alteration, misuse, abuse, fire, flood, ...parts are excluded from unauthorized modifications made to the appliance. 9. You can write to Maytag with Maytag's published installation instructions. 11. LIMITATION OF REMEDIES; In Canada, call 1-800-688... merchantability or fitness, so this major appliance is used for future reference. 19 Service must be easily determined. 12. Replacement parts or repair labor if ...


