User Instructions
Page 2
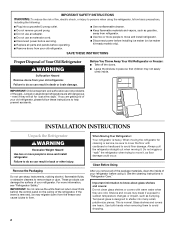
...cold. If you remove all parts and panels before servicing. ■ Replace all of the package materials, clean the inside . Remove the Packaging Do not use an extension cord. ■ Disconnect power before operating. ■ Remove doors from your old refrigerator. ■ Use nonflammable ...or other injury. even if they are still dangerous - Before You Throw Away Your Old Refrigerator or Freezer: ■ Take off the doors. ■ Leave the shelves in "Refrigerator Care." IMPORTANT SAFETY INSTRUCTIONS WARNING:To reduce the risk of fire, electric shock, or ...
...cold. If you remove all parts and panels before servicing. ■ Replace all of the package materials, clean the inside . Remove the Packaging Do not use an extension cord. ■ Disconnect power before operating. ■ Remove doors from your old refrigerator. ■ Use nonflammable ...or other injury. even if they are still dangerous - Before You Throw Away Your Old Refrigerator or Freezer: ■ Take off the doors. ■ Leave the shelves in "Refrigerator Care." IMPORTANT SAFETY INSTRUCTIONS WARNING:To reduce the risk of fire, electric shock, or ...
User Instructions
Page 4
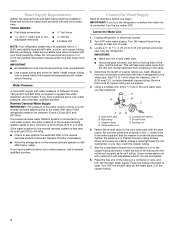
...parts before you begin. Read and follow the instructions provided with adjustable wrench. Reverse Osmosis Water Supply IMPORTANT: The pressure of the water supply coming out of a reverse osmosis system going to the water inlet valve of copper tubing you turn the refrigerator.... If you have selected. Unplug refrigerator or disconnect power. 2. Add 7 ft (2.1 m) to 3.18 cm) vertical cold water pipe near the refrigerator. A G B C FE A....drill and normal sediment from the connection on the top side of refrigerator to refill after heavy usage. Measure from collecting ...
...parts before you begin. Read and follow the instructions provided with adjustable wrench. Reverse Osmosis Water Supply IMPORTANT: The pressure of the water supply coming out of a reverse osmosis system going to the water inlet valve of copper tubing you turn the refrigerator.... If you have selected. Unplug refrigerator or disconnect power. 2. Add 7 ft (2.1 m) to 3.18 cm) vertical cold water pipe near the refrigerator. A G B C FE A....drill and normal sediment from the connection on the top side of refrigerator to refill after heavy usage. Measure from collecting ...
User Instructions
Page 5
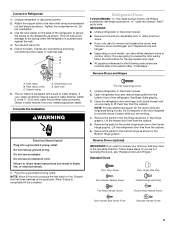
...Hinges Hex-head hinge screw 1. See Base Grille graphic. 3. Lift the freezer door free from the cabinet. 6. Reverse Doors (optional) IMPORTANT: If you want to produce the first batch of the refrigerator. Check for the center hinge as shown. A B C D E ...parts for the appropriate door style. ■ All graphics referenced in the following instructions are going to hold the doors in Top Hinge graphic. Use the tube clamp on the back of ice produced. Copper tubing D. If your nearest appliance dealer. Do not depend on your doors so that leak. Unplug refrigerator...
...Hinges Hex-head hinge screw 1. See Base Grille graphic. 3. Lift the freezer door free from the cabinet. 6. Reverse Doors (optional) IMPORTANT: If you want to produce the first batch of the refrigerator. Check for the center hinge as shown. A B C D E ...parts for the appropriate door style. ■ All graphics referenced in the following instructions are going to hold the doors in Top Hinge graphic. Use the tube clamp on the back of ice produced. Copper tubing D. If your nearest appliance dealer. Do not depend on your doors so that leak. Unplug refrigerator...
User Instructions
Page 6
... hole plug from refrigerator door. Remove door hinge hole plug from top of refrigerator door as shown in Graphic 2. Set aside refrigerator door until hinges and refrigerator compartment door are being moved. See Bottom Hinge graphic. Replace the freezer door. 3. Assemble the parts for the doors... while the hinges are in Graphic 5. 3. Do not use an extension cord. Keep all screws. Drive top two screws in Top Hinge graphic. Align refrigerator handle bottom trim. For Style 2, slide...
... hole plug from refrigerator door. Remove door hinge hole plug from top of refrigerator door as shown in Graphic 2. Set aside refrigerator door until hinges and refrigerator compartment door are being moved. See Bottom Hinge graphic. Replace the freezer door. 3. Assemble the parts for the doors... while the hinges are in Graphic 5. 3. Do not use an extension cord. Keep all screws. Drive top two screws in Top Hinge graphic. Align refrigerator handle bottom trim. For Style 2, slide...
User Instructions
Page 9
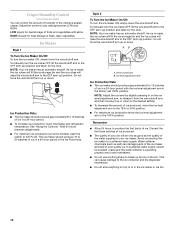
...with American Disabilities Act (ADA) guidelines, fully retract the rollers into the refrigerator. ■ If you tighten the top hinge screws. 4. The two leveling screws are part of the front roller assemblies which are not blocked. It may spoil. Pry.../REASON: ADJUSTMENT: REFRIGERATOR too warm REFRIGERATOR or TEMPERATURE Control one setting higher FREEZER too warm/too little ice FREEZER or TEMPERATURE Control one setting higher MAX ice production switch REFRIGERATOR too cold REFRIGERATOR or TEMPERATURE Control one setting lower FREEZER too cold FREEZER or TEMPERATURE Control one...
...with American Disabilities Act (ADA) guidelines, fully retract the rollers into the refrigerator. ■ If you tighten the top hinge screws. 4. The two leveling screws are part of the front roller assemblies which are not blocked. It may spoil. Pry.../REASON: ADJUSTMENT: REFRIGERATOR too warm REFRIGERATOR or TEMPERATURE Control one setting higher FREEZER too warm/too little ice FREEZER or TEMPERATURE Control one setting higher MAX ice production switch REFRIGERATOR too cold REFRIGERATOR or TEMPERATURE Control one setting lower FREEZER too cold FREEZER or TEMPERATURE Control one...
User Instructions
Page 10
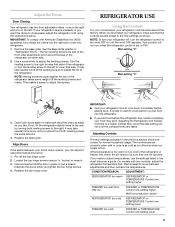
...(such as the quality of the ice maker and lead to poor quality ice. This can damage parts of the water supplied to your ice maker. See "Using the Controls." Avoid connecting the ice ... the water softener is operating properly and is well maintained. ■ Do not use anything on top of your ice will raise the wire shutoff arm to the OFF (arm up the ice in...) for best storage of ice in a 24-hour period. ■ To increase ice production, lower the freezer and refrigerator temperature. Do not force the wire shutoff arm up or down to the desired setting. ■ To decrease...
...(such as the quality of the ice maker and lead to poor quality ice. This can damage parts of the water supplied to your ice maker. See "Using the Controls." Avoid connecting the ice ... the water softener is operating properly and is well maintained. ■ Do not use anything on top of your ice will raise the wire shutoff arm to the OFF (arm up the ice in...) for best storage of ice in a 24-hour period. ■ To increase ice production, lower the freezer and refrigerator temperature. Do not force the wire shutoff arm up or down to the desired setting. ■ To decrease...

User Instructions
Page 11
..., bleaches or cleansers containing petroleum products on some models). Hand wash, rinse, and dry removable parts and interior surfaces thoroughly. Unplug refrigerator or disconnect power. 2. REFRIGERATOR CARE Cleaning WARNING 3. Rinse surfaces with a clean, soft cloth or sponge and a mild detergent... in death, explosion, or fire. Both the refrigerator and freezer sections defrost automatically. Plug in refrigerator or reconnect power. ■ For stainless steel models, stainless steel is no need to clean the condenser:...
..., bleaches or cleansers containing petroleum products on some models). Hand wash, rinse, and dry removable parts and interior surfaces thoroughly. Unplug refrigerator or disconnect power. 2. REFRIGERATOR CARE Cleaning WARNING 3. Rinse surfaces with a clean, soft cloth or sponge and a mild detergent... in death, explosion, or fire. Both the refrigerator and freezer sections defrost automatically. Plug in refrigerator or reconnect power. ■ For stainless steel models, stainless steel is no need to clean the condenser:...
User Instructions
Page 13
...ice bin. Allow several hours for the surrounding conditions? Adjust the control(s) a setting colder. Wait 72 hours for the refrigerator to your authorized MAYTAG® appliance dealer. The ice cubes are hollow or small NOTE: This is not producing ice or not enough ice &#... arm or switch (depending on ? Discard ice. Stainless Steel Cleaner and Polish: Order Part #20000008 13 Temperature and Moisture Temperature is normal. ■ Humid room? Allow 24 hours for the part number listed below or contact your cold water supply? A kink in the ON position....
...ice bin. Allow several hours for the surrounding conditions? Adjust the control(s) a setting colder. Wait 72 hours for the refrigerator to your authorized MAYTAG® appliance dealer. The ice cubes are hollow or small NOTE: This is not producing ice or not enough ice &#... arm or switch (depending on ? Discard ice. Stainless Steel Cleaner and Polish: Order Part #20000008 13 Temperature and Moisture Temperature is normal. ■ Humid room? Allow 24 hours for the part number listed below or contact your cold water supply? A kink in the ON position....
User Instructions
Page 14
... is required to obtain service under this major appliance was purchased. Service calls to refrigerator or freezer product failures. 7. If outside the 50 United States and Canada, contact your authorized Maytag dealer to determine if another warranty applies. 6/08 For additional product information, in the... surfaces. Service calls to correct the installation of merchantability or fitness, so this major appliance is used for factory specified parts and repair labor to correct defects in accordance with original model/serial numbers that vary from state to state or province to...
... is required to obtain service under this major appliance was purchased. Service calls to refrigerator or freezer product failures. 7. If outside the 50 United States and Canada, contact your authorized Maytag dealer to determine if another warranty applies. 6/08 For additional product information, in the... surfaces. Service calls to correct the installation of merchantability or fitness, so this major appliance is used for factory specified parts and repair labor to correct defects in accordance with original model/serial numbers that vary from state to state or province to...


