Owners Manual
Page 2
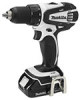
... instructions) SPECIFICATIONS Model LXFD01 Steel 13 mm (1/2") Capacities Wood Wood screw 38 mm (1-1/2") 10 mm x 89 mm (3/8" X 3-1/2") Machine screw M6 (1/4") No load speed (RPM) High (2) Low (1) 0 - 1,500/min. 0 - 400/min. Use personal protective equipment.
... instructions) SPECIFICATIONS Model LXFD01 Steel 13 mm (1/2") Capacities Wood Wood screw 38 mm (1-1/2") 10 mm x 89 mm (3/8" X 3-1/2") Machine screw M6 (1/4") No load speed (RPM) High (2) Low (1) 0 - 1,500/min. 0 - 400/min. Use personal protective equipment.
Owners Manual
Page 5
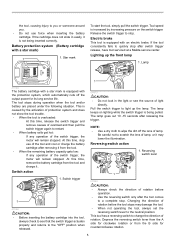
...the "OFF" position when released. 011373 CAUTION: • Do not look in easily, it from the tool. • When the remaining battery capacity gets low: If any operation of lamp, or it . Star mark To start the tool, simply pull the switch trigger. If the tool consistently fails to a ...of the switch trigger, the motor will remain stopped. The lamp goes out 10 -15 seconds after switch trigger release, have tool serviced at a Makita service center. Be careful not to scratch the lens of the switch trigger, the motor will remain stopped. Depress the reversing switch lever from the...
...the "OFF" position when released. 011373 CAUTION: • Do not look in easily, it from the tool. • When the remaining battery capacity gets low: If any operation of lamp, or it . Star mark To start the tool, simply pull the switch trigger. If the tool consistently fails to a ...of the switch trigger, the motor will remain stopped. The lamp goes out 10 -15 seconds after switch trigger release, have tool serviced at a Makita service center. Be careful not to scratch the lens of the switch trigger, the motor will remain stopped. Depress the reversing switch lever from the...
Owners Manual
Page 6
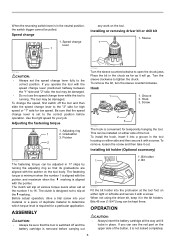
... red part on the tool body. The clutch is designed not to slip at the number 1 to the "2" side for high speed or "1" side for low speed. Use the right speed for your material or a piece of the tool. Hook 3. To remove, loosen the screw and then take it in the...
... red part on the tool body. The clutch is designed not to slip at the number 1 to the "2" side for high speed or "1" side for low speed. Use the right speed for your material or a piece of the tool. Hook 3. To remove, loosen the screw and then take it in the...
