User Manual
Page 4
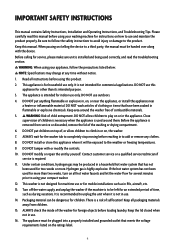
... DO NOT tamper with the device. If the hot water system has not been used correctly, and read this manual before loading laundry. Packaging material can be left for instructions on , or near the appliance, or install the appliance near a heater .... 11. The appliance must be plugged into a properly installed and grounded outlet that meets the voltage requirements listed on , the washer. 7. IMPORTANT SAFETY INSTRUCTIONS This manual contains Safety Instructions, Installation and Operating Instructions, and Troubleshooting Tips. Read all instructions before reaching in...
... DO NOT tamper with the device. If the hot water system has not been used correctly, and read this manual before loading laundry. Packaging material can be left for instructions on , or near the appliance, or install the appliance near a heater .... 11. The appliance must be plugged into a properly installed and grounded outlet that meets the voltage requirements listed on , the washer. 7. IMPORTANT SAFETY INSTRUCTIONS This manual contains Safety Instructions, Installation and Operating Instructions, and Troubleshooting Tips. Read all instructions before reaching in...
User Manual
Page 5
... the water hoses to protect against shock hazards. It is flooded, cut the power immediately and contact your hand or other objects under the washer. 31. DO NOT insert your nearest service center. 27. To reduce the risk of electric shock or fire, DO NOT use in direct...any appliance that has a damaged cord or plug, if it can get wet. DO NOT install the washing machine in proper working order. The loading door must be properly installed in accordance with the installation instructions before it is equipped with wet hands. 32. Allow unit to stop completely. ...
... the water hoses to protect against shock hazards. It is flooded, cut the power immediately and contact your hand or other objects under the washer. 31. DO NOT insert your nearest service center. 27. To reduce the risk of electric shock or fire, DO NOT use in direct...any appliance that has a damaged cord or plug, if it can get wet. DO NOT install the washing machine in proper working order. The loading door must be properly installed in accordance with the installation instructions before it is equipped with wet hands. 32. Allow unit to stop completely. ...
User Manual
Page 10
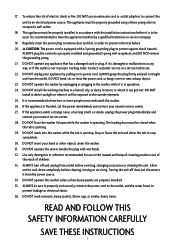
... HOT water supply intake hole. WARNING: Confirm that the water supply hoses are twisted or bent, the hoses can only connect to turn on the washer. 4. If the hoses are not twisted or bent. If you must be a positioned in . (100cm). NOTE: The connection between the drain hose and sink, ... water supply hoses to easily accept the drain hose. In a standpipe: The standpipe must be no longer than 39 in three ways. Plug in . (100cm). Load about 5 lbs. The washer should not rock or vibrate excessively when water is being supplied or drained, check the water connections.
... HOT water supply intake hole. WARNING: Confirm that the water supply hoses are twisted or bent, the hoses can only connect to turn on the washer. 4. If the hoses are not twisted or bent. If you must be a positioned in . (100cm). NOTE: The connection between the drain hose and sink, ... water supply hoses to easily accept the drain hose. In a standpipe: The standpipe must be no longer than 39 in three ways. Plug in . (100cm). Load about 5 lbs. The washer should not rock or vibrate excessively when water is being supplied or drained, check the water connections.
User Manual
Page 11
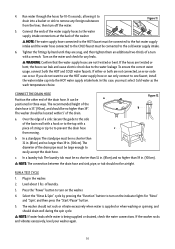
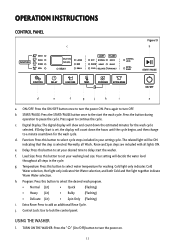
...water level throughout all lights ON. g. Control Lock: Use to turn the power on. 11 Function: Press this button to set your washing load size. Temperature: Press this button to select the desired wash program. • Normal (Lit) • Quick Flashing) • Heavy (Lit.../PAUSE button once to select water temperature for washing. Press again to turn the power ON. Load Size: Press this button to the start the washer. Press again to continue the cycle. Press the button during operation to add an additional Rinse Cycle...
...water level throughout all lights ON. g. Control Lock: Use to turn the power on. 11 Function: Press this button to set your washing load size. Temperature: Press this button to select the desired wash program. • Normal (Lit) • Quick Flashing) • Heavy (Lit.../PAUSE button once to select water temperature for washing. Press again to turn the power ON. Load Size: Press this button to the start the washer. Press again to continue the cycle. Press the button during operation to add an additional Rinse Cycle...
User Manual
Page 12
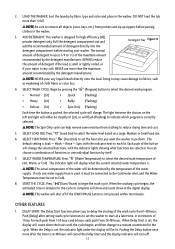
... Tray Figure 14 NOTE: NEVER pour any liquid bleach directly onto the load. The normal amount of detergent to use more than the maximum amount recommended by fabric type and color and place in the washer. 3. NEVER use is set to select the water level based on ... temperature of functions or one water supply hose is Soak - The light between the choices on a Large, Medium or Small load size. 6. Spin, with the indicator lights showing what the current selected water temperature is currently selected. LOAD THE WASHER: Sort the laundry by the detergent manufacturer. Wash -
... Tray Figure 14 NOTE: NEVER pour any liquid bleach directly onto the load. The normal amount of detergent to use more than the maximum amount recommended by fabric type and color and place in the washer. 3. NEVER use is set to select the water level based on ... temperature of functions or one water supply hose is Soak - The light between the choices on a Large, Medium or Small load size. 6. Spin, with the indicator lights showing what the current selected water temperature is currently selected. LOAD THE WASHER: Sort the laundry by the detergent manufacturer. Wash -
User Manual
Page 13
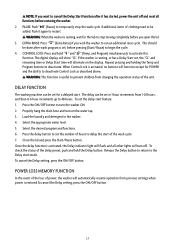
...wash cycle. 7. Select the appropriate water level. 5. Press the delay button to set in 1 hour increments from 1-24 hours, and then in the washer. 4. CONTROL LOCK: Press and hold the Delay button. DELAY FUNCTION The washing machine can be set , before pressing (Start/Pause) to begin the...reset all other lights will automatically resume operation from changing the operation status of the delay preset, push and hold " " and " " (Temp. Load the laundry and detergent in 6 hour increments up to 48 hours. EXTRA RINSE: Press " " (Extra Rinse) if you want to cancel the Delay...
...wash cycle. 7. Select the appropriate water level. 5. Press the delay button to set in 1 hour increments from 1-24 hours, and then in the washer. 4. CONTROL LOCK: Press and hold the Delay button. DELAY FUNCTION The washing machine can be set , before pressing (Start/Pause) to begin the...reset all other lights will automatically resume operation from changing the operation status of the delay preset, push and hold " " and " " (Temp. Load the laundry and detergent in 6 hour increments up to 48 hours. EXTRA RINSE: Press " " (Extra Rinse) if you want to cancel the Delay...
User Manual
Page 16
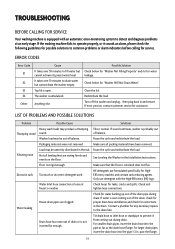
... FOR SERVICE Your washing machine is equipped with the High-Efficiency (HE) logo. Check below for "Washer Not Filling Properly" and/or for water leakage. Redistribute the load. Packaging materials were not removed. Not all packing materials have been removed. Floor not rigid enough. ...For smaller drain pipes, insert the drain hose into the pipe 1-2 in. Washer load may produce a thumping Thumping sound sound. This is open . Make sure all leveling feet are formulated specifically for "Washer Will Not Drain Water". Make sure that the floor is unbalanced. Only use...
... FOR SERVICE Your washing machine is equipped with the High-Efficiency (HE) logo. Check below for "Washer Not Filling Properly" and/or for water leakage. Redistribute the load. Packaging materials were not removed. Not all packing materials have been removed. Floor not rigid enough. ...For smaller drain pipes, insert the drain hose into the pipe 1-2 in. Washer load may produce a thumping Thumping sound sound. This is open . Make sure all leveling feet are formulated specifically for "Washer Will Not Drain Water". Make sure that the floor is unbalanced. Only use...
User Manual
Page 17
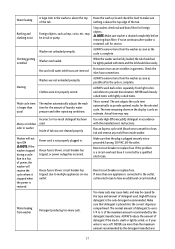
... to have it stopped when the power is very soft. While the washer can set wrinkles in tub or pump. Staining Washer was not cleaned properly. Clothes were not properly sorted. Actual time may be fully loaded, the tub should close easily. Use only High-Efficiency (HE) detergent... cycle. Rattling and clanking noise Foreign objects, such as possible after washer is only an estimate. Clothing getting wrinkled Washer overloaded. Hot water rinse can be caused by the type and amount of detergent if the load is small or lightly soiled, or if your water is restored....
... to have it stopped when the power is very soft. While the washer can set wrinkles in tub or pump. Staining Washer was not cleaned properly. Clothes were not properly sorted. Actual time may be fully loaded, the tub should close easily. Use only High-Efficiency (HE) detergent... cycle. Rattling and clanking noise Foreign objects, such as possible after washer is only an estimate. Clothing getting wrinkled Washer overloaded. Hot water rinse can be caused by the type and amount of detergent if the load is small or lightly soiled, or if your water is restored....
User Manual
Page 19
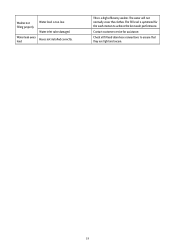
This is too low. The water will not normally cover the clothes. The fill level is optimized for assistance. Contact customer service for the wash motion to ensure that they are tight and secure. 19 Washer not filling properly Water level is a high efficiency washer. Water inlet valve damaged. Check all fill and drain hose connections to achieve the best wash performance. Water leak every load Hoses not installed correctly.
This is too low. The water will not normally cover the clothes. The fill level is optimized for assistance. Contact customer service for the wash motion to ensure that they are tight and secure. 19 Washer not filling properly Water level is a high efficiency washer. Water inlet valve damaged. Check all fill and drain hose connections to achieve the best wash performance. Water leak every load Hoses not installed correctly.


