User Manual (English)
Page 5
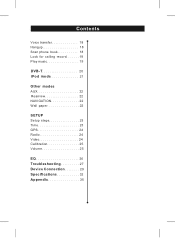
Contents Voice transfer 18 Hangup 18 Scan phone book........... 18 Look for calling record.......19 Play music 19 DVB-T 20 iPod mode 21 Other modes AUX 22 Rearview 22 NAVIGATION 22 Wall paper 22 SETUP Setup steps 23 Time 23 GPS 24 Radio 24 Video 24 Calibration 25 Volume 25 EQ 26 Tr o u b l e s h o o t i n g 2 7 Device Connection........29 Specifications............32 Appendix 35
Contents Voice transfer 18 Hangup 18 Scan phone book........... 18 Look for calling record.......19 Play music 19 DVB-T 20 iPod mode 21 Other modes AUX 22 Rearview 22 NAVIGATION 22 Wall paper 22 SETUP Setup steps 23 Time 23 GPS 24 Radio 24 Video 24 Calibration 25 Volume 25 EQ 26 Tr o u b l e s h o o t i n g 2 7 Device Connection........29 Specifications............32 Appendix 35
User Manual (English)
Page 6
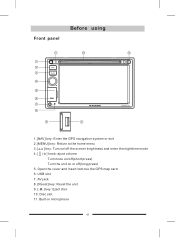
Built-in microphone 01 Open the cover and insert/remove the GPS map card 6. AV jack 8. [Reset] key: Reset the unit 9. [ ] key: Eject disc 10. Front panel Before using M-DVD5561R 8 1.[NAV] key: Enter the GPS navigation system or exit 2.[MENU] key: Return to the home menu 3.[ ] key: Turn on/off the screen brightness and enter the nighttime mode 4.[ / ] knob: ajust volume Turn mute on/off(short press) Turn the unit on or off(long press) 5. Disc slot 11. USB slot 7.
Built-in microphone 01 Open the cover and insert/remove the GPS map card 6. AV jack 8. [Reset] key: Reset the unit 9. [ ] key: Eject disc 10. Front panel Before using M-DVD5561R 8 1.[NAV] key: Enter the GPS navigation system or exit 2.[MENU] key: Return to the home menu 3.[ ] key: Turn on/off the screen brightness and enter the nighttime mode 4.[ / ] knob: ajust volume Turn mute on/off(short press) Turn the unit on or off(long press) 5. Disc slot 11. USB slot 7.
User Manual (English)
Page 7
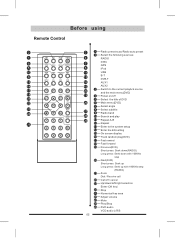
Before using AMS SRC MODE POWER 3 Radio preset scan/Radio auto preset Select the following sources: RADIO DISC TITLE MENU ANGLE SUBTITLE GPS 8 iPod BAND GOTO REPT A-B REPT USB B-T SETUP SEL OSD RDM DVB-T AUX1 AUX2 18 ZOOM PROG 3 Switch to the current playbck source and the main ...
Before using AMS SRC MODE POWER 3 Radio preset scan/Radio auto preset Select the following sources: RADIO DISC TITLE MENU ANGLE SUBTITLE GPS 8 iPod BAND GOTO REPT A-B REPT USB B-T SETUP SEL OSD RDM DVB-T AUX1 AUX2 18 ZOOM PROG 3 Switch to the current playbck source and the main ...
User Manual (English)
Page 27
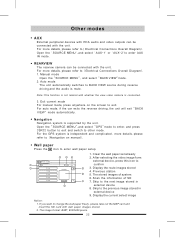
Open the "SOURCE MENU",and select "GPS" mode to enter,and press [SRC] button to exit and switch to enter wall paper setup. For more details,please refer to (Electrical Connections Overall ... unit. Note:This function is not related with whether the view video camera is independent and complicated, more details,please refer to exit. For the GPS system is connected. 3.Exit current mode For manual mode,press anywhere on manual). Wall paper Press the icon to other mode. REARVIEW The reaview camera...
Open the "SOURCE MENU",and select "GPS" mode to enter,and press [SRC] button to exit and switch to enter wall paper setup. For more details,please refer to (Electrical Connections Overall ... unit. Note:This function is not related with whether the view video camera is independent and complicated, more details,please refer to exit. For the GPS system is connected. 3.Exit current mode For manual mode,press anywhere on manual). Wall paper Press the icon to other mode. REARVIEW The reaview camera...
User Manual (English)
Page 28
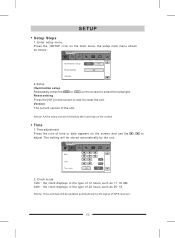
Notice: All the setup can be updated automatically by the signal of 24 hours such as 20:18. SETUP General Ti m e Date GPS Radio Video Calibration Volume 、 to reset the unit. Version The current version of time or date appears on the screen,and use the adjust... to start to Time Time mode 2.Clock mode 12Hr: the clock displays in the type of 12 hours such as below: SETUP General Ti m e GPS Illumination setup Radio Video Calibration Volume Red Blue Reset setting OK Version 2.Setup Illumination setup Repeatedly press the Red or Blue on the screen to...
Notice: All the setup can be updated automatically by the signal of 24 hours such as 20:18. SETUP General Ti m e Date GPS Radio Video Calibration Volume 、 to reset the unit. Version The current version of time or date appears on the screen,and use the adjust... to start to Time Time mode 2.Clock mode 12Hr: the clock displays in the type of 12 hours such as below: SETUP General Ti m e GPS Illumination setup Radio Video Calibration Volume Red Blue Reset setting OK Version 2.Setup Illumination setup Repeatedly press the Red or Blue on the screen to...

User Manual (English)
Page 29
... Normal ON Mirror OFF Brightness:Use the 、 to enter video mode. SETUP GPS After the map card is inserted,press the [GPS]icon on the main source menu to enter radio mode. Shown as below : SETUP General Ti m e GPS Radio Video Calibration Volume Radio setup Europe、China America 1 America 2 Japan Russia...:The default setting is on. 24 Radio Press the [Radio] icon on the main menu. The path is default,shown as below : SETUP General Ti m e GPS Radio Video Calibration OK Volume Notice: The path of the map stored for your reference.To access...
... Normal ON Mirror OFF Brightness:Use the 、 to enter video mode. SETUP GPS After the map card is inserted,press the [GPS]icon on the main source menu to enter radio mode. Shown as below : SETUP General Ti m e GPS Radio Video Calibration Volume Radio setup Europe、China America 1 America 2 Japan Russia...:The default setting is on. 24 Radio Press the [Radio] icon on the main menu. The path is default,shown as below : SETUP General Ti m e GPS Radio Video Calibration OK Volume Notice: The path of the map stored for your reference.To access...
User Manual (English)
Page 30
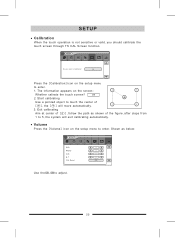
... the touch screen? OK 2.Start calibrating Use a pointed object to touch the center of [ ],the [ ] will exit calibrating automatically. SETUP General Ti m e GPS Radio Video Calibration Volume Do you should calibrate the touch screen through TS CAL Screen function. SETUP Calibration When the touch operation is not sensitive...you want to 5,the system will move automatically. 3.Exit calibrating Aim at center of [ 1 ],follow the path as below: SETUP General Ti m e GPS Radio Video Calibration Volume DVD RADIO AUX B-T VOL Reset OK Use the 、 to adjust. 25
... the touch screen? OK 2.Start calibrating Use a pointed object to touch the center of [ ],the [ ] will exit calibrating automatically. SETUP General Ti m e GPS Radio Video Calibration Volume Do you should calibrate the touch screen through TS CAL Screen function. SETUP Calibration When the touch operation is not sensitive...you want to 5,the system will move automatically. 3.Exit calibrating Aim at center of [ 1 ],follow the path as below: SETUP General Ti m e GPS Radio Video Calibration Volume DVD RADIO AUX B-T VOL Reset OK Use the 、 to adjust. 25

User Manual (English)
Page 40
CAMERA Appendix Overall wiring diagram Notice: connect the AV cable to the AV IN socket on the front panel. 35 YELLOW GREEN BLUE YELLOW CAMERA-VIDEO CAR P R N D 2 L Gearbox Rear R+ Rear RFront R+ Front RFront L+ Front LRear L+ Rear LANT.CONT ILLUME MUTE ACC GND BATTERY(+) AV SYSTEM AUX AV SYSTEM AUX Radio antenna GPS antenna iPod cable DVB-T BOX Optional accessory Amplifier
CAMERA Appendix Overall wiring diagram Notice: connect the AV cable to the AV IN socket on the front panel. 35 YELLOW GREEN BLUE YELLOW CAMERA-VIDEO CAR P R N D 2 L Gearbox Rear R+ Rear RFront R+ Front RFront L+ Front LRear L+ Rear LANT.CONT ILLUME MUTE ACC GND BATTERY(+) AV SYSTEM AUX AV SYSTEM AUX Radio antenna GPS antenna iPod cable DVB-T BOX Optional accessory Amplifier