User Guide
Page 4
... the separation between the equipment and receiver. Notice 2 Shielded interface cables and A.C. VOIR LA NOTICE D'INSTALLATION AVANT DE RACCORDER AU RESEAU. iv Micro-Star International Wind Nettop Series This device complies with the limits for a Class B digital device, pursuant to Part 15 of the FCC Rules. However, there is subject to the...
... the separation between the equipment and receiver. Notice 2 Shielded interface cables and A.C. VOIR LA NOTICE D'INSTALLATION AVANT DE RACCORDER AU RESEAU. iv Micro-Star International Wind Nettop Series This device complies with the limits for a Class B digital device, pursuant to Part 15 of the FCC Rules. However, there is subject to the...
User Guide
Page 9
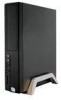
The feature packed platform also gives you an exciting PC experience. 1-1 It is your best slim PC choice. W ith the fantastic appearance and ultra-small form factor, it can easily be set anywhere. Getting Started Chapter 1 Getting Started Congratulations for purchasing the Wind Nettop Series (MS-6645).
The feature packed platform also gives you an exciting PC experience. 1-1 It is your best slim PC choice. W ith the fantastic appearance and ultra-small form factor, it can easily be set anywhere. Getting Started Chapter 1 Getting Started Congratulations for purchasing the Wind Nettop Series (MS-6645).

User Guide
Page 10
Wind Nettop Series Front Panel Standard Type M S-6 645A M S-6645E 1-2
Wind Nettop Series Front Panel Standard Type M S-6 645A M S-6645E 1-2
User Guide
Page 12
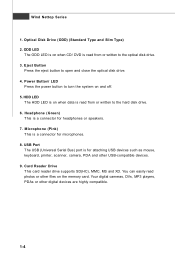
... read from or written to open and close the optical disk drive. 4. Headphone (Green) This is read photos or other digital devices are highly compatible. 1-4 Wind Nettop Series 1. Optical Disk Drive (ODD) (Standard Type and Slim Type) 2.
... read from or written to open and close the optical disk drive. 4. Headphone (Green) This is read photos or other digital devices are highly compatible. 1-4 Wind Nettop Series 1. Optical Disk Drive (ODD) (Standard Type and Slim Type) 2.
User Guide
Page 14
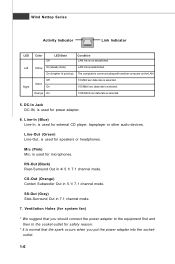
... for power adapter. 6. DC-In Jack DC-IN, is selected. Mic (Pink) Mic, is not established. RS-Out (Black) Rear-Surround Out in 7.1 channel mode. 7. Wind Nettop Series Activity Indicator Link Indicator LED Left Right Color Off LED State Condition LAN link is used for microphones. Line-In (Blue) Line-In, is...
... for power adapter. 6. DC-In Jack DC-IN, is selected. Mic (Pink) Mic, is not established. RS-Out (Black) Rear-Surround Out in 7.1 channel mode. 7. Wind Nettop Series Activity Indicator Link Indicator LED Left Right Color Off LED State Condition LAN link is used for microphones. Line-In (Blue) Line-In, is...
User Guide
Page 15
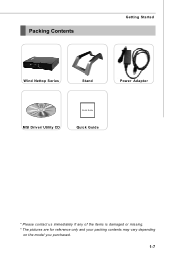
Packing Contents Getting Started Wind Nettop Series Stand Power Adapter MSI Driver/ Utility CD Quick Guide Quick Guide * Please contact us immediately if any of the items is damaged or missing. * The pictures are for reference only and your packing contents may vary depending on the model you purchased. 1-7
Packing Contents Getting Started Wind Nettop Series Stand Power Adapter MSI Driver/ Utility CD Quick Guide Quick Guide * Please contact us immediately if any of the items is damaged or missing. * The pictures are for reference only and your packing contents may vary depending on the model you purchased. 1-7

User Guide
Page 18
Click the audio icon from the system tray at the lower-right corner of the screen to enable the audio driver by clicking the Realtek HD Audio M anager from the Control Panel. It is also available to activate the HD Audio Configuration. Double click 2-2 Wind Nettop Series Software Configuration After installing the audio driver, you are able to use the 2-, 4-, 6- or 8- channel audio feature now.
Click the audio icon from the system tray at the lower-right corner of the screen to enable the audio driver by clicking the Realtek HD Audio M anager from the Control Panel. It is also available to activate the HD Audio Configuration. Double click 2-2 Wind Nettop Series Software Configuration After installing the audio driver, you are able to use the 2-, 4-, 6- or 8- channel audio feature now.
User Guide
Page 20
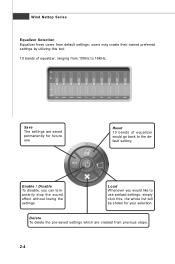
... can temporarily stop the sound effect without losing the settings Load W henever you would like to 16KHz. Save The settings are created from default settings; Wind Nettop Series Equalizer Selection Equalizer frees users from previous steps. 2-4
... can temporarily stop the sound effect without losing the settings Load W henever you would like to 16KHz. Save The settings are created from default settings; Wind Nettop Series Equalizer Selection Equalizer frees users from previous steps. 2-4
User Guide
Page 22
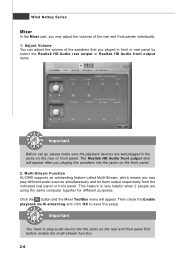
... them output respectively from the indicated real panel or front panel. Adjust Volume You can adjust the volume of the rear and front panels individually. 1. Wind Nettop Series Mixer In the Mixer part, you may adjust the volumes of the speakers that you pluging the speakers into the jacks on the front...
... them output respectively from the indicated real panel or front panel. Adjust Volume You can adjust the volume of the rear and front panels individually. 1. Wind Nettop Series Mixer In the Mixer part, you may adjust the volumes of the speakers that you pluging the speakers into the jacks on the front...

User Guide
Page 24
... sound. Playback control Tool Mute Playback device This function is essential when multistreamingplayback enabled. - Tool - At any given period, you will be displayed. - Advanced controls - Wind Nettop Series 3. Realtek HD Audio Front Output Mute You may choose to mute single or multiple volume controls or to have an audio chat with your...
... sound. Playback control Tool Mute Playback device This function is essential when multistreamingplayback enabled. - Tool - At any given period, you will be displayed. - Advanced controls - Wind Nettop Series 3. Realtek HD Audio Front Output Mute You may choose to mute single or multiple volume controls or to have an audio chat with your...

User Guide
Page 26
Plug the speakers in . - If not correct, Realtek HD Audio Manager will pop up for 7.1-Speaker Output Speaker Configuration: 1. Wind Nettop Series Audio I/O In this tab, you can choose a desired multi-channel operation here. Dialogue "connected device" will guide you to the one that is being ...
Plug the speakers in . - If not correct, Realtek HD Audio Manager will pop up for 7.1-Speaker Output Speaker Configuration: 1. Wind Nettop Series Audio I/O In this tab, you can choose a desired multi-channel operation here. Dialogue "connected device" will guide you to the one that is being ...

User Guide
Page 28
Or you select will light up and make sound, then check whether the cable is inserted firmly to test the sounds of each speaker automatically. Center Front Left Side Left Rear Left Front Right Side Right Sub woof er Rear Right 2-12 The one you may click the auto test button to the connector or replace the bad speakers with good ones. Wind Nettop Series Test Speakers You can select the speaker by clicking it to make testing sound. If any speaker fails to test its functionality.
Or you select will light up and make sound, then check whether the cable is inserted firmly to test the sounds of each speaker automatically. Center Front Left Side Left Rear Left Front Right Side Right Sub woof er Rear Right 2-12 The one you may click the auto test button to the connector or replace the bad speakers with good ones. Wind Nettop Series Test Speakers You can select the speaker by clicking it to make testing sound. If any speaker fails to test its functionality.

User Guide
Page 30
Wind Nettop Series 3D Audio Demo In this tab you like gaming. You may also select different environment to choose the most suitable environment you may adjust your 3D positional audio before playing 3D audio applications like . 2-14
Wind Nettop Series 3D Audio Demo In this tab you like gaming. You may also select different environment to choose the most suitable environment you may adjust your 3D positional audio before playing 3D audio applications like . 2-14
User Guide
Page 32
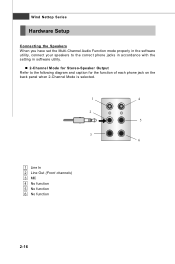
n 2-Channel Mode for Stereo-Speaker Output Refer to the correct phone jacks in accordance with the setting in software utility. Wind Nettop Series Hardware Setup Connecting the Speakers W hen you have set the Multi-Channel Audio Function mode properly in the software utility, connect your speakers to the following diagram and caption for the function of each phone jack on the back panel when 2-Channel Mode is selected. 1 4 2 5 3 6 1 Line In 2 Line Out (Front channels) 3 MIC 4 No function 5 No function 6 No function 2-16
n 2-Channel Mode for Stereo-Speaker Output Refer to the correct phone jacks in accordance with the setting in software utility. Wind Nettop Series Hardware Setup Connecting the Speakers W hen you have set the Multi-Channel Audio Function mode properly in the software utility, connect your speakers to the following diagram and caption for the function of each phone jack on the back panel when 2-Channel Mode is selected. 1 4 2 5 3 6 1 Line In 2 Line Out (Front channels) 3 MIC 4 No function 5 No function 6 No function 2-16

User Guide
Page 34
Wind Nettop Series n 6-Channel Mode for 6-Speaker Output 1 4 2 5 3 6 6-Channel Analog Audio Output 1 Line In 2 Line Out (Front channels) 3 MIC 4 Line Out (Rear channels) 5 Line Out (Center and Subwoofer channel) 6 No function 2-18
Wind Nettop Series n 6-Channel Mode for 6-Speaker Output 1 4 2 5 3 6 6-Channel Analog Audio Output 1 Line In 2 Line Out (Front channels) 3 MIC 4 Line Out (Rear channels) 5 Line Out (Center and Subwoofer channel) 6 No function 2-18

User Guide
Page 38
Wind Nettop Series Installation Guide Follow the steps below to start system installation. 3-2 Other versions will be selected). Step 2. Please select the language that you would like to install (Note: only one language can be destroyed. Step 1. Please confirm the selected W indows version again. Click "OK" to complete the system installation.
Wind Nettop Series Installation Guide Follow the steps below to start system installation. 3-2 Other versions will be selected). Step 2. Please select the language that you would like to install (Note: only one language can be destroyed. Step 1. Please confirm the selected W indows version again. Click "OK" to complete the system installation.

User Guide
Page 40
Read the End User License Agreement. Step 6. Wind Nettop Series Step 5. Select the time zone and click "Next". Select "Yes, I accept" and click "Next". 3-4
Read the End User License Agreement. Step 6. Wind Nettop Series Step 5. Select the time zone and click "Next". Select "Yes, I accept" and click "Next". 3-4
User Guide
Page 42
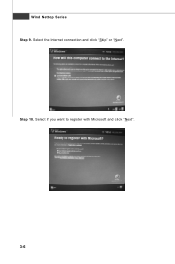
Select if you want to register with Microsoft and click "Next". 3-6 Step 10. Select the Internet connection and click "Skip" or "Next". Wind Nettop Series Step 9.
Select if you want to register with Microsoft and click "Next". 3-6 Step 10. Select the Internet connection and click "Skip" or "Next". Wind Nettop Series Step 9.
User Guide
Page 44
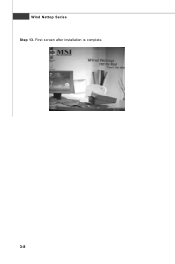
First screen after installation is complete. 3-8 Wind Nettop Series Step 13.
First screen after installation is complete. 3-8 Wind Nettop Series Step 13.
User Guide
Page 46
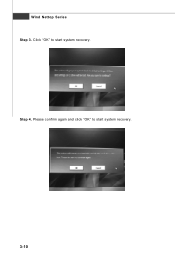
Please confirm again and click "OK" to start system recovery. 3-10 Click "OK" to start system recovery. Step 4. Wind Nettop Series Step 3.
Please confirm again and click "OK" to start system recovery. 3-10 Click "OK" to start system recovery. Step 4. Wind Nettop Series Step 3.
