
User Manual
Page 1
... tablet. Preparing Tools and Components Intel® LGA 1200 CPU CPU Fan DDR4 Memory Power Supply Unit Chassis Graphics Card Thermal Paste SATA Hard Disk Drive SATA DVD Drive Phillips Screwdriver A Package of the installations also provide video demonstrations. Quick Start Thank you for purchasing the MSI® MPG Z490 GAMING CARBON WIFI motherboard. This Quick Start...
... tablet. Preparing Tools and Components Intel® LGA 1200 CPU CPU Fan DDR4 Memory Power Supply Unit Chassis Graphics Card Thermal Paste SATA Hard Disk Drive SATA DVD Drive Phillips Screwdriver A Package of the installations also provide video demonstrations. Quick Start Thank you for purchasing the MSI® MPG Z490 GAMING CARBON WIFI motherboard. This Quick Start...
User Manual
Page 13
JCOM1: Serial Port Connector 39 JBAT1: Clear CMOS (Reset BIOS) Jumper 40 JTBT1: Thunderbolt Add-on Card Connector 40 JRTD3: Intel RTD3 Connector 40 JRGB1: RGB LED connector 41 JRAINBOW1~2: Addressable RGB LED connectors 42 JCORSAIR1: CORSAIR Connector 43 EZ Debug LED...44 LED_SW1: ... Advanced Mode ...53 SETTINGS Menu 54 OC Menu...56 M-FLASH Menu ...60 OC PROFILE Menu 61 HARDWARE MONITOR Menu 62 RAID Configuration 64 Enabling Intel® Rapid Storage Technology 64 Creating RAID Volume 65 Removing a RAID Volume 66 Resetting Disks to Non-RAID 67 Rebuilding RAID Array 68 Installing ...
JCOM1: Serial Port Connector 39 JBAT1: Clear CMOS (Reset BIOS) Jumper 40 JTBT1: Thunderbolt Add-on Card Connector 40 JRTD3: Intel RTD3 Connector 40 JRGB1: RGB LED connector 41 JRAINBOW1~2: Addressable RGB LED connectors 42 JCORSAIR1: CORSAIR Connector 43 EZ Debug LED...44 LED_SW1: ... Advanced Mode ...53 SETTINGS Menu 54 OC Menu...56 M-FLASH Menu ...60 OC PROFILE Menu 61 HARDWARE MONITOR Menu 62 RAID Configuration 64 Enabling Intel® Rapid Storage Technology 64 Creating RAID Volume 65 Removing a RAID Volume 66 Resetting Disks to Non-RAID 67 Rebuilding RAID Array 68 Installing ...

User Manual
Page 14
Intel® Z490 Chipset ∙∙4x DDR4 memory slots, support up to 128GB* ∙∙Supports 1R 2133/2666/2933 MHz* ▪▪1DPC 1R Max speed ... refer to 4000+ MHz ∙∙Supports Dual-Channel mode ∙∙Supports non-ECC, un-buffered memory ∙∙Supports Intel® Extreme Memory Profile (XMP) * Please refer www.msi.com for details. ∙∙Supports 2-Way NVIDIA® SLI™ Technology ∙∙Supports 3-Way AMD® CrossFire™ Technology...
Intel® Z490 Chipset ∙∙4x DDR4 memory slots, support up to 128GB* ∙∙Supports 1R 2133/2666/2933 MHz* ▪▪1DPC 1R Max speed ... refer to 4000+ MHz ∙∙Supports Dual-Channel mode ∙∙Supports non-ECC, un-buffered memory ∙∙Supports Intel® Extreme Memory Profile (XMP) * Please refer www.msi.com for details. ∙∙Supports 2-Way NVIDIA® SLI™ Technology ∙∙Supports 3-Way AMD® CrossFire™ Technology...
User Manual
Page 15
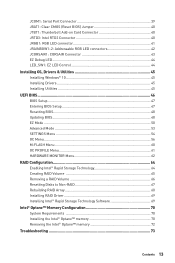
...Z490 Chipset ∙∙Supports RAID 0, RAID 1, RAID 5 and RAID 10 for SATA storage devices ∙∙Supports RAID 0 and RAID 1 for Intel Core™ processors * SATA2 will be unavailable when installing M.2 SATA SSD in the M2_1 slot. ** SATA5 & SATA6 will be unavailable when installing M.2 SSD in the M2_2 slot. *** Before using Intel...Intel® Optane™ Memory Ready*** ▪▪Supports Intel® Smart Response Technology for M.2 PCIe storage devices ∙∙Intel® Z490...Audio LAN Continued from previous page Intel® Z490 Chipset ∙∙6x SATA 6Gb...
...Z490 Chipset ∙∙Supports RAID 0, RAID 1, RAID 5 and RAID 10 for SATA storage devices ∙∙Supports RAID 0 and RAID 1 for Intel Core™ processors * SATA2 will be unavailable when installing M.2 SATA SSD in the M2_1 slot. ** SATA5 & SATA6 will be unavailable when installing M.2 SSD in the M2_2 slot. *** Before using Intel...Intel® Optane™ Memory Ready*** ▪▪Supports Intel® Smart Response Technology for M.2 PCIe storage devices ∙∙Intel® Z490...Audio LAN Continued from previous page Intel® Z490 Chipset ∙∙6x SATA 6Gb...

User Manual
Page 16
Continued from previous page Wireless LAN & Bluetooth® Intel® AX201 ∙∙The Wireless module is pre-installed in the M.2 (Key-E) slot ∙∙Supports MU-MIMO TX/RX, 2.4GHz/ 5GHz (160MHz) up to 2.4Gbps ∙∙Supports 802.11 a/b/g/n/ac/ax ∙∙WiFi 6 pre-certified ∙∙Supports Bluetooth®...
Continued from previous page Wireless LAN & Bluetooth® Intel® AX201 ∙∙The Wireless module is pre-installed in the M.2 (Key-E) slot ∙∙Supports MU-MIMO TX/RX, 2.4GHz/ 5GHz (160MHz) up to 2.4Gbps ∙∙Supports 802.11 a/b/g/n/ac/ax ∙∙WiFi 6 pre-certified ∙∙Supports Bluetooth®...
User Manual
Page 17
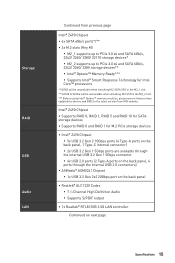
... BIOS ∙∙ACPI 6.2, SMBIOS 3.2 ∙∙ Multi-language ∙∙ Drivers ∙∙DRAGON CENTER ∙∙MSI APP Player (BlueStacks) ∙∙Open Broadcaster Software (OBS) ∙∙CPU-Z MSI GAMING ∙∙Intel® Extreme Tuning Utility ∙∙Google Chrome™, Google Toolbar, Google Drive ∙∙Norton™ Internet...
... BIOS ∙∙ACPI 6.2, SMBIOS 3.2 ∙∙ Multi-language ∙∙ Drivers ∙∙DRAGON CENTER ∙∙MSI APP Player (BlueStacks) ∙∙Open Broadcaster Software (OBS) ∙∙CPU-Z MSI GAMING ∙∙Intel® Extreme Tuning Utility ∙∙Google Chrome™, Google Toolbar, Google Drive ∙∙Norton™ Internet...

User Manual
Page 18
...9642;Audio Boost 4 ∙∙ Network ▪▪2.5G LAN ▪▪LAN Manager with Realtek 8125B ▪▪Intel WiFi ∙∙ Cooling ▪▪M.2 Shield Frozr X2 ▪▪Pump Fan ▪▪Smart Fan Control ∙∙... Specifications com/manual/mb/DRAGONCENTER2. Dragon Center Features Special Features Continued from previous page ∙∙Gaming Mode ∙∙Gaming Hotkey ∙∙LAN Manager ∙∙Mystic Light ∙∙Ambient Link ∙∙... Tool ∙∙Super Charger Please refer to http://download.msi.
...9642;Audio Boost 4 ∙∙ Network ▪▪2.5G LAN ▪▪LAN Manager with Realtek 8125B ▪▪Intel WiFi ∙∙ Cooling ▪▪M.2 Shield Frozr X2 ▪▪Pump Fan ▪▪Smart Fan Control ∙∙... Specifications com/manual/mb/DRAGONCENTER2. Dragon Center Features Special Features Continued from previous page ∙∙Gaming Mode ∙∙Gaming Hotkey ∙∙LAN Manager ∙∙Mystic Light ∙∙Ambient Link ∙∙... Tool ∙∙Super Charger Please refer to http://download.msi.

User Manual
Page 21
Block Diagram Switch PCI Express Bus 1x SATA 6Gb/s 1x M.2 1x M.2 Switch 2x SATA 6Gb/s Switch 3x SATA 6Gb/s 5x USB 3.2 Gen2 2x USB 3.2 Gen1 Processor 2 Channel DDR4 Memory DMI 3.0 2x PCIe x1 slot 1x Intel AX201 Wireless LAN 1x Realtek 2.5G LAN PCH JHL7540 ASMEDIA 3241 1x USB 3.2 Gen2 x 2 6x USB 2.0 NUVOTON 6687 Realtek ALC1220P Rear Audio Jacks Block Diagram 21
Block Diagram Switch PCI Express Bus 1x SATA 6Gb/s 1x M.2 1x M.2 Switch 2x SATA 6Gb/s Switch 3x SATA 6Gb/s 5x USB 3.2 Gen2 2x USB 3.2 Gen1 Processor 2 Channel DDR4 Memory DMI 3.0 2x PCIe x1 slot 1x Intel AX201 Wireless LAN 1x Realtek 2.5G LAN PCH JHL7540 ASMEDIA 3241 1x USB 3.2 Gen2 x 2 6x USB 2.0 NUVOTON 6687 Realtek ALC1220P Rear Audio Jacks Block Diagram 21

User Manual
Page 27
... Chassis Intrusion Connector JCOM1 Serial Port Connector JCORSAIR1 CORSAIR Connector JFP1, JFP2 Front Panel Connectors JRAINBOW1~2 Addressable RGB LED connectors JRGB1 RGB LED connector JRTD3 Intel RTD3 Connector JTBT1 Thunderbolt Add-on Card Connector JTPM1 TPM Module Connector JUSB1~2 USB 2.0 Connectors JUSB3 USB 3.2 Gen 1 5Gbps Connector JUSBC1 USB 3.2 Gen 2 10Gbps Type...
... Chassis Intrusion Connector JCOM1 Serial Port Connector JCORSAIR1 CORSAIR Connector JFP1, JFP2 Front Panel Connectors JRAINBOW1~2 Addressable RGB LED connectors JRGB1 RGB LED connector JRTD3 Intel RTD3 Connector JTBT1 Thunderbolt Add-on Card Connector JTPM1 TPM Module Connector JUSB1~2 USB 2.0 Connectors JUSB3 USB 3.2 Gen 1 5Gbps Connector JUSBC1 USB 3.2 Gen 2 10Gbps Type...

User Manual
Page 31
Loosen the screws of Components 31 http://youtu.be/JCTFABytrYA M2_2 ⚠⚠Important ∙∙Intel® RST only supports PCIe M.2 SSD with UEFI ROM. ∙∙Intel® Optane™ Memory Ready for all M.2 slots. Remove the M.2 SHIELD FROZR and remove the protective films from the thermal pads. 2 1 1 1 1 Overview of M.2 SHIELD FROZR heatsink. 2. Installing M.2 module 1. M2_1~2: M.2 Slots (Key M) M2_1 ⚽⚽Video Demonstration Watch the video to learn how to Install M.2 module.
Loosen the screws of Components 31 http://youtu.be/JCTFABytrYA M2_2 ⚠⚠Important ∙∙Intel® RST only supports PCIe M.2 SSD with UEFI ROM. ∙∙Intel® Optane™ Memory Ready for all M.2 slots. Remove the M.2 SHIELD FROZR and remove the protective films from the thermal pads. 2 1 1 1 1 Overview of M.2 SHIELD FROZR heatsink. 2. Installing M.2 module 1. M2_1~2: M.2 Slots (Key M) M2_1 ⚽⚽Video Demonstration Watch the video to learn how to Install M.2 module.
User Manual
Page 40
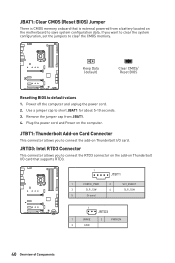
... you to connect the add-on Thunderbolt I /O card that is external powered from JBAT1. 4. Remove the jumper cap from a battery located on the computer. JRTD3: Intel RTD3 Connector This connector allows you to connect the RTD3 connector on the add-on Thunderbolt I /O card. Keep Data (default) Clear CMOS/ Reset BIOS Resetting...
... you to connect the add-on Thunderbolt I /O card that is external powered from JBAT1. 4. Remove the jumper cap from a battery located on the computer. JRTD3: Intel RTD3 Connector This connector allows you to connect the RTD3 connector on the add-on Thunderbolt I /O card. Keep Data (default) Clear CMOS/ Reset BIOS Resetting...
User Manual
Page 55
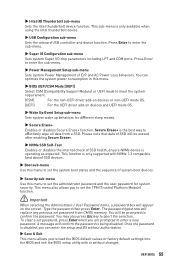
... behaviors. Secure Erase+ is operating as expected. Type the password then press Enter. You will confirm the password is only available when using the Intel thunderbolt device. ▶▶USB Configuration sub-menu Sets the onboard USB controller and device function. You may also press Esc key to enter the...Compatibility Support Module) or UEFI mode to enter a new password. Once the password is only supported with or without changes. UEFI BIOS 55 ▶▶Intel (R) Thunderbolt sub-menu Sets the Intel thunderbolt device function. This sub-menu is being disabled.
... behaviors. Secure Erase+ is operating as expected. Type the password then press Enter. You will confirm the password is only available when using the Intel thunderbolt device. ▶▶USB Configuration sub-menu Sets the onboard USB controller and device function. You may also press Esc key to enter the...Compatibility Support Module) or UEFI mode to enter a new password. Once the password is only supported with or without changes. UEFI BIOS 55 ▶▶Intel (R) Thunderbolt sub-menu Sets the Intel thunderbolt device function. This sub-menu is being disabled.

User Manual
Page 64
.../ volumes/ pictures listed in excellent performance and good fault tolerance. RAID Configuration Below are written to separate hard drives. To enter the Intel(R) Rapid Storage Technology menu 1. RAID 10 uses four hard drives to create a combination of operating systems support UEFI and the... Intel Rapid Storage Technology UEFI mode can change setting to Enabled. 64 RAID Configuration The following description is enabled. Spreading the hard drive I/O ...
.../ volumes/ pictures listed in excellent performance and good fault tolerance. RAID Configuration Below are written to separate hard drives. To enter the Intel(R) Rapid Storage Technology menu 1. RAID 10 uses four hard drives to create a combination of operating systems support UEFI and the... Intel Rapid Storage Technology UEFI mode can change setting to Enabled. 64 RAID Configuration The following description is enabled. Spreading the hard drive I/O ...

User Manual
Page 65
... to create the RAID volume. Upon completion you want to create for RAID volume. 4. As previously mentioned, enable Intel(R) Rapid Storage Technology. 2. Go to the Create Volume field and press Enter to the Intel(R) Rapid Storage Technology menu. The following screen appears: 3. Specify a Name for the RAID volume. 6. Select the Strip Size... the selected disks. 8. 5. Go to 128 KB in the Capacity (MB) field. Creating RAID Volume 1. The available values range from 4KB to BIOS > SETTING > Advanced > Intel(R) Rapid Storage Technology submenu.
... to create the RAID volume. Upon completion you want to create for RAID volume. 4. As previously mentioned, enable Intel(R) Rapid Storage Technology. 2. Go to the Create Volume field and press Enter to the Intel(R) Rapid Storage Technology menu. The following screen appears: 3. Specify a Name for the RAID volume. 6. Select the Strip Size... the selected disks. 8. 5. Go to 128 KB in the Capacity (MB) field. Creating RAID Volume 1. The available values range from 4KB to BIOS > SETTING > Advanced > Intel(R) Rapid Storage Technology submenu.

User Manual
Page 66
... If your system will become unbootable. 1. Go to delete the selected RAID volume. Select the Delete item and press Enter key to BIOS > SETTING > Advanced > Intel(R) Rapid Storage Technology. 2. Select the RAID volume from the Intel(R) Rapid Storage Technology screen to enter the RAID VOLUME INFO screen. 3.
... If your system will become unbootable. 1. Go to delete the selected RAID volume. Select the Delete item and press Enter key to BIOS > SETTING > Advanced > Intel(R) Rapid Storage Technology. 2. Select the RAID volume from the Intel(R) Rapid Storage Technology screen to enter the RAID VOLUME INFO screen. 3.

User Manual
Page 67
... to accept the disk reseting. ⚠⚠Important ∙∙You will lose all data on the RAID drives and any RAID structures from the Intel(R) Rapid Storage Technology screen to Non-RAID could include issues such as incompatible RAID configurations or a failed volume or failed disk. Select the RAID volume... from the drives. Select the disk and press Enter to BIOS > SETTING > Advanced > Intel(R) Rapid Storage Technology. 2. Go to enter PHYSICAL DISK INFO screen. 4. The following screen appears: 5.
... to accept the disk reseting. ⚠⚠Important ∙∙You will lose all data on the RAID drives and any RAID structures from the Intel(R) Rapid Storage Technology screen to Non-RAID could include issues such as incompatible RAID configurations or a failed volume or failed disk. Select the RAID volume... from the drives. Select the disk and press Enter to BIOS > SETTING > Advanced > Intel(R) Rapid Storage Technology. 2. Go to enter PHYSICAL DISK INFO screen. 4. The following screen appears: 5.

User Manual
Page 68
... hard drive members fails or is temporarily disconnected, and data mirroring is of equal or greater capacity. 3. Select the Degraded RAID volume from the Intel(R) Rapid Storage Technology screen to the current situation. 1. Select the Rebuild item and press Enter key to BIOS > SETTING > Advanced... > Intel(R) Rapid Storage Technology. 4. Rebuilding RAID Array A RAID 1, RAID 5 or RAID 10 volume is reported as Degraded when one that corresponds to enter the RAID ...
... hard drive members fails or is temporarily disconnected, and data mirroring is of equal or greater capacity. 3. Select the Degraded RAID volume from the Intel(R) Rapid Storage Technology screen to the current situation. 1. Select the Rebuild item and press Enter key to BIOS > SETTING > Advanced... > Intel(R) Rapid Storage Technology. 4. Rebuilding RAID Array A RAID 1, RAID 5 or RAID 10 volume is reported as Degraded when one that corresponds to enter the RAID ...
User Manual
Page 69
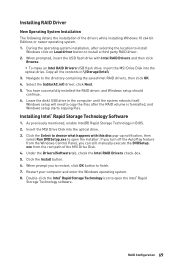
...2. As previously mentioned, enable Intel(R) Rapid Storage Technology in the computer until the system reboots itself. Navigate to install a third party RAID driver. 2. Windows setup will need to open the installer. Copy all the contents in \\Storage\Intel\ 3. Insert the MSI Drive Disk into the optical... drive. Click the Select to choose what happens with Intel RAID Drivers and then click Browse. ▪▪To make an Intel RAID Drivers USB flash drive. You have ...
...2. As previously mentioned, enable Intel(R) Rapid Storage Technology in the computer until the system reboots itself. Navigate to install a third party RAID driver. 2. Windows setup will need to open the installer. Copy all the contents in \\Storage\Intel\ 3. Insert the MSI Drive Disk into the optical... drive. Click the Select to choose what happens with Intel RAID Drivers and then click Browse. ▪▪To make an Intel RAID Drivers USB flash drive. You have ...

User Manual
Page 70
... Panel, you can accelerate the Windows 10 64bit operating system. System Requirements ∙∙Intel® Optane™ memory ready MSI® motherboards ∙∙Supported 8th Gen, or later, Intel® Core™ - Enable M.2/Optane Genie ▫▫Power on and press Delete...notification, then select Run DVDSetup.exe to operating system. ▫▫Insert the MSI Drive Disk into the M.2 slot. 3. i Processor ∙∙System BIOS that supports the Intel® Rapid Storage Technology (Intel® RST) 16 or later driver ∙∙Operating system: Windows 10...
... Panel, you can accelerate the Windows 10 64bit operating system. System Requirements ∙∙Intel® Optane™ memory ready MSI® motherboards ∙∙Supported 8th Gen, or later, Intel® Core™ - Enable M.2/Optane Genie ▫▫Power on and press Delete...notification, then select Run DVDSetup.exe to operating system. ▫▫Insert the MSI Drive Disk into the M.2 slot. 3. i Processor ∙∙System BIOS that supports the Intel® Rapid Storage Technology (Intel® RST) 16 or later driver ∙∙Operating system: Windows 10...

User Manual
Page 71
.... ∙∙ DO NOT set the SATA mode back to AHCI in the dialog. 6. Enable Intel® Optane™ Memory. ▫▫Run the Intel® Rapid Storage Technology software. ▫▫Click Intel® Optane™ Memory tab and click Enable. ▫▫Click Yes in BIOS. ∙&#...8729; DO NOT revert back to older version of the BIOS. ∙∙ DO NOT remove the Intel® Optane™ memory module. ∙∙ DO NOT replace the CPU that is not supported by Intel® Optane™ Memory. Intel® Optane™ Memory Configuration 71 5.
.... ∙∙ DO NOT set the SATA mode back to AHCI in the dialog. 6. Enable Intel® Optane™ Memory. ▫▫Run the Intel® Rapid Storage Technology software. ▫▫Click Intel® Optane™ Memory tab and click Enable. ▫▫Click Yes in BIOS. ∙&#...8729; DO NOT revert back to older version of the BIOS. ∙∙ DO NOT remove the Intel® Optane™ memory module. ∙∙ DO NOT replace the CPU that is not supported by Intel® Optane™ Memory. Intel® Optane™ Memory Configuration 71 5.

