
Manual
Page 5
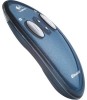
... slides effortlessly, and a built-in Mouse Mode, you can assign special operations, such as a two-button Logitech® Cordless Presenter™ optical mouse with your notebook computer or PC. Welcome! Battery status LED Give professional...Battery compartment door the touch of the mouse buttons using Logitech's MouseWare® software. 1 English And while in laser pointer gives you focus on your Logitech® Cordless Presenter™ without the hassle Scroll up to use your Logitech® Cordless Presenter™ on -screen with your delivery. Change modes...
... slides effortlessly, and a built-in Mouse Mode, you can assign special operations, such as a two-button Logitech® Cordless Presenter™ optical mouse with your notebook computer or PC. Welcome! Battery status LED Give professional...Battery compartment door the touch of the mouse buttons using Logitech's MouseWare® software. 1 English And while in laser pointer gives you focus on your Logitech® Cordless Presenter™ without the hassle Scroll up to use your Logitech® Cordless Presenter™ on -screen with your delivery. Change modes...
Manual
Page 6
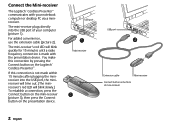
...'s red LED will blink slowly.) To establish a connection, press the Connect button on the mini-receiver (picture 3), then press the Connect button on the Logitech® Cordless Presenter™. You make this connection is made within 15 minutes after plugging the minireceiver into the USB port of mini-receiver 3 2 English Connect the Mini...
...'s red LED will blink slowly.) To establish a connection, press the Connect button on the mini-receiver (picture 3), then press the Connect button on the Logitech® Cordless Presenter™. You make this connection is made within 15 minutes after plugging the minireceiver into the USB port of mini-receiver 3 2 English Connect the Mini...

Manual
Page 7
... to install the batteries correctly. 3. Battery Status LED • The Battery Status LED above the Back (right) button is green for two seconds after the presentation device is estimated to be from 60-to conserve battery power. Install the batteries before installing the software. 1. Remove the battery door (picture 1). Replace the.... Align the battery door in use, make sure to move the Mode Switch to the Off position to -100 hours. 3 English Install the Batteries 1 The Logitech® Cordless Presenter™ uses two AA alkaline batteries.
... to install the batteries correctly. 3. Battery Status LED • The Battery Status LED above the Back (right) button is green for two seconds after the presentation device is estimated to be from 60-to conserve battery power. Install the batteries before installing the software. 1. Remove the battery door (picture 1). Replace the.... Align the battery door in use, make sure to move the Mode Switch to the Off position to -100 hours. 3 English Install the Batteries 1 The Logitech® Cordless Presenter™ uses two AA alkaline batteries.

Manual
Page 8
... is recommended that you promptly change the batteries. Follow the on your computer running, insert the software CD into the CD-ROM drive of the Logitech® Cordless Presenter™, make sure to install the software. 1. You may explode or leak, causing burns and personal injury. Conducting materials, such as rings, bracelets, and...
... is recommended that you promptly change the batteries. Follow the on your computer running, insert the software CD into the CD-ROM drive of the Logitech® Cordless Presenter™, make sure to install the software. 1. You may explode or leak, causing burns and personal injury. Conducting materials, such as rings, bracelets, and...

Manual
Page 9
...-receiver • Should the presentation device move out of range from the presentation device to either Mouse Mode or Presentation Mode. Press and release the Connect button on the presentation device by moving the Mode switch to the mini-receiver. Using the Presentation Device The Logitech® Cordless Presenter™ has two modes: Presentation Mode and Mouse Mode. If...
...-receiver • Should the presentation device move out of range from the presentation device to either Mouse Mode or Presentation Mode. Press and release the Connect button on the presentation device by moving the Mode switch to the mini-receiver. Using the Presentation Device The Logitech® Cordless Presenter™ has two modes: Presentation Mode and Mouse Mode. If...

Manual
Page 11
...to re-establish a radio-frequency link with a soft cloth. 7 English To re-activate the presentation device, press a button, move the device (Mouse Mode), or press one of inactivity, the Logitech® Cordless Presenter™ enters a power saving state. The standard requires the following statement: CAUTION: Use of ...exposure. • Never shine the laser pointer at mirror-like a direct beam on this device is designed to protect the Logitech® Cordless Presenter™. International Standards and Safety Laser Pointer Warning! LASER RADIATION: DO NOT STARE INTO LASER BEAM;
...to re-establish a radio-frequency link with a soft cloth. 7 English To re-activate the presentation device, press a button, move the device (Mouse Mode), or press one of inactivity, the Logitech® Cordless Presenter™ enters a power saving state. The standard requires the following statement: CAUTION: Use of ...exposure. • Never shine the laser pointer at mirror-like a direct beam on this device is designed to protect the Logitech® Cordless Presenter™. International Standards and Safety Laser Pointer Warning! LASER RADIATION: DO NOT STARE INTO LASER BEAM;

Manual
Page 13
..., cramping, or stiffness in Mouse Mode, make sure you are working in these areas, see a qualified health professional. It is required for the Logitech® Cordless Presenter™. Make sure that the Logitech® Cordless Presenter™ only be associated with a limited five-year warranty. For more information, please read the Comfort Guidelines located on the...
..., cramping, or stiffness in Mouse Mode, make sure you are working in these areas, see a qualified health professional. It is required for the Logitech® Cordless Presenter™. Make sure that the Logitech® Cordless Presenter™ only be associated with a limited five-year warranty. For more information, please read the Comfort Guidelines located on the...
