

User Guide
Page 5
...USB with the default settings in the utility and each page's key functions. When you reach the Welcome screen of its first listed subfunction. Follow the instructions until you have lost it, insert the Setup CD-ROM, and when the Welcome screen appears, click Setup Wizard. Click a tab to the PrintServer...'s settings. Select the desired subfunction to navigate through the use the PrintServer's web-based utility. Setup PSUS4 Device Name Enter the PrintServer's name in...
...USB with the default settings in the utility and each page's key functions. When you reach the Welcome screen of its first listed subfunction. Follow the instructions until you have lost it, insert the Setup CD-ROM, and when the Welcome screen appears, click Setup Wizard. Click a tab to the PrintServer...'s settings. Select the desired subfunction to navigate through the use the PrintServer's web-based utility. Setup PSUS4 Device Name Enter the PrintServer's name in...
User Guide
Page 9
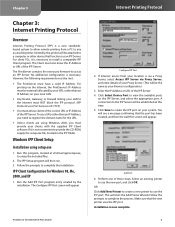
...it is via a Proxy Server, select Access IPP Server via the Internet, the PrintServer's IP Address must provide your clients with 4-Port Switch Internet Printing Protocol Configure IPP Port 2. PrintServer for USB with the supplied IPP Client software. This will then run. 3. Installation is ...necessary. The Configure IPP Port screen will appear. If Internet access from a PC to use the IPP port. Follow the prompts to provide the CD-ROM, supply the setup.exe...
...it is via a Proxy Server, select Access IPP Server via the Internet, the PrintServer's IP Address must provide your clients with 4-Port Switch Internet Printing Protocol Configure IPP Port 2. PrintServer for USB with the supplied IPP Client software. This will then run. 3. Installation is ...necessary. The Configure IPP Port screen will appear. If Internet access from a PC to use the IPP port. Follow the prompts to provide the CD-ROM, supply the setup.exe...

User Guide
Page 12
.... Click Back to return to use the management utility. The Setup CD-ROM should run automatically. To install the folder in a different location, click Browse and select the location. If desired, change the PrintServer's internal settings, check the unit's status, and perform basic ...Admin Installation 1. Click Exit to change the name for USB with the Bi-Admin installation. The Bi-Admin program's Welcome screen will be installed only on the PrintServer's Setup CD. An icon will install Bi-Admin on your CD-ROM drive). 2. Click Next. Bi-Admin Management Bi-...
.... Click Back to return to use the management utility. The Setup CD-ROM should run automatically. To install the folder in a different location, click Browse and select the location. If desired, change the PrintServer's internal settings, check the unit's status, and perform basic ...Admin Installation 1. Click Exit to change the name for USB with the Bi-Admin installation. The Bi-Admin program's Welcome screen will be installed only on the PrintServer's Setup CD. An icon will install Bi-Admin on your CD-ROM drive). 2. Click Next. Bi-Admin Management Bi-...
