

3280 Manual
Page 2
... OF CONTENTS Introduction 2-5 Safety symbol and signal word review 2 Preparing your garage door 3 Tools needed 3 Planning 4 Carton inventory 5 Hardware inventory 5 Assembly 6-7 Attach the rail to the motor unit 6 Set the belt tension 6 Attach the belt cap retainer 7 Installation 7-22 Installation safety instructions 7 Determine... requirements 15 Install the Protector System 16-18 Fasten the door bracket 19-20 Connect the door arm to the trolley 21-22 Adjustment 23-25 Adjust the travel limits 23 Adjust the force 24 Test the safety reversal system 25 Test...
... OF CONTENTS Introduction 2-5 Safety symbol and signal word review 2 Preparing your garage door 3 Tools needed 3 Planning 4 Carton inventory 5 Hardware inventory 5 Assembly 6-7 Attach the rail to the motor unit 6 Set the belt tension 6 Attach the belt cap retainer 7 Installation 7-22 Installation safety instructions 7 Determine... requirements 15 Install the Protector System 16-18 Fasten the door bracket 19-20 Connect the door arm to the trolley 21-22 Adjustment 23-25 Adjust the travel limits 23 Adjust the force 24 Test the safety reversal system 25 Test...

3280 Manual
Page 6
... any tools. • Insert a screwdriver tip into the motor unitL.iftTmiagshtetreSnynbchoroltsDrisveecurely. This extends the spring for optimum belt tension. Spring Trolley Nut Assembly Use only 3t/h5/e92s-e5/b16o/9lt2s-!5/U21s/9e2 -o6f/2a/9n2y other bolts will cause6/1s1e/9r2ious damage to door opener.... • Position belt over sprocket. Rotate about 1/4 turn until the spring releases and snaps the nut ring against the trolley (Figure 1). ASSEMBLY STEP 1 Attach the Rail to the Motor Unit To avoid installation difficulties, do not run the garage door opener until instructed to...
... any tools. • Insert a screwdriver tip into the motor unitL.iftTmiagshtetreSnynbchoroltsDrisveecurely. This extends the spring for optimum belt tension. Spring Trolley Nut Assembly Use only 3t/h5/e92s-e5/b16o/9lt2s-!5/U21s/9e2 -o6f/2a/9n2y other bolts will cause6/1s1e/9r2ious damage to door opener.... • Position belt over sprocket. Rotate about 1/4 turn until the spring releases and snaps the nut ring against the trolley (Figure 1). ASSEMBLY STEP 1 Attach the Rail to the Motor Unit To avoid installation difficulties, do not run the garage door opener until instructed to...

3280 Manual
Page 22
... enough, adjust the limit further. Figure 5 Inner Trolley Outer Trolley Door Bracket Ring Fastener Clevis Pin 5/16"x1-1/4" Figure 4 Straight Arm Bolts 5/16"-18x7/8 Lock Washers 5/16" Nuts 5/16"-18 Curved Door Arm - Press the Door Control push button. Assemble the door arm, Figure 4: • Fasten the... straight and curved door arm sections together to the trolley. Refer to the fully open position (parallel to the floor), and lift the door arm ...
... enough, adjust the limit further. Figure 5 Inner Trolley Outer Trolley Door Bracket Ring Fastener Clevis Pin 5/16"x1-1/4" Figure 4 Straight Arm Bolts 5/16"-18x7/8 Lock Washers 5/16" Nuts 5/16"-18 Curved Door Arm - Press the Door Control push button. Assemble the door arm, Figure 4: • Fasten the... straight and curved door arm sections together to the trolley. Refer to the fully open position (parallel to the floor), and lift the door arm ...
3280 Manual
Page 26
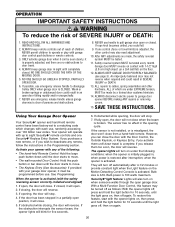
...will stop . 4. If the sensor is not installed, or is activated. when power is activated. NEVER use emergency release handle to disengage trolley ONLY when garage door is clear of which changes with up to deactivate any of the following conditions: when the opener is adjusted, the...plugged in SEVERE INJURY or DEATH. 13. Your opener will close from a hand-held remote control have been factory-set to cables, spring assemblies and other control may be tested every month. If obstructed while opening cycle. If the door has been stopped in a partially open position,...
...will stop . 4. If the sensor is not installed, or is activated. when power is activated. NEVER use emergency release handle to disengage trolley ONLY when garage door is clear of which changes with up to deactivate any of the following conditions: when the opener is adjusted, the...plugged in SEVERE INJURY or DEATH. 13. Your opener will close from a hand-held remote control have been factory-set to cables, spring assemblies and other control may be tested every month. If obstructed while opening cycle. If the door has been stopped in a partially open position,...
3280 Manual
Page 33
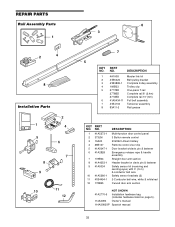
... 5). 114A3083 Owner's manual 114A3083SP Spanish manual 33 REPAIR PARTS Rail Assembly Parts 1 2 4 8 Installation Parts LOCK LIGHT 13 2 4 5 6 NOTICE 8 CEILING MOUNT ONLY UP 7 9 10 11 12 6 3 7 5 KEY PART NO. NO. DESCRIPTION 1 4A1008 Master link kit 2 41B5424 Belt pulley bracket 3 41B3869-1 Complete trolley assembly 4 109B33 Trolley clip 5 2777BD One-piece T-rail 2778BD Complete rail 8' (2.4m) 2770BD...
... 5). 114A3083 Owner's manual 114A3083SP Spanish manual 33 REPAIR PARTS Rail Assembly Parts 1 2 4 8 Installation Parts LOCK LIGHT 13 2 4 5 6 NOTICE 8 CEILING MOUNT ONLY UP 7 9 10 11 12 6 3 7 5 KEY PART NO. NO. DESCRIPTION 1 4A1008 Master link kit 2 41B5424 Belt pulley bracket 3 41B3869-1 Complete trolley assembly 4 109B33 Trolley clip 5 2777BD One-piece T-rail 2778BD Complete rail 8' (2.4m) 2770BD...

