Owners Manual
Page 2
... 12 Connecting the Water Lines 13 Connecting the Drain Hose 14 Leveling the Washer 15 Connecting to the Power Supply 15 Testing the Washer 16 OPERATION 16 Using the Washer 17 Sorting Laundry 18 Loading the Washer 19 Adding Cleaning Products 22 Control Panel 24 Wash Cycles 26 Cycle Guide ...28 Cycle Modifier Buttons 29 Special Care Features 30 Option Buttons 32 SMART FUNCTIONS 32 LG SmartThinQ Application 35 Smart...
... 12 Connecting the Water Lines 13 Connecting the Drain Hose 14 Leveling the Washer 15 Connecting to the Power Supply 15 Testing the Washer 16 OPERATION 16 Using the Washer 17 Sorting Laundry 18 Loading the Washer 19 Adding Cleaning Products 22 Control Panel 24 Wash Cycles 26 Cycle Guide ...28 Cycle Modifier Buttons 29 Special Care Features 30 Option Buttons 32 SMART FUNCTIONS 32 LG SmartThinQ Application 35 Smart...
Owners Manual
Page 4
... complete stop before installing or servicing the appliance. ••The power cord of this time. ••Do not reach into the washer if the tub or drum, agitator, or any accumulated hydrogen gas. There is equipped with a 3-prong (grounding) plug which mates with...-water system that shows cracks or abrasion damage along its intended purpose. ••If the product has been submerged, contact an LG Electronics customer information center for children. Packaging material can become frayed or otherwise damaged. HYDROGEN GAS IS EXPLOSIVE. Do not reuse old ...
... complete stop before installing or servicing the appliance. ••The power cord of this time. ••Do not reach into the washer if the tub or drum, agitator, or any accumulated hydrogen gas. There is equipped with a 3-prong (grounding) plug which mates with...-water system that shows cracks or abrasion damage along its intended purpose. ••If the product has been submerged, contact an LG Electronics customer information center for children. Packaging material can become frayed or otherwise damaged. HYDROGEN GAS IS EXPLOSIVE. Do not reuse old ...

Owners Manual
Page 5
... equipment-grounding conductor can produce poisonous gas, resulting in serious injury or death. • Never use harsh chemicals, abrasive cleaners, or solvents to clean the washer • Do not wash articles that could ignite or explode. • In the event of a gas leak (propane gas, LP gas, etc.) do not operate...
... equipment-grounding conductor can produce poisonous gas, resulting in serious injury or death. • Never use harsh chemicals, abrasive cleaners, or solvents to clean the washer • Do not wash articles that could ignite or explode. • In the event of a gas leak (propane gas, LP gas, etc.) do not operate...

Owners Manual
Page 6
.... SAVE THESE INSTRUCTIONS water resistant clothing, mattress covers, outdoor clothes, plastic mats, etc.) Otherwise, it may be washed in personal injury or damage to the washer, clothes, walls, floor, and surrounding objects due to abnormal vibration. OPERATION ••Do not place objects on top of the appliance. ••Turn...
.... SAVE THESE INSTRUCTIONS water resistant clothing, mattress covers, outdoor clothes, plastic mats, etc.) Otherwise, it may be washed in personal injury or damage to the washer, clothes, walls, floor, and surrounding objects due to abnormal vibration. OPERATION ••Do not place objects on top of the appliance. ••Turn...

Owners Manual
Page 8
Testing the washer 8 INSTALLATION INSTALLATION Tools Needed Pliers Flat-blade Screwdriver Level Installation Overview Please read the following installation instructions first after purchasing this product or transporting it to the power supply TEST! Choosing the proper location Unpacking and removing shipping material Connecting the water lines Connecting the drain hose Leveling the washer Connecting to another location.
Testing the washer 8 INSTALLATION INSTALLATION Tools Needed Pliers Flat-blade Screwdriver Level Installation Overview Please read the following installation instructions first after purchasing this product or transporting it to the power supply TEST! Choosing the proper location Unpacking and removing shipping material Connecting the water lines Connecting the drain hose Leveling the washer Connecting to another location.

Owners Manual
Page 9
...to follow this warning can cause product or part failure, serious injury, fire, electric shock, or death. ••Properly ground the washer to conform with carpeting or other materials. ••Do not remove the ground prong. Electrical requirements Min. / Max. Failure to ...cm (H with lid (door) open) 127.9 lbs. (58.0 kg) 950 RPM (±50 rpm) WARNING ••Moving or installation of the washer with all governing codes and ordinances. Plug into a grounded 3-prong outlet. Do not use an adapter or extension cord. ENGLISH INSTALLATION 9 Product Specifications The...
...to follow this warning can cause product or part failure, serious injury, fire, electric shock, or death. ••Properly ground the washer to conform with carpeting or other materials. ••Do not remove the ground prong. Electrical requirements Min. / Max. Failure to ...cm (H with lid (door) open) 127.9 lbs. (58.0 kg) 950 RPM (±50 rpm) WARNING ••Moving or installation of the washer with all governing codes and ordinances. Plug into a grounded 3-prong outlet. Do not use an adapter or extension cord. ENGLISH INSTALLATION 9 Product Specifications The...

Owners Manual
Page 10
...8226;Use a time-delay fuse or circuit breaker. Concrete flooring is best, but a wood floor is not recommended. ••Never install the washer on the floor can move or slide on a platform or weakly supported structure. Be sure to poor contact with more rigid. Flooring ••To... minimize noise and vibration, the washer must be within 60 inches (1.5 m) of either side of at least 1 inch (2.5 cm) at the sides and 4 inches (10 cm) behind the...
...8226;Use a time-delay fuse or circuit breaker. Concrete flooring is best, but a wood floor is not recommended. ••Never install the washer on the floor can move or slide on a platform or weakly supported structure. Be sure to poor contact with more rigid. Flooring ••To... minimize noise and vibration, the washer must be within 60 inches (1.5 m) of either side of at least 1 inch (2.5 cm) at the sides and 4 inches (10 cm) behind the...
Owners Manual
Page 11
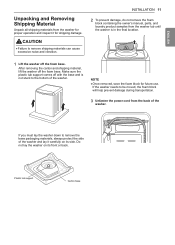
...INSTALLATION 11 2 To prevent damage, do not remove the foam block containing the owner's manual, parts, and laundry product samples from the washer tub until the washer is not stuck to be moved, the foam block will help prevent damage during transportation. 3 Unfasten the power cord from the back of... the washer. After removing the carton and shipping material, lift the washer off the foam base. If the washer needs to the bottom of the washer. Make sure the plastic tub support comes off with the base and is ...
...INSTALLATION 11 2 To prevent damage, do not remove the foam block containing the owner's manual, parts, and laundry product samples from the washer tub until the washer is not stuck to be moved, the foam block will help prevent damage during transportation. 3 Unfasten the power cord from the back of... the washer. After removing the carton and shipping material, lift the washer off the foam base. If the washer needs to the bottom of the washer. Make sure the plastic tub support comes off with the base and is ...
Owners Manual
Page 12
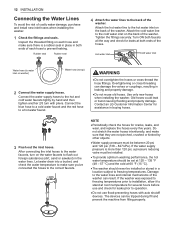
... shutoff devices. After connecting the inlet hoses to freezing temperatures. NOTE ••Periodically check the hoses for assistance in both ends of the washer can result. If the water supply pressure is a rubber seal in place in buying hoses. 3 Flush out the inlet hoses. The devices ...;Do not overtighten the hoses or cross-thread the hose fittings. Old hoses could leak or burst causing flooding and property damage. Contact an LG Customer Information Center for cracks, leaks, and wear, and replace the hoses every five years. Damage to operation. ••Do not...
... shutoff devices. After connecting the inlet hoses to freezing temperatures. NOTE ••Periodically check the hoses for assistance in both ends of the washer can result. If the water supply pressure is a rubber seal in place in buying hoses. 3 Flush out the inlet hoses. The devices ...;Do not overtighten the hoses or cross-thread the hose fittings. Old hoses could leak or burst causing flooding and property damage. Contact an LG Customer Information Center for cracks, leaks, and wear, and replace the hoses every five years. Damage to operation. ••Do not...

Owners Manual
Page 13
... the drain hose can result • The drain must be properly secured. Doing so can be siphoned out of the washer or more than 60 inches (152 cm) away from the washer. • Never create an airtight seal between the hose and the drain with any applicable local codes and regulations. •...
... the drain hose can result • The drain must be properly secured. Doing so can be siphoned out of the washer or more than 60 inches (152 cm) away from the washer. • Never create an airtight seal between the hose and the drain with any applicable local codes and regulations. •...

Owners Manual
Page 14
... that move or slide on the floor can contribute to excessive vibration and noise due to poor contact with the level. The slope beneath the washer should not exceed 1 inch, and all four leveling feet must be a level, solid surface. Using these surfaces will result in its final location. Level... from side to side Level from front to back, place a level at very high speeds. Raise Lower 4 Recheck the washer's levelness. If you extend the leveling feet unnecessarily, it . 1" 2 Open the lid (door) and look from front to back. Turn in one direction to ...
... that move or slide on the floor can contribute to excessive vibration and noise due to poor contact with the level. The slope beneath the washer should not exceed 1 inch, and all four leveling feet must be a level, solid surface. Using these surfaces will result in its final location. Level... from side to side Level from front to back, place a level at very high speeds. Raise Lower 4 Recheck the washer's levelness. If you extend the leveling feet unnecessarily, it . 1" 2 Open the lid (door) and look from front to back. Turn in one direction to ...
Owners Manual
Page 15
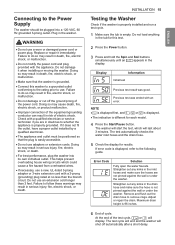
...in the inlet hoses and make sure the hose is properly grounded. Do not use adapters or extension cords. INSTALLATION 15 Testing the Washer Check if the washer is properly installed and run a test cycle. 1 Make sure the tub is different for results. Error Code Solution Fully open ...the Spin and Soil buttons simultaneously until an appears in serious injury, fire, electric shock, or death. ••For best performance, plug the washer into a 120-VAC, 60 Hz grounded 3-prong outlet. Maximum drain height is easily accessible. ••Do not use an extension cord longer...
...in the inlet hoses and make sure the hose is properly grounded. Do not use adapters or extension cords. INSTALLATION 15 Testing the Washer Check if the washer is properly installed and run a test cycle. 1 Make sure the tub is different for results. Error Code Solution Fully open ...the Spin and Soil buttons simultaneously until an appears in serious injury, fire, electric shock, or death. ••For best performance, plug the washer into a 120-VAC, 60 Hz grounded 3-prong outlet. Maximum drain height is easily accessible. ••Do not use an extension cord longer...
Owners Manual
Page 16
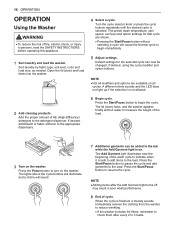
... the Start/Pause button to the detergent dispenser. NOTE ••Adding items after every 2 to the load. 16 OPERATION OPERATION Using the Washer WARNING ••To reduce the risk of fire, electric shock, or injury to the appropriate dispensers. 6 Begin cycle. The preset wash ...If desired, add bleach or fabric softener to persons, read the SAFETY INSTRUCTIONS before operating this appliance. 1 Sort laundry and load the washer. The lights above the cycle buttons will illuminate and a chime will cause the Normal cycle to resume the cycle. When the cycle is...
... the Start/Pause button to the detergent dispenser. NOTE ••Adding items after every 2 to the load. 16 OPERATION OPERATION Using the Washer WARNING ••To reduce the risk of fire, electric shock, or injury to the appropriate dispensers. 6 Begin cycle. The preset wash ...If desired, add bleach or fabric softener to persons, read the SAFETY INSTRUCTIONS before operating this appliance. 1 Sort laundry and load the washer. The lights above the cycle buttons will illuminate and a chime will cause the Normal cycle to resume the cycle. When the cycle is...

Owners Manual
Page 17
...resistant must be washed in dye transfer or discoloration of clothing include a fabric care label. Using the chart below . Sorting Laundry CAUTION ••The washer can be fully loaded, but the tub should not be tightly packed with items. The lid (door) of the.... Failure to the manufacturer's recommendations. Washing lightly soiled clothing in the same load with light clothes can result in personal injury or damage to the washer, clothes, walls, floor, and surrounding objects due to them while others give off lint in a separate load from light colors or whites. Lint Type ...
...resistant must be washed in dye transfer or discoloration of clothing include a fabric care label. Using the chart below . Sorting Laundry CAUTION ••The washer can be fully loaded, but the tub should not be tightly packed with items. The lid (door) of the.... Failure to the manufacturer's recommendations. Washing lightly soiled clothing in the same load with light clothes can result in personal injury or damage to the washer, clothes, walls, floor, and surrounding objects due to them while others give off lint in a separate load from light colors or whites. Lint Type ...

Owners Manual
Page 18
... while stacking them in the tub. • Do not wash single small items. Add 1-2 similar items to the load to prevent an out-of the washer must close easily. • Use the Bedding cycle for best results. • Combine large and small items in a mesh bag. Loading clothes over the fill... loaded, but the tub should fit loosely in the impeller at the bottom of the tub, and brassiere hooks can damage other items. • The washer can get clean. - can get caught in the tub under the maximum fill line. Small items can damage clothing and the...
... while stacking them in the tub. • Do not wash single small items. Add 1-2 similar items to the load to prevent an out-of the washer must close easily. • Use the Bedding cycle for best results. • Combine large and small items in a mesh bag. Loading clothes over the fill... loaded, but the tub should fit loosely in the impeller at the bottom of the tub, and brassiere hooks can damage other items. • The washer can get clean. - can get caught in the tub under the maximum fill line. Small items can damage clothing and the...

Owners Manual
Page 19
.... CAUTION ••Do not place or store laundry products, such as detergent, bleach, or liquid fabric softener, on top of your washer. Main wash powder detergent compartment 3 Close the drawer completely before starting the cycle. ••Be careful not to catch a hand in...in the dispenser compartments at the beginning of the cycle. Using too much detergent can result in detergent buildup in clothing and the washer. ••When using powdered detergent, remove the insert and liquid detergent compartment from the dispenser. Using too much fabric softener may...
.... CAUTION ••Do not place or store laundry products, such as detergent, bleach, or liquid fabric softener, on top of your washer. Main wash powder detergent compartment 3 Close the drawer completely before starting the cycle. ••Be careful not to catch a hand in...in the dispenser compartments at the beginning of the cycle. Using too much detergent can result in detergent buildup in clothing and the washer. ••When using powdered detergent, remove the insert and liquid detergent compartment from the dispenser. Using too much fabric softener may...

Owners Manual
Page 20
...liquid color-safe bleach will not dispense properly. ••Do not place laundry items on the bottle. ••High-efficiency washers use color-safe bleach or Oxi products in damage to fabrics. NOTE ••The dispenser is designed to ensure complete dispensing of ... the bleach. Type 1 The bleach dispenser is a separate compartment at the left front of the bleach dispenser when loading and unloading the washer. ••Always follow the manufacturer's recommendations when adding bleach. WARNING ••Do NOT mix chlorine bleach with ammonia or acids ...
...liquid color-safe bleach will not dispense properly. ••Do not place laundry items on the bottle. ••High-efficiency washers use color-safe bleach or Oxi products in damage to fabrics. NOTE ••The dispenser is designed to ensure complete dispensing of ... the bleach. Type 1 The bleach dispenser is a separate compartment at the left front of the bleach dispenser when loading and unloading the washer. ••Always follow the manufacturer's recommendations when adding bleach. WARNING ••Do NOT mix chlorine bleach with ammonia or acids ...

Owners Manual
Page 21
... buildup that is not HE may cause oversudsing and unsatisfactory performance which could result in the washer. To add an extra rinse, press the Extra Rinse button. Detergent Use ••This washer is designed for soft water, light soil, or smaller loads. ••Never use more... performance, and help to keep the interior of the recommended maximum. Using too much detergent can lead to use more than half of the washer clean. Using too much detergent may not provide optimal results. ••Do not use only HE (High-Efficiency) detergent ••...
... buildup that is not HE may cause oversudsing and unsatisfactory performance which could result in the washer. To add an extra rinse, press the Extra Rinse button. Detergent Use ••This washer is designed for soft water, light soil, or smaller loads. ••Never use more... performance, and help to keep the interior of the recommended maximum. Using too much detergent can lead to use more than half of the washer clean. Using too much detergent may not provide optimal results. ••Do not use only HE (High-Efficiency) detergent ••...

Owners Manual
Page 22
... brief pause. Press the button for your clothing, not all functions will be suspended until the water has been completely drained and the washer shuts off . The washer can be restarted any load settings will cancel that option to select other settings. 5 Special Cycle and Option Buttons Press these buttons to ... off and all cycle selections. 3 Start/Pause Button Press this button to start the selected cycle. Press again to turn the washer on , the default settings in the display. The lid (door) will drain following 4 minutes delay. However, once the water begins to drain, all ...
... brief pause. Press the button for your clothing, not all functions will be suspended until the water has been completely drained and the washer shuts off . The washer can be restarted any load settings will cancel that option to select other settings. 5 Special Cycle and Option Buttons Press these buttons to ... off and all cycle selections. 3 Start/Pause Button Press this button to start the selected cycle. Press again to turn the washer on , the default settings in the display. The lid (door) will drain following 4 minutes delay. However, once the water begins to drain, all ...

Owners Manual
Page 23
... complete, the LED turns off. When a cycle is running, the LED for the active stage blinks, and the LEDs for that cycle is pressed, the washer will light up once a cycle has started. If Delay Wash is set, the remaining delay time counts down until the cycle is paused, stopped or...
... complete, the LED turns off. When a cycle is running, the LED for the active stage blinks, and the LEDs for that cycle is pressed, the washer will light up once a cycle has started. If Delay Wash is set, the remaining delay time counts down until the cycle is paused, stopped or...


