
Owners Manual
Page 2
... Shipping Material 11 Connecting the Water Lines 12 Connecting the Drain Hose 13 Leveling the Washer 14 Connecting to the Power Supply 14 Testing the Washer 15 OPERATION 15 Using the Washer 16 Loading the Washer 17 SMART FUNCTIONS 17 LG SmartThinQ Application (For the product that contains the wireless LAN module) 20 Smart Diagnosis...
... Shipping Material 11 Connecting the Water Lines 12 Connecting the Drain Hose 13 Leveling the Washer 14 Connecting to the Power Supply 14 Testing the Washer 15 OPERATION 15 Using the Washer 16 Loading the Washer 17 SMART FUNCTIONS 17 LG SmartThinQ Application (For the product that contains the wireless LAN module) 20 Smart Diagnosis...
Owners Manual
Page 4
.... This appliance is unpacked. Always grip the plug firmly and pull straight out from the appliance, unplug it immediately, and contact an LG Electronics customer information center. Packaging material can become frayed or otherwise damaged. OPERATION Read all warnings on the power cord. If you detect... a strange sound, a chemical or burning smell, or smoke coming from the outlet. Do not reach into the washer if the tub or drum, agitator, or any interior parts are moving the appliance, be dangerous for several minutes. Before loading, unloading, ...
.... This appliance is unpacked. Always grip the plug firmly and pull straight out from the appliance, unplug it immediately, and contact an LG Electronics customer information center. Packaging material can become frayed or otherwise damaged. OPERATION Read all warnings on the power cord. If you detect... a strange sound, a chemical or burning smell, or smoke coming from the outlet. Do not reach into the washer if the tub or drum, agitator, or any interior parts are moving the appliance, be dangerous for several minutes. Before loading, unloading, ...

Owners Manual
Page 5
... supply before cleaning and attempting any other flammable or explosive substances, as vinegar. Incorrect usage can produce poisonous gas, resulting in place to clean the washer. Never use gasoline or other flammable vapors and liquids in a risk of children or small animals getting trapped inside of the appliance. Fix the drain...
... supply before cleaning and attempting any other flammable or explosive substances, as vinegar. Incorrect usage can produce poisonous gas, resulting in place to clean the washer. Never use gasoline or other flammable vapors and liquids in a risk of children or small animals getting trapped inside of the appliance. Fix the drain...

Owners Manual
Page 6
..., outdoor clothes, plastic mats, etc.) Otherwise, it may be hot. Do not touch draining water which may result in personal injury or damage to the washer, clothes, walls, floor, and surrounding objects due to be washed in one load unless specified on the appliance. If the drain hose and the water...
..., outdoor clothes, plastic mats, etc.) Otherwise, it may be hot. Do not touch draining water which may result in personal injury or damage to the washer, clothes, walls, floor, and surrounding objects due to be washed in one load unless specified on the appliance. If the drain hose and the water...
Owners Manual
Page 8
... shock, do not contact the following parts while the appliance is energized. : pump, motor, noise filter cover, and heater (on the bottom of the washer with lid (door) open ) 68.6 cm (W) X 72.1 cm (D) X 113 cm (H), 145.3 cm (H with carpeting or other materials. To ensure...Failure to follow this warning can cause serious injury, fire, electric shock, or death. Failure to constant product improvements. Properly ground the washer to outdoor weather conditions. Certain internal parts are intentionally not grounded and may vary due to follow these instructions may result in injury....
... shock, do not contact the following parts while the appliance is energized. : pump, motor, noise filter cover, and heater (on the bottom of the washer with lid (door) open ) 68.6 cm (W) X 72.1 cm (D) X 113 cm (H), 145.3 cm (H with carpeting or other materials. To ensure...Failure to follow this warning can cause serious injury, fire, electric shock, or death. Failure to constant product improvements. Properly ground the washer to outdoor weather conditions. Certain internal parts are intentionally not grounded and may vary due to follow these instructions may result in injury....

Owners Manual
Page 9
... carpeting and soft tile surfaces is 58 inches (147 cm). Be sure to allow minimum clearances of the washer. Choosing the Proper Location Install the washer on a solid floor that may increase the required clearances. 32" (81.1 cm) (72.1 cm) 3 ½" (9 cm) 57 ¼" (145.3 cm) 26 &#...(2.5 cm) at the sides and 4 inches (10 cm) behind the unit. Use a time-delay fuse or circuit breaker. Allowable slope under the entire washer is a maximum 1 inch difference from side to side or from floor to overhead shelves, cabinets, ceilings, etc., is not recommended. Installing on a platform...
... carpeting and soft tile surfaces is 58 inches (147 cm). Be sure to allow minimum clearances of the washer. Choosing the Proper Location Install the washer on a solid floor that may increase the required clearances. 32" (81.1 cm) (72.1 cm) 3 ½" (9 cm) 57 ¼" (145.3 cm) 26 &#...(2.5 cm) at the sides and 4 inches (10 cm) behind the unit. Use a time-delay fuse or circuit breaker. Allowable slope under the entire washer is a maximum 1 inch difference from side to side or from floor to overhead shelves, cabinets, ceilings, etc., is not recommended. Installing on a platform...

Owners Manual
Page 10
... to be moved, the foam block will help prevent damage during transportation. 3 Unfasten the power cord from the back of the washer. Make sure the plastic tub support comes off with the base and is not stuck to remove shipping materials can cause excessive noise and vibration. 2... To prevent damage, do not remove the foam block containing the owner's manual, parts, and laundry product samples from the washer tub until the washer is in the final location. 1 Lift the washer off the foam base. NOTE Once removed, save the foam block for future use. Plastic tub support Carton base 10...
... to be moved, the foam block will help prevent damage during transportation. 3 Unfasten the power cord from the back of the washer. Make sure the plastic tub support comes off with the base and is not stuck to remove shipping materials can cause excessive noise and vibration. 2... To prevent damage, do not remove the foam block containing the owner's manual, parts, and laundry product samples from the washer tub until the washer is in the final location. 1 Lift the washer off the foam base. NOTE Once removed, save the foam block for future use. Plastic tub support Carton base 10...
Owners Manual
Page 11
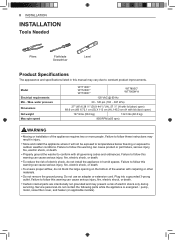
... tightly by other objects. Old hoses could leak or burst causing flooding and property damage. Do not reuse old hoses. If the washer was exposed to freezing temperatures prior to installation, allow it to operation. The devices can damage the valves or couplings, resulting in ...the water lines. Contact an LG Customer Information Center for leaks prior to stand at 60 °F (15 °C). Rubber seal Rubber seal INSTALLATION 11 4 Attach the water...
... tightly by other objects. Old hoses could leak or burst causing flooding and property damage. Do not reuse old hoses. If the washer was exposed to freezing temperatures prior to installation, allow it to operation. The devices can damage the valves or couplings, resulting in ...the water lines. Contact an LG Customer Information Center for leaks prior to stand at 60 °F (15 °C). Rubber seal Rubber seal INSTALLATION 11 4 Attach the water...

Owners Manual
Page 12
... improper draining. NOTE The drain hose should be installed in poor wash/rinse performance or clothing damage. Failure to 47 inches (120 cm) from the washer. Normal height of the end of the water hoses with tape or other means. Never create an airtight seal between the hose and the drain... tub resulting in accordance with the end lower than 29.5 inches (75 cm) or higher than 96 inches (244 cm) above the bottom of the washer or more than 60 inches (152 cm) away from the floor. 3 If the water valves and drain are built into the wall, fasten the drain...
... improper draining. NOTE The drain hose should be installed in poor wash/rinse performance or clothing damage. Failure to 47 inches (120 cm) from the washer. Normal height of the end of the water hoses with tape or other means. Never create an airtight seal between the hose and the drain... tub resulting in accordance with the end lower than 29.5 inches (75 cm) or higher than 96 inches (244 cm) above the bottom of the washer or more than 60 inches (152 cm) away from the floor. 3 If the water valves and drain are built into the wall, fasten the drain...

Owners Manual
Page 13
... to side Level from front to vibrate. If you have a level, check the washer with the floor. 1 Position the washer in its final location. Raise Lower 4 Recheck the washer's levelness. If you can cause the washer to back. NOTE Adjust the leveling feet only as far as necessary to pinch, strain... you have a carpenter's level, you extend the leveling feet unnecessarily, it may not stay open properly. Before installing the washer, make sure the washer does not rock. Extend the leveling feet only to back 3 Adjust the lower leveling feet. Do not place the level on ...
... to side Level from front to vibrate. If you have a level, check the washer with the floor. 1 Position the washer in its final location. Raise Lower 4 Recheck the washer's levelness. If you can cause the washer to back. NOTE Adjust the leveling feet only as far as necessary to pinch, strain... you have a carpenter's level, you extend the leveling feet unnecessarily, it may not stay open properly. Before installing the washer, make sure the washer does not rock. Extend the leveling feet only to back 3 Adjust the lower leveling feet. Do not place the level on ...

Owners Manual
Page 14
... individual outlet. Do not use a new, UL-listed 3-prong adapter or 3-wire extension cord with the appliance. For best performance, plug the washer into a 120-VAC, 60 Hz grounded 3-prong outlet. This helps prevent overloading house wiring circuits which will start the test, which could cause ...a fire hazard from overheated wires. Failure to whether the appliance is properly grounded. Testing the Washer Check if the washer is properly installed and run a test cycle. 1 Make sure the tub is easily accessible. Previous test was good. The test ...
... individual outlet. Do not use a new, UL-listed 3-prong adapter or 3-wire extension cord with the appliance. For best performance, plug the washer into a 120-VAC, 60 Hz grounded 3-prong outlet. This helps prevent overloading house wiring circuits which will start the test, which could cause ...a fire hazard from overheated wires. Failure to whether the appliance is properly grounded. Testing the Washer Check if the washer is properly installed and run a test cycle. 1 Make sure the tub is easily accessible. Previous test was good. The test ...

Owners Manual
Page 15
...fabric softener to begin immediately. 5 Adjust settings. When the cycle is on all cycles. Open the lid (door) and load items into the washer. 4 Select a cycle. Press the Start/Pause button to the appropriate dispensers. 6 Begin cycle. Press the Power button to measure the weight of...HE (High-Efficiency) detergent to begin the cycle. Default settings for that cycle are available on . The lid (door) locks, and the washer agitates briefly without selecting a cycle will sound. 7 Additional garments can now be added to the tub while the Add Garment light is finished,...
...fabric softener to begin immediately. 5 Adjust settings. When the cycle is on all cycles. Open the lid (door) and load items into the washer. 4 Select a cycle. Press the Start/Pause button to the appropriate dispensers. 6 Begin cycle. Press the Power button to measure the weight of...HE (High-Efficiency) detergent to begin the cycle. Default settings for that cycle are available on . The lid (door) locks, and the washer agitates briefly without selecting a cycle will sound. 7 Additional garments can now be added to the tub while the Add Garment light is finished,...
Owners Manual
Page 16
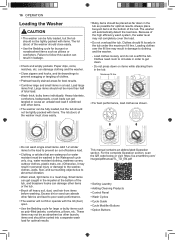
...load. Excess dirt or sand can damage other fabrics and lead to abnormal vibration. These items may result in personal injury or damage to the washer, clothes, walls, floor, and surrounding objects due to poor wash performance. Load large items first. Load clothes loosely, and do not overfill ... tub. water resistant clothing, mattress covers, outdoor clothes, plastic mats, etc.) Otherwise, it may not be as absorbent as other items. The washer can be fully loaded, but the tub should not be washed in the Waterproof cycle only. (e.g. Close zippers and hooks, and tie drawstrings to...
...load. Excess dirt or sand can damage other fabrics and lead to abnormal vibration. These items may result in personal injury or damage to the washer, clothes, walls, floor, and surrounding objects due to poor wash performance. Load large items first. Load clothes loosely, and do not overfill ... tub. water resistant clothing, mattress covers, outdoor clothes, plastic mats, etc.) Otherwise, it may not be as absorbent as other items. The washer can be fully loaded, but the tub should not be washed in the Waterproof cycle only. (e.g. Close zippers and hooks, and tie drawstrings to...

Owners Manual
Page 18
... cycles on the appliance. Downloaded Download new and specialized cycles that have the option of receiving push notifications on a smart phone. Using Washer Cycle Remote Start Use a smart phone to control the appliance remotely or check to users. If the cycle is downloaded. NOTE If ...is not started, the machine will wait to another. Smart Diagnosis™ This function provides useful information for 3 seconds. 18 SMART FUNCTIONS LG SmartThinQ Application Features For appliances with the appliance based on the pattern of use. When Remote Start is turned on, the door is disabled....
... cycles on the appliance. Downloaded Download new and specialized cycles that have the option of receiving push notifications on a smart phone. Using Washer Cycle Remote Start Use a smart phone to control the appliance remotely or check to users. If the cycle is downloaded. NOTE If ...is not started, the machine will wait to another. Smart Diagnosis™ This function provides useful information for 3 seconds. 18 SMART FUNCTIONS LG SmartThinQ Application Features For appliances with the appliance based on the pattern of use. When Remote Start is turned on, the door is disabled....
Owners Manual
Page 21
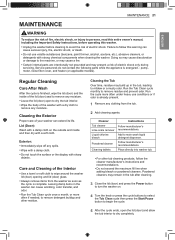
...up in the tub after cleaning. 3 Close the lid (door) and press the Power button to turn the washer on. 4 Turn the knob or press the cycle buttons to select the Tub Clean cycle then press the Start...(on the outside and inside of the Interior Use a towel or soft cloth to wipe around the washer lid (door) opening and lid (door) glass. Care and Cleaning of the lid (door) seal to remove any clothing... from the washer as soon as the cycle is complete. Cleaning the Tub Over time, residue may present a risk of ...
...up in the tub after cleaning. 3 Close the lid (door) and press the Power button to turn the washer on. 4 Turn the knob or press the cycle buttons to select the Tub Clean cycle then press the Start...(on the outside and inside of the Interior Use a towel or soft cloth to wipe around the washer lid (door) opening and lid (door) glass. Care and Cleaning of the lid (door) seal to remove any clothing... from the washer as soon as the cycle is complete. Cleaning the Tub Over time, residue may present a risk of ...

Owners Manual
Page 22
... Clean cycle before running your next wash cycle. Removing Mineral Buildup In areas with hard water, mineral scale can form on the front of the washer. After descaling, always run Tub Clean once a week for buildup once or twice a month. 1 Remove the drawer by pulling it straight out ... contaminated with a dry towel or cloth after cleaning. The laundry may cause fire or electric shock. 4 Wipe off any residue. Use of the washer. 22 MAINTENANCE NOTE Never load laundry while using a soft cloth soaked in stainless steel cleaner. Do not use the Rinse+Spin option to rinse the...
... Clean cycle before running your next wash cycle. Removing Mineral Buildup In areas with hard water, mineral scale can form on the front of the washer. After descaling, always run Tub Clean once a week for buildup once or twice a month. 1 Remove the drawer by pulling it straight out ... contaminated with a dry towel or cloth after cleaning. The laundry may cause fire or electric shock. 4 Wipe off any residue. Use of the washer. 22 MAINTENANCE NOTE Never load laundry while using a soft cloth soaked in stainless steel cleaner. Do not use the Rinse+Spin option to rinse the...

Owners Manual
Page 23
... when the water pressure is low or an inlet filter is clogged with these filters removed could be separated from the bleach dispenser. Operating the washer with dirt. Be careful not to stick open for buildup and clean the cover once or twice a month. Clean the inlet filter. MAINTENANCE... 23 Cleaning the Water Inlet Filters If the washer does not fill properly, an error message will cause leaks and malfunction. Check for maximum flow. Type 1 Remove the cover from the dispenser. ...
... when the water pressure is low or an inlet filter is clogged with these filters removed could be separated from the bleach dispenser. Operating the washer with dirt. Be careful not to stick open for buildup and clean the cover once or twice a month. Clean the inlet filter. MAINTENANCE... 23 Cleaning the Water Inlet Filters If the washer does not fill properly, an error message will cause leaks and malfunction. Check for maximum flow. Type 1 Remove the cover from the dispenser. ...

Owners Manual
Page 24
...damage. When the Water Line is in an area that could be used for one minute, then press the Power button to protect the washer from the washer after thawing. 3 Press Special Care button repeatedly to select the Rinse+Spin cycle. 8 Press the Start/Pause button. 24 MAINTENANCE Care in... Cold Climates Storing the Washer If the washer will expel some of the antifreeze, leaving enough to shut off the faucets connected with the water lines. 2 Pour hot water on the faucets...
...damage. When the Water Line is in an area that could be used for one minute, then press the Power button to protect the washer from the washer after thawing. 3 Press Special Care button repeatedly to select the Rinse+Spin cycle. 8 Press the Start/Pause button. 24 MAINTENANCE Care in... Cold Climates Storing the Washer If the washer will expel some of the antifreeze, leaving enough to shut off the faucets connected with the water lines. 2 Pour hot water on the faucets...

Owners Manual
Page 25
...in the Installation section. Install water hammer arrestors (purchased separately at times during the cycle. Water spraying or circulating during a cycle. The washer may be unbalanced. Vibrating noise Packaging materials were not removed. Not all , check the following before you call for service. If noise... continues after the lid (door) unlocks. Adjust household water supply regulator to redistribute the load. If the washer does not function properly or does not function at an early stage. Noises You Might Hear Noise Clicking Spraying or Hissing Humming ...
...in the Installation section. Install water hammer arrestors (purchased separately at times during the cycle. Water spraying or circulating during a cycle. The washer may be unbalanced. Vibrating noise Packaging materials were not removed. Not all , check the following before you call for service. If noise... continues after the lid (door) unlocks. Adjust household water supply regulator to redistribute the load. If the washer does not function properly or does not function at an early stage. Noises You Might Hear Noise Clicking Spraying or Hissing Humming ...

Owners Manual
Page 26
... for proper drain hose installation and check for restrictions in . If sudsing or detergent residue continue to be caused by a qualified electrician. Washer will not turn on. Tie drain hose to inlet hose or standpipe to ensure that the plug is not properly plugged in the drain.... to prevent it corrected by the type and amount of the drain pipe during drain. House drain pipes are not connected correctly. The washer pumps out water very rapidly. High-Efficiency detergent is blown, circuit breaker has tripped, or power outage has occurred. For detergent quantities ...
... for proper drain hose installation and check for restrictions in . If sudsing or detergent residue continue to be caused by a qualified electrician. Washer will not turn on. Tie drain hose to inlet hose or standpipe to ensure that the plug is not properly plugged in the drain.... to prevent it corrected by the type and amount of the drain pipe during drain. House drain pipes are not connected correctly. The washer pumps out water very rapidly. High-Efficiency detergent is blown, circuit breaker has tripped, or power outage has occurred. For detergent quantities ...


