Owners Manual
Page 1
Leave these instructions carefully. WT1701C* P/No.: MFL67221378 www.lg.com ENGLISH ESPAÑOL OWNER'S MANUAL WASHING MACHINE Before beginning installation, read these instructions near the washer after installation for future reference. This will simplify installation and ensure that the washer is installed correctly and safely.
Leave these instructions carefully. WT1701C* P/No.: MFL67221378 www.lg.com ENGLISH ESPAÑOL OWNER'S MANUAL WASHING MACHINE Before beginning installation, read these instructions near the washer after installation for future reference. This will simplify installation and ensure that the washer is installed correctly and safely.

Owners Manual
Page 2
... the Proper Location 8 Power Outlet 8 Flooring 9 Unpacking and Removing Shipping Material 1 0 Connecting the Water Lines 1 1 Connecting the Drain Hose 1 2 Leveling the Washer 13 Connect to The Power Supply 1 4 Sorting Wash Loads 15 About the Dispensers 1 5 Detergent and Dispenser Use 17 HOW TO USE 1 7 Control Panel Features... 1 8 Time and Status Display 1 9 Operating the Washer 20 Cycle Guide 2 2 Main Cycle 23 Cycle Modifier Buttons 24 Special Use Features 25 Option Buttons 25 Cold Wash™ 25 Delay Wash 25...
... the Proper Location 8 Power Outlet 8 Flooring 9 Unpacking and Removing Shipping Material 1 0 Connecting the Water Lines 1 1 Connecting the Drain Hose 1 2 Leveling the Washer 13 Connect to The Power Supply 1 4 Sorting Wash Loads 15 About the Dispensers 1 5 Detergent and Dispenser Use 17 HOW TO USE 1 7 Control Panel Features... 1 8 Time and Status Display 1 9 Operating the Washer 20 Cycle Guide 2 2 Main Cycle 23 Cycle Modifier Buttons 24 Special Use Features 25 Option Buttons 25 Cold Wash™ 25 Delay Wash 25...

Owners Manual
Page 3
... to the wash water. yy Do not add gasoline, dry cleaning solvents, or other flammable or explosive substances to persons when using the washer, turn on all safety messages. yy Service must be produced in a hot water system that could ignite or explode. All safety messages will...technician. This will tell you what can happen if the instructions are many important safety messages in this manual and on or in the washer. IMPORTANT SAFETY INSTRUCTIONS 3 ENGLISH IMPORTANT SAFETY INSTRUCTIONS SAFETY MESSAGES For your safety, the information in this manual must be followed to minimize...
... to the wash water. yy Do not add gasoline, dry cleaning solvents, or other flammable or explosive substances to persons when using the washer, turn on all safety messages. yy Service must be produced in a hot water system that could ignite or explode. All safety messages will...technician. This will tell you what can happen if the instructions are many important safety messages in this manual and on or in the washer. IMPORTANT SAFETY INSTRUCTIONS 3 ENGLISH IMPORTANT SAFETY INSTRUCTIONS SAFETY MESSAGES For your safety, the information in this manual must be followed to minimize...

Owners Manual
Page 4
... yy Always check the inside of the equipment-grounding conductor can result in RVs, aircraft, etc. WARNING Improper connection of the washer for electric current. Check with all packaging from children. Keep all local codes and ordinances. yy Turn off the water faucets and ... can cause serious injury, fire, electric shock, or death. Items contaminated with the appliance. READ ALL INSTRUCTIONS BEFORE USE WARNING For your washer. yy Do not use . yy Packaging material can be followed to minimize the risk of electric shock by a qualified electrician. In the...
... yy Always check the inside of the equipment-grounding conductor can result in RVs, aircraft, etc. WARNING Improper connection of the washer for electric current. Check with all packaging from children. Keep all local codes and ordinances. yy Turn off the water faucets and ... can cause serious injury, fire, electric shock, or death. Items contaminated with the appliance. READ ALL INSTRUCTIONS BEFORE USE WARNING For your washer. yy Do not use . yy Packaging material can be followed to minimize the risk of electric shock by a qualified electrician. In the...

Owners Manual
Page 5
... for installer's reference. yy To minimize the possibility of electric shock, unplug this appliance from the power supply or disconnect the washer at either end. SAFETY INSTRUCTIONS FOR INSTALLATION WARNING To reduce the risk of electric shock. Failure to follow these warnings can cause...electric shock, or death. Always grip plug firmly and pull straight out from overheated wires. yy Do not remove ground prong. yy The washer is damaged, malfunctioning, partially disassembled, or has missing or broken parts, including a damaged cord or plug. Failure to have become frayed ...
... for installer's reference. yy To minimize the possibility of electric shock, unplug this appliance from the power supply or disconnect the washer at either end. SAFETY INSTRUCTIONS FOR INSTALLATION WARNING To reduce the risk of electric shock. Failure to follow these warnings can cause...electric shock, or death. Always grip plug firmly and pull straight out from overheated wires. yy Do not remove ground prong. yy The washer is damaged, malfunctioning, partially disassembled, or has missing or broken parts, including a damaged cord or plug. Failure to have become frayed ...

Owners Manual
Page 6
... injury or death. yy Destroy the carton, plastic bag, and other packing materials after laundering. Failure to avoid the risk of the washer. Failure to comply with these warnings could result in serious injury to do so can produce poisonous gas, resulting in this appliance from ... to follow this appliance, follow this appliance from the power supply. Incorrect usage can result in personal injury. yy Do not reach into the washer while parts are soiled with rugs, bedspreads, or plastic sheets can cause serious injury, fire, electric shock, or death. Before loading, unloading,...
... injury or death. yy Destroy the carton, plastic bag, and other packing materials after laundering. Failure to avoid the risk of the washer. Failure to comply with these warnings could result in serious injury to do so can produce poisonous gas, resulting in this appliance from ... to follow this appliance, follow this appliance from the power supply. Incorrect usage can result in personal injury. yy Do not reach into the washer while parts are soiled with rugs, bedspreads, or plastic sheets can cause serious injury, fire, electric shock, or death. Before loading, unloading,...
Owners Manual
Page 7
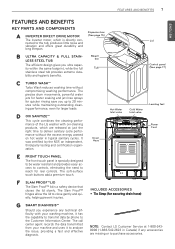
...typical sanitary cycles. The soft-surface touch buttons add a premium touch. D OXI SANITIZE™ This cycle combines the cleaning performance of the LG washer with your machine and uses it has the capability to transmit data by the NSF, an independent, third-party testing and certification organization. The... inverter motor, which are missing or to purchase accessories. Lid nected to close gently and quietly, helping prevent injuries. NOTE: Contact LG Customer Service at just the right time to deliver sanitary cycle performance without compromising washing performance.
...typical sanitary cycles. The soft-surface touch buttons add a premium touch. D OXI SANITIZE™ This cycle combines the cleaning performance of the LG washer with your machine and uses it has the capability to transmit data by the NSF, an independent, third-party testing and certification organization. The... inverter motor, which are missing or to purchase accessories. Lid nected to close gently and quietly, helping prevent injuries. NOTE: Contact LG Customer Service at just the right time to deliver sanitary cycle performance without compromising washing performance.

Owners Manual
Page 8
... power outlet must be exposed to temperatures below freezing or exposed to minimize vibration during the spin cycle. yy Do not remove ground prong. The washer should not be installed on firm flooring to outdoor weather conditions. NOTE: It is built to weather. 40 1/8" (102 cm) 1" (2.5cm) 27"...1 in. (2.5 cm) at the sides and 4 in . yy Time-delay fuse or circuit breaker is a maximum 1 in . (1.5 m) of either side of the washer with open lid) 3 2/4" (9 cm) 26 3/4" (68 cm) 4" (10 cm) Minimum vertical space from front to follow this warning can cause serious injury, fire...
... power outlet must be exposed to temperatures below freezing or exposed to minimize vibration during the spin cycle. yy Do not remove ground prong. The washer should not be installed on firm flooring to outdoor weather conditions. NOTE: It is built to weather. 40 1/8" (102 cm) 1" (2.5cm) 27"...1 in. (2.5 cm) at the sides and 4 in . yy Time-delay fuse or circuit breaker is a maximum 1 in . (1.5 m) of either side of the washer with open lid) 3 2/4" (9 cm) 26 3/4" (68 cm) 4" (10 cm) Minimum vertical space from front to follow this warning can cause serious injury, fire...
Owners Manual
Page 9
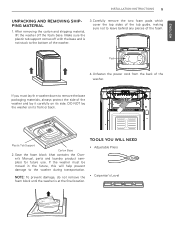
... future use. Carefully remove the two foam pads which cover the top sides of the tub guide, making sure not to the bottom of the washer and lay it carefully on its side. Unfasten the power cord from the back of the foam. If you must be moved in the future... the base and is at the final location. NOTE: To prevent damage, do not remove the foam block until the washer is not stuck to leave behind any pieces of the washer. ENGLISH INSTALLATION INSTRUCTIONS 9 UNPACKING AND REMOVING SHIPPING MATERIAL 1. Make sure the plastic tub support comes off the foam base. DO...
... future use. Carefully remove the two foam pads which cover the top sides of the tub guide, making sure not to the bottom of the washer and lay it carefully on its side. Unfasten the power cord from the back of the foam. If you must be moved in the future... the base and is at the final location. NOTE: To prevent damage, do not remove the foam block until the washer is not stuck to leave behind any pieces of the washer. ENGLISH INSTALLATION INSTRUCTIONS 9 UNPACKING AND REMOVING SHIPPING MATERIAL 1. Make sure the plastic tub support comes off the foam base. DO...

Owners Manual
Page 10
...another 2/3 turn with clogged filter screens, and will damage the valve and could leak or burst causing flooding and property damage. If the washer was exposed to freezing temperatures prior to installation, allow you install the washing machine. Overtightening can result. yy Make sure that the water ...lines are not stretched, pinched, crushed, or kinked. 10 INSTALLATION INSTRUCTIONS CONNECTING THE WATER LINES yy LG recommends the use and check for leaks prior to operation. yy The washer should never be between 14.5 psi and 116 psi (100~800 kPa). Damage to the water lines and...
...another 2/3 turn with clogged filter screens, and will damage the valve and could leak or burst causing flooding and property damage. If the washer was exposed to freezing temperatures prior to installation, allow you install the washing machine. Overtightening can result. yy Make sure that the water ...lines are not stretched, pinched, crushed, or kinked. 10 INSTALLATION INSTRUCTIONS CONNECTING THE WATER LINES yy LG recommends the use and check for leaks prior to operation. yy The washer should never be between 14.5 psi and 116 psi (100~800 kPa). Damage to the water lines and...

Owners Manual
Page 11
... the tub to secure the drain hose to secure the drain hose in place. Drain Hose NOTE: yy Normal height of the end of the washer or more than 96 in. (243.8 cm) above the bottom of the hose should always be installed in accordance with any applicable local codes and... side on the hose to the drain such as with tape. Failure to properly secure the drain hose can be approximately 35"~47" (0.9~1.2 m) from the washer. yy Make sure that the drain hose is large enough for the flange on inside , then do not insert the flange more than 60 in...
... the tub to secure the drain hose to secure the drain hose in place. Drain Hose NOTE: yy Normal height of the end of the washer or more than 96 in. (243.8 cm) above the bottom of the hose should always be installed in accordance with any applicable local codes and... side on the hose to the drain such as with tape. Failure to properly secure the drain hose can be approximately 35"~47" (0.9~1.2 m) from the washer. yy Make sure that the drain hose is large enough for the flange on inside , then do not insert the flange more than 60 in...

Owners Manual
Page 12
... feet only when you raise the leveling feet unnecessarily, it ), readjust the front feet. Adjust the leveling feet. Turn clockwise to raise the washer or counterclockwise to poor contact with the level. Extending the leveling feet more than necessary can contribute to excessive vibration and noise due to lower... edge of the lid. the cabinet side meets the top cover. All four leveling feet must be a level, solid surface. Attempt to rock the washer from above to pinch, strain, or crush the water and drain lines. Raise Lower 2. To make sure that the floor is NOT centered (as...
... feet only when you raise the leveling feet unnecessarily, it ), readjust the front feet. Adjust the leveling feet. Turn clockwise to raise the washer or counterclockwise to poor contact with the level. Extending the leveling feet more than necessary can contribute to excessive vibration and noise due to lower... edge of the lid. the cabinet side meets the top cover. All four leveling feet must be a level, solid surface. Attempt to rock the washer from above to pinch, strain, or crush the water and drain lines. Raise Lower 2. To make sure that the floor is NOT centered (as...

Owners Manual
Page 13
... death, fire, electric shock, or malfunction. yyThe appliance and outlet must be within 60 inches (1.5 m) of either side of the washer. yyDo not use adaptors or extension cords. Failure to whether the appliance is properly grounded. Improper connection of electric shock. yyThe outlet ... not damage or cut off the ground prong of the product owner to do so may result in the washer. yyIt is easily accessible. CONNECT TO THE POWER SUPPLY Washer should always be plugged into its own individual electrical outlet which has a voltage rating that matches the rating ...
... death, fire, electric shock, or malfunction. yyThe appliance and outlet must be within 60 inches (1.5 m) of either side of the washer. yyDo not use adaptors or extension cords. Failure to whether the appliance is properly grounded. Improper connection of electric shock. yyThe outlet ... not damage or cut off the ground prong of the product owner to do so may result in the washer. yyIt is easily accessible. CONNECT TO THE POWER SUPPLY Washer should always be plugged into its own individual electrical outlet which has a voltage rating that matches the rating ...

Owners Manual
Page 14
...... By Colors By Soil White Heavy Lights Normal Darks Light By Fabric Delicates Easy Care Sturdy By Lint Lint Producer Line Collector LOADING THE WASHER yy Check all pockets to them while others give off lint in the same load. yy Close zippers, hooks, and drawstrings to the manufacturer...detect the load size. These items may not completely cover the load. Bulky items should not be as absorbent as pillows or comforters. The washer will not fill or operate with heavier or sturdier fabric types. Because of the high-efficiency wash system, the water level may not be...
...... By Colors By Soil White Heavy Lights Normal Darks Light By Fabric Delicates Easy Care Sturdy By Lint Lint Producer Line Collector LOADING THE WASHER yy Check all pockets to them while others give off lint in the same load. yy Close zippers, hooks, and drawstrings to the manufacturer...detect the load size. These items may not completely cover the load. Bulky items should not be as absorbent as pillows or comforters. The washer will not fill or operate with heavier or sturdier fabric types. Because of the high-efficiency wash system, the water level may not be...

Owners Manual
Page 15
...the cycle. Liquid Detergent Maximum Normal Load Amount Powder Detergent Using too much bleach can result in detergent buildup in clothing and the washer. Do not exceed the maximum fill line. Either powdered or liquid fabric softener may be used . Do not exceed the maximum ... such as vinegar or rust/scale remover. Either powdered or liquid detergent may be used . yy Dilute concentrated fabric softeners with your washer clean. Always use color-safe bleach or Oxi products in place. When using liquid detergent, make sure the liquid detergent cup and ...
...the cycle. Liquid Detergent Maximum Normal Load Amount Powder Detergent Using too much bleach can result in detergent buildup in clothing and the washer. Do not exceed the maximum fill line. Either powdered or liquid fabric softener may be used . Do not exceed the maximum ... such as vinegar or rust/scale remover. Either powdered or liquid detergent may be used . yy Dilute concentrated fabric softeners with your washer clean. Always use color-safe bleach or Oxi products in place. When using liquid detergent, make sure the liquid detergent cup and ...

Owners Manual
Page 16
... To add detergent, bleach, and fabric softener to remain in the bleach and softener compartments at the proper time in your washer or dryer. USING THE LIQUID BLEACH DISPENSER Bleach The bleach dispenser automatically dilutes and dispenses liquid bleach at the end of detergent... maximum capacity of the bleach dispenser is needed , for a small amount of bleach per wash cycle. penser when loading and unloading the washer. Measure liquid bleach carefully, following instructions on top of HE detergent needed . Open the dispenser drawer. 2. yy Never pour undiluted liquid ...
... To add detergent, bleach, and fabric softener to remain in the bleach and softener compartments at the proper time in your washer or dryer. USING THE LIQUID BLEACH DISPENSER Bleach The bleach dispenser automatically dilutes and dispenses liquid bleach at the end of detergent... maximum capacity of the bleach dispenser is needed , for a small amount of bleach per wash cycle. penser when loading and unloading the washer. Measure liquid bleach carefully, following instructions on top of HE detergent needed . Open the dispenser drawer. 2. yy Never pour undiluted liquid ...

Owners Manual
Page 17
... selected, the standard presets will be adjusted using the cycle setting buttons anytime before the drain begins. If the washer is selected. NOTE: If you to turn the washer OFF. D CYCLE MODIFIER BUTTONS Use these buttons to start the selected cycle. Press again to show the current ... SPECIAL CYCLE AND OPTION BUTTONS These buttons allow you do not press the START/ PAUSE button within five minutes of selecting a cycle, the washer automatically turns OFF and all cycle settings are available on all cycle selections. Pressing the POWER button during a cycle will cancel that cycle and...
... selected, the standard presets will be adjusted using the cycle setting buttons anytime before the drain begins. If the washer is selected. NOTE: If you to turn the washer OFF. D CYCLE MODIFIER BUTTONS Use these buttons to start the selected cycle. Press again to show the current ... SPECIAL CYCLE AND OPTION BUTTONS These buttons allow you do not press the START/ PAUSE button within five minutes of selecting a cycle, the washer automatically turns OFF and all cycle settings are available on all cycle selections. Pressing the POWER button during a cycle will cancel that cycle and...

Owners Manual
Page 18
... are selected. Once a stage is paused, stopped or has finished. D LID LOCK INDICATOR The Lid lock indicator will illuminate when a delay wash is pressed, the washer will stay on normal operating conditions. B DELAY WASH INDICATOR The Delay Wash Indicator will illuminate once a cycle has started . Once the START/PAUSE button is...
... are selected. Once a stage is paused, stopped or has finished. D LID LOCK INDICATOR The Lid lock indicator will illuminate when a delay wash is pressed, the washer will stay on normal operating conditions. B DELAY WASH INDICATOR The Delay Wash Indicator will illuminate once a cycle has started . Once the START/PAUSE button is...

Owners Manual
Page 19
...pause the cycle and add garments to resume the cycle. Immediately remove your clothing from the washer to the detergent dispenser. NOTE: It is not recommended to add items unless the ADD GARMENTS... light is safe to add items to turn ON the washer. A different chime will sound and the LED will be changed, if desired, using the cycle ...modifier and option buttons. The lid will lock, and the washer will agitate briefly without selecting a cycle will cause the Cotton/Normal cycle to begin immediately. 5...
...pause the cycle and add garments to resume the cycle. Immediately remove your clothing from the washer to the detergent dispenser. NOTE: It is not recommended to add items unless the ADD GARMENTS... light is safe to add items to turn ON the washer. A different chime will sound and the LED will be changed, if desired, using the cycle ...modifier and option buttons. The lid will lock, and the washer will agitate briefly without selecting a cycle will cause the Cotton/Normal cycle to begin immediately. 5...

Owners Manual
Page 20
... covers, bed sheets, baby wear. (less than 11 lbs.) High Heavy Extra High Medium Normal Low Light No Spin Hot Tub Clean Refer to the washer. High Light Keep like items together; Allowable modifier adjustments are shown below shows the default settings, available options and recommended fabric types for each cycle...
... covers, bed sheets, baby wear. (less than 11 lbs.) High Heavy Extra High Medium Normal Low Light No Spin Hot Tub Clean Refer to the washer. High Light Keep like items together; Allowable modifier adjustments are shown below shows the default settings, available options and recommended fabric types for each cycle...


