
Owner's Manual
Page 2
... INSTRUCTIONS Choose the Proper Location 9 Clearances 9 Flooring 10 Installations With Optional Pedestal Base or Stacking Kit 10 Unpacking and Removing Shipping Bolts 11 Connecting the Water Lines 12 Connecting the Drain Line 13 Leveling the Washer 14 HOW TO USE Sorting Wash Loads 15 ...ACCESSORIES Key Dimensions and Specifications 33 Optional Accessories 33 WARRANTY Product Registration Information 35 2 THANK YOU! Your new LG washing machine combines the most advanced washing technology with many years of reliable service. By following the operating and care instructions ...
... INSTRUCTIONS Choose the Proper Location 9 Clearances 9 Flooring 10 Installations With Optional Pedestal Base or Stacking Kit 10 Unpacking and Removing Shipping Bolts 11 Connecting the Water Lines 12 Connecting the Drain Line 13 Leveling the Washer 14 HOW TO USE Sorting Wash Loads 15 ...ACCESSORIES Key Dimensions and Specifications 33 Optional Accessories 33 WARRANTY Product Registration Information 35 2 THANK YOU! Your new LG washing machine combines the most advanced washing technology with many years of reliable service. By following the operating and care instructions ...

Owner's Manual
Page 8
... line and drain pump filter. 4 Drain Hose 2 1 3 Hot and Cold Water Inlets Rear of Washer Included Accessories Hot and Cold Water Hoses Caps (4) (for covering shipping bolt holes) Wrench (for removing shipping bolts and adjusting leveling feet) Tie Strap (for securing drain hose) Elbow Bracket (for securing drain hose) 8
... line and drain pump filter. 4 Drain Hose 2 1 3 Hot and Cold Water Inlets Rear of Washer Included Accessories Hot and Cold Water Hoses Caps (4) (for covering shipping bolt holes) Wrench (for removing shipping bolts and adjusting leveling feet) Tie Strap (for securing drain hose) Elbow Bracket (for securing drain hose) 8

Owner's Manual
Page 11
... transport, the washer is secured to the back of the carton base. NOTE: Save the bolts and retainers for future use the included wrench to remove the 4 shipping bolts by turning them counterclockwise. INSTALLATION INSTRUCTIONS UNPACKING AND REMOVING SHIPPING BOLTS When removing the washer from the carton base, be sure to remove the foam tub...
... transport, the washer is secured to the back of the carton base. NOTE: Save the bolts and retainers for future use the included wrench to remove the 4 shipping bolts by turning them counterclockwise. INSTALLATION INSTRUCTIONS UNPACKING AND REMOVING SHIPPING BOLTS When removing the washer from the carton base, be sure to remove the foam tub...
Owner's Manual
Page 30
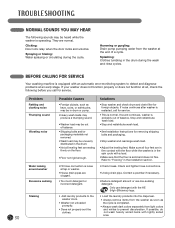
... • Load the laundry products into the dispenser. • Always remove items from the washer at the end of balance. • Shipping bolts and/or packaging materials not removed. • Wash load may be unevenly distributed in the drum. • Not all leveling feet are ...detergent with lightly soiled ones. Stop and redistribute wash load. • Stop and redistribute wash load. • See Installation Instructions for removing shipping bolts and packaging. • Stop washer and rearrange wash load. • Adjust the leveling feet. They are in firm contact with...
... • Load the laundry products into the dispenser. • Always remove items from the washer at the end of balance. • Shipping bolts and/or packaging materials not removed. • Wash load may be unevenly distributed in the drum. • Not all leveling feet are ...detergent with lightly soiled ones. Stop and redistribute wash load. • Stop and redistribute wash load. • See Installation Instructions for removing shipping bolts and packaging. • Stop washer and rearrange wash load. • Adjust the leveling feet. They are in firm contact with...

