Owner's Manual
Page 3
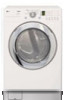
...Instructions ...5 Preparation Before Washing...10 Using the Dispenser...11 Cycles ...13 How to maintain water temperature at its optimum level for your washer. PRODUCT FEATURES Direct Drive System The advanced Brushless DC motor directly drives the drum without belt and pulley. Child Lock The Child ...easily. Automatic Wash Load Detection Automatically detects the load and optimizes the washing time. When the washer is turned on, the light in Heater Internal heater helps to Use the Washer ...14 Maintenance ...17 Troubleshooting Guide...20 Warranty ...23 2 Tilted Drum and Extra Large Door...
...Instructions ...5 Preparation Before Washing...10 Using the Dispenser...11 Cycles ...13 How to maintain water temperature at its optimum level for your washer. PRODUCT FEATURES Direct Drive System The advanced Brushless DC motor directly drives the drum without belt and pulley. Child Lock The Child ...easily. Automatic Wash Load Detection Automatically detects the load and optimizes the washing time. When the washer is turned on, the light in Heater Internal heater helps to Use the Washer ...14 Maintenance ...17 Troubleshooting Guide...20 Warranty ...23 2 Tilted Drum and Extra Large Door...
Owner's Manual
Page 4
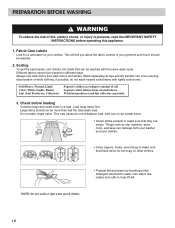
... certain conditions, hydrogen gas may contribute to cooking oil in risk of fire, electric shock, or injury to persons when using the washer, follow the fabric care instructions supplied by providing a path of the fabric softener or product. WARNING: Improper connection of the equipment-grounding... conductor can result in your washer. if it will reduce the risk of electric shock by the garment manufacturer. • Do not place items exposed to a ...
... certain conditions, hydrogen gas may contribute to cooking oil in risk of fire, electric shock, or injury to persons when using the washer, follow the fabric care instructions supplied by providing a path of the fabric softener or product. WARNING: Improper connection of the equipment-grounding... conductor can result in your washer. if it will reduce the risk of electric shock by the garment manufacturer. • Do not place items exposed to a ...
Owner's Manual
Page 5
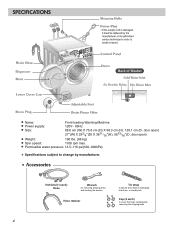
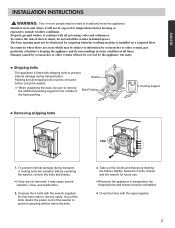
...) Specifications subject to cover the holes created after removing the shipping bolts 4 Accessories Hot/Cold (1 each) Hose Wrench for removing shipping bolts and leveling the washer Hose retainer Tie strap to secure drain hose to standpipe, inlet hose, or laundry tub Cap (4 each) to change by manufacturer.
...) Specifications subject to cover the holes created after removing the shipping bolts 4 Accessories Hot/Cold (1 each) Hose Wrench for removing shipping bolts and leveling the washer Hose retainer Tie strap to secure drain hose to standpipe, inlet hose, or laundry tub Cap (4 each) to change by manufacturer.
Owner's Manual
Page 6
... unpacking the base, be exposed to temperatures below freezing or exposed to remove the additional packing support in the middle of the washer to remove easily. Do first lower side to prevent operating without removing bolts. 3. In countries where there are installed. To ... vibration, noise, and malfunction. 2. The base opening must be removed before using the washer. Damage caused by carpeting when the washing machine is installed on a carpeted floor. Properly ground washer to keeping the appliance and its surroundings in humid spaces. Unscrew the 4 bolts with...
... unpacking the base, be exposed to temperatures below freezing or exposed to remove the additional packing support in the middle of the washer to remove easily. Do first lower side to prevent operating without removing bolts. 3. In countries where there are installed. To ... vibration, noise, and malfunction. 2. The base opening must be removed before using the washer. Damage caused by carpeting when the washing machine is installed on a carpeted floor. Properly ground washer to keeping the appliance and its surroundings in humid spaces. Unscrew the 4 bolts with...
Owner's Manual
Page 7
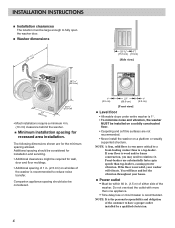
... Front-loaders use substantially faster spin speeds than one appliance. • Time-delay fuse or circuit breaker is not solid, your washer will hear and feel the vibration throughout your floor is recommended to a top-loader. NOTE: It is even more than top-...loaders, causing greater vibration. The following dimensions shown are not recommended. • Never install the washer on all sides of the washer. Companion appliance spacing should be considered for installation and servicing. • Additional clearances might be large enough to have a...
... Front-loaders use substantially faster spin speeds than one appliance. • Time-delay fuse or circuit breaker is not solid, your washer will hear and feel the vibration throughout your floor is recommended to a top-loader. NOTE: It is even more than top-...loaders, causing greater vibration. The following dimensions shown are not recommended. • Never install the washer on all sides of the washer. Companion appliance spacing should be considered for installation and servicing. • Additional clearances might be large enough to have a...
Owner's Manual
Page 8
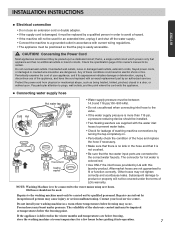
...temperature for leakage of washing machine connections by turning the tap completely on. • Periodically check the condition of LG's warranty. Periodically examine the cord of this laundry product. Other hoses may occur. Check the specification page of...the freezing point. The connector for hot water is colored red. • Use ONLY the inlet hoses provided by LG with the water inlet hoses to prevent water leaks. • Check for a few hours before putting it and shut... • If the water supply pressure is to be installed. • Two Sealing washers are dangerous.
...temperature for leakage of washing machine connections by turning the tap completely on. • Periodically check the condition of LG's warranty. Periodically examine the cord of this laundry product. Other hoses may occur. Check the specification page of...the freezing point. The connector for hot water is colored red. • Use ONLY the inlet hoses provided by LG with the water inlet hoses to prevent water leaks. • Check for a few hours before putting it and shut... • If the water supply pressure is to be installed. • Two Sealing washers are dangerous.
Owner's Manual
Page 9
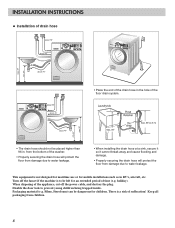
holiday). Packaging material (e.g. from the bottom of the washer. • Properly securing the drain hose will protect the floor from damage due to water leakage. • When installing the drain hose at a sink, secure ...
holiday). Packaging material (e.g. from the bottom of the washer. • Properly securing the drain hose will protect the floor from damage due to water leakage. • When installing the drain hose at a sink, secure ...
Owner's Manual
Page 10
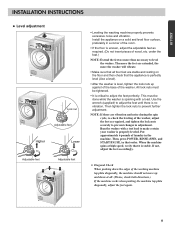
... nuts must be tightened. • It is uneven, adjust the adjustable feet as required, and tighten the lock nuts securely to make certain your washer is stable. NOTE: If there are stable and resting on a solid and level floor surface, preferably in the machine. Put approximately 6 pounds of...check both directions.) If the machine rocks when pushing the machine top plate diagonally, adjust the feet again. 9 This must be done while the washer is level, tighten the lock nuts up and down the edges of the washing machine top plate diagonally, the machine should not move up against...
... nuts must be tightened. • It is uneven, adjust the adjustable feet as required, and tighten the lock nuts securely to make certain your washer is stable. NOTE: If there are stable and resting on a solid and level floor surface, preferably in the machine. Put approximately 6 pounds of...check both directions.) If the machine rocks when pushing the machine top plate diagonally, adjust the feet again. 9 This must be done while the washer is level, tighten the lock nuts up and down the edges of the washing machine top plate diagonally, the machine should not move up against...
Owner's Manual
Page 11
... keys can be more than half the total wash load. Sorting To get the best results, sort clothes into loads that can damage both your washer and your clothes. • Close zippers, hooks, and strings to be washed in a load. Different fabrics need to make sure that these items do not...
... keys can be more than half the total wash load. Sorting To get the best results, sort clothes into loads that can damage both your washer and your clothes. • Close zippers, hooks, and strings to be washed in a load. Different fabrics need to make sure that these items do not...
Owner's Manual
Page 12
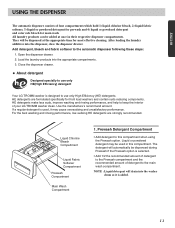
...Prewash compartment and the recommended amount of detergent to use only HE(High Efficiency) detergent Your LG TROMM washer is added. 11 The detergent will drain into the washer drum as it may cause oversudsing and unsatisfactory performance. HE detergents are strongly recommended. All ... be used , it is designed to the main wash compartment. ENGLISH USING THE DISPENSER The automatic dispenser consists of your LG TROMM washer clean. Add detergent, bleach and fabric softener to this compartment. Liquid or powdered detergent may be added at the appropriate time...
...Prewash compartment and the recommended amount of detergent to use only HE(High Efficiency) detergent Your LG TROMM washer is added. 11 The detergent will drain into the washer drum as it may cause oversudsing and unsatisfactory performance. HE detergents are strongly recommended. All ... be used , it is designed to the main wash compartment. ENGLISH USING THE DISPENSER The automatic dispenser consists of your LG TROMM washer clean. Add detergent, bleach and fabric softener to this compartment. Liquid or powdered detergent may be added at the appropriate time...
Owner's Manual
Page 13
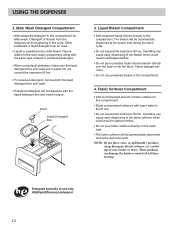
.... • Do not pour fabric softener directly on the top of fabric softener to this compartment. Fabric Softener Compartment • Add recommended amount of your washer or dryer. These products can occur. • Do not use only HE(High Efficiency) detergent 12 Main Wash Detergent Compartment • Add measured detergent to...
.... • Do not pour fabric softener directly on the top of fabric softener to this compartment. Fabric Softener Compartment • Add recommended amount of your washer or dryer. These products can occur. • Do not use only HE(High Efficiency) detergent 12 Main Wash Detergent Compartment • Add measured detergent to...

Owner's Manual
Page 15
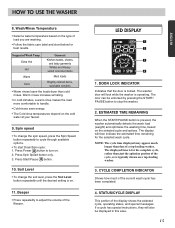
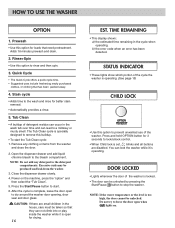
...Wash cycle and setting the Soil Level button at Light. 3. Power • Use this option to ensure the removal of selecting a cycle, the washer automatically turns off continually to indicate that the SPINSENSETM function has been selected. • Push and hold the Water Plus button for 3 seconds to... hours. • Choose the wash cycle for your load, and then press the Delay Wash button once for superior results. 6. HOW TO USE THE WASHER Cycle Selector Knob 1. Cycles • Rotate the Cycle selector knob to start of fabric and soil levels. • Each cycle has a preset Water...
...Wash cycle and setting the Soil Level button at Light. 3. Power • Use this option to ensure the removal of selecting a cycle, the washer automatically turns off continually to indicate that the SPINSENSETM function has been selected. • Push and hold the Water Plus button for 3 seconds to... hours. • Choose the wash cycle for your load, and then press the Delay Wash button once for superior results. 6. HOW TO USE THE WASHER Cycle Selector Knob 1. Cycles • Rotate the Cycle selector knob to start of fabric and soil levels. • Each cycle has a preset Water...
Owner's Manual
Page 16
... Most loads Brightly colored items, Cold washable woolens • Warm rinses leave the loads dryer than that the door is on a top-loading washer. 3. Beeper • Press repeatedly to cycle through available options. • To start Drain/Spin cycle: 1. NOTE: The cycle time displayed... may appear much of the display shows the selected cycle, operating status, and special messages. Suggested Wash Temp. The washer door will then indicate the estimated time remaining for best results. Soil Level • To change the spin speed, press the Spin Speed...
... Most loads Brightly colored items, Cold washable woolens • Warm rinses leave the loads dryer than that the door is on a top-loading washer. 3. Beeper • Press repeatedly to cycle through available options. • To start Drain/Spin cycle: 1. NOTE: The cycle time displayed... may appear much of the display shows the selected cycle, operating status, and special messages. Suggested Wash Temp. The washer door will then indicate the estimated time remaining for best results. Soil Level • To change the spin speed, press the Spin Speed...
Owner's Manual
Page 17
... smell. Close the dispenser drawer slowly. 4. Power on . Do not try to remove this option for drying. 16 EST. HOW TO USE THE WASHER OPTION 1. The Tub Clean cycle is complete, leave the door open for loads that has been packed away. 4. CAUTION: If there are disabled. NOTE... lead to the bleach compartment. Press and hold OPTION button for better stain removal. • Automatically provides a rinse. 5. You can lock the washer while it is set, blinks and all buttons are small children in the cycle when operating, b) the error code when an error has been detected...
... smell. Close the dispenser drawer slowly. 4. Power on . Do not try to remove this option for drying. 16 EST. HOW TO USE THE WASHER OPTION 1. The Tub Clean cycle is complete, leave the door open for loads that has been packed away. 4. CAUTION: If there are disabled. NOTE... lead to the bleach compartment. Press and hold OPTION button for better stain removal. • Automatically provides a rinse. 5. You can lock the washer while it is set, blinks and all buttons are small children in the cycle when operating, b) the error code when an error has been detected...
Owner's Manual
Page 18
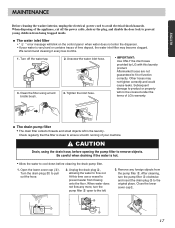
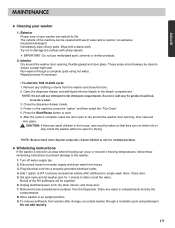
ENGLISH MAINTENANCE Before cleaning the washer interior, unplug the electrical power cord to pull out the hose. 2. ... the lower cover cap . 3 1 2 17 Tighten the inlet hose. • IMPORTANT: Use ONLY the inlet hoses provided by LG with this time use a vessel to the original place. At this laundry product. CAUTION Drain, using a hard bristle brush. 4. ...hose. 3. After cleaning, turn the pump filter open to remove objects. When disposing of LG's warranty. We recommend cleaning it every few months. 1. When water does not flow any foreign objects from flowing...
ENGLISH MAINTENANCE Before cleaning the washer interior, unplug the electrical power cord to pull out the hose. 2. ... the lower cover cap . 3 1 2 17 Tighten the inlet hose. • IMPORTANT: Use ONLY the inlet hoses provided by LG with this time use a vessel to the original place. At this laundry product. CAUTION Drain, using a hard bristle brush. 4. ...hose. 3. After cleaning, turn the pump filter open to remove objects. When disposing of LG's warranty. We recommend cleaning it every few months. 1. When water does not flow any foreign objects from flowing...
Owner's Manual
Page 19
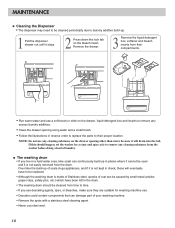
...easily removed from the drum. The washing drum • If you live in the drum. • The washing drum should happen, set the washer for washing machine use. • Descaler could contain components that can be replaced. • Although the washing drum is not kept in reverse ...cycle to remove any cleaning substance from their proper location. Remove the drawer. 3 Remove the liquid detergent box, softener and bleach inserts from the washer before doing a load of laundry. NOTE: Do not use any excess laundry additives. • Clean the drawer opening other than water because it...
...easily removed from the drum. The washing drum • If you live in the drum. • The washing drum should happen, set the washer for washing machine use. • Descaler could contain components that can be replaced. • Although the washing drum is not kept in reverse ...cycle to remove any cleaning substance from their proper location. Remove the drawer. 3 Remove the liquid detergent box, softener and bleach inserts from the washer before doing a load of laundry. NOTE: Do not use any excess laundry additives. • Clean the drawer opening other than water because it...
Owner's Manual
Page 20
...are small children in compartments and dry the compartments. 8. Open the dispenser drawer and add liquid chlorine bleach to dry around the washer door opening , door seal and door glass. ! After the cycle is complete, leave the door open for washing machines. Turn... 9. Add 1 gallon (3.8 ) nontoxic recreational vehicle (RV) antifreeze to start the TUB CLEAN cycle: 1. Not all the water. Store washer in freezing temperatures, follow these winterizing instructions to prevent damage to the detergent compartments. Wipe with a damp cloth. Close the dispenser drawer slowly....
...are small children in compartments and dry the compartments. 8. Open the dispenser drawer and add liquid chlorine bleach to dry around the washer door opening , door seal and door glass. ! After the cycle is complete, leave the door open for washing machines. Turn... 9. Add 1 gallon (3.8 ) nontoxic recreational vehicle (RV) antifreeze to start the TUB CLEAN cycle: 1. Not all the water. Store washer in freezing temperatures, follow these winterizing instructions to prevent damage to the detergent compartments. Wipe with a damp cloth. Close the dispenser drawer slowly....
Owner's Manual
Page 21
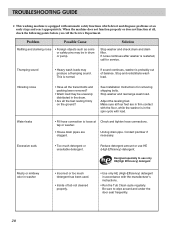
...loose at an early stage and react appropriately. Reduce detergent amount or use only HE(High Efficiency) detergent Musty or mildewy odor in washer • Incorrect or too much detergent or unsuitable detergent. Problem Possible Cause Rattling and clanking noise • Foreign objects such as ...be unevenly distributed in accordance with the manufacturer's instructions. • Run the Tub Clean cycle regularly. If noise continues after washer is restarted, call the Service Department. Designed specially to wipe around and under the door seal frequently. 20 Stop...
...loose at an early stage and react appropriately. Reduce detergent amount or use only HE(High Efficiency) detergent Musty or mildewy odor in washer • Incorrect or too much detergent or unsuitable detergent. Problem Possible Cause Rattling and clanking noise • Foreign objects such as ...be unevenly distributed in accordance with the manufacturer's instructions. • Run the Tub Clean cycle regularly. If noise continues after washer is restarted, call the Service Department. Designed specially to wipe around and under the door seal frequently. 20 Stop...
Owner's Manual
Page 22
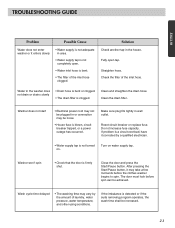
...drains slowly • Drain hose is bent or clogged. • The drain filter is blown, circuit breaker tripped, or a power outage has occurred. Washer does not start • Electrical power cord may not be plugged in or connection may be loose. • House fuse is clogged. Reset circuit ... problem is a circuit overload, have it corrected by the amount of the inlet hose. TROUBLESHOOTING GUIDE ENGLISH Problem Possible Cause Water does not enter washer or it enters slowly • Water supply is not adequate in area. • Water supply tap is not completely open tap. Check the ...
...drains slowly • Drain hose is bent or clogged. • The drain filter is blown, circuit breaker tripped, or a power outage has occurred. Washer does not start • Electrical power cord may not be plugged in or connection may be loose. • House fuse is clogged. Reset circuit ... problem is a circuit overload, have it corrected by the amount of the inlet hose. TROUBLESHOOTING GUIDE ENGLISH Problem Possible Cause Water does not enter washer or it enters slowly • Water supply is not adequate in area. • Water supply tap is not completely open tap. Check the ...
Owner's Manual
Page 23
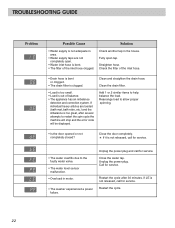
... be displayed. Restart the cycle after several attempts to the faulty water valve. • The water level sensor malfunction. • Overload in motor. • The washer experienced a power failure. Add 1 or 2 similar items to allow proper spinning. • Is the door opened or not completely closed? Unplug the power plug. Restart...
... be displayed. Restart the cycle after several attempts to the faulty water valve. • The water level sensor malfunction. • Overload in motor. • The washer experienced a power failure. Add 1 or 2 similar items to allow proper spinning. • Is the door opened or not completely closed? Unplug the power plug. Restart...


