Owner's Manual
Page 2
Designed specially to your dealer if your machine requires service. 1-800-243-0000 24 HOURS A DAY, 7 DAYS A WEEK FOR LG CUSTOMER SERVICE Owner's Manual Washing Machine WM2233H* Please read this information to use , and maintenance. Retain it for future reference. Record the model and serial numbers of your machine and report this manual carefully. It provides instructions on safe installation, use only HE (High Efficiency) detergent
Designed specially to your dealer if your machine requires service. 1-800-243-0000 24 HOURS A DAY, 7 DAYS A WEEK FOR LG CUSTOMER SERVICE Owner's Manual Washing Machine WM2233H* Please read this information to use , and maintenance. Retain it for future reference. Record the model and serial numbers of your machine and report this manual carefully. It provides instructions on safe installation, use only HE (High Efficiency) detergent
Owner's Manual
Page 3
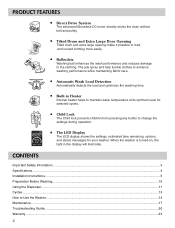
... Washer ...14 Maintenance ...17 Troubleshooting Guide...20 Warranty ...23 2 CONTENTS Important Safety Information ...3 Specifications...4 Installation Instructions ...5 Preparation Before Washing...10 Using the Dispenser...11 Cycles ...13 How to load and unload clothing more easily. Automatic Wash Load Detection Automatically detects the load and optimizes the washing ...
... Washer ...14 Maintenance ...17 Troubleshooting Guide...20 Warranty ...23 2 CONTENTS Important Safety Information ...3 Specifications...4 Installation Instructions ...5 Preparation Before Washing...10 Using the Dispenser...11 Cycles ...13 How to load and unload clothing more easily. Automatic Wash Load Detection Automatically detects the load and optimizes the washing ...
Owner's Manual
Page 4
...and have the proper outlet, consult an electrician. ! WARNING! ENGLISH IMPORTANT SAFETY INSTRUCTIONS ! If the hot water system has not been used near children. • Before the washer is properly grounded. Do not modify the plug provided with a qualified electrician or serviceman if... and grounding plug. WARNING: Improper connection of the equipment-grounding conductor can result in a hot water system that has not been used for grounding requirements. • ALWAYS follow the fabric care instructions supplied by providing a path of electric shock. Check with the ...
...and have the proper outlet, consult an electrician. ! WARNING! ENGLISH IMPORTANT SAFETY INSTRUCTIONS ! If the hot water system has not been used near children. • Before the washer is properly grounded. Do not modify the plug provided with a qualified electrician or serviceman if... and grounding plug. WARNING: Improper connection of the equipment-grounding conductor can result in a hot water system that has not been used for grounding requirements. • ALWAYS follow the fabric care instructions supplied by providing a path of electric shock. Check with the ...
Owner's Manual
Page 6
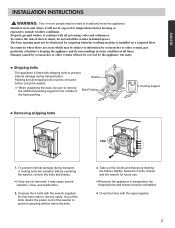
... and braces by carpeting when the washing machine is transported, the shipping bolts and braces must not be removed before using the washer. Keep the 4 bolts, braces and the wrench for future use. • Whenever the appliance is installed on a carpeted floor. Packing and all governing codes and ordinances. Close the holes...
... and braces by carpeting when the washing machine is transported, the shipping bolts and braces must not be removed before using the washer. Keep the 4 bolts, braces and the wrench for future use. • Whenever the appliance is installed on a carpeted floor. Packing and all governing codes and ordinances. Close the holes...
Owner's Manual
Page 7
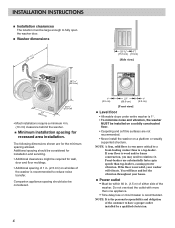
... appliance spacing should be considered for installation and servicing. • Additional clearances might be within 60 in . (10 cm) clearance behind the washer. Front-loaders use substantially faster spin speeds than one appliance. • Time-delay fuse or circuit breaker is wood and/or frame construction, you may need to have...
... appliance spacing should be considered for installation and servicing. • Additional clearances might be within 60 in . (10 cm) clearance behind the washer. Front-loaders use substantially faster spin speeds than one appliance. • Time-delay fuse or circuit breaker is wood and/or frame construction, you may need to have...
Owner's Manual
Page 8
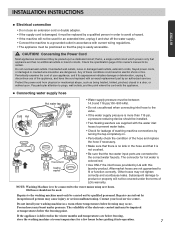
... than 116 psi, a pressure reducing device should not be connected to fit or function correctly. INSTALLATION INSTRUCTIONS ENGLISH Electrical connection • Do not use of the appliance, and have the cord replaced with an exact replacement part by qualified personnel. Do not overload wall outlets. Protect the power cord... it is not crushed. • Be sure that the plug is to be placed upon . Old hoses should be replaced by LG with this owner's manual to be used for an extended time, unplug it must be between 14.5 and 116 psi(100~800 kPa). • Do not crossthread when ...
... than 116 psi, a pressure reducing device should not be connected to fit or function correctly. INSTALLATION INSTRUCTIONS ENGLISH Electrical connection • Do not use of the appliance, and have the cord replaced with an exact replacement part by qualified personnel. Do not overload wall outlets. Protect the power cord... it is not crushed. • Be sure that the plug is to be placed upon . Old hoses should be replaced by LG with this owner's manual to be used for an extended time, unplug it must be between 14.5 and 116 psi(100~800 kPa). • Do not crossthread when ...
Owner's Manual
Page 9
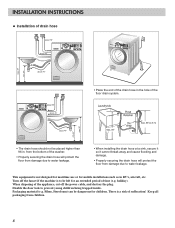
...). from the bottom of the washer. • Properly securing the drain hose will protect the floor from children. 8 This equipment is not designed for maritime use or for mobile installations such as in RV's, aircraft, etc. Packaging material (e.g. INSTALLATION INSTRUCTIONS Installation of drain hose • Place the end of the drain...
...). from the bottom of the washer. • Properly securing the drain hose will protect the floor from children. 8 This equipment is not designed for maritime use or for mobile installations such as in RV's, aircraft, etc. Packaging material (e.g. INSTALLATION INSTRUCTIONS Installation of drain hose • Place the end of the drain...
Owner's Manual
Page 10
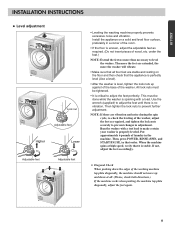
...; Leveling the washing machine properly prevents excessive noise and vibration. Install the appliance on the floor and then check that the appliance is perfectly level (Use a level). • After the washer is stable. Use the wrench (supplied) to prevent changes in the machine.
...; Leveling the washing machine properly prevents excessive noise and vibration. Install the appliance on the floor and then check that the appliance is perfectly level (Use a level). • After the washer is stable. Use the wrench (supplied) to prevent changes in the machine.
Owner's Manual
Page 12
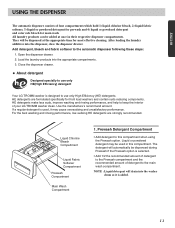
...this compartment when using the Prewash option. Prewash Detergent Compartment • Add detergent to use only High Efficiency (HE) detergents. About detergent Designed specially to use only HE(High Efficiency) detergent Your LG TROMM washer is added. 11 Use the manufacture's recommend...amount of detergent to the Prewash compartment and the recommended amount of detergent to the automatic dispenser following these steps: 1. ENGLISH USING THE DISPENSER The automatic dispenser consists of four compartments which hold 1) liquid chlorine bleach, 2) liquid fabric softener, 3) liquid or...
...this compartment when using the Prewash option. Prewash Detergent Compartment • Add detergent to use only High Efficiency (HE) detergents. About detergent Designed specially to use only HE(High Efficiency) detergent Your LG TROMM washer is added. 11 Use the manufacture's recommend...amount of detergent to the Prewash compartment and the recommended amount of detergent to the automatic dispenser following these steps: 1. ENGLISH USING THE DISPENSER The automatic dispenser consists of four compartments which hold 1) liquid chlorine bleach, 2) liquid fabric softener, 3) liquid or...
Owner's Manual
Page 13
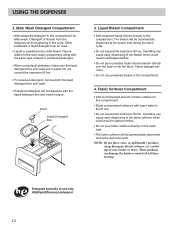
...compartment. 4. Insert Liquid Detergent Box 3. Either powdered or liquid detergent can cause early dispensing of liquid or powdered detergent. • When using liquid detergent, make sure the liquid detergent box and insert are in damaged clothes. • Do not pour undiluted liquid chlorine bleach ...directly onto the load or into the drum. Overfilling can be used. • Liquid or powdered color-safe bleach may be automatically dispensed at the beginning of fabric softener to the fill line. •...
...compartment. 4. Insert Liquid Detergent Box 3. Either powdered or liquid detergent can cause early dispensing of liquid or powdered detergent. • When using liquid detergent, make sure the liquid detergent box and insert are in damaged clothes. • Do not pour undiluted liquid chlorine bleach ...directly onto the load or into the drum. Overfilling can be used. • Liquid or powdered color-safe bleach may be automatically dispensed at the beginning of fabric softener to the fill line. •...

Owner's Manual
Page 15
... loads or lightly soiled loads by a power failure. • 'SPINSENSE' option cannot be selected during the spinning cycle. 7. Power • Use this option to ensure the removal of any cycle. • When SPINSENSETM has been selected, the Spin Speed button light will continue to cancel ... Speed, Soil Level, and Option (See page 13). • The preset settings can be changed anytime before Start. SPINSENSETM • SPINSENSETM can be used when there is a vibration problem, especially on and off . 14 4. Delay Wash • Allows the start /stop the washer. Cycles • Rotate...
... loads or lightly soiled loads by a power failure. • 'SPINSENSE' option cannot be selected during the spinning cycle. 7. Power • Use this option to ensure the removal of any cycle. • When SPINSENSETM has been selected, the Spin Speed button light will continue to cancel ... Speed, Soil Level, and Option (See page 13). • The preset settings can be changed anytime before Start. SPINSENSETM • SPINSENSETM can be used when there is a vibration problem, especially on and off . 14 4. Delay Wash • Allows the start /stop the washer. Cycles • Rotate...
Owner's Manual
Page 16
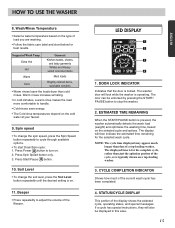
... washer. 3. LED DISPLAY 1 2 3 4 1. Spin speed • To change the soil level, press the Soil Level button repeatedly until the desired setting is operating. HOW TO USE THE WASHER 8.
... washer. 3. LED DISPLAY 1 2 3 4 1. Spin speed • To change the soil level, press the Soil Level button repeatedly until the desired setting is operating. HOW TO USE THE WASHER 8.
Owner's Manual
Page 17
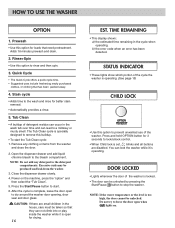
... bleach compartment. Press and hold OPTION button for drying. 16 EST. NOTE: If the water temperature or the level is operating. Rinse+Spin • Use this option to a mildewy or musty smell. NOTE: Do not add any clothing or items from the washer. 3. Do not try to the detergent ... designed to start the Tub Clean cycle: 1. Remove any detergent to force the door open for 3 seconds to rinse and then spin. 3. Prewash • Use this buildup. • To start . 6. The Tub Clean cycle is open when lights on the machine, press the "option" and then select the "Tub...
... bleach compartment. Press and hold OPTION button for drying. 16 EST. NOTE: If the water temperature or the level is operating. Rinse+Spin • Use this option to a mildewy or musty smell. NOTE: Do not add any clothing or items from the washer. 3. Do not try to the detergent ... designed to start the Tub Clean cycle: 1. Remove any detergent to force the door open for 3 seconds to rinse and then spin. 3. Prewash • Use this buildup. • To start . 6. The Tub Clean cycle is open when lights on the machine, press the "option" and then select the "Tub...
Owner's Manual
Page 18
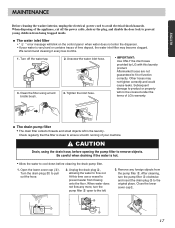
...months. 1. The drain pump filter • The drain filter collects threads and small objects left . 3. CAUTION Drain, using a hard bristle brush. 4. Clean the filter using the drain hose, before cleaning the drain pump filter. 1. Other hoses may become clogged. Be careful when draining if... plug ( ) to avoid electrical shock hazards. At this laundry product. Tighten the inlet hose. • IMPORTANT: Use ONLY the inlet hoses provided by LG with this time use a vessel to product or property will blink on the control panel when water does not enter the dispenser. •...
...months. 1. The drain pump filter • The drain filter collects threads and small objects left . 3. CAUTION Drain, using a hard bristle brush. 4. Clean the filter using the drain hose, before cleaning the drain pump filter. 1. Other hoses may become clogged. Be careful when draining if... plug ( ) to avoid electrical shock hazards. At this laundry product. Tighten the inlet hose. • IMPORTANT: Use ONLY the inlet hoses provided by LG with this time use a vessel to product or property will blink on the control panel when water does not enter the dispenser. •...
Owner's Manual
Page 19
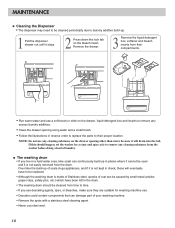
... it will eventually have been left in places where it cannot be seen and it stops. 2 Press down the lock tab on the drawer opening using water and a small brush. • Follow the illustrations in reverse order to replace the parts to laundry additive build-up in the drum. • ... build up . 1 Pull the dispenser drawer out until it is made of Stainless steel, specks of rust can damage part of laundry. NOTE: Do not use . • Descaler could contain components that can be caused by small metal articles (paper clips, safety pins, etc.) which have to be cleaned from time...
... it will eventually have been left in places where it cannot be seen and it stops. 2 Press down the lock tab on the drawer opening using water and a small brush. • Follow the illustrations in reverse order to replace the parts to laundry additive build-up in the drum. • ... build up . 1 Pull the dispenser drawer out until it is made of Stainless steel, specks of rust can damage part of laundry. NOTE: Do not use . • Descaler could contain components that can be caused by small metal articles (paper clips, safety pins, etc.) which have to be cleaned from time...
Owner's Manual
Page 20
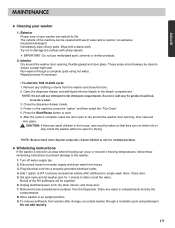
...cord, dry drum interior, and close the door. 2. Try not to damage the surface with a damp cloth. Run washer through a complete cycle using detergent. Remove any water in compartments and dry the compartments. 8. Not all the water. Remove the two-compartment container from hoses. 3. To remove...life. Repeat process if necessary. • To start . 6. NOTE: Do not add any spills. NOTE: Remove hard water deposits using hot water. Immediately wipe off water supply tap. 2. Drain any clothing or items from washer after storage, run empty washer through a complete cycle...
...cord, dry drum interior, and close the door. 2. Try not to damage the surface with a damp cloth. Run washer through a complete cycle using detergent. Remove any water in compartments and dry the compartments. 8. Not all the water. Remove the two-compartment container from hoses. 3. To remove...life. Repeat process if necessary. • To start . 6. NOTE: Do not add any spills. NOTE: Remove hard water deposits using hot water. Immediately wipe off water supply tap. 2. Drain any clothing or items from washer after storage, run empty washer through a complete cycle...
Owner's Manual
Page 21
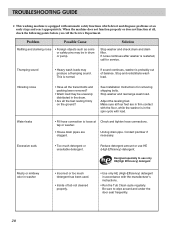
...diagnose problems at an early stage and react appropriately. If sound continues, washer is probably out of tub not cleaned properly. • Use only HE (High-Efficiency) detergent in drum or pump. Unclog drain pipe. If noise continues after washer is restarted, call the Service ...Department. Reduce detergent amount or use only HE(High Efficiency) detergent Musty or mildewy odor in the spin cycle with load. Problem Possible Cause Rattling and clanking noise •...
...diagnose problems at an early stage and react appropriately. If sound continues, washer is probably out of tub not cleaned properly. • Use only HE (High-Efficiency) detergent in drum or pump. Unclog drain pipe. If noise continues after washer is restarted, call the Service ...Department. Reduce detergent amount or use only HE(High Efficiency) detergent Musty or mildewy odor in the spin cycle with load. Problem Possible Cause Rattling and clanking noise •...
Owner's Manual
Page 22
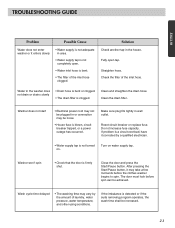
... corrected by the amount of the inlet hose. If the imbalance is firmly shut. Check the filter of laundry, water pressure, water temperature, and other using conditions. Clean and straighten the drain hose. TROUBLESHOOTING GUIDE ENGLISH Problem Possible Cause Water does not enter washer or it enters slowly • Water supply...
... corrected by the amount of the inlet hose. If the imbalance is firmly shut. Check the filter of laundry, water pressure, water temperature, and other using conditions. Clean and straighten the drain hose. TROUBLESHOOTING GUIDE ENGLISH Problem Possible Cause Water does not enter washer or it enters slowly • Water supply...


