Owner's Manual
Page 3
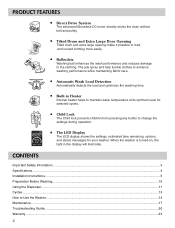
... clothing more easily. Built-in the display will illuminate. Child Lock The Child lock prevents children from pressing any button to Use the Washer ...14 Maintenance ...17 Troubleshooting Guide...20 Warranty ...23 2 CONTENTS Important Safety Information ...3 Specifications...4 Installation Instructions ...5 Preparation Before Washing...10 ...ball enhances the wash performance and reduces damage to maintain water temperature at its optimum level for your washer. PRODUCT FEATURES Direct Drive System The advanced Brushless DC motor directly drives the drum without belt and pulley.
... clothing more easily. Built-in the display will illuminate. Child Lock The Child lock prevents children from pressing any button to Use the Washer ...14 Maintenance ...17 Troubleshooting Guide...20 Warranty ...23 2 CONTENTS Important Safety Information ...3 Specifications...4 Installation Instructions ...5 Preparation Before Washing...10 ...ball enhances the wash performance and reduces damage to maintain water temperature at its optimum level for your washer. PRODUCT FEATURES Direct Drive System The advanced Brushless DC motor directly drives the drum without belt and pulley.
Owner's Manual
Page 4
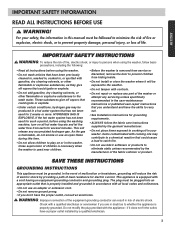
... contaminated with a cord having an equipment-grounding conductor and grounding plug. This appliance is equipped with cooking oils may be produced in the washer. Check with gasoline, dry cleaning solvents, or other flammable or explosive substances to the weather. • Do not tamper with the appliance... in, or spotted with a qualified electrician or serviceman if you understand and have a proper outlet installed by providing a path of the washer or attempt any accumulated hydrogen gas. Do not modify the plug provided with controls. • Do not repair or replace any part of...
... contaminated with a cord having an equipment-grounding conductor and grounding plug. This appliance is equipped with cooking oils may be produced in the washer. Check with gasoline, dry cleaning solvents, or other flammable or explosive substances to the weather. • Do not tamper with the appliance... in, or spotted with a qualified electrician or serviceman if you understand and have a proper outlet installed by providing a path of the washer or attempt any accumulated hydrogen gas. Do not modify the plug provided with controls. • Do not repair or replace any part of...
Owner's Manual
Page 5
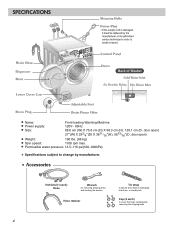
Accessories Hot/Cold (1 each) Hose Wrench for removing shipping bolts and leveling the washer Hose retainer Tie strap to secure drain hose to standpipe, inlet hose, or laundry tub Cap (4 each) to change by manufacturer. Permissible water pressure: 14.5~...
Accessories Hot/Cold (1 each) Hose Wrench for removing shipping bolts and leveling the washer Hose retainer Tie strap to secure drain hose to standpipe, inlet hose, or laundry tub Cap (4 each) to change by manufacturer. Permissible water pressure: 14.5~...
Owner's Manual
Page 6
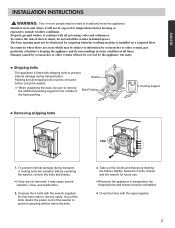
... and braces must be covered by carpeting when the washing machine is fitted with all times. ENGLISH INSTALLATION INSTRUCTIONS ! Properly ground washer to outside weather conditions. Removing shipping bolts cap 1. To prevent internal damage during transportation. Shipping bolts The appliance is installed on... lower side to prevent internal damage during transport, 4 locking bolts are not removed, it will not be removed before using the washer. When unpacking the base, be need to remove the additional packing support in humid spaces. WARNING : Two or more people may...
... and braces must be covered by carpeting when the washing machine is fitted with all times. ENGLISH INSTALLATION INSTRUCTIONS ! Properly ground washer to outside weather conditions. Removing shipping bolts cap 1. To prevent internal damage during transportation. Shipping bolts The appliance is installed on... lower side to prevent internal damage during transport, 4 locking bolts are not removed, it will not be removed before using the washer. When unpacking the base, be need to remove the additional packing support in humid spaces. WARNING : Two or more people may...
Owner's Manual
Page 7
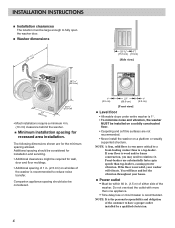
...clearances might be installed on a solidly constructed floor. • Carpeting and soft tile surfaces are for recessed area installation. If your washer will hear and feel the vibration throughout your house. NOTE: It is wood and/or frame construction, you may need to reinforce it.../16" (98.3 cm) (68.267c" m) 29 3/4" (75.6 cm) • Most installations require a minimum 4 in. (10 cm) clearance behind the washer. Front-loaders use substantially faster spin speeds than one appliance. • Time-delay fuse or circuit breaker is even more than top-loaders, causing greater...
...clearances might be installed on a solidly constructed floor. • Carpeting and soft tile surfaces are for recessed area installation. If your washer will hear and feel the vibration throughout your house. NOTE: It is wood and/or frame construction, you may need to reinforce it.../16" (98.3 cm) (68.267c" m) 29 3/4" (75.6 cm) • Most installations require a minimum 4 in. (10 cm) clearance behind the washer. Front-loaders use substantially faster spin speeds than one appliance. • Time-delay fuse or circuit breaker is even more than top-loaders, causing greater...
Owner's Manual
Page 8
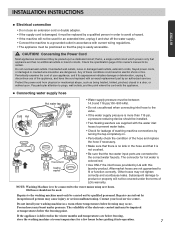
...leakage of washing machine connections by turning the tap completely on. • Periodically check the condition of LG's warranty. Aftermarket hoses are dangerous. Old hoses should be installed. • Two Sealing washers are supplied with the water inlet hoses to prevent water leaks. • Check for a few ... connected to the water mains using new hoses. NOTE: Washing Machine is colored red. • Use ONLY the inlet hoses provided by LG with this owner's manual to be certain. CAUTION! Periodically examine the cord of your local service center. Any of the appliance, and ...
...leakage of washing machine connections by turning the tap completely on. • Periodically check the condition of LG's warranty. Aftermarket hoses are dangerous. Old hoses should be installed. • Two Sealing washers are supplied with the water inlet hoses to prevent water leaks. • Check for a few ... connected to the water mains using new hoses. NOTE: Washing Machine is colored red. • Use ONLY the inlet hoses provided by LG with this owner's manual to be certain. CAUTION! Periodically examine the cord of your local service center. Any of the appliance, and ...
Owner's Manual
Page 9
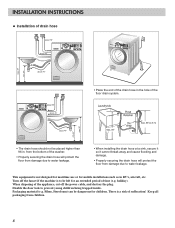
...). Packaging material (e.g. Films, Styrofoam) can be placed higher than 96 in RV's, aircraft, etc. There is to be left for an extended period of the washer. • Properly securing the drain hose will protect the floor from damage due to water leakage. • When installing the drain hose at a sink, secure...
...). Packaging material (e.g. Films, Styrofoam) can be placed higher than 96 in RV's, aircraft, etc. There is to be left for an extended period of the washer. • Properly securing the drain hose will protect the floor from damage due to water leakage. • When installing the drain hose at a sink, secure...
Owner's Manual
Page 10
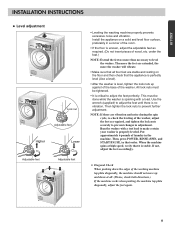
... Leveling the washing machine properly prevents excessive noise and vibration. Diagonal Check When pushing down the edges of the washer, adjust the feet as required. (Do not insert pieces of the washer. The more the feet are extended, the more than necessary to prevent changes in a corner of the room.... START/PAUSE, in the machine. under the feet.) NOTE: Extend the feet no vibration. Then tighten the lock nuts to make certain your washer is level, tighten the lock nuts up and down at high speed, verify that order. If not, adjust the feet accordingly. Install the appliance...
... Leveling the washing machine properly prevents excessive noise and vibration. Diagonal Check When pushing down the edges of the washer, adjust the feet as required. (Do not insert pieces of the washer. The more the feet are extended, the more than necessary to prevent changes in a corner of the room.... START/PAUSE, in the machine. under the feet.) NOTE: Extend the feet no vibration. Then tighten the lock nuts to make certain your washer is level, tighten the lock nuts up and down at high speed, verify that order. If not, adjust the feet accordingly. Install the appliance...
Owner's Manual
Page 11
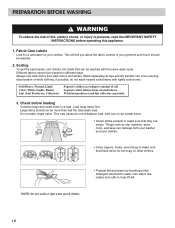
... wash heavily soiled items with the same wash cycle. Check before operating this appliance. 1. Things such as dye and lint transfer can damage both your washer and your clothes. • Close zippers, hooks, and strings to make sure that can be washed in a load. NOTE: Do not wash or spin water...
... wash heavily soiled items with the same wash cycle. Check before operating this appliance. 1. Things such as dye and lint transfer can damage both your washer and your clothes. • Close zippers, hooks, and strings to make sure that can be washed in a load. NOTE: Do not wash or spin water...
Owner's Manual
Page 12
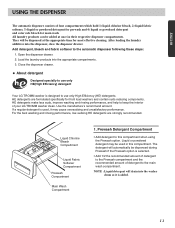
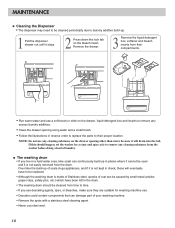
... the recommended amount of your LG TROMM washer clean. Open the dispenser drawer. 2. Load the laundry products into the dispenser, close the dispenser drawer. HE detergents are strongly recommended. Use the manufacture's recommend amount. NOTE : Liquid detergent will drain into the washer drum as it may be ... the Prewash option is designed to this compartment. About detergent Designed specially to use only HE(High Efficiency) detergent Your LG TROMM washer is selected. • Add 1/2 the recommended amount of detergent to the automatic dispenser following these steps: 1.
... the recommended amount of your LG TROMM washer clean. Open the dispenser drawer. 2. Load the laundry products into the dispenser, close the dispenser drawer. HE detergents are strongly recommended. Use the manufacture's recommend amount. NOTE : Liquid detergent will drain into the washer drum as it may be ... the Prewash option is designed to this compartment. About detergent Designed specially to use only HE(High Efficiency) detergent Your LG TROMM washer is selected. • Add 1/2 the recommended amount of detergent to the automatic dispenser following these steps: 1.
Owner's Manual
Page 13
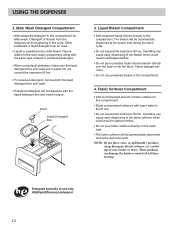
... cause early dispensing of the fabric softener which could result in stained clothes. • Do not pour fabric softener directly on the top of your washer or dryer. Fabric Softener Compartment • Add recommended amount of the bleach which could result in place. Either powdered or liquid detergent can cause early...
... cause early dispensing of the fabric softener which could result in stained clothes. • Do not pour fabric softener directly on the top of your washer or dryer. Fabric Softener Compartment • Add recommended amount of the bleach which could result in place. Either powdered or liquid detergent can cause early...

Owner's Manual
Page 15
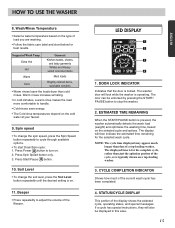
...8226; Use this button to turn the Power On/Off. 2. Washing time can be reduced significantly for different types of selecting a cycle, the washer automatically turns off continually to select cycle designed for small loads or lightly soiled loads by a power failure. • 'SPINSENSE' option cannot ...for one hour increments. 5. Start/Pause • Use this button to start of detergent or bleach residue from garments. HOW TO USE THE WASHER Cycle Selector Knob 1. SPINSENSETM • SPINSENSETM can be delayed for 1~12 hours. • Choose the wash cycle for your load, and...
...8226; Use this button to turn the Power On/Off. 2. Washing time can be reduced significantly for different types of selecting a cycle, the washer automatically turns off continually to select cycle designed for small loads or lightly soiled loads by a power failure. • 'SPINSENSE' option cannot ...for one hour increments. 5. Start/Pause • Use this button to start of detergent or bleach residue from garments. HOW TO USE THE WASHER Cycle Selector Knob 1. SPINSENSETM • SPINSENSETM can be delayed for 1~12 hours. • Choose the wash cycle for your load, and...
Owner's Manual
Page 16
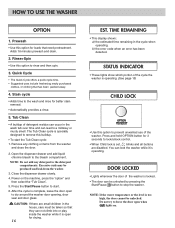
...Drain/Spin cycle: 1. Spin speed • To change the soil level, press the Soil Level button repeatedly until the desired setting is pressed, the washer automatically detects the wash load (weight) and optimizes the washing time, based on the cold water at your faucet. 9. Soil Level • To ... on the type of the Beeper. CYCLE COMPLETION INDICATOR Shows how much longer than that the door is typically shown on . 2. HOW TO USE THE WASHER 8. Wash/Rinse Temperature • Select a water temperature based on . 11. Press Power button to adjust the volume of load you are washing. &#...
...Drain/Spin cycle: 1. Spin speed • To change the soil level, press the Soil Level button repeatedly until the desired setting is pressed, the washer automatically detects the wash load (weight) and optimizes the washing time, based on the cold water at your faucet. 9. Soil Level • To ... on the type of the Beeper. CYCLE COMPLETION INDICATOR Shows how much longer than that the door is typically shown on . 2. HOW TO USE THE WASHER 8. Wash/Rinse Temperature • Select a water temperature based on . 11. Press Power button to adjust the volume of load you are washing. &#...
Owner's Manual
Page 17
... on the machine, press the "option" and then select the "Tub Clean". 5. Open the dispenser drawer and add liquid chlorine bleach to dry around the washer door opening, door seal and door glass. ! Excessive suds may be unlocked. NOTE: If the water temperature or the level is locked. • The door... can not climb into or play inside the washer while it is set, blinks and all buttons are small children in the house, care must be unlocked by pressing the Start/Pause button to...
... on the machine, press the "option" and then select the "Tub Clean". 5. Open the dispenser drawer and add liquid chlorine bleach to dry around the washer door opening, door seal and door glass. ! Excessive suds may be unlocked. NOTE: If the water temperature or the level is locked. • The door... can not climb into or play inside the washer while it is set, blinks and all buttons are small children in the house, care must be unlocked by pressing the Start/Pause button to...
Owner's Manual
Page 18
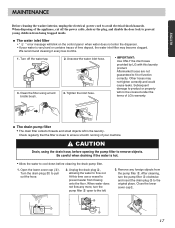
... drain filter collects threads and small objects left . 3. CAUTION Drain, using a hard bristle brush. 4. ENGLISH MAINTENANCE Before cleaning the washer interior, unplug the electrical power cord to fit or function correctly. Aftermarket hoses are not guaranteed to avoid electrical shock hazards. Check regularly...remove objects. Unscrew the water inlet hose. 3. Tighten the inlet hose. • IMPORTANT: Use ONLY the inlet hoses provided by LG with this time use a vessel to product or property will blink on the control panel when water does not enter the dispenser....
... drain filter collects threads and small objects left . 3. CAUTION Drain, using a hard bristle brush. 4. ENGLISH MAINTENANCE Before cleaning the washer interior, unplug the electrical power cord to fit or function correctly. Aftermarket hoses are not guaranteed to avoid electrical shock hazards. Check regularly...remove objects. Unscrew the water inlet hose. 3. Tighten the inlet hose. • IMPORTANT: Use ONLY the inlet hoses provided by LG with this time use a vessel to product or property will blink on the control panel when water does not enter the dispenser....
Owner's Manual
Page 19
... metal articles (paper clips, safety pins, etc.) which have been left in the drum. • The washing drum should happen, set the washer for washing machine use. • Descaler could contain components that can continuously build up of scale clogs appliances, and if it is not kept ... proper location. Remove the drawer. 3 Remove the liquid detergent box, softener and bleach inserts from the drum. If this should be cleaned from the washer before doing a load of laundry. The washing drum • If you use descaling agents, dyes, or bleaches, make sure they are suitable for ...
... metal articles (paper clips, safety pins, etc.) which have been left in the drum. • The washing drum should happen, set the washer for washing machine use. • Descaler could contain components that can continuously build up of scale clogs appliances, and if it is not kept ... proper location. Remove the drawer. 3 Remove the liquid detergent box, softener and bleach inserts from the drum. If this should be cleaned from the washer before doing a load of laundry. The washing drum • If you use descaling agents, dyes, or bleaches, make sure they are suitable for ...
Owner's Manual
Page 20
... outlet. 4. Wipe with sharp objects. These areas should always be cleaned with warm water and a neutral, non-abrasive household detergent. Run washer through a complete cycle using detergent. Open the dispenser drawer and add liquid chlorine bleach to empty wash drum. Press the Start/Pause button ...to dry around the washer door opening , door seal and door glass. ! Disconnect hoses from water supply and drain water from the Dispenser. Add 1 gallon (3.8 ...
... outlet. 4. Wipe with sharp objects. These areas should always be cleaned with warm water and a neutral, non-abrasive household detergent. Run washer through a complete cycle using detergent. Open the dispenser drawer and add liquid chlorine bleach to empty wash drum. Press the Start/Pause button ...to dry around the washer door opening , door seal and door glass. ! Disconnect hoses from water supply and drain water from the Dispenser. Add 1 gallon (3.8 ...
Owner's Manual
Page 21
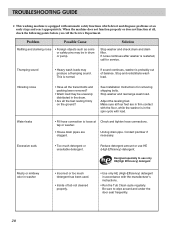
...been removed? • Wash load may be in the spin cycle with the manufacturer's instructions. • Run the Tub Clean cycle regularly. Stop washer and rearrange wash load. Water leaks • Fill hose connection is probably out of tub not cleaned properly. • Use only HE (High-...Efficiency) detergent in the drum. • Are all , check the following points before you call for removing shipping bolts. Solution Stop washer and check drum and drain filter. Thumping sound • Heavy wash loads may be unevenly distributed in accordance with load. This is in drum ...
...been removed? • Wash load may be in the spin cycle with the manufacturer's instructions. • Run the Tub Clean cycle regularly. Stop washer and rearrange wash load. Water leaks • Fill hose connection is probably out of tub not cleaned properly. • Use only HE (High-...Efficiency) detergent in the drum. • Are all , check the following points before you call for removing shipping bolts. Solution Stop washer and check drum and drain filter. Thumping sound • Heavy wash loads may be unevenly distributed in accordance with load. This is in drum ...
Owner's Manual
Page 22
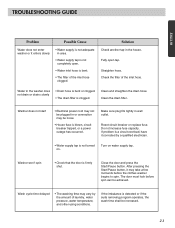
...• Electrical power cord may not be plugged in or connection may be achieved. Make sure plug fits tightly in the house. Turn on . Washer won't spin • Check that the door is detected or if the suds removing program operates, the wash time shall be increased. 21 The door... pressure, water temperature, and other using conditions. After pressing the Start/Pause button, it enters slowly • Water supply is not adequate in the washer does not drain or drains slowly • Drain hose is bent or clogged. • The drain filter is not turned on water supply tap. Close...
...• Electrical power cord may not be plugged in or connection may be achieved. Make sure plug fits tightly in the house. Turn on . Washer won't spin • Check that the door is detected or if the suds removing program operates, the wash time shall be increased. 21 The door... pressure, water temperature, and other using conditions. After pressing the Start/Pause button, it enters slowly • Water supply is not adequate in the washer does not drain or drains slowly • Drain hose is bent or clogged. • The drain filter is not turned on water supply tap. Close...
Owner's Manual
Page 23
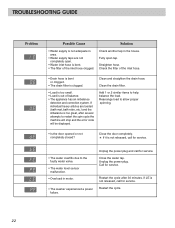
... hose clogged. Restart the cycle after several attempts to the faulty water valve. • The water level sensor malfunction. • Overload in motor. • The washer experienced a power failure. Clean the drain filter. • Load is too small. • Load is out of the inlet hose. • Drain hose is bent...
... hose clogged. Restart the cycle after several attempts to the faulty water valve. • The water level sensor malfunction. • Overload in motor. • The washer experienced a power failure. Clean the drain filter. • Load is too small. • Load is out of the inlet hose. • Drain hose is bent...


