
Owner's Manual
Page 2
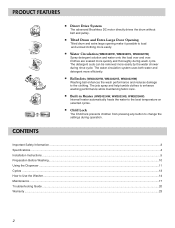
... The jets spray and help tumble clothes to enhance washing performance while maintaining fabric care. ■ Built-in Heater (WM2432HW, WM2032HS, WM2032HW) Internal heater automatically heats the water to the best temperature on selected cycles. ■ Child Lock The Child lock prevents...any button to load and unload clothing more efficiently. ■ RollerJets (WM2432HW, WM2032HS, WM2032HW) Washing ball enhances the wash performance and reduces damage to Use the Washer...14 Maintenance ...17 Troubleshooting Guide ...20 Warranty ...23 2 PRODUCT FEATURES ■ Direct Drive System The ...
... The jets spray and help tumble clothes to enhance washing performance while maintaining fabric care. ■ Built-in Heater (WM2432HW, WM2032HS, WM2032HW) Internal heater automatically heats the water to the best temperature on selected cycles. ■ Child Lock The Child lock prevents...any button to load and unload clothing more efficiently. ■ RollerJets (WM2432HW, WM2032HS, WM2032HW) Washing ball enhances the wash performance and reduces damage to Use the Washer...14 Maintenance ...17 Troubleshooting Guide ...20 Warranty ...23 2 PRODUCT FEATURES ■ Direct Drive System The ...
Owner's Manual
Page 20
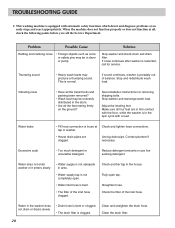
.... Adjust the leveling feet. If sound continues, washer is normal. This is probably out of balance. Excessive suds • Too much detergent or unsuitable detergent. TROUBLESHOOTING GUIDE ✽ This washing machine is equipped with a load.
.... Adjust the leveling feet. If sound continues, washer is normal. This is probably out of balance. Excessive suds • Too much detergent or unsuitable detergent. TROUBLESHOOTING GUIDE ✽ This washing machine is equipped with a load.
Owner's Manual
Page 21
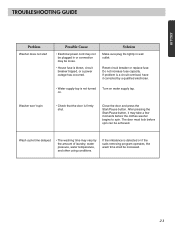
.... Washer won't spin • Check that the door is detected or if the suds removing program operates, the wash time shall be increased. 21 ENGLISH TROUBLESHOOTING GUIDE Problem Washer does not start Possible Cause • Electrical power cord may not be plugged in wall outlet. Solution Make sure plug fits tightly...
.... Washer won't spin • Check that the door is detected or if the suds removing program operates, the wash time shall be increased. 21 ENGLISH TROUBLESHOOTING GUIDE Problem Washer does not start Possible Cause • Electrical power cord may not be plugged in wall outlet. Solution Make sure plug fits tightly...
Owner's Manual
Page 22
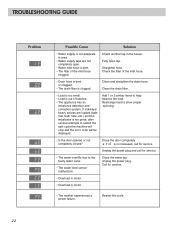
... motor. • Overload in the house. Call for service. • The water overfills due to the faulty water valve. • The water level sensor malfunction. TROUBLESHOOTING GUIDE Problem Possible Cause Solution • Water supply is not adequate in area. • Water supply taps are loaded (bath mat, bath robe, etc.) and...
... motor. • Overload in the house. Call for service. • The water overfills due to the faulty water valve. • The water level sensor malfunction. TROUBLESHOOTING GUIDE Problem Possible Cause Solution • Water supply is not adequate in area. • Water supply taps are loaded (bath mat, bath robe, etc.) and...
Service Manual
Page 3
... & CONTROL PANEL ASSEMBLY 40 10-2. WIRING DIAGRAM / PROGRAM CHART 15 7. DIAGNOSIS AND SOLUTION FOR ABNORMAL OPERATION 22 8-2. OPERATION ...11 6. FEATURES & TECHNICAL EXPLANATION 5 3. FAULT DIAGNOSIS AND TROUBLESHOOTING 25 9. ERROR DIAGNOSIS AND CHECK LIST 22 8-1. CONTENTS 1. BEFORE PERFORMING SERVICE 19 7-2. EXPLODED VIEW ...40 10-1. PARTS IDENTIFICATION ...7 4. DRUM & TUB ASSEMBLY 41 10-3. ERROR DISPLAY...
... & CONTROL PANEL ASSEMBLY 40 10-2. WIRING DIAGRAM / PROGRAM CHART 15 7. DIAGNOSIS AND SOLUTION FOR ABNORMAL OPERATION 22 8-2. OPERATION ...11 6. FEATURES & TECHNICAL EXPLANATION 5 3. FAULT DIAGNOSIS AND TROUBLESHOOTING 25 9. ERROR DIAGNOSIS AND CHECK LIST 22 8-1. CONTENTS 1. BEFORE PERFORMING SERVICE 19 7-2. EXPLODED VIEW ...40 10-1. PARTS IDENTIFICATION ...7 4. DRUM & TUB ASSEMBLY 41 10-3. ERROR DISPLAY...
Service Manual
Page 9
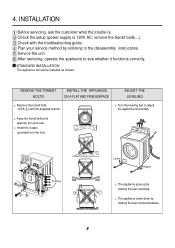
... appliance should be installed as follows: REMOVE THE TRANSIT BOLTS INSTALL THE APPLIANCE ON A FLAT AND FIRM SURFACE Remove the transit bolts (4 EA: ) with the troubleshooting guide. Check with the supplied wrench. Service the unit. Plan your service method by referring to adjust the appliance horizontally. Check the setup (power supply...
... appliance should be installed as follows: REMOVE THE TRANSIT BOLTS INSTALL THE APPLIANCE ON A FLAT AND FIRM SURFACE Remove the transit bolts (4 EA: ) with the troubleshooting guide. Check with the supplied wrench. Service the unit. Plan your service method by referring to adjust the appliance horizontally. Check the setup (power supply...
Service Manual
Page 20
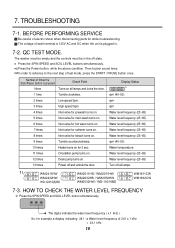
... TEST MODE. Number of 241 x.1 kHz = 24.1 kHz 19 7. TROUBLESHOOTING 7-1. Display Status rpm (40~50) rpm rpm Water level frequency (25~65) Water level frequency (25~65) Water level frequency (25~65) Water level frequency (... empty and the controls must be in . 7-2. The voltage of test mode, press the START / PAUSE button once. WM2411HW WM2432HW WD-12210(5)BD WM2011HS / WM2011HW WM2032HS / WM2032HW WM0532HW / WD-10210BD WM1811CW WM1832CW 7-3. Then buzzer sound twice. ¤ØIn order to advance to the next step of each terminal is 120V...
... TEST MODE. Number of 241 x.1 kHz = 24.1 kHz 19 7. TROUBLESHOOTING 7-1. Display Status rpm (40~50) rpm rpm Water level frequency (25~65) Water level frequency (25~65) Water level frequency (25~65) Water level frequency (... empty and the controls must be in . 7-2. The voltage of test mode, press the START / PAUSE button once. WM2411HW WM2432HW WD-12210(5)BD WM2011HS / WM2011HW WM2032HS / WM2032HW WM0532HW / WD-10210BD WM1811CW WM1832CW 7-3. Then buzzer sound twice. ¤ØIn order to advance to the next step of each terminal is 120V...

Service Manual
Page 26
NO POWER Connector Is the supplied voltage 120V AC? YES Reconnect. 8-2.FAULT DIAGNOSIS AND TROUBLESHOOTING CAUTION 1. First of all, check the connection of the DISPLAY PWB ASSEMBLY broken? YES NO Check the fuse or reset the circuit breaker. Are the ... Replace the FILTER ASSEMBLY (CIRC). NO Is wire of each electrical terminal with the wiring diagram. 3. Be careful of electric shock if disconnecting parts while troubleshooting. 2. YES Is the LED(1) on the PWB loose?
NO POWER Connector Is the supplied voltage 120V AC? YES Reconnect. 8-2.FAULT DIAGNOSIS AND TROUBLESHOOTING CAUTION 1. First of all, check the connection of the DISPLAY PWB ASSEMBLY broken? YES NO Check the fuse or reset the circuit breaker. Are the ... Replace the FILTER ASSEMBLY (CIRC). NO Is wire of each electrical terminal with the wiring diagram. 3. Be careful of electric shock if disconnecting parts while troubleshooting. 2. YES Is the LED(1) on the PWB loose?

