
Owner's Manual
Page 2
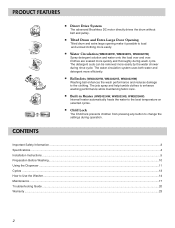
...and pulley. ■ Tilted Drum and Extra Large Door Opening Tilted drum and extra large opening make it possible to Use the Washer...14 Maintenance ...17 Troubleshooting Guide ...20 Warranty ...23 2 CONTENTS Important Safety Information ...3 Specifications...4 Installation Instructions ...5 Preparation Before Washing... jets spray and help tumble clothes to enhance washing performance while maintaining fabric care. ■ Built-in Heater (WM2432HW, WM2032HS, WM2032HW) Internal heater automatically heats the water to the best temperature on selected cycles. ■ Child Lock The Child lock...
...and pulley. ■ Tilted Drum and Extra Large Door Opening Tilted drum and extra large opening make it possible to Use the Washer...14 Maintenance ...17 Troubleshooting Guide ...20 Warranty ...23 2 CONTENTS Important Safety Information ...3 Specifications...4 Installation Instructions ...5 Preparation Before Washing... jets spray and help tumble clothes to enhance washing performance while maintaining fabric care. ■ Built-in Heater (WM2432HW, WM2032HS, WM2032HW) Internal heater automatically heats the water to the best temperature on selected cycles. ■ Child Lock The Child lock...
Owner's Manual
Page 3
... INFORMATION READ ALL INSTRUCTIONS BEFORE USE ! WARNING: To reduce the risk of fire, electric shock, or injury to persons when using the washer, follow the fabric care instructions supplied by the garment manufacturer. • Do not place items exposed to cooking oil in your safety, ... equipped with a qualified electrician or serviceman if you don't have a proper outlet installed by providing a path of electric shock. For your washer. The plug must be produced in a hot water system that you understand and have been previously cleaned in, washed in, soaked in risk...
... INFORMATION READ ALL INSTRUCTIONS BEFORE USE ! WARNING: To reduce the risk of fire, electric shock, or injury to persons when using the washer, follow the fabric care instructions supplied by the garment manufacturer. • Do not place items exposed to cooking oil in your safety, ... equipped with a qualified electrician or serviceman if you don't have a proper outlet installed by providing a path of electric shock. For your washer. The plug must be produced in a hot water system that you understand and have been previously cleaned in, washed in, soaked in risk...
Owner's Manual
Page 4
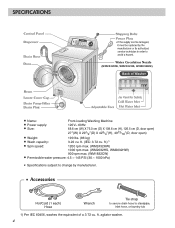
ft. agitator washer. 4 ft. (IEC: 3.72 cu. SPECIFICATIONS Water Circulation Nozzle (WM2432HW, WM2032HS, WM2032HW) ■ Name: ■ Power supply: ■ Size: Front-loading Washing Machine 120V~ 60Hz 68.6 cm (W) X 75.0 cm (D) X 108.6 cm (H), 126.5 ...4913/16"(D, door open) 190 lbs. (86 kg) ■ Wash capacity: 3.22 cu. ft.)1) ■ Spin speed: 1200 rpm max. (WM2432HW) 1000 rpm max. (WM2032HS, WM2032HW) 900 rpm max. (WM1832CW) ■ Permissible water pressure: 4.5 ~ 145 PSI (30 ~ 1000 kPa) ✽ Specifications subject to change by manufacturer. ■ Accessories...
ft. agitator washer. 4 ft. (IEC: 3.72 cu. SPECIFICATIONS Water Circulation Nozzle (WM2432HW, WM2032HS, WM2032HW) ■ Name: ■ Power supply: ■ Size: Front-loading Washing Machine 120V~ 60Hz 68.6 cm (W) X 75.0 cm (D) X 108.6 cm (H), 126.5 ...4913/16"(D, door open) 190 lbs. (86 kg) ■ Wash capacity: 3.22 cu. ft.)1) ■ Spin speed: 1200 rpm max. (WM2432HW) 1000 rpm max. (WM2032HS, WM2032HW) 900 rpm max. (WM1832CW) ■ Permissible water pressure: 4.5 ~ 145 PSI (30 ~ 1000 kPa) ✽ Specifications subject to change by manufacturer. ■ Accessories...
Owner's Manual
Page 5
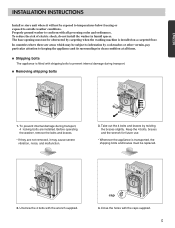
... are areas which may cause severe vibration, noise, and malfunction. 3. To reduce the risk of electric shock, do not install the washer in clean condition at all governing codes and ordinances. Take out the 4 bolts and braces by cockroaches or other vermin, pay particular attention...keeping the appliance and its surroundings in humid spaces. Close the holes with the wrench supplied. In countries where there are installed. Before operating the washer, remove the bolts and braces. • If they are not removed, it will not be replaced. 2. Unscrew the 4 bolts with the...
... are areas which may cause severe vibration, noise, and malfunction. 3. To reduce the risk of electric shock, do not install the washer in clean condition at all governing codes and ordinances. Take out the 4 bolts and braces by cockroaches or other vermin, pay particular attention...keeping the appliance and its surroundings in humid spaces. Close the holes with the wrench supplied. In countries where there are installed. Before operating the washer, remove the bolts and braces. • If they are not removed, it will not be replaced. 2. Unscrew the 4 bolts with the...
Owner's Manual
Page 6
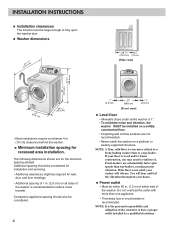
... be considered. 6 1" (2.5 cm) 27" (68.6 cm) [Front view] 1" (2.5 cm) ■ Level floor • Allowable slope under entire washer is recommended to reduce noise transfer. If your house. ■ Power outlet • Must be within 60 in . (2.5 cm) on a platform or weakly... of the customer to reinforce it. You will vibrate. INSTALLATION INSTRUCTIONS ■ Installation clearances The location must be large enough to fully open the washer door. ■ Washer dimensions (142961.53/1c6m" ) 29 1/2" 4" (75.0 cm) (10 cm) [Side view] 36" (91.5 cm) 42 3/4" (108.6 cm) (68.267c...
... be considered. 6 1" (2.5 cm) 27" (68.6 cm) [Front view] 1" (2.5 cm) ■ Level floor • Allowable slope under entire washer is recommended to reduce noise transfer. If your house. ■ Power outlet • Must be within 60 in . (2.5 cm) on a platform or weakly... of the customer to reinforce it. You will vibrate. INSTALLATION INSTRUCTIONS ■ Installation clearances The location must be large enough to fully open the washer door. ■ Washer dimensions (142961.53/1c6m" ) 29 1/2" 4" (75.0 cm) (10 cm) [Side view] 36" (91.5 cm) 42 3/4" (108.6 cm) (68.267c...

Owner's Manual
Page 7
... used for a few hours before putting it is not crushed. • Be sure that it into operation. 7 Old hoses should be installed. • Two Sealing washers are connected to the correct water faucets. Contact your washing machine in a room where temperatures below the freezing point. ENGLISH INSTALLATION INSTRUCTIONS ■ Electrical connection...
... used for a few hours before putting it is not crushed. • Be sure that it into operation. 7 Old hoses should be installed. • Two Sealing washers are connected to the correct water faucets. Contact your washing machine in a room where temperatures below the freezing point. ENGLISH INSTALLATION INSTRUCTIONS ■ Electrical connection...
Owner's Manual
Page 8
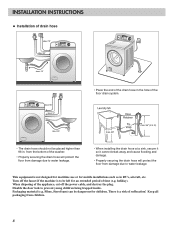
... drain hose in RV's, aircraft, etc. This equipment is not designed for maritime use or for mobile installations such as in the hole of the washer. • Properly securing the drain hose will protect the floor from damage due to water leakage. • When installing the drain hose at a sink, secure...
... drain hose in RV's, aircraft, etc. This equipment is not designed for maritime use or for mobile installations such as in the hole of the washer. • Properly securing the drain hose will protect the floor from damage due to water leakage. • When installing the drain hose at a sink, secure...
Owner's Manual
Page 9
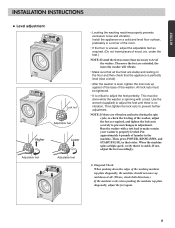
... 9 NOTE: If there are stable and resting on a solid and level floor surface, preferably in that order. Then tighten the lock nuts to level the washer. Put approximately 6 pounds of wood, etc. When the machine spins at all four feet are vibration and noise during the spin cycle, re-check the... leveling of the washer, adjust the feet as required. (Do not insert pieces of laundry in adjustment. All lock nuts must be tightened. • It is properly leveled....
... 9 NOTE: If there are stable and resting on a solid and level floor surface, preferably in that order. Then tighten the lock nuts to level the washer. Put approximately 6 pounds of wood, etc. When the machine spins at all four feet are vibration and noise during the spin cycle, re-check the... leveling of the washer, adjust the feet as required. (Do not insert pieces of laundry in adjustment. All lock nuts must be tightened. • It is properly leveled....
Owner's Manual
Page 10
... they are empty. Always sort dark colors from colored fabrics. Load large items first. Things such as dye and lint transfer can damage both your washer and your clothes. Check before operating this appliance. 1. PREPARATION BEFORE WASHING WARNING To reduce the risk of fire, electric shock, or injury to persons, read...
... they are empty. Always sort dark colors from colored fabrics. Load large items first. Things such as dye and lint transfer can damage both your washer and your clothes. Check before operating this appliance. 1. PREPARATION BEFORE WASHING WARNING To reduce the risk of fire, electric shock, or injury to persons, read...
Owner's Manual
Page 11
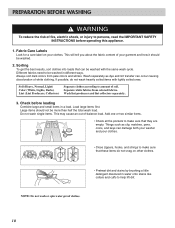
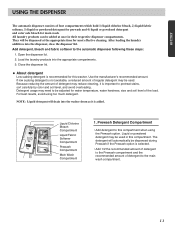
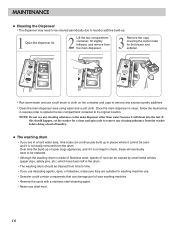
Open the dispenser lid. 2. Because reducing the amount of detergent may be dispensed at once in this washer. Prewash Detergent Compartment • Add detergent to this compartment when using too much detergent. Use the manufacturer's recommended amount. They will ... Low sudsing detergent is recommended for most effective cleaning. For best results, avoid using the Prewash option. The detergent will drain into the washer drum as it is added. Add detergent, bleach and fabric softener to the main wash compartment. 11 Liquid or powdered detergent may reduce...
Open the dispenser lid. 2. Because reducing the amount of detergent may be dispensed at once in this washer. Prewash Detergent Compartment • Add detergent to this compartment when using too much detergent. Use the manufacturer's recommended amount. They will ... Low sudsing detergent is recommended for most effective cleaning. For best results, avoid using the Prewash option. The detergent will drain into the washer drum as it is added. Add detergent, bleach and fabric softener to the main wash compartment. 11 Liquid or powdered detergent may reduce...

Owner's Manual
Page 12
... Prewash option, powdered detergent must be used . • Liquid or powdered color-safe bleach may be automatically dispensed at the beginning of your washer or dryer. These products can cause early dispensing of fabric softener to the fill line. • Do not exceed the maximum fill line. ... Liquid detergent will be used in damaged clothes. • Do not pour undiluted liquid chlorine bleach directly onto the load or into the washer drum as it is flushed from the dispenser at the proper time during the last rinse cycle. Fabric Softener Compartment • Add recommended ...
... Prewash option, powdered detergent must be used . • Liquid or powdered color-safe bleach may be automatically dispensed at the beginning of your washer or dryer. These products can cause early dispensing of fabric softener to the fill line. • Do not exceed the maximum fill line. ... Liquid detergent will be used in damaged clothes. • Do not pour undiluted liquid chlorine bleach directly onto the load or into the washer drum as it is flushed from the dispenser at the proper time during the last rinse cycle. Fabric Softener Compartment • Add recommended ...
Owner's Manual
Page 14
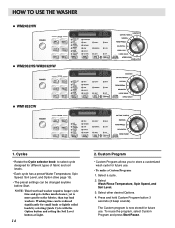
Select a cycle. 2. Press and hold Custom Program button 3 seconds (2 beep sounds). NOTE: This front load washer requires longer cycle time and gets clothes much cleaner, yet is now stored for small loads or lightly soiled loads by selecting Quick Cycle ... . Select Wash/Rinse Temperature, Spin Speed, and Soil Level. 3. To reuse the program, select Custom Program and press Start/Pause. HOW TO USE THE WASHER WM2432HW WM2032HS/WM2032HW WM1832CW 1. Cycles • Rotate the Cycle selector knob to store a customized wash cycle for different types of fabric and soil levels. • Each...
Select a cycle. 2. Press and hold Custom Program button 3 seconds (2 beep sounds). NOTE: This front load washer requires longer cycle time and gets clothes much cleaner, yet is now stored for small loads or lightly soiled loads by selecting Quick Cycle ... . Select Wash/Rinse Temperature, Spin Speed, and Soil Level. 3. To reuse the program, select Custom Program and press Start/Pause. HOW TO USE THE WASHER WM2432HW WM2032HS/WM2032HW WM1832CW 1. Cycles • Rotate the Cycle selector knob to store a customized wash cycle for different types of fabric and soil levels. • Each...
Owner's Manual
Page 15
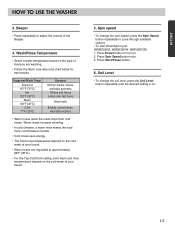
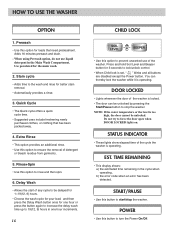
... Spin Speed button only. 3. Press Start/Pause button. 6. Press Power button to cycle through available options. • To start Drain/Spin cycle: (WM2032HS, WM2032HW, WM1832CW) 1. Warm rinses increase wrinkling. • In cold climates, a warm rinse makes the load more comfortable to adjust the volume of ...faucet. • Warm rinses are washing. • Follow the fabric care label and chart below for best results. ENGLISH HOW TO USE THE WASHER 3. Wash/Rinse Temperature • Select a water temperature based on the cold water at approximately 86°F (30°C). • For ...
... Spin Speed button only. 3. Press Start/Pause button. 6. Press Power button to cycle through available options. • To start Drain/Spin cycle: (WM2032HS, WM2032HW, WM1832CW) 1. Warm rinses increase wrinkling. • In cold climates, a warm rinse makes the load more comfortable to adjust the volume of ...faucet. • Warm rinses are washing. • Follow the fabric care label and chart below for best results. ENGLISH HOW TO USE THE WASHER 3. Wash/Rinse Temperature • Select a water temperature based on the cold water at approximately 86°F (30°C). • For ...
Owner's Manual
Page 16
... estimated time remaining in the Main Wash Compartment. Adds 16 minutes prewash and drain. - Delay Wash • Allows the start /stop the washer. START/PAUSE • Use this option to turn the Power On/Off. When using Prewash option, do not use of detergent or bleach residue... uses include freshening newly purchased clothes, or clothing that need pretreatment. Rinse+Spin • Use this button to ensure the removal of the washer. Press and hold Soil Level and Beeper button for loads that has been packed away. 4. STATUS INDICATOR • These lights show elapsed time...
... estimated time remaining in the Main Wash Compartment. Adds 16 minutes prewash and drain. - Delay Wash • Allows the start /stop the washer. START/PAUSE • Use this option to turn the Power On/Off. When using Prewash option, do not use of detergent or bleach residue... uses include freshening newly purchased clothes, or clothing that need pretreatment. Rinse+Spin • Use this button to ensure the removal of the washer. Press and hold Soil Level and Beeper button for loads that has been packed away. 4. STATUS INDICATOR • These lights show elapsed time...
Owner's Manual
Page 17
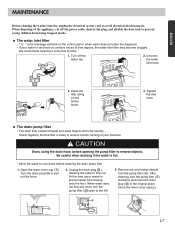
... is very hard or contains traces of the appliance, cut off the water tap. 2. Close the lower cover cap( ). 3 1 2 17 ENGLISH MAINTENANCE Before cleaning the washer interior, unplug the electrical power cord to cool down before opening the pump filter to the left in the laundry. Remove out any more, turn...
... is very hard or contains traces of the appliance, cut off the water tap. 2. Close the lower cover cap( ). 3 1 2 17 ENGLISH MAINTENANCE Before cleaning the washer interior, unplug the electrical power cord to cool down before opening the pump filter to the left in the laundry. Remove out any more, turn...
Owner's Manual
Page 18
... to be cleaned periodically due to laundry additive build-up in places where it cannot be seen and it is not easily removed from the washer before doing a load of laundry. ■ The washing drum • If you use descaling agents, dyes, or bleaches, make sure they are suitable for the... caused by small metal articles (paper clips, safety pins, etc.) which have been left in the drum. • The washing drum should happen, set the washer for a rinse and spin cycle to be replaced. • Although the washing drum is clean, follow the illustrations in a hard water area, lime scale can...
... to be cleaned periodically due to laundry additive build-up in places where it cannot be seen and it is not easily removed from the washer before doing a load of laundry. ■ The washing drum • If you use descaling agents, dyes, or bleaches, make sure they are suitable for the... caused by small metal articles (paper clips, safety pins, etc.) which have been left in the drum. • The washing drum should happen, set the washer for a rinse and spin cycle to be replaced. • Although the washing drum is clean, follow the illustrations in a hard water area, lime scale can...
Owner's Manual
Page 19
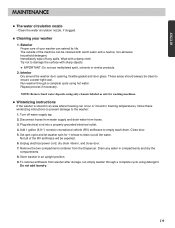
.... 3. Drain any spills. To remove antifreeze from washer after storage, run empty washer through a complete cycle using detergent. Set spin cycle and let washer spin for washing machines. ■ Winterizing instructions If the washer is stored in an area where freezing can occur ... vehicle (RV) antifreeze to damage the surface with a damp cloth. Not all the water. Store washer in compartments and dry the compartments. 8. Try not to empty wash drum. Run washer through a complete cycle using hot water. Repeat process if necessary. ENGLISH MAINTENANCE ■ The water ...
.... 3. Drain any spills. To remove antifreeze from washer after storage, run empty washer through a complete cycle using detergent. Set spin cycle and let washer spin for washing machines. ■ Winterizing instructions If the washer is stored in an area where freezing can occur ... vehicle (RV) antifreeze to damage the surface with a damp cloth. Not all the water. Store washer in compartments and dry the compartments. 8. Try not to empty wash drum. Run washer through a complete cycle using hot water. Repeat process if necessary. ENGLISH MAINTENANCE ■ The water ...
Owner's Manual
Page 20
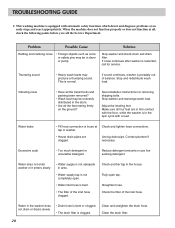
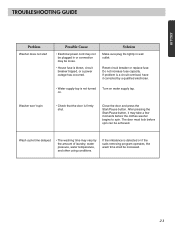
...before you call for removing shipping bolts. Water leaks • Fill hose connection is clogged. tap or washer. • House drain pipes are in firm contact with the floor, while the washer is equipped with a load. Reduce detergent amounts or use low sudsing detergent. Check another tap in ...may produce a thumping sound. This is bent. • The filter of the inlet hose. See Installation Instructions for service. Water does not enter washer or it enters slowly • Water supply is not adequate in area. • Water supply tap is not completely open tap. Clean the ...
...before you call for removing shipping bolts. Water leaks • Fill hose connection is clogged. tap or washer. • House drain pipes are in firm contact with the floor, while the washer is equipped with a load. Reduce detergent amounts or use low sudsing detergent. Check another tap in ...may produce a thumping sound. This is bent. • The filter of the inlet hose. See Installation Instructions for service. Water does not enter washer or it enters slowly • Water supply is not adequate in area. • Water supply tap is not completely open tap. Clean the ...
Owner's Manual
Page 21
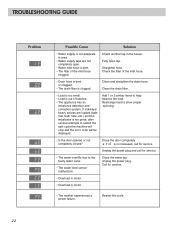
...Start/Pause button, it corrected by the amount of laundry, water pressure, water temperature, and other using conditions. ENGLISH TROUBLESHOOTING GUIDE Problem Washer does not start Possible Cause • Electrical power cord may not be plugged in wall outlet. If the imbalance is firmly shut.... The door must lock before the clothes washer begins to spin. Do not increase fuse capacity. Washer won't spin • Check that the door is detected or if the suds removing program operates, the...
...Start/Pause button, it corrected by the amount of laundry, water pressure, water temperature, and other using conditions. ENGLISH TROUBLESHOOTING GUIDE Problem Washer does not start Possible Cause • Electrical power cord may not be plugged in wall outlet. If the imbalance is firmly shut.... The door must lock before the clothes washer begins to spin. Do not increase fuse capacity. Washer won't spin • Check that the door is detected or if the suds removing program operates, the...
Owner's Manual
Page 22
Check another tap in motor. • The washer experienced a power failure. Add 1 or 2 similar items to restart the spin cycle the machine will stop and the error code will be displayed. Close the ...
Check another tap in motor. • The washer experienced a power failure. Add 1 or 2 similar items to restart the spin cycle the machine will stop and the error code will be displayed. Close the ...


